Page Summary
-
Google offers a JavaScript library to help web applications manage OAuth 2.0 flows, including handling scopes and user consent.
-
Authentication-only scopes like
email,profile, andopenidare often best managed using a JWT ID Token and Sign In With Google for user sign-up and sign-in. -
Key terms for Google Identity Services include Access Token, Authorization Code, Refresh Token, Scope, Popup Mode, and Redirect Mode.
-
The two main OAuth 2.0 flows discussed are the implicit flow and the recommended authorization code flow, both returning an access token.
-
User consent for requested scopes is required before an access token is issued and is managed through Google's consent dialog, with users able to view or revoke consent at any time.
If you are new or unfamiliar with Google Identity Services or authorization, start by reading the Overview.
Google offers a JavaScript library which includes authorization features to help you to manage scopes, obtain user consent, and more easily work with standard OAuth 2.0 flows. Your web application, running in the user's browser, uses this library to manage the OAuth 2.0 implicit flow, or to start the authorization code flow which finishes on your backend platform.
Authentication only scopes
Several scopes are used only for user authentication: email, profile, and
openid. If your app only uses these scopes, consider if a JWT ID Token and
Sign In With Google for user sign-up and sign-in meets your needs. In most
cases, this is the most straightforward and simple method available for user
authentication.
Key terms and concepts
These guides assume that you have a basic understanding of OAuth 2.0 concepts and IETF standards such as RFC6749. The following terms are used throughout authorization guides:
- Access token is a short-lived per user credential issued by Google that is used to securely call Google APIs and access user data.
- Authorization code is a temporary code issued by Google to securely identify individual users who sign-in to their Google Account from a browser. Your backend platform exchanges this code for access and refresh tokens.
- Refresh token is a long-lived per user credential issued by Google that is securely stored on your platform and can be used to obtain a new, valid access token even when the user is not present.
- Scope restricts tokens to a defined and limited amount of user data, see OAuth 2.0 Scopes for Google APIs for more.
- Popup mode is an authorization code flow based upon a JavaScript callback running in the user's browser. Google invokes your callback handler which is then responsible for sending the auth code to your platform, how this is done is up to you.
- Redirect mode is an authorization code flow based upon HTTP redirects. The user-agent is first redirected to Google, a second redirect from Google to your platform's authorization code endpoint includes the code.
Token lifetimes are set by Google, as the issuer. Due to various factors the exact duration may vary.
OAuth 2.0 flows
Two flows, implicit and authorization code are discussed. Both return an access token suitable for use with Google APIs.
The authorization code flow is recommended as it offers improved user security. This flow also returns a refresh token which can be used to obtain access tokens without the user being present, enabling your platform to more easily perform asynchronous actions such as sending an SMS reminder of an upcoming meeting that was scheduled at the last minute. Choose an authorization model explains the differences between the two flows in more detail.
The Google Identity Services JavaScript library follows the OAuth 2.0 standard to:
- manage the implicit flow to enable your in-browser web app to quickly and easily obtain an access token from Google that is necessary to call Google APIs.
- start the authorization code flow from the user's browser.
Common steps
Both the implicit and authorization code flow begin the same way:
- Your app requests access to one or more scopes.
- Google displays a consent dialog to the user, and if necessary first signs the user into their Google Account.
- The user individually approves each requested scope.
Each flow then finishes with different steps.
When using the implicit flow
- Google uses a callback handler to notify your app of the consent outcome and return an access token for any approved scopes.
When using the auth code flow
- Google responds with a per user authorization code:
- In redirect mode, the code is returned to your platform's authorization code endpoint.
- In popup mode, the code is returned to your in-browser app's callback handler, without users needing to leave your website.
- Beginning at Step 4: Handle the OAuth 2.0 server response your backend platform completes a server-to-server exchange with Google, ultimately resulting in a per user refresh token and access token being returned to your platform.
User consent
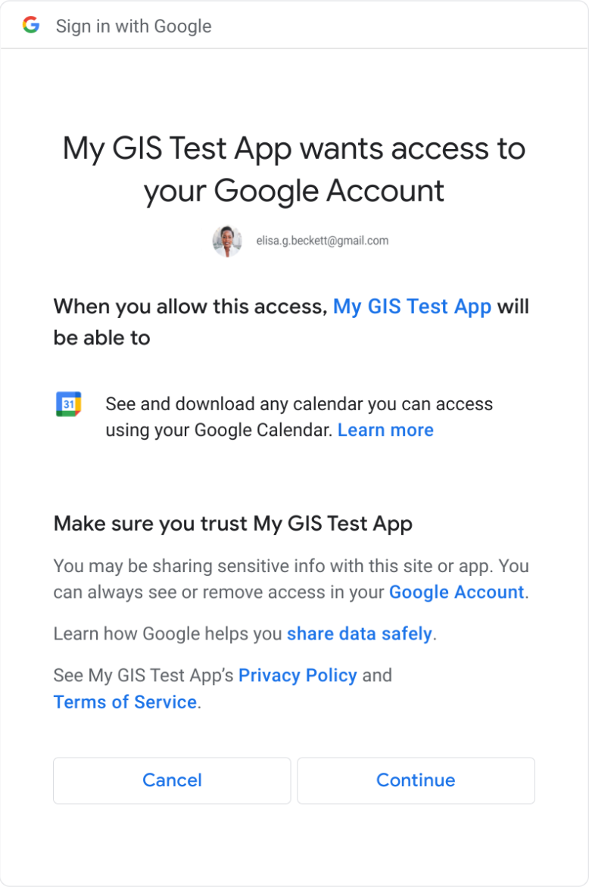
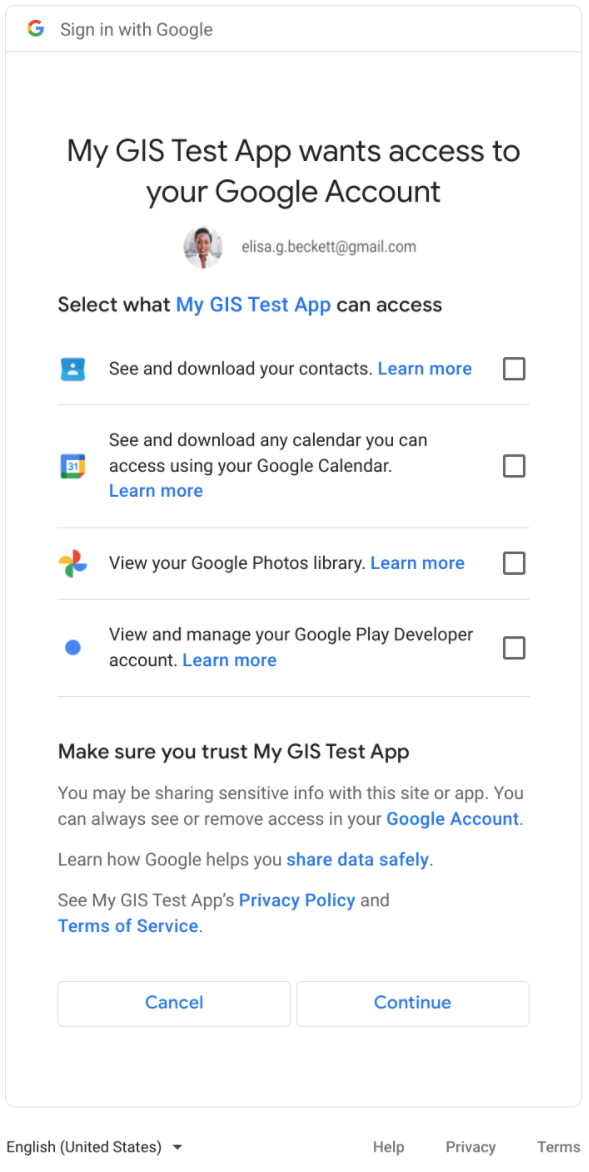
Prior to obtaining an access token individual users must grant consent for your app to access the requested scopes. To do so, Google displays a consent dialog during Step 2 above and records the result in myaccount.google.com/permissions.
Your app name, logo, privacy policy, terms of service and requested scopes are displayed to the user along with the option to approve or cancel the request.
In figure 1, the consent dialog for a single scope is shown. When a single scope is requested, no checkboxes are necessary to approve or deny a scope.

Figure 1: User consent dialog with a single scope.
In figure 2, the consent dialog for multiple scopes is shown. When more than one scope is requested individual checkboxes are necessary to allow the user to approve or to deny each scope.

Figure 2: User consent dialog with multiple scopes.
User accounts
A Google Account is required to record consent and to issue an access token. Prior to this, individual users must have authenticated themselves to Google by signing-in to a Google Account.
While not a requirement, it is recommended that Sign In With Google be used for sign-up and sign-in to your web app or backend platform. Doing so reduces user friction by minimizing the number of required steps and optionally enables you to easily associate access tokens with individual accounts on your platform.
For example, using Sign In With Google establishes an active Google Account session, thus avoiding the need to later prompt the user to sign-in to a Google Account when making an authorization request. If you choose to authenticate users to your app by other means such as username and password, or other identity providers, they will still be required to first sign in to a Google Account for consent.
Adding a login hint during authorization initialization--typically the email address of the user's Google Account--enables Google to skip the display of an account chooser, saving users a step. The ID Token credential returned by Sign In With Google contains the user's email address.
Web apps running only in the browser may rely solely on Google for user authentication, choosing to not to implement a user account management system. In this scenario, known as the implicit flow, there is no need to associate a refresh token with a user account and management secure storage.
Alternatively, a user account system is required by the authorization code flow. Per user refresh tokens must be associated with an individual account on your backend platform and stored for later use. How to implement, work with, and manage a user account system is unique to your platform and is not discussed in more detail.
Viewing and revoking consent
Users may view or revoke consent at any time from their Google Account settings.
Optionally, your web app or platform can call
google.accounts.oauth2.revoke to revoke tokens and remove user consent,
useful when a user deletes their account from your platform.
Other authorization options
Alternatively, browsers may obtain access tokens using the implicit flow by directly calling Google's OAuth 2.0 Endpoints as described by OAuth 2.0 for Client-side Web Applications.
Similarly, for the authorization code flow you may choose to implement your own methods and follow the steps outlined in Using OAuth 2.0 for Web Server Applications.
In both cases we strongly recommend using the Google Identity Services library to reduce your development time and effort and to minimize security risks such as those described by OAuth 2.0 Security Best Current Practice.