
這是 Classroom 外掛程式操作說明系列的第六集操作說明。
在本逐步操作說明中,您將修改上一個逐步操作步驟中的範例,產生評分活動類型附件。您也可以透過程式設計將成績傳回 Google Classroom,這會在老師的成績簿中顯示為草稿成績。
這份逐步操作說明與本系列其他文章略有不同,因為我們會介紹兩種可能的做法,讓您將成績傳回 Classroom。這兩種方式對開發人員和使用者體驗的影響各有不同,因此請在設計 Classroom 外掛程式時考量這兩種方式。如要進一步瞭解實作選項,請參閱「與附件互動」指南頁面。
請注意,API 中的評分功能為選用功能。可搭配任何活動類型附件使用。
在本逐步操作說明的過程中,您將完成下列工作:
- 修改先前傳送至 Classroom API 的附件建立要求,同時設定附件的成績分母。
- 以程式輔助方式評分學生提交的作業,並設定附件的成績分母。
- 實作兩種方法,使用已登入或離線的老師憑證,將提交作業的成績傳送至 Classroom。
完成後,系統會在觸發回傳行為後,將成績顯示在 Classroom 成績簿中。確切的發生時間取決於導入方式。
為了說明本例,我們將重複使用上一個操作說明中的活動,向學生顯示著名地標的圖片,並提示學生輸入地標名稱。如果學生輸入正確的名稱,就給予附件滿分,否則給零分。
瞭解 Classroom 外掛程式 API 評分功能
外掛程式可以為附件設定成績分子和分母。這些值分別是使用 API 中的 pointsEarned 和 maxPoints 值設定。在 Classroom 使用者介面中,附件資訊卡會在設定 maxPoints 值時顯示該值。
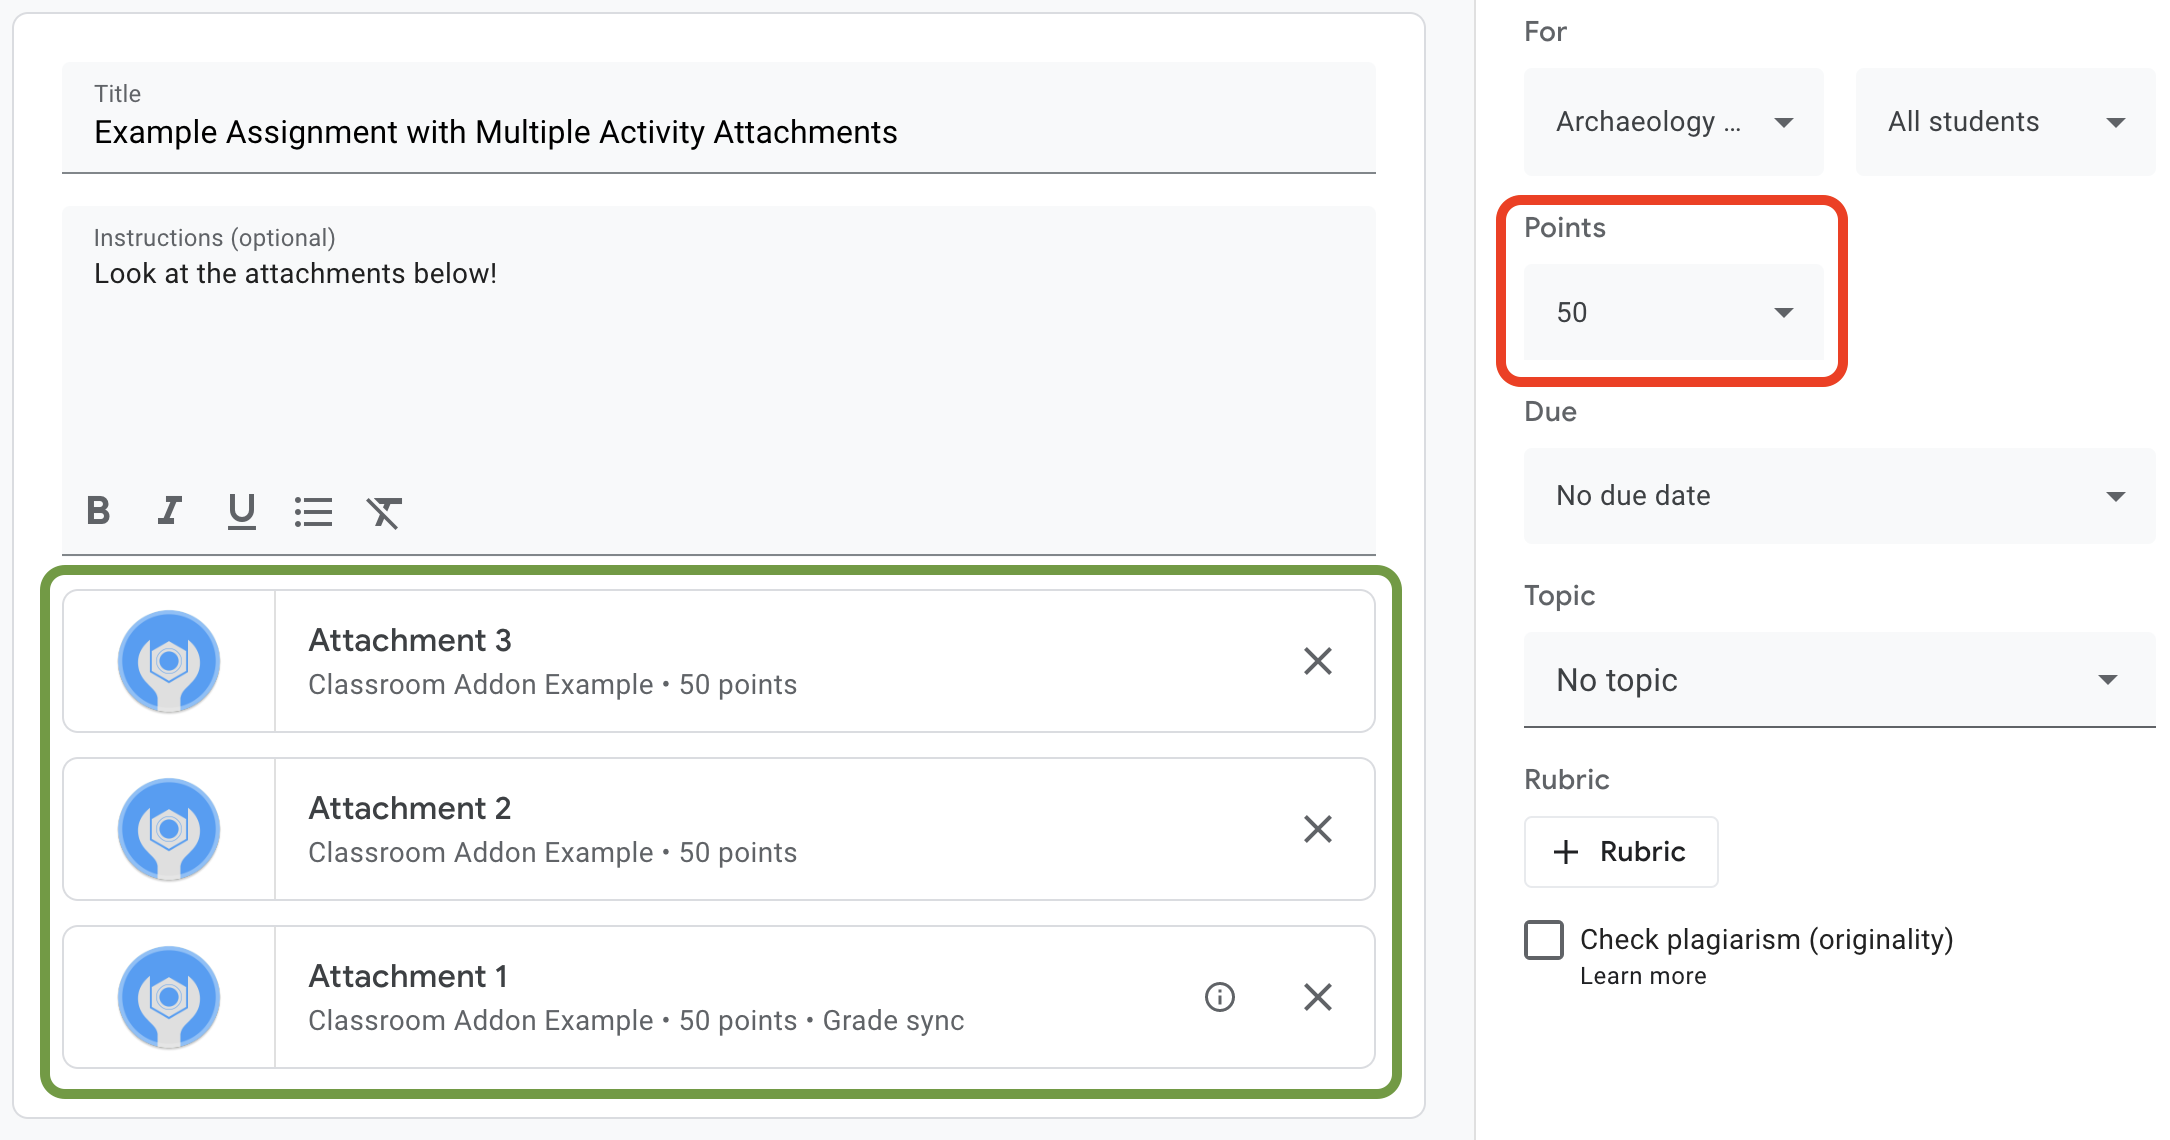
圖 1. 作業建立 UI,其中包含三張已設定 maxPoints 的外掛程式附件卡片。
您可以使用 Classroom 外掛程式 API 設定附件成績的設定,並設定獲得的分數。這些與作業成績不同。不過,作業成績設定會遵循附件成績設定,也就是附件資訊卡上有「成績同步處理」標籤的附件成績設定。當「成績同步」附件為學生繳交的作業設定 pointsEarned 時,也會為該作業設定學生的草稿成績。
通常,在設定 maxPoints 的作業中,新增的第一個附件會收到「Grade sync」標籤。如需「成績同步處理」標籤的範例,請參閱圖 1 所示的作業建立 UI 範例。請注意,「附件 1」資訊卡上有「成績同步」標籤,紅色方塊中的作業成績已更新為 50 分。請注意,雖然圖 1 顯示三個附件資訊卡,但只有一個資訊卡有「Grade sync」標籤。這是目前實作方式的主要限制:只有一個附件可以有「Grade sync」標籤。
如果有多個附件已設定 maxPoints,移除附有「成績同步」的附件不會在任何剩餘的附件上啟用「成績同步」。新增另一個設定 maxPoints 的附件,即可啟用新附件的成績同步功能,並調整作業最高成績。目前沒有任何機制可透過程式碼查看哪些附件具有「成績同步」標籤,也無法查看特定作業有多少附件。
設定附件的最高成績
本節將說明如何設定附件成績的分母,也就是所有學生提交內容可獲得的最高分數。如要這樣做,請設定附件的 maxPoints 值。
您只需要對現有導入方式進行輕微修改,即可啟用評分功能。建立附件時,請在包含 studentWorkReviewUri、teacherViewUri 和其他附件欄位的相同 AddOnAttachment 物件中新增 maxPoints 值。
請注意,新指派項目的預設最高分數為 100 分。建議您將 maxPoints 設為 100 以外的值,以便確認成績設定正確無誤。將 maxPoints 設為 50 做為示範:
Python
建構 attachment 物件時,請在向 courses.courseWork.addOnAttachments 端點發出 CREATE 要求之前,新增 maxPoints 欄位。如果您按照我們的範例操作,可以在 webapp/attachment_routes.py 檔案中找到這個值。
attachment = {
    # Specifies the route for a teacher user.
    "teacherViewUri": {
        "uri":
            flask.url_for(
                "load_activity_attachment",
                _scheme='https',
                _external=True),
    },
    # Specifies the route for a student user.
    "studentViewUri": {
        "uri":
            flask.url_for(
                "load_activity_attachment",
                _scheme='https',
                _external=True)
    },
    # Specifies the route for a teacher user when the attachment is
    # loaded in the Classroom grading view.
    "studentWorkReviewUri": {
        "uri":
            flask.url_for(
                "view_submission", _scheme='https', _external=True)
    },
    # Sets the maximum points that a student can earn for this activity.
    # This is the denominator in a fractional representation of a grade.
    "maxPoints": 50,
    # The title of the attachment.
    "title": f"Attachment {attachment_count}",
}
為了進行這項示範,您也將 maxPoints 值儲存在本機附件資料庫中,這樣日後在評分學生提交內容時,就不必再進行額外的 API 呼叫。不過,請注意,老師可能會不經過外掛程式,自行變更作業成績設定。將 GET 要求傳送至 courses.courseWork 端點,即可查看指派層級的 maxPoints 值。請在 CourseWork.id 欄位中傳遞 itemId。
接著更新資料庫模型,讓該模型也能保留附件的 maxPoints 值。建議您使用 CREATE 回應中的 maxPoints 值:
Python
首先,請在 Attachment 表格中新增 max_points 欄位。如果您按照我們的範例操作,可以在 webapp/models.py 檔案中找到這個值。
# Database model to represent an attachment.
class Attachment(db.Model):
    # The attachmentId is the unique identifier for the attachment.
    attachment_id = db.Column(db.String(120), primary_key=True)

    # The image filename to store.
    image_filename = db.Column(db.String(120))

    # The image caption to store.
    image_caption = db.Column(db.String(120))

    # The maximum number of points for this activity.
    max_points = db.Column(db.Integer)
返回 courses.courseWork.addOnAttachments CREATE 要求。儲存回應中傳回的 maxPoints 值。
new_attachment = Attachment(
    # The new attachment's unique ID, returned in the CREATE response.
    attachment_id=resp.get("id"),
    image_filename=key,
    image_caption=value,
    # Store the maxPoints value returned in the response.
    max_points=int(resp.get("maxPoints")))
db.session.add(new_attachment)
db.session.commit()
附件現在已達到最高等級。您現在應該可以測試這項行為了;在新的作業中新增附件,並觀察附件資訊卡是否顯示「成績同步」標籤,以及作業的「分數」值是否有所變動。
在 Classroom 中設定學生繳交作業的成績
本節將說明如何設定附件成績的分母,也就是個別學生的附件成績。方法是設定學生提交內容的 pointsEarned 值。
您現在必須做出一項重要決定:外掛程式應如何發出要求來設定 pointsEarned?
問題是設定 pointsEarned 需要 teacher OAuth 範圍。您不應將 teacher 範圍授予學生使用者,否則學生與外掛程式互動時可能會發生非預期行為,例如載入老師檢視畫面 iframe 而非學生檢視畫面 iframe。因此,您可以透過兩種方式設定 pointsEarned:
- 使用已登入老師的憑證。
- 使用儲存的 (離線) 教師憑證。
以下各節將討論各項方法的取捨,然後示範各項實作方式。請注意,我們提供的範例會示範兩種將成績傳送至 Classroom 的方法。請參閱下方的語言專屬操作說明,瞭解如何在執行提供的範例時選取方法:
Python
在 webapp/attachment_routes.py 檔案頂端找出 SET_GRADE_WITH_LOGGED_IN_USER_CREDENTIALS 宣告。將這個值設為 True,即可使用已登入老師的憑證傳回成績。將這個值設為 False,即可在學生提交活動時,使用已儲存的憑證傳回成績。
使用已登入老師的憑證設定成績
使用已登入使用者的憑證,發出要求以設定 pointsEarned。這應該會顯得相當直覺,因為它反映了目前為止的其他實作項目,而且實作起來也沒有太大困難。
不過,請注意,老師「僅」會在「Student Work Review」iframe 中與學生提交的作業互動。這會產生一些重要影響:
- 老師必須在 Classroom UI 中採取行動,否則系統不會在 Classroom 中填入成績。
- 老師可能必須開啟每位學生的作業,才能為所有學生填入成績。
- Classroom 收到成績後,會稍微延遲一段時間才會顯示在 Classroom UI 中。延遲時間通常為 5 到 10 秒,但也可能長達 30 秒。
綜合上述因素,老師可能必須花費大量時間手動填入課程成績。
如要實作這項做法,請在現有的學生作業評論路徑中,再新增一個 API 呼叫。
擷取學生提交的作業和附件記錄後,請評估學生提交的作業,並儲存產生的成績。在 AddOnAttachmentStudentSubmission 物件的 pointsEarned 欄位中設定等級。最後,請向 courses.courseWork.addOnAttachments.studentSubmissions 端點提出 PATCH 要求,並在要求主體中提供 AddOnAttachmentStudentSubmission 例項。請注意,我們也需要在 PATCH 要求的 updateMask 中指定 pointsEarned:
Python
# Look up the student's submission in our database.
student_submission = Submission.query.get(flask.session["submissionId"])

# Look up the attachment in the database.
attachment = Attachment.query.get(student_submission.attachment_id)

grade = 0

# See if the student response matches the stored name.
if student_submission.student_response.lower(
) == attachment.image_caption.lower():
    grade = attachment.max_points

# Create an instance of the Classroom service.
classroom_service = ch._credential_handler.get_classroom_service()

# Build an AddOnAttachmentStudentSubmission instance.
add_on_attachment_student_submission = {
    # Specifies the student's score for this attachment.
    "pointsEarned": grade,
}

# Issue a PATCH request to set the grade numerator for this attachment.
patch_grade_response = classroom_service.courses().courseWork(
).addOnAttachments().studentSubmissions().patch(
    courseId=flask.session["courseId"],
    itemId=flask.session["itemId"],
    attachmentId=flask.session["attachmentId"],
    submissionId=flask.session["submissionId"],
    # updateMask is a list of fields being modified.
    updateMask="pointsEarned",
    body=add_on_attachment_student_submission).execute()
使用離線老師憑證設定成績
設定成績的第二種方法需要使用建立附件的老師的儲存憑證。這個實作方式需要使用先前授權老師的重新整理和存取權存證,建構憑證,然後使用這些憑證設定 pointsEarned。
這種做法的重要優點是,在 Classroom UI 中填入成績時,不必採取老師的動作,因此可避免上述的問題。因此,使用者會覺得評分作業流程順暢又有效率。此外,您也可以透過這種方式選擇發還成績的時機,例如學生完成活動時,或是非同步時。
請完成下列工作來實作此方法:
- 修改使用者資料庫記錄,以便儲存存取權權杖。
- 修改附件資料庫記錄,以便儲存老師 ID。
- 擷取老師的憑證,並視需要建構新的 Classroom 服務例項。
- 設定繳交作業的成績。
為了進行這項示範,請在學生完成活動時設定成績,也就是學生在「學生檢視」路徑中提交表單時。
修改使用者資料庫記錄以儲存存取權杖
您需要兩個專屬權杖才能進行 API 呼叫,分別是更新權杖和存取權杖。如果您已按照逐步操作說明系列進行操作,您的 User 資料表結構定義應已儲存重新整理權杖。如果您只使用已登入的使用者呼叫 API,儲存重新整理權杖就足夠了,因為您會在驗證流程中收到存取權杖。
不過,您現在必須以登入使用者以外的身份發出呼叫,也就是說無法使用驗證流程。因此,您需要將存取權杖與更新憑證一併儲存。更新 User 資料表結構定義,加入存取權存證:
Python
在我們提供的範例中,這項資訊位於 webapp/models.py 檔案中。
# Database model to represent a user.
class User(db.Model):
    # The user's identifying information:
    id = db.Column(db.String(120), primary_key=True)
    display_name = db.Column(db.String(80))
    email = db.Column(db.String(120), unique=True)
    portrait_url = db.Column(db.Text())

    # The user's refresh token, which will be used to obtain an access token.
    # Note that refresh tokens will become invalid if:
    # - The refresh token has not been used for six months.
    # - The user revokes your app's access permissions.
    # - The user changes passwords.
    # - The user belongs to a Google Cloud organization
    #   that has session control policies in effect.
    refresh_token = db.Column(db.Text())

    # An access token for this user.
    access_token = db.Column(db.Text())
接著,請更新任何建立或更新 User 記錄的程式碼,以便儲存存取權杖:
Python
在我們提供的範例中,這項資訊位於 webapp/credential_handler.py 檔案中。
def save_credentials_to_storage(self, credentials):
    # Issue a request for the user's profile details.
    user_info_service = googleapiclient.discovery.build(
        serviceName="oauth2", version="v2", credentials=credentials)
    user_info = user_info_service.userinfo().get().execute()
    flask.session["username"] = user_info.get("name")
    flask.session["login_hint"] = user_info.get("id")

    # See if we have any stored credentials for this user. If they have used
    # the add-on before, we should have received login_hint in the query
    # parameters.
    existing_user = self.get_credentials_from_storage(user_info.get("id"))

    # If we do have stored credentials, update the database.
    if existing_user:
        if user_info:
            existing_user.id = user_info.get("id")
            existing_user.display_name = user_info.get("name")
            existing_user.email = user_info.get("email")
            existing_user.portrait_url = user_info.get("picture")

        if credentials and credentials.refresh_token is not None:
            existing_user.refresh_token = credentials.refresh_token
            # Update the access token.
            existing_user.access_token = credentials.token

    # If not, this must be a new user, so add a new entry to the database.
    else:
        new_user = User(
            id=user_info.get("id"),
            display_name=user_info.get("name"),
            email=user_info.get("email"),
            portrait_url=user_info.get("picture"),
            refresh_token=credentials.refresh_token,
            # Store the access token as well.
            access_token=credentials.token)

        db.session.add(new_user)

    db.session.commit()
修改附件資料庫記錄以儲存老師 ID
如要為活動設定成績,請呼叫將 pointsEarned 設為課程老師的 API。您可以透過下列幾種方式完成這項操作:
- 將教師憑證與課程 ID 的本機對應項目儲存起來。不過,請注意,同一位老師不一定會與特定課程相關聯。
- 請向 Classroom API
courses端點提出GET要求,以取得目前的講師。接著,請查詢本機使用者記錄,找出符合的師資憑證。 - 建立外掛程式附件時,請將教師 ID 儲存在本機附件資料庫中。接著,從傳送至學生檢視畫面 iframe 的
attachmentId中擷取老師憑證。
這個範例會示範最後一個選項,因為您是在學生完成活動附件時設定成績。
在資料庫的 Attachment 資料表中新增教師 ID 欄位:
Python
在我們提供的範例中,這項資訊位於 webapp/models.py 檔案中。
# Database model to represent an attachment.
class Attachment(db.Model):
    # The attachmentId is the unique identifier for the attachment.
    attachment_id = db.Column(db.String(120), primary_key=True)

    # The image filename to store.
    image_filename = db.Column(db.String(120))

    # The image caption to store.
    image_caption = db.Column(db.String(120))

    # The maximum number of points for this activity.
    max_points = db.Column(db.Integer)

    # The ID of the teacher that created the attachment.
    teacher_id = db.Column(db.String(120))
接著,請更新任何建立或更新 Attachment 記錄的程式碼,以便儲存建立者的 ID:
Python
在我們提供的範例中,這項屬性位於 webapp/attachment_routes.py 檔案中的 create_attachments 方法中。
# Store the attachment by id.
new_attachment = Attachment(
    # The new attachment's unique ID, returned in the CREATE response.
    attachment_id=resp.get("id"),
    image_filename=key,
    image_caption=value,
    max_points=int(resp.get("maxPoints")),
    teacher_id=flask.session["login_hint"])
db.session.add(new_attachment)
db.session.commit()
擷取老師的憑證
找出提供學生檢視畫面 iframe 的路徑。將學生的回覆儲存在本機資料庫後,立即從本機儲存空間擷取老師的憑證。由於前兩個步驟已做好準備,這應該是簡單的作業。您也可以使用這些方法,為老師使用者建構 Classroom 服務的新例項:
Python
在我們提供的範例中,這項屬性位於 webapp/attachment_routes.py 檔案的 load_activity_attachment 方法中。
# Create an instance of the Classroom service using the tokens for the
# teacher that created the attachment.

# We're assuming that there are already credentials in the session, which
# should be true given that we are adding this within the Student View
# route; we must have had valid credentials for the student to reach this
# point. The student credentials will be valid to construct a Classroom
# service for another user except for the tokens.
if not flask.session.get("credentials"):
    raise ValueError(
        "No credentials found in session for the requested user.")

# Make a copy of the student credentials so we don't modify the original.
teacher_credentials_dict = deepcopy(flask.session.get("credentials"))

# Retrieve the requested user's stored record.
teacher_record = User.query.get(attachment.teacher_id)

# Apply the user's tokens to the copied credentials.
teacher_credentials_dict["refresh_token"] = teacher_record.refresh_token
teacher_credentials_dict["token"] = teacher_record.access_token

# Construct a temporary credentials object.
teacher_credentials = google.oauth2.credentials.Credentials(
    **teacher_credentials_dict)

# Refresh the credentials if necessary; we don't know when this teacher last
# made a call.
if teacher_credentials.expired:
    teacher_credentials.refresh(Request())

# Request the Classroom service for the specified user.
teacher_classroom_service = googleapiclient.discovery.build(
    serviceName=CLASSROOM_API_SERVICE_NAME,
    version=CLASSROOM_API_VERSION,
    credentials=teacher_credentials)
設定繳交作業的成績
這裡的程序與使用已登入教師的憑證的程序相同。不過,請注意,您必須使用上一個步驟擷取的講師憑證進行呼叫:
Python
# Issue a PATCH request as the teacher to set the grade numerator for this
# attachment.
patch_grade_response = teacher_classroom_service.courses().courseWork(
).addOnAttachments().studentSubmissions().patch(
    courseId=flask.session["courseId"],
    itemId=flask.session["itemId"],
    attachmentId=flask.session["attachmentId"],
    submissionId=flask.session["submissionId"],
    # updateMask is a list of fields being modified.
    updateMask="pointsEarned",
    body=add_on_attachment_student_submission).execute()
測試外掛程式
與前述逐步操作說明類似,請以老師身分建立含有活動類型附件的作業,以學生身分提交回覆,然後在「學生作業評估」iframe 中開啟學生提交的內容。您應該會看到成績在不同時間點顯示,具體取決於實作方式:
- 如果您選擇在學生完成活動時發回成績,在開啟學生作業評論 iframe 之前,您應該會在 UI 中看到學生的草稿成績。您也可以在開啟作業時,在學生名單中看到該作業,以及在「學生作業檢查」iframe 旁的「成績」方塊中。
- 如果您選擇在老師開啟「學生作業評論」iframe 時傳回成績,iframe 載入後,成績就會顯示在「成績」方塊中。如上文所述,這項作業最多可能需要 30 秒。之後,特定學生的成績也應會顯示在其他 Classroom 成績單檢視畫面中。
確認學生顯示正確的分數。
恭喜!您已準備好進行下一個步驟:在 Google Classroom 外建立附件。