
이 워크스루는 클래스룸 부가기능 워크스루 시리즈의 여섯 번째 워크스루입니다.
이 워크스루에서는 이전 워크스루 단계의 예시를 수정하여 평가된 활동 유형 첨부파일을 만듭니다. 또한 프로그래매틱 방식으로 성적을 Google 클래스룸에 다시 전달할 수 있으며, 이 성적은 교사의 성적 기록에 초안 성적으로 표시됩니다.
이 워크스루는 성적을 클래스룸으로 다시 전달하는 데 두 가지 접근 방식이 있다는 점에서 이 시리즈의 다른 워크스루와 약간 다릅니다. 둘 다 개발자와 사용자 환경에 고유한 영향을 미칩니다. 클래스룸 부가기능을 설계할 때는 둘 다 고려하세요. 구현 옵션에 관한 자세한 내용은 첨부파일과 상호작용하는 방법 가이드 페이지를 참고하세요.
API의 평가 기능은 선택사항입니다. 모든 활동 유형 첨부파일과 함께 사용할 수 있습니다.
이 워크스루에서는 다음을 완료합니다.
- 이전의 클래스룸 API에 대한 첨부파일 생성 요청을 수정하여 첨부파일의 성적 분모도 설정합니다.
- 프로그래매틱 방식으로 학생의 제출물에 점수를 매기고 첨부파일의 성적 분자를 설정합니다.
- 로그인한 교사 사용자 인증 정보 또는 오프라인 교사 사용자 인증 정보를 사용하여 제출물의 성적을 클래스룸에 전달하는 두 가지 접근 방식을 구현합니다.
완료되면 패스백 동작이 트리거된 후 클래스룸 성적부에서 성적이 표시됩니다. 정확한 시점은 구현 접근 방식에 따라 다릅니다.
이 예에서는 이전 워크스루의 활동을 재사용합니다. 이 활동에서는 학생에게 유명한 랜드마크의 이미지가 표시되고 이름을 입력하라는 메시지가 표시됩니다. 학생이 올바른 이름을 입력하면 첨부파일에 전체 점수를, 그렇지 않으면 0점을 할당합니다.
Classroom 부가기능 API 평가 기능 이해하기
부가기능은 첨부파일의 성적 분자와 성적 분모를 모두 설정할 수 있습니다. 이는 API의 pointsEarned 및 maxPoints 값을 사용하여 각각 설정됩니다. 클래스룸 UI의 첨부파일 카드에는 maxPoints 값이 설정된 경우 이 값이 표시됩니다.
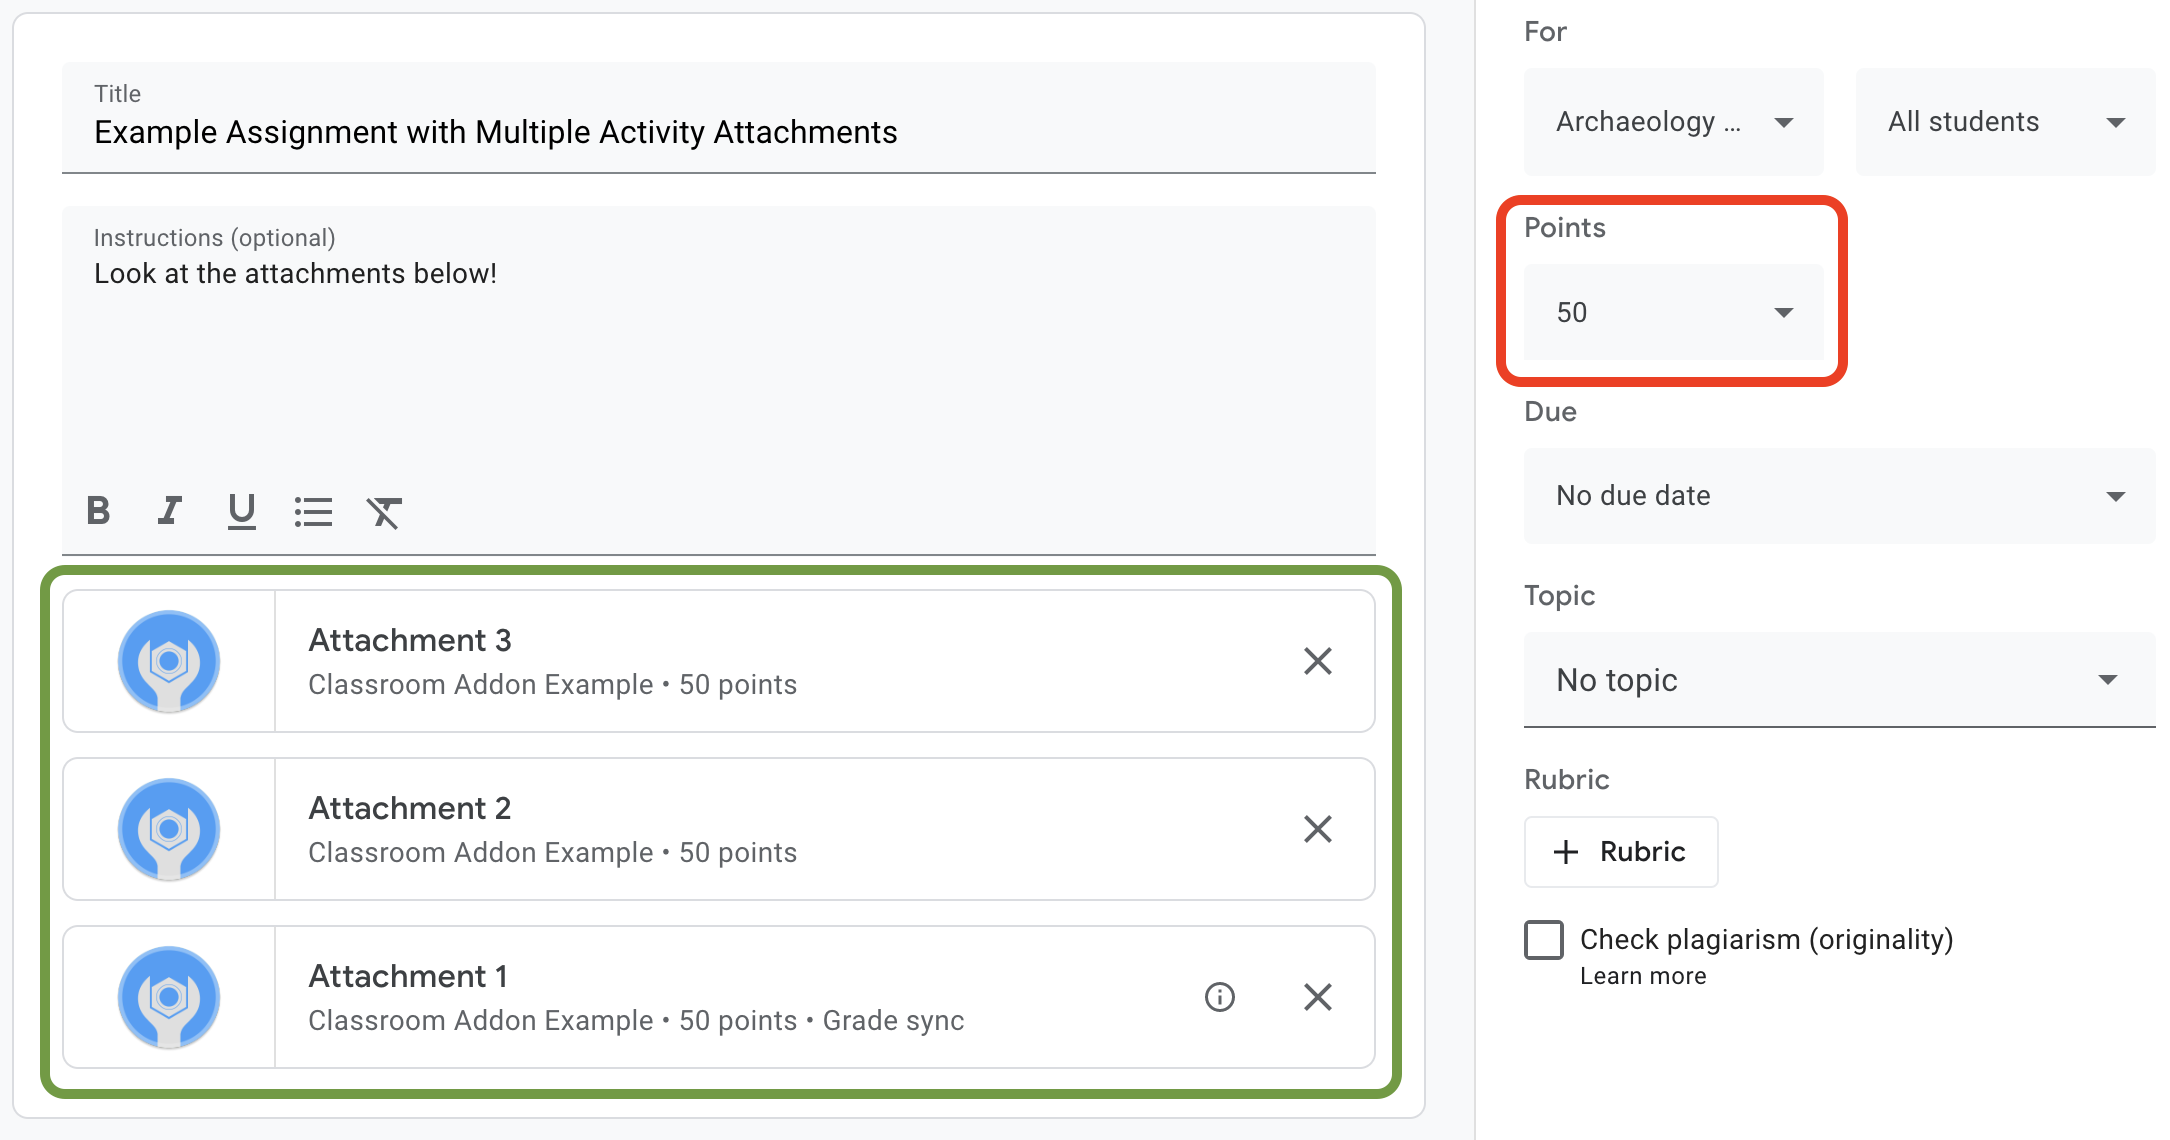
그림 1. maxPoints가 설정된 부가기능 첨부파일 카드 3개가 있는 과제 생성 UI
클래스룸 부가기능 API를 사용하면 첨부파일 성적에 대한 설정을 구성하고 획득한 점수를 설정할 수 있습니다. 과제 성적과는 다릅니다. 하지만 과제 성적 설정은 첨부파일 카드에 성적 동기화 라벨이 있는 첨부파일의 첨부파일 성적 설정을 따릅니다. '성적 동기화' 첨부파일이 학생 제출물에 pointsEarned를 설정하면 과제에 대한 학생의 초안 성적도 설정됩니다.
일반적으로 maxPoints를 설정하는 과제에 추가된 첫 번째 첨부파일에는 '성적 동기화' 라벨이 지정됩니다. '성적 동기화' 라벨의 예는 그림 1의 과제 생성 UI 예시를 참고하세요. '첨부파일 1' 카드에 '성적 동기화' 라벨이 있고 빨간색 상자의 과제 성적이 50점으로 업데이트되었습니다. 또한 그림 1에는 첨부파일 카드가 3개 표시되지만 '성적 동기화' 라벨이 있는 카드는 하나뿐입니다. 이는 현재 구현의 주요 제한사항입니다. 첨부파일에 '성적 동기화' 라벨을 지정할 수 있는 첨부파일은 하나뿐입니다.
maxPoints를 설정한 첨부파일이 여러 개인 경우 '성적 동기화'가 있는 첨부파일을 삭제해도 나머지 첨부파일에서 '성적 동기화'가 사용 설정되지 않습니다. maxPoints를 설정하는 다른 첨부파일을 추가하면 새 첨부파일에 성적 동기화가 사용 설정되고 최대 과제 성적이 일치하도록 조정됩니다. '성적 동기화' 라벨이 있는 첨부파일을 프로그래매틱 방식으로 확인하거나 특정 과제에 있는 첨부파일 수를 확인하는 메커니즘은 없습니다.
첨부파일의 최대 성적 설정
이 섹션에서는 첨부파일 성적의 분모, 즉 모든 학생이 제출물에 대해 받을 수 있는 최대 점수를 설정하는 방법을 설명합니다. 이렇게 하려면 첨부파일의 maxPoints 값을 설정합니다.
채점 기능을 사용 설정하려면 기존 구현을 약간만 수정하면 됩니다. 첨부파일을 만들 때 studentWorkReviewUri, teacherViewUri, 기타 첨부파일 필드가 포함된 동일한 AddOnAttachment 객체에 maxPoints 값을 추가합니다.
새 과제의 기본 최대 점수는 100점입니다. 성적이 올바르게 설정되는지 확인할 수 있도록 maxPoints를 100이 아닌 값으로 설정하는 것이 좋습니다. 예시로 maxPoints를 50으로 설정합니다.
Python
courses.courseWork.addOnAttachments 엔드포인트에 CREATE 요청을 실행하기 직전에 attachment 객체를 구성할 때 maxPoints 필드를 추가합니다. 제공된 예시를 따르면 webapp/attachment_routes.py 파일에서 이 값을 찾을 수 있습니다.
attachment = {
    # Specifies the route for a teacher user.
    "teacherViewUri": {
        "uri":
            flask.url_for(
                "load_activity_attachment",
                _scheme='https',
                _external=True),
    },
    # Specifies the route for a student user.
    "studentViewUri": {
        "uri":
            flask.url_for(
                "load_activity_attachment",
                _scheme='https',
                _external=True)
    },
    # Specifies the route for a teacher user when the attachment is
    # loaded in the Classroom grading view.
    "studentWorkReviewUri": {
        "uri":
            flask.url_for(
                "view_submission", _scheme='https', _external=True)
    },
    # Sets the maximum points that a student can earn for this activity.
    # This is the denominator in a fractional representation of a grade.
    "maxPoints": 50,
    # The title of the attachment.
    "title": f"Attachment {attachment_count}",
}
이 데모를 위해 maxPoints 값을 로컬 첨부파일 데이터베이스에 저장합니다. 이렇게 하면 나중에 학생 제출물을 채점할 때 API를 추가로 호출하지 않아도 됩니다. 하지만 교사가 부가기능과 별개로 과제 성적 설정을 변경할 수도 있습니다. courses.courseWork 엔드포인트에 GET 요청을 전송하여 할당 수준 maxPoints 값을 확인합니다. 이때 CourseWork.id 필드에 itemId를 전달합니다.
이제 데이터베이스 모델을 업데이트하여 첨부파일의 maxPoints 값도 보관합니다.
CREATE 응답의 maxPoints 값을 사용하는 것이 좋습니다.
Python
먼저 Attachment 테이블에 max_points 필드를 추가합니다. 제공된 예시를 따르면 webapp/models.py 파일에서 이 값을 찾을 수 있습니다.
# Database model to represent an attachment.
class Attachment(db.Model):
    # The attachmentId is the unique identifier for the attachment.
    attachment_id = db.Column(db.String(120), primary_key=True)

    # The image filename to store.
    image_filename = db.Column(db.String(120))

    # The image caption to store.
    image_caption = db.Column(db.String(120))

    # The maximum number of points for this activity.
    max_points = db.Column(db.Integer)
courses.courseWork.addOnAttachments CREATE 요청으로 돌아갑니다. 응답에서 반환된 maxPoints 값을 저장합니다.
new_attachment = Attachment(
    # The new attachment's unique ID, returned in the CREATE response.
    attachment_id=resp.get("id"),
    image_filename=key,
    image_caption=value,
    # Store the maxPoints value returned in the response.
    max_points=int(resp.get("maxPoints")))
db.session.add(new_attachment)
db.session.commit()
이제 첨부파일에 최대 성적이 부여되었습니다. 이제 이 동작을 테스트할 수 있습니다. 새 과제에 첨부파일을 추가하고 첨부파일 카드에 '성적 동기화' 라벨이 표시되고 과제의 '점수' 값이 변경되는지 확인합니다.
클래스룸에서 학생 제출물 성적 설정하기
이 섹션에서는 첨부파일 성적의 분자, 즉 개별 학생의 첨부파일 점수를 설정하는 방법을 설명합니다. 이렇게 하려면 학생 제출물의 pointsEarned 값을 설정합니다.
이제 중요한 결정을 내려야 합니다. 부가기능에서 pointsEarned 설정 요청을 어떻게 실행해야 하나요?
문제는 pointsEarned를 설정하려면 teacher OAuth 범위가 필요하다는 점입니다.
학생 사용자에게 teacher 범위를 부여해서는 안 됩니다. 이렇게 하면 학생이 부가기능과 상호작용할 때 학생 보기 iframe 대신 교사 보기 iframe이 로드되는 등 예기치 않은 동작이 발생할 수 있습니다. 따라서 pointsEarned를 설정하는 방법에는 두 가지가 있습니다.
- 로그인한 교사의 사용자 인증 정보를 사용합니다.
- 저장된 (오프라인) 교사 사용자 인증 정보 사용
다음 섹션에서는 각 구현을 보여주기 전에 각 접근 방식의 장단점을 설명합니다. 제공된 예시에서는 성적을 클래스룸에 전달하는 두 가지 접근 방식을 보여줍니다. 제공된 예시를 실행할 때 어떤 접근 방식을 선택할지 알아보려면 아래의 언어별 안내를 참고하세요.
Python
webapp/attachment_routes.py 파일 상단에서 SET_GRADE_WITH_LOGGED_IN_USER_CREDENTIALS 선언을 찾습니다. 로그인한 교사의 사용자 인증 정보를 사용하여 성적을 다시 전달하려면 이 값을 True로 설정합니다. 이 값을 False로 설정하면 학생이 활동을 제출할 때 저장된 사용자 인증 정보를 사용하여 성적을 다시 전달할 수 있습니다.
로그인한 교사의 사용자 인증 정보를 사용하여 성적 설정
로그인한 사용자의 사용자 인증 정보를 사용하여 pointsEarned 설정 요청을 실행합니다.
이는 지금까지의 나머지 구현을 반영하고 구현하는 데 거의 노력이 들지 않으므로 매우 직관적으로 보일 것입니다.
그러나 교사는 학생 과제물 검토 iframe에서 학생의 제출물과 만 상호작용합니다. 이에 따라 몇 가지 중요한 의미가 있습니다.
- 교사가 클래스룸 UI에서 조치를 취할 때까지 클래스룸에 성적이 채워지지 않습니다.
- 교사는 모든 학생 성적을 채우기 위해 모든 학생 제출물을 열어야 할 수 있습니다.
- 클래스룸에서 성적을 수신하고 클래스룸 UI에 표시되는 사이에는 약간의 지연이 발생합니다. 지연 시간은 일반적으로 5~10초이지만 최대 30초까지 걸릴 수 있습니다.
이러한 요소를 종합하면 교사는 수업의 성적을 완전히 채우기 위해 상당히 많은 시간과 노력을 들여 수동으로 작업해야 할 수 있습니다.
이 접근 방식을 구현하려면 기존 학생 작업 검토 경로에 API 호출을 하나 더 추가합니다.
학생 제출물 및 첨부파일 레코드를 가져온 후 학생의 제출물을 평가하고 결과 성적을 저장합니다. AddOnAttachmentStudentSubmission 객체의 pointsEarned 필드에서 성적을 설정합니다. 마지막으로 요청 본문에 AddOnAttachmentStudentSubmission 인스턴스를 사용하여 courses.courseWork.addOnAttachments.studentSubmissions 엔드포인트에 PATCH 요청을 실행합니다. PATCH 요청의 updateMask에서 pointsEarned도 지정해야 합니다.
Python
# Look up the student's submission in our database.
student_submission = Submission.query.get(flask.session["submissionId"])

# Look up the attachment in the database.
attachment = Attachment.query.get(student_submission.attachment_id)

grade = 0

# See if the student response matches the stored name.
if student_submission.student_response.lower(
) == attachment.image_caption.lower():
    grade = attachment.max_points

# Create an instance of the Classroom service.
classroom_service = ch._credential_handler.get_classroom_service()

# Build an AddOnAttachmentStudentSubmission instance.
add_on_attachment_student_submission = {
    # Specifies the student's score for this attachment.
    "pointsEarned": grade,
}

# Issue a PATCH request to set the grade numerator for this attachment.
patch_grade_response = classroom_service.courses().courseWork(
).addOnAttachments().studentSubmissions().patch(
    courseId=flask.session["courseId"],
    itemId=flask.session["itemId"],
    attachmentId=flask.session["attachmentId"],
    submissionId=flask.session["submissionId"],
    # updateMask is a list of fields being modified.
    updateMask="pointsEarned",
    body=add_on_attachment_student_submission).execute()
오프라인 교사 사용자 인증 정보를 사용하여 성적 설정
성적을 설정하는 두 번째 방법은 첨부파일을 만든 교사의 저장된 사용자 인증 정보를 사용해야 합니다. 이 구현을 사용하려면 이전에 승인된 교사의 새로고침 및 액세스 토큰을 사용하여 사용자 인증 정보를 생성한 다음 이 사용자 인증 정보를 사용하여 pointsEarned를 설정해야 합니다.
이 접근 방식의 중요한 이점은 클래스룸 UI에서 교사의 작업 없이 성적이 채워지므로 위에서 언급된 문제가 방지된다는 것입니다. 그 결과 최종 사용자는 평가 환경을 원활하고 효율적으로 인식합니다. 또한 이 접근 방식을 사용하면 학생이 활동을 완료할 때 또는 비동기식으로 성적을 반환할 때와 같이 성적을 다시 전달할 시점을 선택할 수 있습니다.
이 접근 방식을 구현하려면 다음 작업을 완료하세요.
- 액세스 토큰을 저장하도록 사용자 데이터베이스 레코드를 수정합니다.
- 교사 ID를 저장하도록 첨부파일 데이터베이스 레코드를 수정합니다.
- 교사의 사용자 인증 정보를 가져오고 원하는 경우 새 클래스룸 서비스 인스턴스를 만듭니다.
- 제출물의 성적을 설정합니다.
이 데모에서는 학생이 활동을 완료할 때(즉, 학생 보기 경로에서 양식을 제출할 때) 성적을 설정합니다.
액세스 토큰을 저장하도록 사용자 데이터베이스 레코드 수정
API를 호출하려면 두 가지 고유한 토큰, 즉 갱신 토큰과 액세스 토큰이 필요합니다. 지금까지 워크스루 시리즈를 따라왔다면 User 테이블 스키마에 이미 새로고침 토큰이 저장되어 있어야 합니다. 로그인한 사용자로만 API를 호출하는 경우 인증 흐름의 일부로 액세스 토큰을 수신하므로 새로고침 토큰을 저장하는 것으로 충분합니다.
하지만 이제 로그인한 사용자 이외의 사용자로 호출해야 하므로 인증 흐름을 사용할 수 없습니다. 따라서 액세스 토큰을 갱신 토큰과 함께 저장해야 합니다. 액세스 토큰을 포함하도록 User 테이블 스키마를 업데이트합니다.
Python
제공된 예시에서는 webapp/models.py 파일에 있습니다.
# Database model to represent a user.
class User(db.Model):
    # The user's identifying information:
    id = db.Column(db.String(120), primary_key=True)
    display_name = db.Column(db.String(80))
    email = db.Column(db.String(120), unique=True)
    portrait_url = db.Column(db.Text())

    # The user's refresh token, which will be used to obtain an access token.
    # Note that refresh tokens will become invalid if:
    # - The refresh token has not been used for six months.
    # - The user revokes your app's access permissions.
    # - The user changes passwords.
    # - The user belongs to a Google Cloud organization
    #   that has session control policies in effect.
    refresh_token = db.Column(db.Text())

    # An access token for this user.
    access_token = db.Column(db.Text())
그런 다음 User 레코드를 만들거나 업데이트하는 모든 코드를 업데이트하여 액세스 토큰도 저장합니다.
Python
제공된 예시에서는 webapp/credential_handler.py 파일에 있습니다.
def save_credentials_to_storage(self, credentials):
    # Issue a request for the user's profile details.
    user_info_service = googleapiclient.discovery.build(
        serviceName="oauth2", version="v2", credentials=credentials)
    user_info = user_info_service.userinfo().get().execute()
    flask.session["username"] = user_info.get("name")
    flask.session["login_hint"] = user_info.get("id")

    # See if we have any stored credentials for this user. If they have used
    # the add-on before, we should have received login_hint in the query
    # parameters.
    existing_user = self.get_credentials_from_storage(user_info.get("id"))

    # If we do have stored credentials, update the database.
    if existing_user:
        if user_info:
            existing_user.id = user_info.get("id")
            existing_user.display_name = user_info.get("name")
            existing_user.email = user_info.get("email")
            existing_user.portrait_url = user_info.get("picture")

        if credentials and credentials.refresh_token is not None:
            existing_user.refresh_token = credentials.refresh_token
            # Update the access token.
            existing_user.access_token = credentials.token

    # If not, this must be a new user, so add a new entry to the database.
    else:
        new_user = User(
            id=user_info.get("id"),
            display_name=user_info.get("name"),
            email=user_info.get("email"),
            portrait_url=user_info.get("picture"),
            refresh_token=credentials.refresh_token,
            # Store the access token as well.
            access_token=credentials.token)

        db.session.add(new_user)

    db.session.commit()
교사 ID를 저장하도록 첨부파일 데이터베이스 레코드 수정
활동의 성적을 설정하려면 pointsEarned를 과정의 교사로 설정하도록 호출합니다. 다음과 같은 방법으로 할 수 있습니다.
- 교사 사용자 인증 정보와 과정 ID 간의 로컬 매핑을 저장합니다. 그러나 동일한 교사가 특정 과정과 항상 연결되는 것은 아닙니다.
- Classroom API
courses엔드포인트에GET요청을 보내 현재 교사를 가져옵니다. 그런 다음 로컬 사용자 레코드를 쿼리하여 일치하는 교사 사용자 인증 정보를 찾습니다. - 부가기능 첨부파일을 만들 때 로컬 첨부파일 데이터베이스에 교사 ID를 저장합니다. 그런 다음 학생 보기 iframe에 전달된
attachmentId에서 교사 사용자 인증 정보를 가져옵니다.
이 예에서는 학생이 활동 첨부파일을 완료할 때 성적을 설정하기 때문에 마지막 옵션을 보여줍니다.
데이터베이스의 Attachment 테이블에 교사 ID 필드를 추가합니다.
Python
제공된 예시에서는 webapp/models.py 파일에 있습니다.
# Database model to represent an attachment.
class Attachment(db.Model):
    # The attachmentId is the unique identifier for the attachment.
    attachment_id = db.Column(db.String(120), primary_key=True)

    # The image filename to store.
    image_filename = db.Column(db.String(120))

    # The image caption to store.
    image_caption = db.Column(db.String(120))

    # The maximum number of points for this activity.
    max_points = db.Column(db.Integer)

    # The ID of the teacher that created the attachment.
    teacher_id = db.Column(db.String(120))
그런 다음 Attachment 레코드를 만들거나 업데이트하는 코드를 업데이트하여 크리에이터의 ID도 저장합니다.
Python
제공된 예에서는 webapp/attachment_routes.py 파일의 create_attachments 메서드에 있습니다.
# Store the attachment by id.
new_attachment = Attachment(
    # The new attachment's unique ID, returned in the CREATE response.
    attachment_id=resp.get("id"),
    image_filename=key,
    image_caption=value,
    max_points=int(resp.get("maxPoints")),
    teacher_id=flask.session["login_hint"])
db.session.add(new_attachment)
db.session.commit()
교사의 사용자 인증 정보 검색
학생 보기 iframe을 제공하는 경로를 찾습니다. 로컬 데이터베이스에 학생의 응답을 저장한 직후 로컬 저장소에서 교사의 사용자 인증 정보를 가져옵니다. 이전 두 단계에서 준비한 내용을 고려하면 간단합니다. 이를 사용하여 교사 사용자를 위한 클래스룸 서비스의 새 인스턴스를 구성할 수도 있습니다.
Python
제공된 예에서는 webapp/attachment_routes.py 파일의 load_activity_attachment 메서드에 있습니다.
# Create an instance of the Classroom service using the tokens for the
# teacher that created the attachment.

# We're assuming that there are already credentials in the session, which
# should be true given that we are adding this within the Student View
# route; we must have had valid credentials for the student to reach this
# point. The student credentials will be valid to construct a Classroom
# service for another user except for the tokens.
if not flask.session.get("credentials"):
    raise ValueError(
        "No credentials found in session for the requested user.")

# Make a copy of the student credentials so we don't modify the original.
teacher_credentials_dict = deepcopy(flask.session.get("credentials"))

# Retrieve the requested user's stored record.
teacher_record = User.query.get(attachment.teacher_id)

# Apply the user's tokens to the copied credentials.
teacher_credentials_dict["refresh_token"] = teacher_record.refresh_token
teacher_credentials_dict["token"] = teacher_record.access_token

# Construct a temporary credentials object.
teacher_credentials = google.oauth2.credentials.Credentials(
    **teacher_credentials_dict)

# Refresh the credentials if necessary; we don't know when this teacher last
# made a call.
if teacher_credentials.expired:
    teacher_credentials.refresh(Request())

# Request the Classroom service for the specified user.
teacher_classroom_service = googleapiclient.discovery.build(
    serviceName=CLASSROOM_API_SERVICE_NAME,
    version=CLASSROOM_API_VERSION,
    credentials=teacher_credentials)
제출물의 성적 설정
여기에서 진행하는 절차는 로그인한 교사의 사용자 인증 정보 사용과 동일합니다. 단, 이전 단계에서 가져온 교사 사용자 인증 정보로 호출해야 합니다.
Python
# Issue a PATCH request as the teacher to set the grade numerator for this
# attachment.
patch_grade_response = teacher_classroom_service.courses().courseWork(
).addOnAttachments().studentSubmissions().patch(
    courseId=flask.session["courseId"],
    itemId=flask.session["itemId"],
    attachmentId=flask.session["attachmentId"],
    submissionId=flask.session["submissionId"],
    # updateMask is a list of fields being modified.
    updateMask="pointsEarned",
    body=add_on_attachment_student_submission).execute()
부가기능 테스트
이전 워크플로와 마찬가지로 교사로서 활동 유형 첨부파일이 있는 과제를 만들고 학생으로서 답변을 제출한 다음 학생 과제 검토 iframe에서 제출물을 엽니다. 구현 접근 방식에 따라 성적이 다른 시점에 표시되는 것을 볼 수 있습니다.
- 학생이 활동을 완료했을 때 성적을 전달하도록 선택한 경우 학생 과제 검토 iframe을 열기 전에 UI에 이미 초안 성적이 표시되어야 합니다. 과제를 열 때 학생 목록과 학생 과제 검토 iframe 옆의 '성적' 체크박스에서도 확인할 수 있습니다.
- 교사가 학생 과제 검토 iframe을 열 때 성적을 전달하도록 선택한 경우 iframe이 로드된 직후 '성적' 상자에 성적이 표시됩니다. 위에서 언급한 대로 최대 30초가 걸릴 수 있습니다. 그러면 해당 학생의 성적이 다른 클래스룸 성적 기록 뷰에도 표시됩니다.
학생에게 올바른 점수가 표시되는지 확인합니다.
축하합니다. 이제 다음 단계인 Google 클래스룸 외부에서 첨부파일 만들기를 진행할 수 있습니다.