
これは、Classroom アドオンのチュートリアル シリーズの4 つ目のチュートリアルです。
このチュートリアルでは、Google Classroom API を使用して添付ファイルを作成します。ユーザーが添付ファイルの内容を表示するためのルートを指定します。表示は、クラスでのユーザーの役割によって異なります。このチュートリアルでは、生徒からの提出を必要としないコンテンツ タイプの添付ファイルについて説明します。
このチュートリアルでは、次の作業を行います。
- 次のアドオン クエリ パラメータを取得して使用します。
addOnToken: アタッチメント検出ビューに渡される認証トークン。itemId: アドオン アタッチメントを受信する CourseWork、CourseWorkMaterial、またはお知らせの一意の識別子。itemType: 「courseWork」、「courseWorkMaterials」、「announcement」のいずれか。courseId: 課題が作成されている Google Classroom コースの一意の識別子。attachmentId: 作成後に Google Classroom によってアドオン アタッチメントに割り当てられる一意の識別子。
- コンテンツ タイプのアタッチメント用の永続ストレージを実装する。
- 添付ファイルを作成し、教師ビューと生徒ビューの iframe を提供するルートを指定します。
- Google Classroom アドオン API に次のリクエストを発行します。
- 新しい添付ファイルを作成します。
- ログインしたユーザーが生徒か教師かを識別するアドオン コンテキストを取得します。
作成が完了したら、教師としてログインして Google Classroom の UI から、課題にコンテンツ タイプの添付ファイルを作成できます。クラスの教師と生徒もコンテンツを表示できます。
Classroom API を有効にする
このステップから、Classroom API を呼び出します。API を呼び出すには、Google Cloud プロジェクトで API を有効にする必要があります。Google Classroom API のライブラリ エントリに移動し、[有効にする] を選択します。
アタッチメント検出ビューのクエリ パラメータを処理する
前述のとおり、Google Classroom は iframe に添付ファイル検索ビューを読み込むときにクエリ パラメータを渡します。
courseId: 現在の Classroom コースの ID。itemId: アドオン アタッチメントを受信する CourseWork、CourseWorkMaterial、またはお知らせの一意の識別子。itemType: 「courseWork」、「courseWorkMaterials」、「announcement」のいずれか。addOnToken: 特定の Classroom アドオン アクションを承認するために使用されるトークン。login_hint: 現在のユーザーの Google ID。
このチュートリアルでは、courseId、itemId、itemType、addOnToken について説明します。これらの値を保持し、Classroom API を呼び出すときに渡します。
前のチュートリアルの手順と同様に、渡されたクエリ パラメータ値をセッションに保存します。添付ファイル検索ビューが初めて開かれたときにこの操作を行うことが重要です。これは、Classroom がこれらのクエリ パラメータを渡す唯一の機会です。
Python
アタッチメント検出ビューのルートを提供する Flask サーバー ファイルに移動します(提供されている例を使用する場合は attachment-discovery-routes.py)。アドオンのランディング ルートの上部(提供されている例では /classroom-addon)で、courseId、itemId、itemType、addOnToken のクエリ パラメータを取得して保存します。
# Retrieve the itemId, courseId, and addOnToken query parameters.
if flask.request.args.get("itemId"):
    flask.session["itemId"] = flask.request.args.get("itemId")
if flask.request.args.get("itemType"):
    flask.session["itemType"] = flask.request.args.get("itemType")
if flask.request.args.get("courseId"):
    flask.session["courseId"] = flask.request.args.get("courseId")
if flask.request.args.get("addOnToken"):
    flask.session["addOnToken"] = flask.request.args.get("addOnToken")
これらの値は、存在する場合にのみセッションに書き込みます。ユーザーが iframe を閉じずに後でアタッチメント検出ビューに戻った場合、これらの値は再度渡されません。
コンテンツ タイプのアタッチメントの永続ストレージを追加
作成されたアタッチメントのローカル レコードが必要です。これにより、Classroom から提供された ID を使用して、教師が選択したコンテンツを検索できます。
Attachment のデータベース スキーマを設定します。提供されている例では、画像とキャプションを示すアタッチメントを示しています。Attachment には次の属性が含まれます。
attachment_id: アタッチメントの一意の識別子。Classroom によって割り当てられ、添付ファイルを作成するときにレスポンスで返されます。image_filename: 表示する画像のローカル ファイル名。image_caption: 画像とともに表示するキャプション。
Python
前の手順の SQLite と flask_sqlalchemy の実装を拡張します。
User テーブルを定義したファイル(提供されている例の場合は models.py)に移動します。ファイルの末尾の User クラスの下に、次のコードを追加します。
class Attachment(db.Model):
    # The attachmentId is the unique identifier for the attachment.
    attachment_id = db.Column(db.String(120), primary_key=True)

    # The image filename to store.
    image_filename = db.Column(db.String(120))

    # The image caption to store.
    image_caption = db.Column(db.String(120))
新しい Attachment クラスを、アタッチメント処理ルートを含むサーバー ファイルにインポートします。
新しいルートを設定する
このチュートリアルのステップでは、まずアプリに新しいページを設定します。ユーザーはアドオンを使用してコンテンツを作成、表示できます。
添付ファイル作成ルートを追加
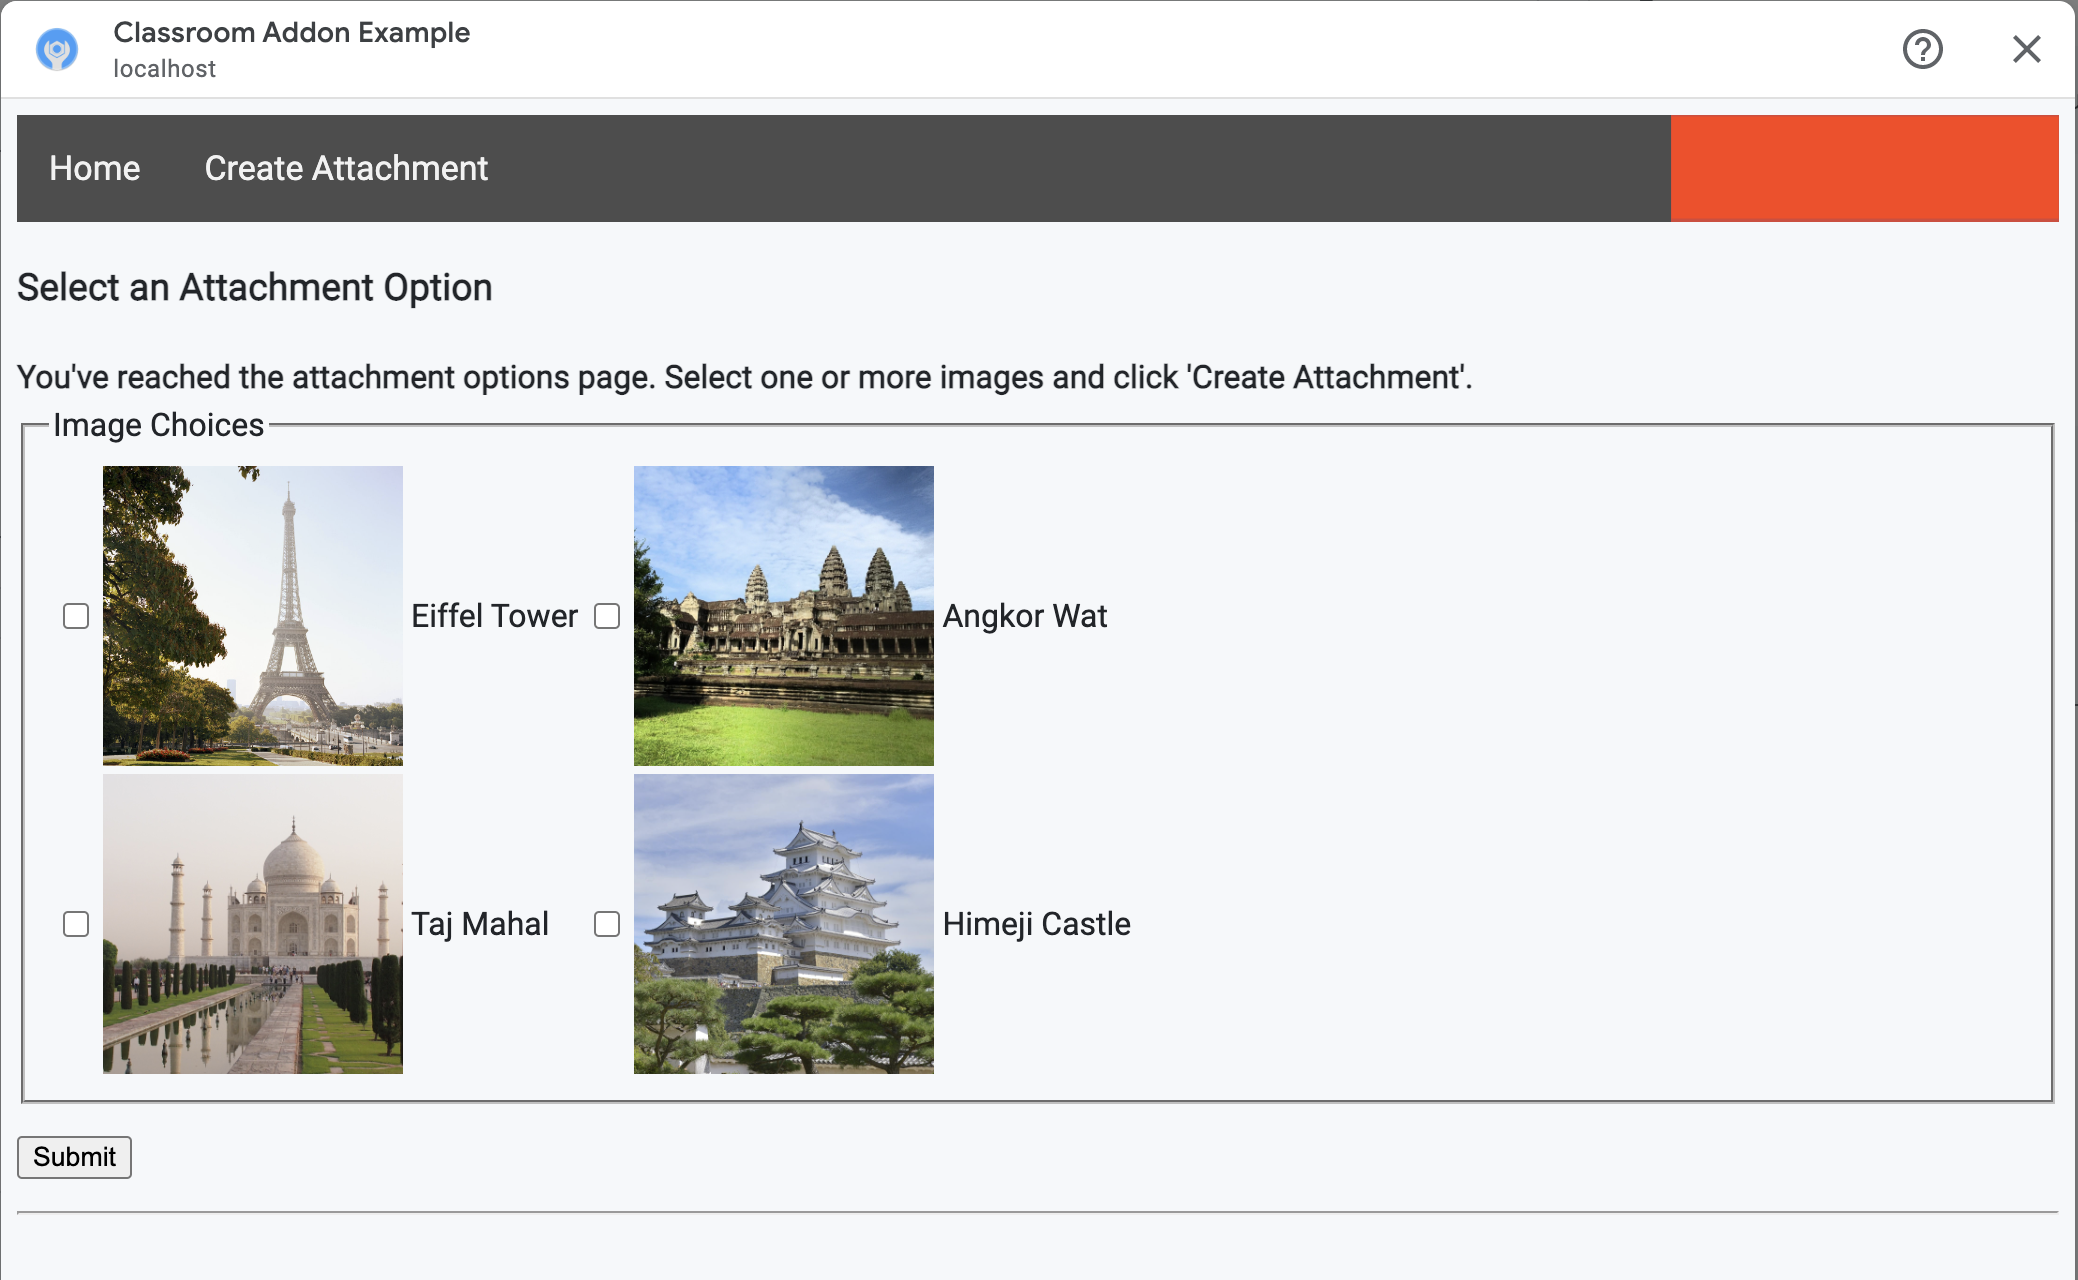
教師がコンテンツを選択し、添付ファイルの作成リクエストを発行するためのページが必要です。/attachment-options ルートを実装して、教師が選択できるコンテンツ オプションを表示します。また、コンテンツの選択と作成の確認ページのテンプレートも必要です。提供されているサンプルには、これらのテンプレートが含まれています。また、Classroom API からのリクエストとレスポンスを表示することもできます。
新しい /attachment-options ページを作成する代わりに、既存の添付ファイル検出ビューのランディング ページを変更してコンテンツ オプションを表示することもできます。この演習では、2 つ目のチュートリアルの手順で実装した SSO の動作(アプリの権限の取り消しなど)を保持できるように、新しいページを作成することをおすすめします。これらは、アドオンの作成とテストに役立ちます。
教師は、提供されているサンプルの字幕付き画像からいくつか選択できます。有名なランドマークの画像が 4 枚用意されており、キャプションはファイル名から取得されます。
Python
提供されている例では、webapp/attachment_routes.py ファイルにあります。
@app.route("/attachment-options", methods=["GET", "POST"])
def attachment_options():
    """
    Render the attachment options page from the "attachment-options.html"
    template.

    This page displays a grid of images that the user can select using
    checkboxes.
    """

    # A list of the filenames in the static/images directory.
    image_filenames = os.listdir(os.path.join(app.static_folder, "images"))

    # The image_list_form_builder method creates a form that displays a grid
    # of images, checkboxes, and captions with a Submit button. All images
    # passed in image_filenames will be shown, and the captions will be the
    # title-cased filenames.

    # The form must be built dynamically due to limitations in WTForms. The
    # image_list_form_builder method therefore also returns a list of
    # attribute names in the form, which will be used by the HTML template
    # to properly render the form.
    form, var_names = image_list_form_builder(image_filenames)

    # If the form was submitted, validate the input and create the attachments.
    if form.validate_on_submit():

        # Build a dictionary that maps image filenames to captions.
        # There will be one dictionary entry per selected item in the form.
        filename_caption_pairs = construct_filename_caption_dictionary_list(
            form)

        # Check that the user selected at least one image, then proceed to
        # make requests to the Classroom API.
        if len(filename_caption_pairs) > 0:
            return create_attachments(filename_caption_pairs)
        else:
            return flask.render_template(
                "create-attachment.html",
                message="You didn't select any images.",
                form=form,
                var_names=var_names)

    return flask.render_template(
        "attachment-options.html",
        message=("You've reached the attachment options page. "
                "Select one or more images and click 'Create Attachment'."),
        form=form,
        var_names=var_names,
    )
これにより、次のような [添付ファイルを作成] ページが表示されます。
教師は複数の画像を選択できます。教師が create_attachments メソッドで選択した画像ごとに 1 つのアタッチメントを作成します。
添付ファイルの作成リクエストを発行する
教師が添付するコンテンツがわかったので、Classroom API にリクエストを送信して、課題に添付ファイルを作成します。Classroom API からレスポンスを受け取ったら、添付ファイルの詳細をデータベースに保存します。
まず、Classroom サービスのインスタンスを取得します。
Python
提供されている例では、webapp/attachment_routes.py ファイルにあります。
def create_attachments(filename_caption_pairs):
    """
    Create attachments and show an acknowledgement page.

    Args:
        filename_caption_pairs: A dictionary that maps image filenames to
            captions.
    """
    # Get the Google Classroom service.
    classroom_service = googleapiclient.discovery.build(
        serviceName="classroom",
        version="v1",
        credentials=credentials)
courses.courseWork.addOnAttachments エンドポイントに CREATE リクエストを発行します。教師が選択した画像ごとに、まず AddOnAttachment オブジェクトを作成します。
Python
提供されている例では、これは create_attachments メソッドの続きです。
# Create a new attachment for each image that was selected.
attachment_count = 0
for key, value in filename_caption_pairs.items():
    attachment_count += 1

    # Create a dictionary with values for the AddOnAttachment object fields.
    attachment = {
        # Specifies the route for a teacher user.
        "teacherViewUri": {
            "uri":
                flask.url_for(
                    "load_content_attachment", _scheme='https', _external=True),
        },
        # Specifies the route for a student user.
        "studentViewUri": {
            "uri":
                flask.url_for(
                    "load_content_attachment", _scheme='https', _external=True)
        },
        # The title of the attachment.
        "title": f"Attachment {attachment_count}",
    }
アタッチメントごとに、少なくとも teacherViewUri、studentViewUri、title のフィールドを指定する必要があります。teacherViewUri と studentViewUri は、それぞれのユーザータイプが添付ファイルを開いたときに読み込まれる URL を表します。
リクエストの本文にある AddOnAttachment オブジェクトを、適切な addOnAttachments エンドポイントに送信します。各リクエストで courseId、itemId、itemType、addOnToken の識別子を指定します。
Python
提供されている例では、これは create_attachments メソッドの続きです。
# Use the itemType to determine which stream item type the teacher created
match flask.session["itemType"]:
    case "announcements":
        parent = classroom_service.courses().announcements()
    case "courseWorkMaterials":
        parent = classroom_service.courses().courseWorkMaterials()
    case _:
        parent = classroom_service.courses().courseWork()

# Issue a request to create the attachment.
resp = parent.addOnAttachments().create(
    courseId=flask.session["courseId"],
    itemId=flask.session["itemId"],
    addOnToken=flask.session["addOnToken"],
    body=attachment).execute()
後で正しいコンテンツを読み込めるように、ローカル データベースにこの添付ファイルのエントリを作成します。Classroom は、作成リクエストのレスポンスに一意の id 値を返します。この値をデータベースの主キーとして使用します。また、Classroom は、教師ビューと生徒ビューを開くときに attachmentId クエリ パラメータを渡します。
Python
提供されている例では、これは create_attachments メソッドの続きです。
# Store the value by id.
new_attachment = Attachment(
    # The new attachment's unique ID, returned in the CREATE response.
    attachment_id=resp.get("id"),
    image_filename=key,
    image_caption=value)
db.session.add(new_attachment)
db.session.commit()
この時点で、添付ファイルが正常に作成されたことを確認する確認ページにユーザーを転送することを検討してください。
アドオンからの添付ファイルを許可する
この機会に、Google Workspace Marketplace SDK の [アプリの設定] ページの [許可された添付ファイルの URI 接頭辞] フィールドに適切なアドレスを追加します。アドオンで作成できる添付ファイルは、このページに記載されている URI 接頭辞のいずれかからのみ作成できます。これは、中間者攻撃の可能性を低減するためのセキュリティ対策です。
最も簡単な方法は、このフィールドにトップレベル ドメイン(https://example.com など)を指定することです。ローカルマシンをウェブサーバーとして使用している場合は、https://localhost:<your port number>/ が機能します。
教師ビューと生徒ビューのルートを追加する
Google Classroom アドオンが読み込まれる可能性がある iframe は 4 つあります。ここまでは、アタッチメント検出ビューの iframe を提供するルートのみを作成しました。次に、教師ビューと生徒ビューの iframe も提供するルートを追加します。
生徒向けの表示のプレビューを表示するには、教師用ビューの iframe が必要ですが、必要に応じて追加情報や編集機能を含めることができます。
[生徒ビュー] は、生徒がアドオンの添付ファイルを開いたときに表示されるページです。
この演習では、教師ビューと生徒ビューの両方にサービスを提供する単一の /load-content-attachment ルートを作成します。Classroom API メソッドを使用して、ページの読み込み時にユーザーが教師か生徒かを判断します。
Python
提供されている例では、webapp/attachment_routes.py ファイルにあります。
@app.route("/load-content-attachment")
def load_content_attachment():
    """
    Load the attachment for the user's role."""

    # Since this is a landing page for the Teacher and Student View iframes, we
    # need to preserve the incoming query parameters.
    if flask.request.args.get("itemId"):
        flask.session["itemId"] = flask.request.args.get("itemId")
    if flask.request.args.get("itemType"):
        flask.session["itemType"] = flask.request.args.get("itemType")
    if flask.request.args.get("courseId"):
        flask.session["courseId"] = flask.request.args.get("courseId")
    if flask.request.args.get("attachmentId"):
        flask.session["attachmentId"] = flask.request.args.get("attachmentId")
この時点でユーザーの認証も行う必要があります。また、ここで login_hint クエリ パラメータを処理し、必要に応じてユーザーを認可フローに転送する必要があります。このフローについて詳しくは、前回のチュートリアルで説明したログイン ガイダンスの詳細をご覧ください。
次に、アイテムの種類に一致する getAddOnContext エンドポイントにリクエストを送信します。
Python
提供されている例では、これは load_content_attachment メソッドの続きです。
# Create an instance of the Classroom service.
classroom_service = googleapiclient.discovery.build(
    serviceName="classroom"
    version="v1",
    credentials=credentials)

# Use the itemType to determine which stream item type the teacher created
match flask.session["itemType"]:
    case "announcements":
        parent = classroom_service.courses().announcements()
    case "courseWorkMaterials":
        parent = classroom_service.courses().courseWorkMaterials()
    case _:
        parent = classroom_service.courses().courseWork()

addon_context_response = parent.getAddOnContext(
    courseId=flask.session["courseId"],
    itemId=flask.session["itemId"]).execute()
このメソッドは、クラス内の現在のユーザーのロールに関する情報を返します。ユーザーのロールに応じて、ユーザーに表示されるビューを変更します。レスポンス オブジェクトには、studentContext フィールドまたは teacherContext フィールドのいずれか 1 つが格納されます。これらの情報を確認して、お客様に対応する方法を判断します。
いずれの場合も、attachmentId クエリ パラメータ値を使用して、データベースから取得するアタッチメントを特定します。このクエリ パラメータは、教師ビューまたは生徒ビューの URI を開くときに指定します。
Python
提供されている例では、これは load_content_attachment メソッドの続きです。
# Determine which view we are in by testing the returned context type.
user_context = "student" if addon_context_response.get(
    "studentContext") else "teacher"

# Look up the attachment in the database.
attachment = Attachment.query.get(flask.session["attachmentId"])

# Set the text for the next page depending on the user's role.
message_str = f"I see that you're a {user_context}! "
message_str += (
    f"I've loaded the attachment with ID {attachment.attachment_id}. "
    if user_context == "teacher" else
    "Please enjoy this image of a famous landmark!")

# Show the content with the customized message text.
return flask.render_template(
    "show-content-attachment.html",
    message=message_str,
    image_filename=attachment.image_filename,
    image_caption=attachment.image_caption,
    responses=response_strings)
アドオンをテストする
添付ファイルの作成をテストする手順は次のとおりです。
- 教師のテストユーザーとして [Google Classroom] にログインします。
- [授業] タブに移動し、新しい [課題] を作成します。
- テキスト ボックスの下にある [アドオン] ボタンをクリックし、アドオンを選択します。iframe が開き、Google Workspace Marketplace SDK の [アプリの設定] ページで指定したアタッチメント設定 URI がアドオンによって読み込まれます。
- 課題に添付するコンテンツを選択します。
- アタッチメント作成フローが完了したら、iframe を閉じます。
Google Classroom の課題作成 UI に添付カードが表示されます。カードをクリックして教師ビューの iframe を開き、正しい添付ファイルが表示されていることを確認します。[割り当て] ボタンをクリックします。
生徒の操作性をテストする手順は次のとおりです。
- 次に、教師のテストユーザーと同じクラスの生徒のテストユーザーとして Classroom にログインします。
- [授業] タブでテスト課題を見つけます。
- 課題を開き、添付ファイルカードをクリックして生徒ビューの iframe を開きます。
生徒に正しい添付ファイルが表示されていることを確認します。
これで、これで、次のステップであるアクティビティ タイプのアタッチメントの作成に進むことができます。