1. Overview

This codelab outlines how to build a Custom Web Receiver app that uses the Cast Ad Breaks API.
What is Google Cast?
Google Cast allows users to cast content from a mobile device to a TV. Users can then use their mobile device as a remote control for media playback on the TV.
The Google Cast SDK lets you extend your app to control a TV or sound system. The Cast SDK lets you add the necessary UI components based on the Google Cast Design Checklist.
The Google Cast Design Checklist is provided to standardize Cast implementations to make user's experiences intuitive across all supported platforms.
What are we going to be building?
When you have completed this codelab, you will have built a Cast Receiver that takes advantage of the Break API.
What you'll learn
- How to include VMAP and VAST breaks in content for Cast
- How to skip break clips
- How to customize default break behavior on seek
What you'll need
- The latest Google Chrome browser.
- HTTPS hosting service such as Firebase Hosting or ngrok.
- A Google Cast device such as a Chromecast or Android TV configured with internet access.
- A TV or monitor with HDMI input, or a Google Home Hub
Experience
Ensure you have the following experience before continuing through this codelab.
- General Web development knowledge.
- Building Cast Web Receiver applications.
How will you use this tutorial?
How would you rate your experience with building web apps?
2. Get the sample code
Download all the sample code to your computer...
and unpack the downloaded zip file.
3. Deploy the receiver locally
To be able to use your web receiver with a Cast device, it needs to be hosted somewhere where your Cast device can reach it. Should you already have a server available to you that supports https, skip the following instructions and make note of the URL, as you'll need it in the next section.
If you don't have a server available to use, you can use Firebase Hosting or ngrok.
Run the server
Once you have the service of your choice set up, navigate to app-start and start your server.
Make note of the URL for your hosted receiver. You will be using it in the next section.
4. Register an application in the Cast Developer Console
You must register your application to be able to run a custom receiver, as built-in this codelab, on Chromecast devices. After you've registered your application, an application ID will be generated that the Sender Application must be configured to launch the Web Receiver application.
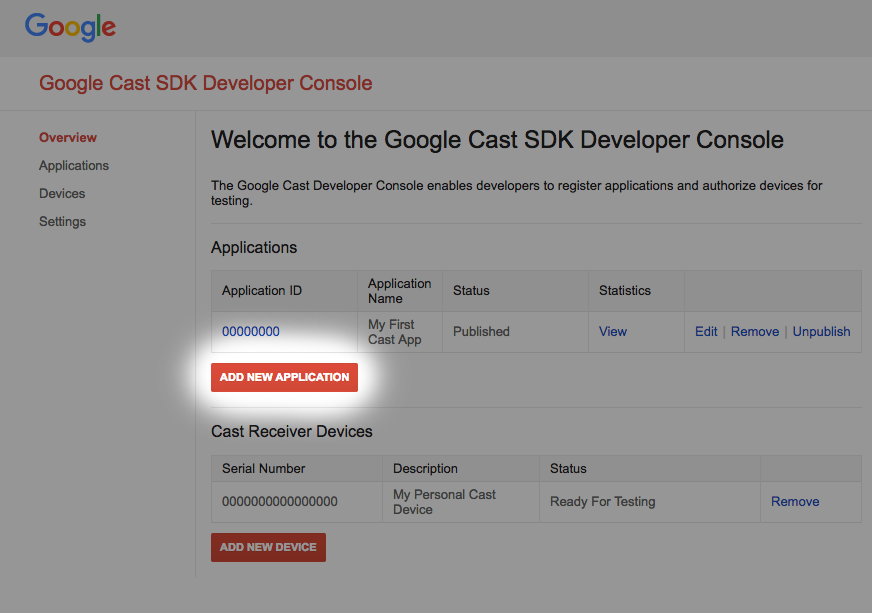
Click "Add new application"
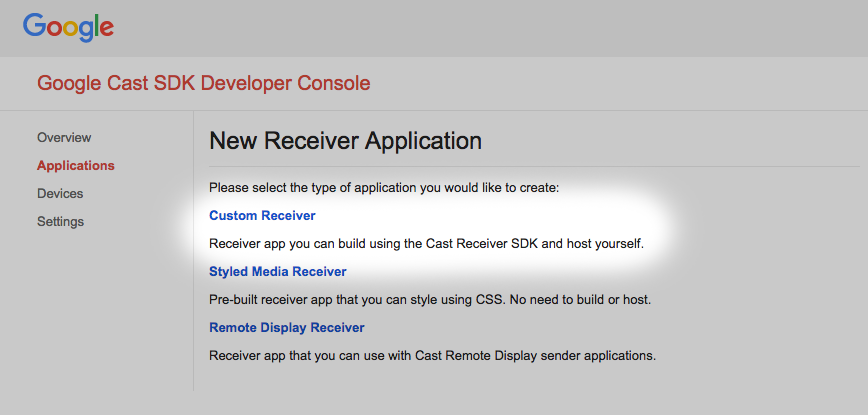
Select "Custom Receiver", this is what we're building.
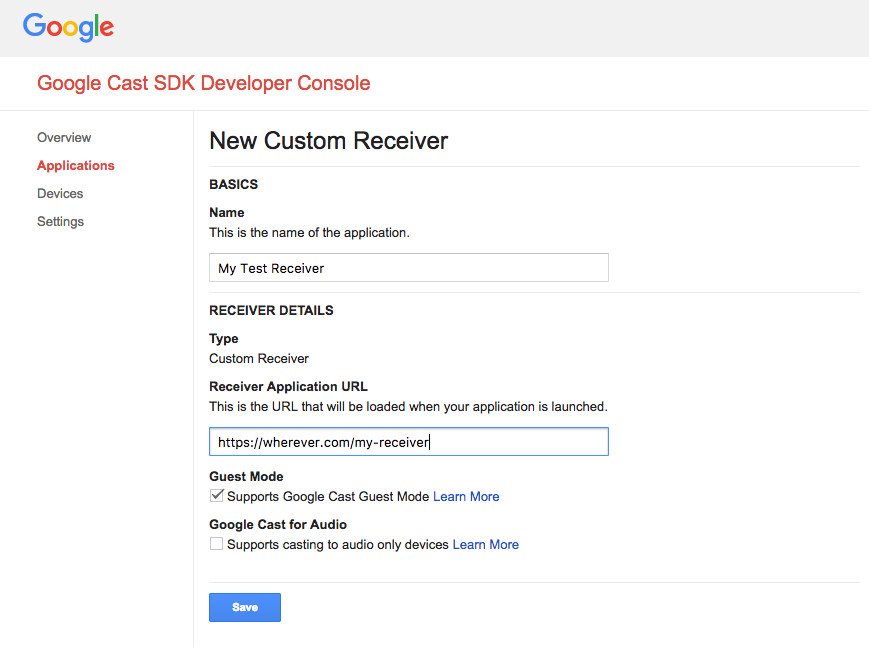
Enter the details of your new receiver. Be sure to use the URL pointing to where you are planning on hosting your Web Receiver application. Make a note of the Application ID generated by the console once you register the application. The sender application will be configured to use that identifier in a later section.
You must also register a Google Cast device so that it may access your receiver application before you publish it. Once you publish your receiver application, it will be available to all Google Cast devices. For the purposes of this codelab it's advised to work with an unpublished receiver application.
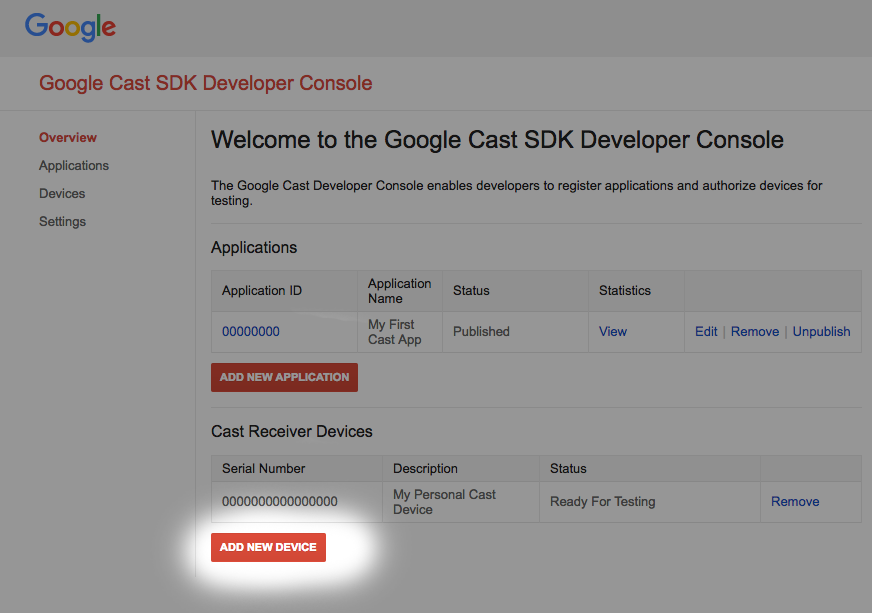
Click "Add new Device"
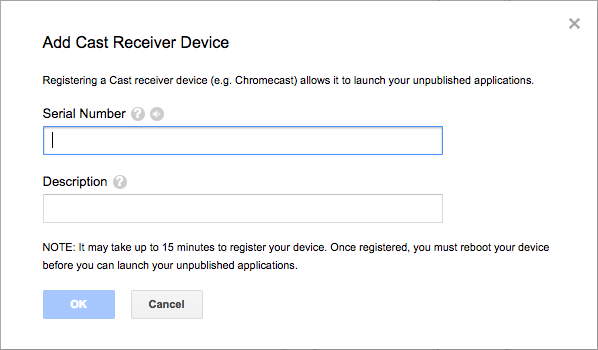
Enter the serial number printed on the back of your Cast device and give it a descriptive name. You can also find your serial number by casting your screen in Chrome when accessing Google Cast SDK Developer Console
It takes 5-15 minutes for your receiver and device to be ready for testing. After waiting 5-15 minutes you must reboot your Cast device.
5. Prepare the Start Project
Before starting this codelab, it may be helpful to review the ads developer guide which provides an overview of the ad break APIs.
Support for Google Cast needs to be added to the start app you downloaded. Here is some Google Cast terminology that is used in this codelab:
- a sender app runs on a mobile device or laptop,
- a receiver app runs on the Google Cast device.
Now you're ready to build on top of the starter project using your favorite text editor:
- Select the

app-startdirectory from your sample code download. - Open up
js/receiver.jsand index.html
Note, as you're working through this codelab, the web hosting solution you have chosen should be updated with the changes made. Ensure that you are pushing the changes to the host site when continuing to validate and test them.
App Design
As mentioned, the codelab utilizes a sender application to initiate a Cast Session, and a receiver application which will be modified to use the ad break APIs.
In this codelab, the Cast and Command Tool will act as the Web Sender to launch the receiver app. To begin, open the tool in a Chrome browser. Enter the Receiver App ID you were given on the Cast SDK Developer Console and click Set to configure the sender app for testing.
Note: If you find that the cast icon does not appear, ensure that the Web Receiver and cast device(s) are registered properly in the Cast Developer Console. If you haven't already done so, power cycle any cast devices that have just been registered.
The receiver app is the main focus of this codelab and consists of one main view defined in index.html and one JavaScript file called js/receiver.js. These are further described below.
index.html
This html file contains the UI for our receiver app provided by the cast-media-player element. It also loads the CAF SDK and Cast Debug Logger libraries.
receiver.js
This script manages all of the logic for our receiver app. Right now it contains a basic CAF receiver to initialize the cast context and load a video asset upon initialization. Some debug logger capabilities have also been added to provide logging back to the Cast and Command tool.
6. Add VMAP to Your Content
The Cast Web Receiver SDK provides support for ads specified through Digital Video Multiple Ad Playlists, also known as VMAP. The XML structure specifies a media's ad breaks and its associated break clip metadata. To insert these ads, the SDK provides the vmapAdsRequest property in the MediaInformation object.
In the js/receiver.js file, create a VastAdsRequest object. Locate the LOAD request interceptor function and replace it with the following code below. It contains a sample VMAP tag URL from DoubleClick and provides a random correlator value to ensure that subsequent requests to the same URL generate an XML template with ad breaks that haven't been watched yet.
playerManager.setMessageInterceptor(
    cast.framework.messages.MessageType.LOAD, (loadRequestData) => {
      castDebugLogger.info('MyAPP.LOG', 'Intercepting LOAD request');

      // Create the VMAP Ads request data and append it to the MediaInformation.
      const vmapUrl =
          'https://pubads.g.doubleclick.net/gampad/ads?sz=640x480&iu=/124319096/external/ad_rule_samples&ciu_szs=300x250&ad_rule=1&impl=s&gdfp_req=1&env=vp&output=vmap&unviewed_position_start=1&cust_params=deployment%3Ddevsite%26sample_ar%3Dpremidpost&cmsid=496&vid=short_onecue&correlator=' +
          Math.floor(Math.random() * Math.pow(10, 10));
      let vmapRequest = new cast.framework.messages.VastAdsRequest();
      vmapRequest.adTagUrl = vmapUrl;
      loadRequestData.media.vmapAdsRequest = vmapRequest;

      castDebugLogger.warn(
          'MyAPP.LOG', 'Playable URL: ' + loadRequestData.media.contentId);

      return loadRequestData;
    });
Save your changes to js/receiver.js and upload the file to your web server. Initiate a Cast session on the Cast and Command Tool by clicking on the Cast icon. The VMAP ads should play, followed by the main content.
7. Add VAST to Your Content
As mentioned before, there is support for many types of ads in the Web Receiver SDK. This section highlights the APIs available to integrate Digital Video Ad Serving Template ads also known as VAST. If you have implemented the VMAP code from the previous section, comment it out.
Copy the following into your js/receiver.js file after the load request interceptor. It contains six VAST break clips from DoubleClick and a random correlator value. These break clips are assigned to 5 breaks. Each break's position is set to a time in seconds relative to the main content, including pre-roll (position set to 0) and post-roll (position set to -1) breaks.
const addVASTBreaksToMedia = (mediaInformation) => {
  mediaInformation.breakClips = [
    {
      id: 'bc1',
      title: 'bc1 (Pre-roll)',
      vastAdsRequest: {
        adTagUrl: generateVastUrl('preroll')
      }
    },
    {
      id: 'bc2',
      title: 'bc2 (Mid-roll)',
      vastAdsRequest: {
        adTagUrl: generateVastUrl('midroll')
      }
    },
    {
      id: 'bc3',
      title: 'bc3 (Mid-roll)',
      vastAdsRequest: {
        adTagUrl: generateVastUrl('midroll')
      }
    },
    {
      id: 'bc4',
      title: 'bc4 (Mid-roll)',
      vastAdsRequest: {
        adTagUrl: generateVastUrl('midroll')
      }
    },
    {
      id: 'bc5',
      title: 'bc5 (Mid-roll)',
      vastAdsRequest: {
        adTagUrl: generateVastUrl('midroll')
      }
    },
    {
      id: 'bc6',
      title: 'bc6 (Post-roll)',
      vastAdsRequest: {
        adTagUrl: generateVastUrl('postroll')
      }
    }
  ];

  mediaInformation.breaks = [
    {id: 'b1', breakClipIds: ['bc1'], position: 0},
    {id: 'b2', breakClipIds: ['bc2'], position: 15},
    {id: 'b3', breakClipIds: ['bc3', 'bc4'], position: 60},
    {id: 'b4', breakClipIds: ['bc5'], position: 100},
    {id: 'b5', breakClipIds: ['bc6'], position: -1}
  ];
};
Note: The breakClipIds property of a break is an array which means that multiple break clips can be assigned to each break.
In your js/receiver.js file, locate the LOAD message interceptor and replace it with the following code. Note that the VMAP work is commented out to showcase VAST type ads.
playerManager.setMessageInterceptor(
    cast.framework.messages.MessageType.LOAD, (loadRequestData) => {
      castDebugLogger.info('MyAPP.LOG', 'Intercepting LOAD request');

      // Create the VMAP Ads request data and append it to the MediaInformation.
      // const vmapUrl =
      //     'https://pubads.g.doubleclick.net/gampad/ads?sz=640x480&iu=/124319096/external/ad_rule_samples&ciu_szs=300x250&ad_rule=1&impl=s&gdfp_req=1&env=vp&output=vmap&unviewed_position_start=1&cust_params=deployment%3Ddevsite%26sample_ar%3Dpremidpost&cmsid=496&vid=short_onecue&correlator=' +
      //     Math.floor(Math.random() * Math.pow(10, 10));
      // let vmapRequest = new cast.framework.messages.VastAdsRequest();
      // vmapRequest.adTagUrl = vmapUrl;
      // loadRequestData.media.vmapAdsRequest = vmapRequest;

      // Append VAST ad breaks to the MediaInformation.
      addVASTBreaksToMedia(loadRequestData.media);

      castDebugLogger.warn(
          'MyAPP.LOG', 'Playable URL: ' + loadRequestData.media.contentId);

      return loadRequestData;
    });
Save your changes to js/receiver.js and upload the file to your web server. Initiate a Cast session on the Cast and Command Tool by clicking on the Cast icon. The VAST ads should play, followed by the main content.
8. Ad Break Skipping
CAF has a class called BreakManager which assists you with implementing custom business rules for ad behaviors. One of these features allows applications to programmatically skip breaks and break clips based on some condition. This example shows how to skip an ad break whose position is within the first 30 seconds of the content, but not the post-roll breaks. When using the VAST ads configured in the previous section, there are 5 breaks defined: 1 pre-roll break, 3 mid-roll breaks (at 15, 60, and 100 seconds), and finally, one post-roll break. After completing the steps, only the pre-roll and mid-roll whose position is at 15 seconds are skipped.
To do so, the application should call APIs available through BreakManager to set an interceptor for break loading. Copy the following line into your js/receiver.js file, after the lines containing the context and playerManager variables to get a reference to the instance.
const breakManager = playerManager.getBreakManager();
The application should set up an interceptor with a rule to ignore any ad breaks that occur before 30 seconds while keeping in mind any post-roll breaks (as their position values are -1). This interceptor works like the LOAD interceptor on PlayerManager, except this one is specific to loading break clips. Set this after the LOAD request interceptor, and before the addVASTBreaksToMedia function declaration.
Copy the following into the js/receiver.js file.
breakManager.setBreakClipLoadInterceptor((breakClip, breakContext) => {
  /**
   * The code will skip playback of break clips if the break position is within
   * the first 30 seconds.
   */
  let breakObj = breakContext.break;
  if (breakObj.position >= 0 && breakObj.position < 30) {
    castDebugLogger.debug(
        'MyAPP.LOG',
        'Break Clip Load Interceptor skipping break with ID: ' + breakObj.id);
    return null;
  } else {
    return breakClip;
  }
});
Note: Returning null here skips the BreakClip being processed. If a Break doesn't have any break clips defined, the break itself is skipped.
Save your changes to js/receiver.js and upload the file to your web server. Initiate a Cast session on the Cast and Command Tool by clicking on the Cast icon. The VAST ads should be processed. Note that the pre-roll and first mid-roll (whose position is 15 seconds) ads are not played.
9. Customize Break Seek Behavior
When seeking past breaks, the default implementation obtains all of the Break items whose position are between the seek operation's seekFrom and seekTo values. From this list of breaks, the SDK plays the Break whose position is closest to the seekTo value and whose isWatched property is set to false. That break's isWatched property is then set to true and the player commences playing its break clips. Once the break is watched, the main content resumes playback from the seekTo position. If no such break exists, then no break is played and the main content resumes playing at the seekTo position.
To customize which breaks play on a seek, the Cast SDK provides the setBreakSeekInterceptor API in BreakManager. When an application provides its custom logic through that API, the SDK calls it whenever a seek operation is performed over one or more breaks. The callback function is passed an object that contains all the breaks between the seekFrom position and the seekTo position. The application then needs to modify and return the BreakSeekData.
To show its usage, the sample below overrides the default behavior by taking all of the breaks that have been seeked over, and only playing the first one that appears in the timeline.
Copy the following into your js/receiver.js file under the definition to the setBreakClipLoadInterceptor.
breakManager.setBreakSeekInterceptor((breakSeekData) => {
  /**
   * The code will play an unwatched break between the seekFrom and seekTo
   * position. Note: If the position of a break is less than 30 then it will be
   * skipped due to the setBreakClipLoadInterceptor code.
   */
  castDebugLogger.debug(
      'MyAPP.LOG',
      'Break Seek Interceptor processing break ids ' +
          JSON.stringify(breakSeekData.breaks.map(adBreak => adBreak.id)));

  // Remove all other breaks except for the first one.
  breakSeekData.breaks.splice(1,breakSeekData.breaks.length);
  return breakSeekData;
});
Note: If the function does not return a value or if it returns null, no breaks are played.
Save your changes to js/receiver.js and upload the file to your web server. Initiate a Cast session on the Cast and Command Tool by clicking on the Cast icon. The VAST ads should be processed. Note that the pre-roll and first mid-roll (whose position is 15 seconds) ads are not played.
Wait for the playback time to reach 30 seconds to get past all of the breaks that are skipped by the break clip load interceptor. Once reached, dispatch a seek command by navigating to the Media Control tab. Populate the Seek Into Media input with 300 seconds, and click the TO button. Note the logs printed in the Break Seek Interceptor. The default behavior should now be overridden to play the break closer to the seekFrom time.
10. Congratulations
You now know how to add ads to your receiver application using the latest Cast Receiver SDK.
For more details, see the Ad Breaks Developer's Guide.