1. Overview

This codelab will teach you how to build a Custom Web Receiver app to play content on Cast-enabled devices.
What is Google Cast?
Google Cast allows users to cast content from a mobile device to a TV. Users can then use their mobile device or desktop Chrome Browser as a remote control for media playback on the TV.
The Google Cast SDK allows your app to control Google Cast enabled devices (for example, a TV or sound system). The Cast SDK provides you with the necessary UI components based on the Google Cast Design Checklist.
The Google Cast Design Checklist is provided to make the Cast user experience simple and predictable across all supported platforms. See more here.
What are we going to be building?
When you have completed this codelab, you will have a HTML5 app that acts as your very own custom receiver capable of displaying video content on Cast-enabled devices.
What you'll learn
- How to get set up for receiver development.
- The basics of a Cast-enabled receiver based on the Cast Application Framework.
- How to receive a casted video.
- How to integrate the Debug Logger.
- How to Optimize your receiver for smart displays.
What you'll need
- The latest Google Chrome browser.
- HTTPS hosting service such as Firebase Hosting or ngrok.
- A Google Cast device such as a Chromecast or Android TV configured with internet access.
- A TV or monitor with HDMI input.
Experience
- You will need to have previous web development knowledge.
- You will also need previous knowledge of watching TV :)
How will you use this tutorial?
How would you rate your experience with building web apps?
How would you rate your experience with watching TV?
2. Get the sample code
You can download all the sample code to your computer...
and unpack the downloaded zip file.
3. Deploying your receiver locally
To be able to use your web receiver with a Cast device, it needs to be hosted somewhere where your Cast device can reach it. Should you already have a server available to you that supports https, skip the following instructions and make note of the URL, as you'll need it in the next section.
If you don't have a server available to use, you can use Firebase Hosting or ngrok.
Run the server
Once you have the service of your choice set up, navigate to app-start and start your server.
Make note of the URL for your hosted receiver. You will be using it in the next section.
4. Register an application in the Cast Developer Console
You must register your application to be able to run a custom receiver, as built in this codelab, on Chromecast devices. After you've registered your application, you'll receive an application ID that your sender application must use to perform API calls, such as to launch a receiver application.
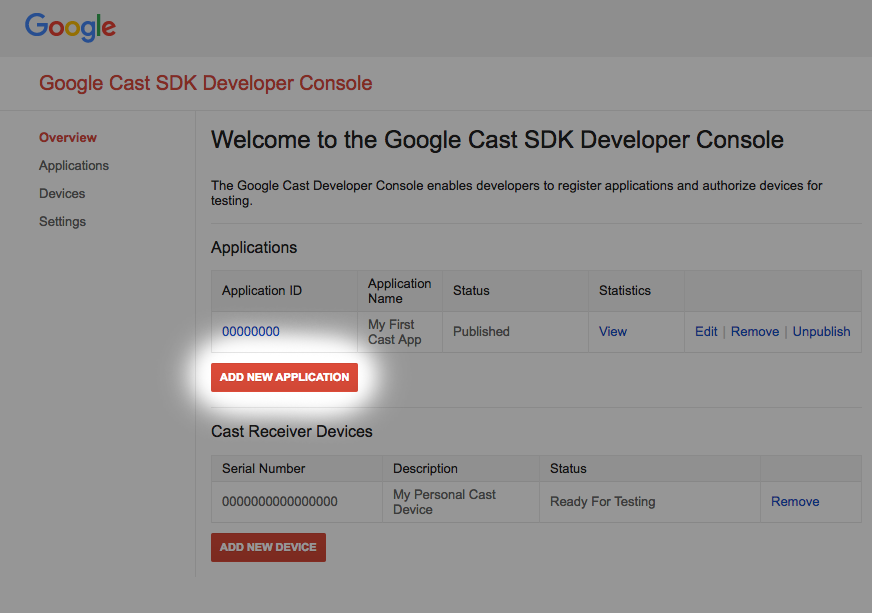
Click "Add new application"
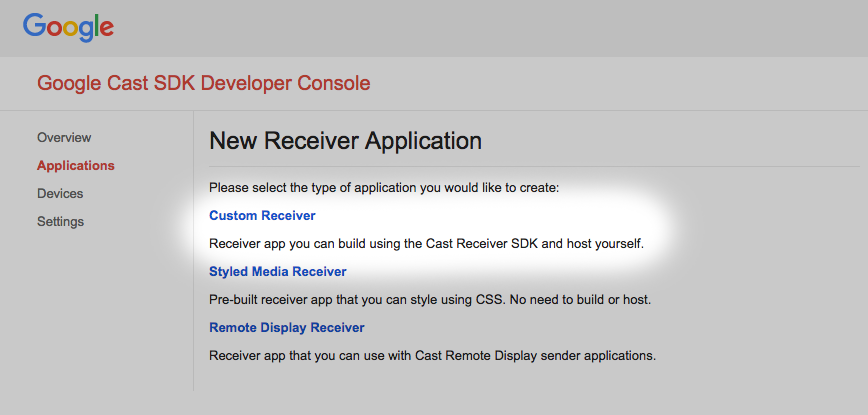
Select "Custom Receiver," this is what we're building.
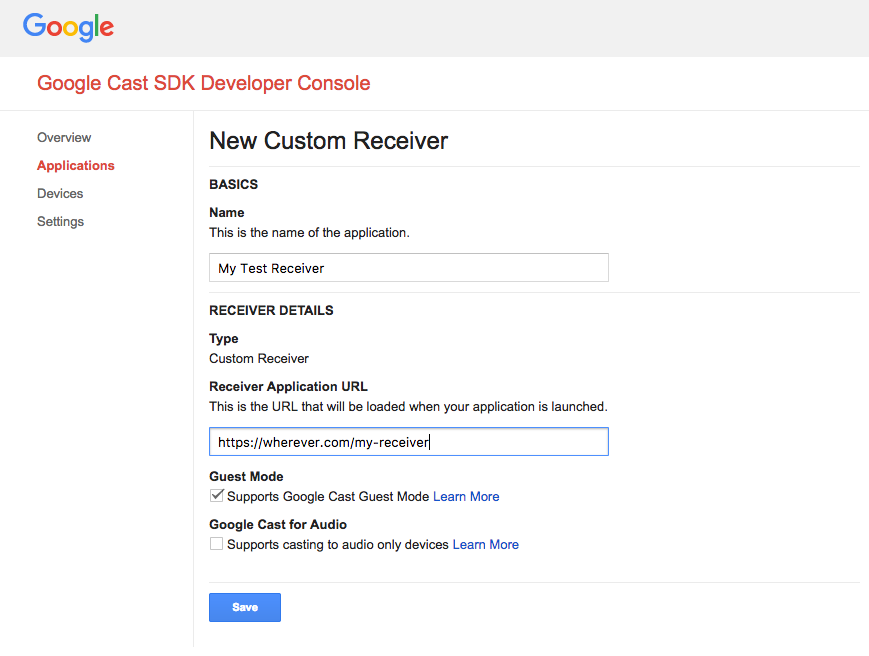
Enter the details of your new receiver, be sure to use the URL you ended up with
in the last section. Make a note of the Application ID assigned to your brand new receiver.
You must also register your Google Cast device so that it may access your receiver application before you publish it. Once you publish your receiver application, it will be available to all Google Cast devices. For the purpose of this codelab it's advised to work with an unpublished receiver application.
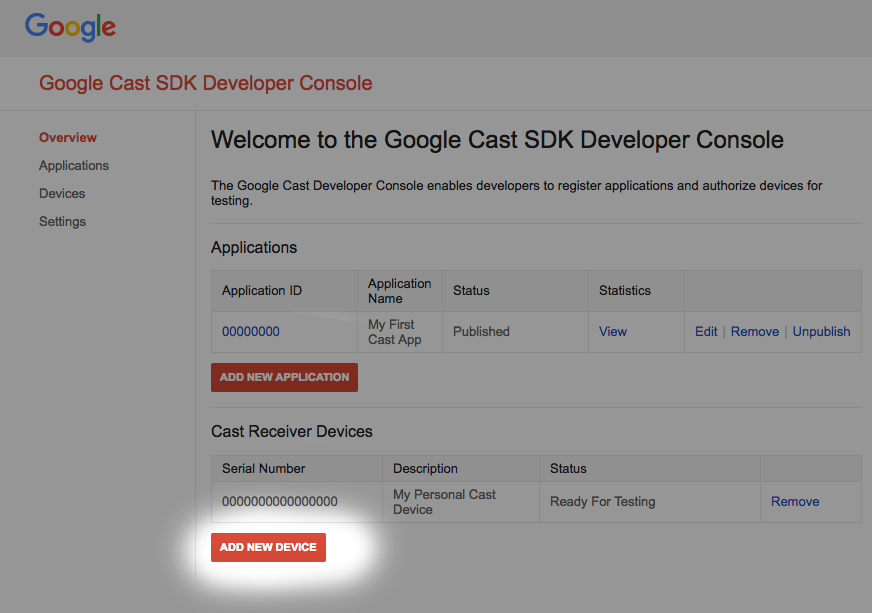
Click on "Add new Device"
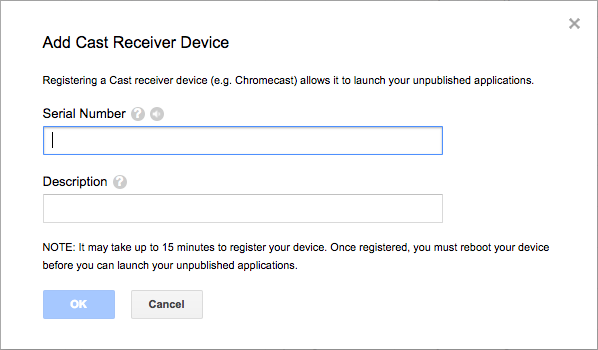
Enter the serial number printed on the back of your Cast device and give it a descriptive name. You can also find your serial number by casting your screen in Chrome when accessing Google Cast SDK Developer Console
It will take 5-15 minutes before your receiver and device are ready for testing. After waiting 5-15 minutes you must reboot your Cast device.
5. Run the sample app
While we wait for our new receiver application to be ready for testing let's see what a sample completed receiver app looks like. The receiver we're going to build will be capable of playing back media using adaptive bitrate streaming (we'll be using sample content encoded for Dynamic Adaptive Streaming over HTTP (DASH)).
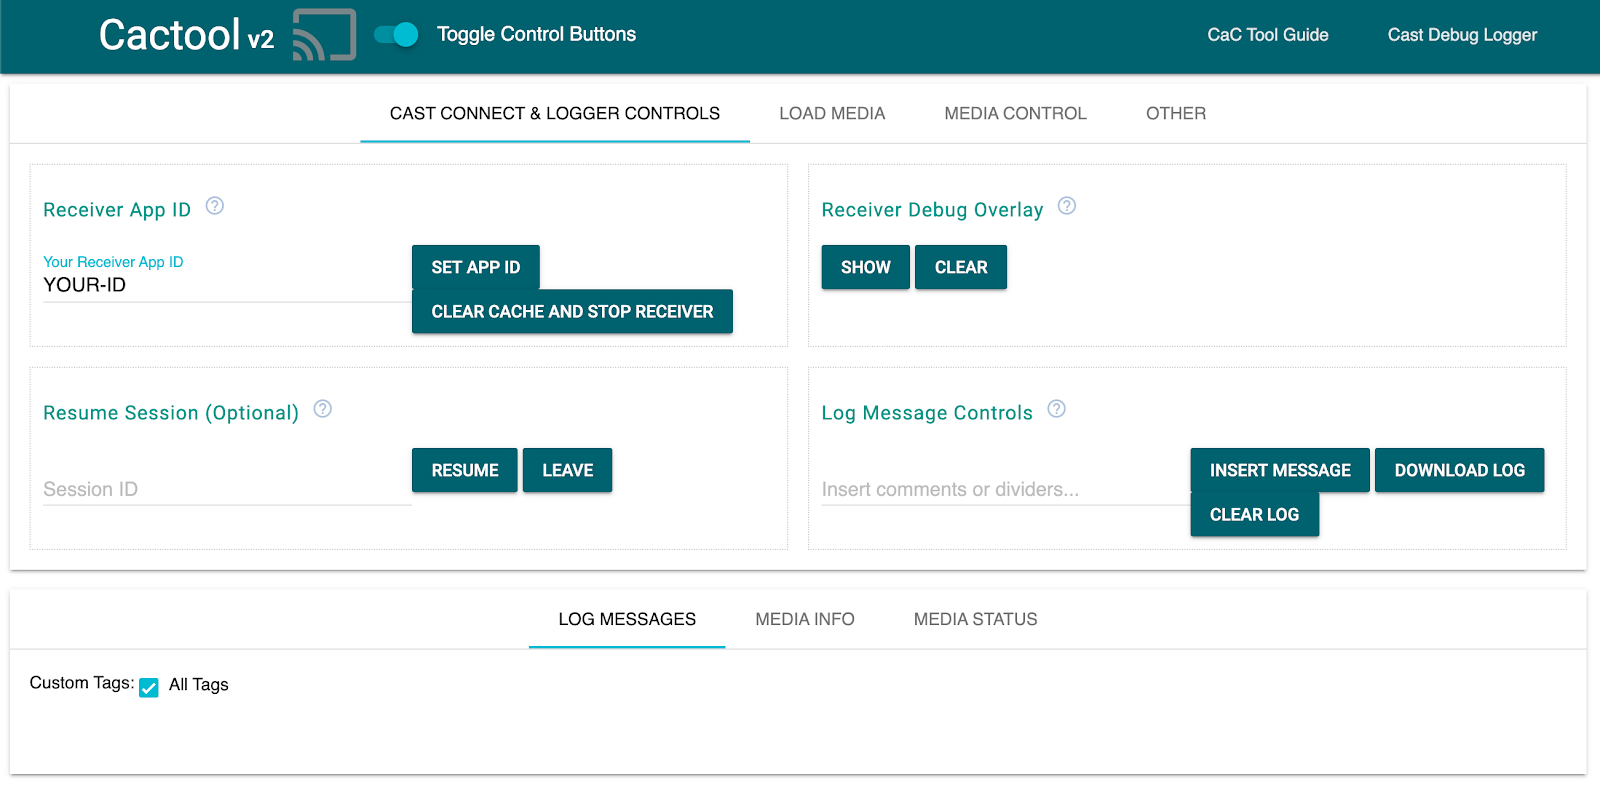
In your browser, open the Command and Control (CaC) Tool.

- You should see our CaC Tool.
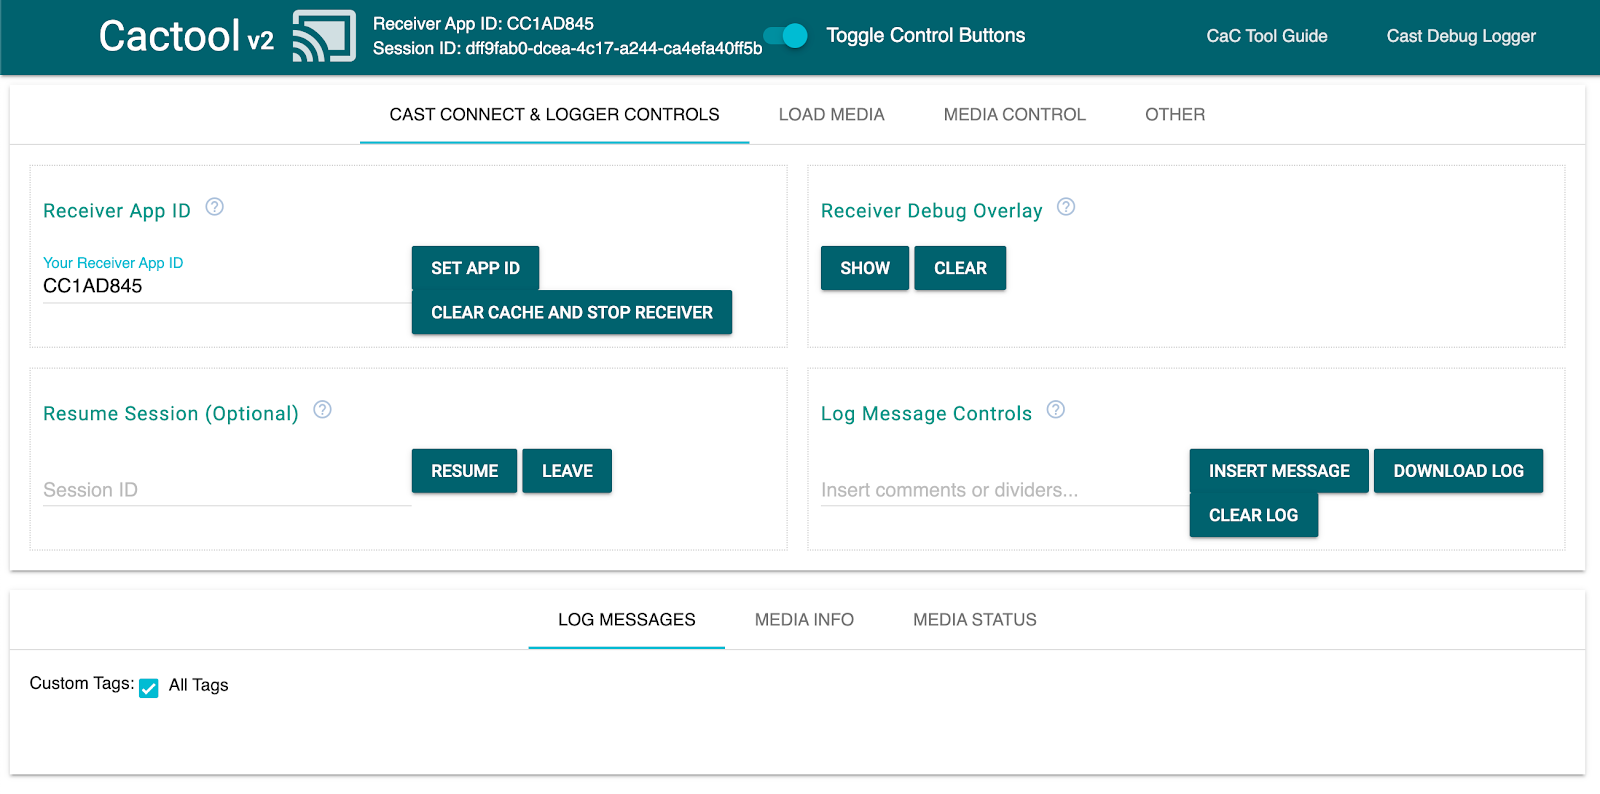
- Use the default "CC1AD845" sample receiver ID and click the "Set App ID" button.
- Click the Cast button at the top left and select your Google Cast device.
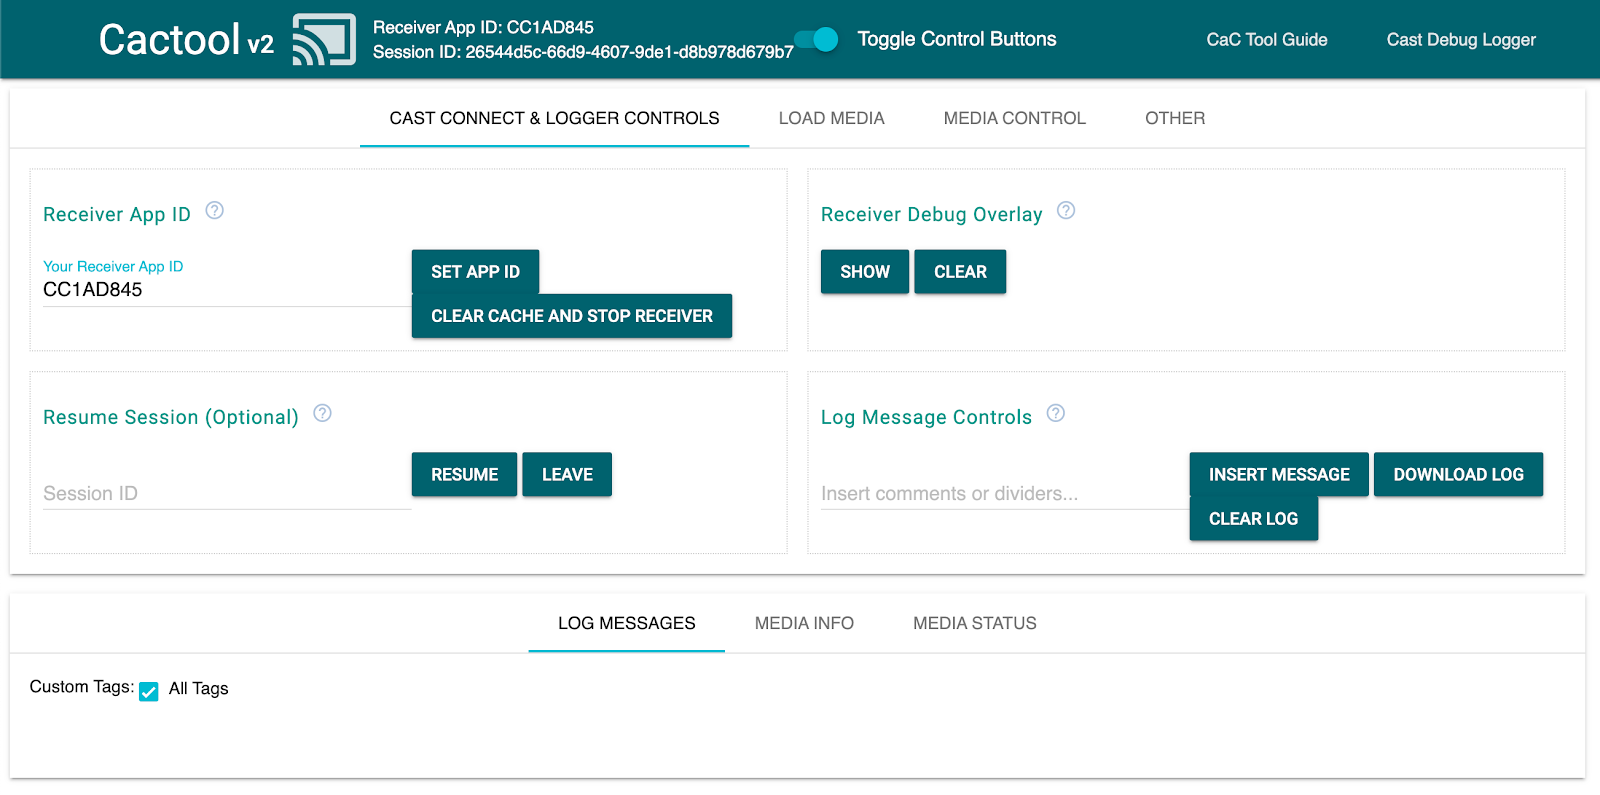
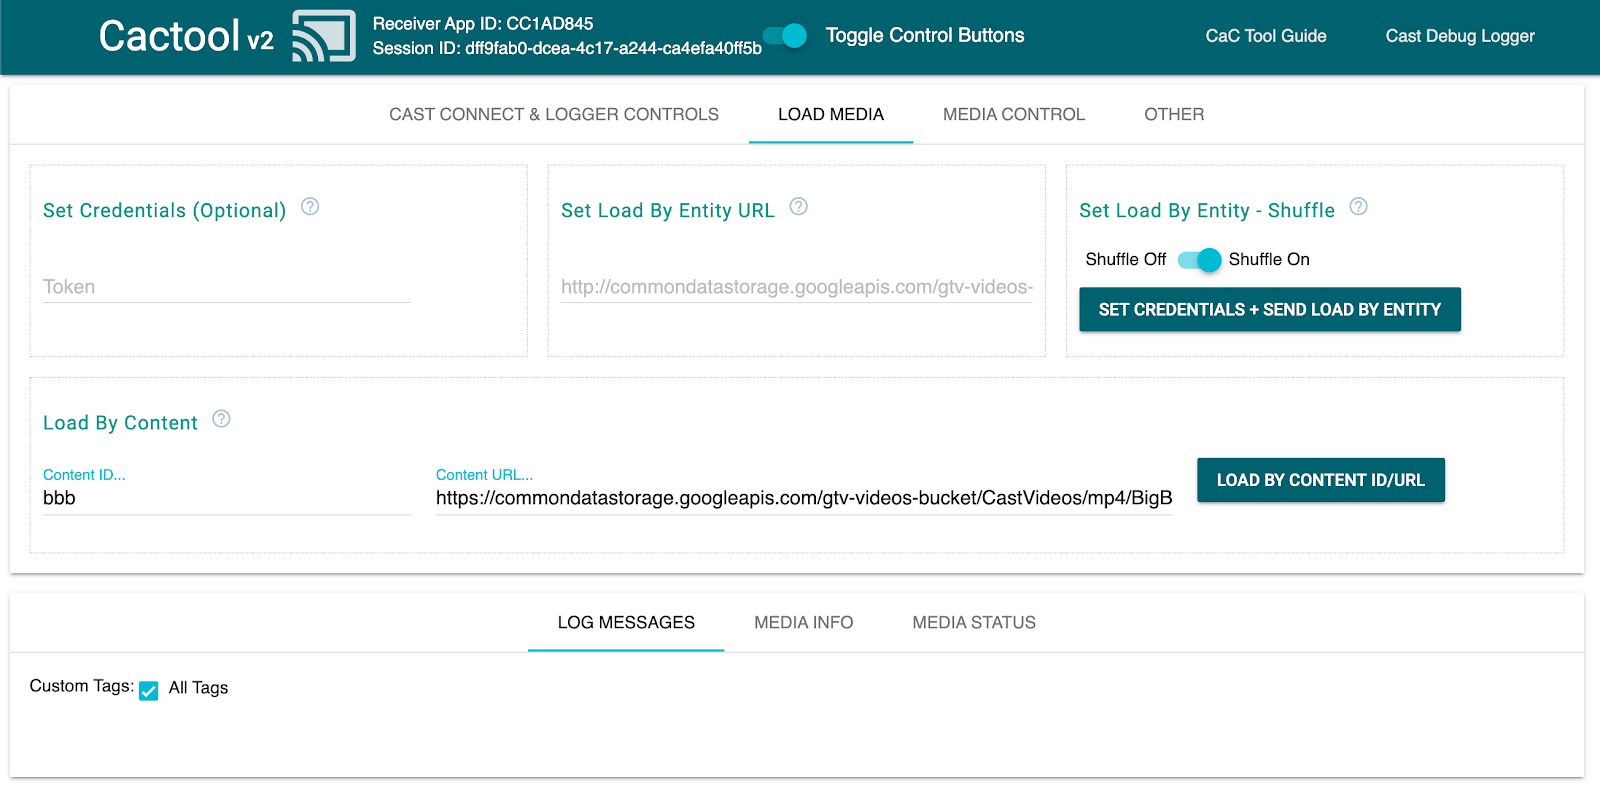
- Navigate to the "Load Media" tab at the top.
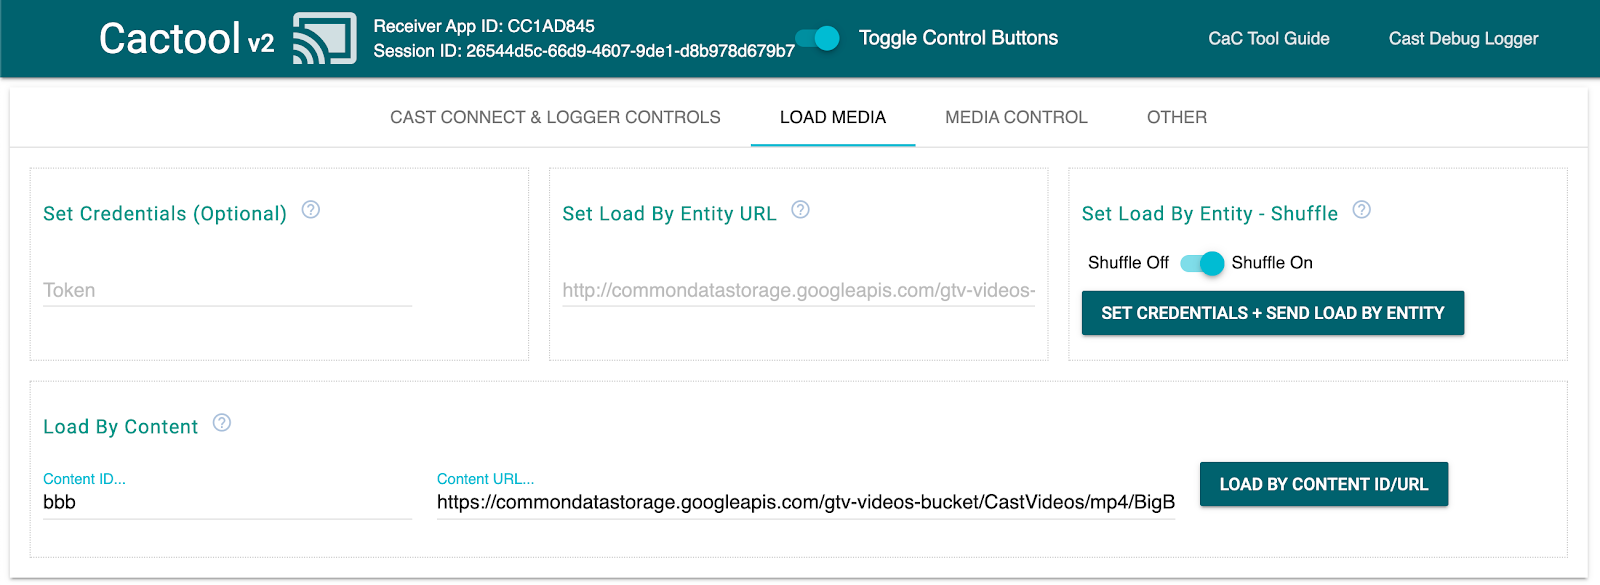
- Click the "Load by Content" button to play a sample video.
- The video will start playing on your Google Cast device to show what basic receiver functionality looks like using the Default Receiver.
6. Prepare the start project
We need to add support for Google Cast to the start app you downloaded. Here are some Google Cast terminology that we will be using in this codelab:
- a sender app runs on a mobile device or laptop,
- a receiver app runs on the Google Cast device.
Now you're ready to build on top of the starter project using your favorite text editor:
- Select the

app-startdirectory from your sample code download. - Open up
js/receiver.jsandindex.html
Note, as you're working through this codelab, http-server should be picking up changes you make. If you notice it doesn't, try killing and restarting http-server.
App Design
The receiver app initializes the Cast session and will stand-by until a LOAD request (in other words, the command to play back a piece of media) from a sender arrives.
The app consists of one main view, defined in index.html and one JavaScript file called js/receiver.js containing all the logic to make our receiver work.
index.html
This html file will contain the UI for our receiver app. For now it's empty, and we'll be adding to it throughout the code lab.
receiver.js
This script will manage all of the logic for our receiver app. Right now it's just an empty file, but we're going to turn it into a fully functioning Cast receiver with just a few lines of code in the next section.
7. A basic Cast receiver
A basic Cast receiver will initialize the Cast session on startup. This is necessary to tell all connected sender applications that bringing up the receiver was successful. In addition, the new SDK comes pre-configured to handle adaptive bitrate streaming media (using DASH, HLS and Smooth Streaming) and plain MP4 files out of the box. Let's try this out.
Initialization
Add the following code to index.html in the header:
<head>
  ...

  <script src="//www.gstatic.com/cast/sdk/libs/caf_receiver/v3/cast_receiver_framework.js"></script>
</head>
Add the following code to index.html <body> before the <footer> loading receiver.js, to provide the receiver SDK with space to bring-up the default receiver UI which is shipping with the script you have just added.
<cast-media-player></cast-media-player>
Now, we need to initialize the SDK in js/receiver.js, consisting of:
- acquiring a reference to
CastReceiverContext, your primary entry point to the whole Receiver SDK - storing a reference to the
PlayerManager, the object handling playback and providing you with all the hooks you need to plug-in your own custom logic - initializing the SDK by calling
start()onCastReceiverContext
Add the following to js/receiver.js.
const context = cast.framework.CastReceiverContext.getInstance();
const playerManager = context.getPlayerManager();

context.start();
8. Casting "basic" video content
For the purpose of this Codelab, use the CaC Tool to try out your brand new receiver.
Point your web browser to the Command and Control (CaC) Tool.
Be sure to substitute your own App Id as registered earlier in the field and click "Set App ID". This instructs the tool to use your receiver when starting the Cast session.
Casting media
At a high level, to play media on a Cast device the following needs to happen:
- The sender creates a
MediaInfoJSONobject from the Cast SDK that models a media item. - The sender connects to the Cast device to launch the receiver application.
- The receiver loads the
MediaInfoobject through aLOADrequest to play the content. - The receiver monitors and tracks the media status.
- The sender sends playback commands to the receiver to control playback based on user interactions with the sender app.
In this first basic attempt we're going to populate MediaInfo with a playable asset URL (stored in MediaInfo.contentUrl).
A real-world sender uses an application-specific media identifier in MediaInfo.contentId. The receiver uses the contentId as an identifier to make appropriate backend API calls to resolve the actual asset URL and set it to MediaInfo.contentUrl. The receiver will also handle tasks such as DRM license acquisition or injecting information about ad breaks.
We're going to extend your receiver to do something just like that in the next section. For now, click on the Cast icon and select your device to open your receiver.
Navigate to the "Load Media" tab and click the "Load by Content'' button. Your receiver should start playing the sample content.
So out-of-the-box the Receiver SDK handles:
- Initializing the Cast session
- Handle incoming
LOADrequests from senders that contain playable assets - Provide a basic player UI ready to be displayed on the big screen.
Feel free to explore the CaC Tool and its code before moving on to the next section, where we're going to extend our receiver to talk to a simple sample API to fulfill incoming LOAD requests from senders.
9. Integrate with an external API
In line with how most developers interact with their Cast Receivers in real-world applications, we're going to modify our receiver to handle LOAD requests that reference the intended media content by its API key instead of sending over a playable asset URL.
Applications typically do this because:
- The sender might not know the content URL.
- The Cast application is designed to handle authentication, other business logic or API calls directly on the receiver.
This functionality is primarily implemented in the PlayerManager setMessageInterceptor() method. This enables you to intercept incoming messages by type and modify them before they reach the SDK's internal message handler. In this section we are dealing with LOAD requests where we will do the following:
- Read the incoming
LOADrequest and its customcontentId. - Make a
GETcall to our API to look up the streamable asset by itscontentId. - Modify the
LOADrequest with the stream's URL. - Modify the
MediaInformationobject to set the stream type parameters. - Pass the request to the SDK for playback, or reject the command if we're unable to look up the requested media.
The provided sample API showcases the SDK's hooks for customizing common receiver tasks, while still relying on a mostly out-of-the-box experience.
Sample API
Point your browser to https://storage.googleapis.com/cpe-sample-media/content.json and have a look at our sample video catalog. The content includes URLs for poster images in png format as well as both DASH and HLS streams. The DASH and HLS streams point to demuxed video and audio sources stored in fragmented mp4 containers.
{
  "bbb": {
    "author": "The Blender Project",
    "description": "Grumpy Bunny is grumpy",
    "poster": "https://[...]/[...]/BigBuckBunny/images/screenshot1.png",
    "stream": {
      "dash": "https://[...]/[...]/BigBuckBunny/BigBuckBunny_master.mpd",
      "hls": "https://[...]/[...]/BigBuckBunny/BigBuckBunny_master.m3u8",
    "title": "Big Buck Bunny"
  },
  "fbb_ad": {
    "author": "Google Inc.",
    "description": "Introducing Chromecast. The easiest way to enjoy [...]",
    "poster": "https://[...]/[...]/ForBiggerBlazes/images/screenshot8.png",
    "stream": {
      "dash": "https://[...]/[...]/ForBiggerBlazes/ForBiggerBlazes.mpd",
      "hls": "https://[...]/[...]/ForBiggerBlazes/ForBiggerBlazes.m3u8",
    "title": "For Bigger Blazes"
  },

  [...]

}
In the next step we'll map each entry's key (for example, bbb, fbb_ad ) to the stream's URL after the receiver gets called with a LOAD request.
Intercept the LOAD request
In this step we will be creating a load interceptor with a function that makes an XHR request to the hosted JSON file. Once the JSON file is obtained we will parse the content and set the metadata. In the following sections we will customize the MediaInformation parameters to specify the content type.
Add the following code to your js/receiver.js file, just before the call to context.start().
function makeRequest (method, url) {
  return new Promise(function (resolve, reject) {
    let xhr = new XMLHttpRequest();
    xhr.open(method, url);
    xhr.onload = function () {
      if (this.status >= 200 && this.status < 300) {
        resolve(JSON.parse(xhr.response));
      } else {
        reject({
          status: this.status,
          statusText: xhr.statusText
        });
      }
    };
    xhr.onerror = function () {
      reject({
        status: this.status,
        statusText: xhr.statusText
      });
    };
    xhr.send();
  });
}

playerManager.setMessageInterceptor(
    cast.framework.messages.MessageType.LOAD,
    request => {
      return new Promise((resolve, reject) => {
        // Fetch content repository by requested contentId
        makeRequest('GET', 'https://storage.googleapis.com/cpe-sample-media/content.json').then(function (data) {
          let item = data[request.media.contentId];
          if(!item) {
            // Content could not be found in repository
            reject();
          } else {
            // Add metadata
            let metadata = new
               cast.framework.messages.GenericMediaMetadata();
            metadata.title = item.title;
            metadata.subtitle = item.author;

            request.media.metadata = metadata;

            // Resolve request
            resolve(request);
          }
        });
      });
    });
The next section will outline how to configure the load request's media property for DASH content.
Using the Sample API DASH Content
Now that we have prepared the load interceptor, we will specify the content type to the receiver. This information will provide the receiver with the master playlist URL and the stream MIME type. Add the following code to the js/receiver.js file in the LOAD interceptor's Promise():
...
playerManager.setMessageInterceptor(
    cast.framework.messages.MessageType.LOAD,
    request => {
      return new Promise((resolve, reject) => {
          ...
          } else {
            // Adjusting request to make requested content playable
            request.media.contentUrl = item.stream.dash;
            request.media.contentType = 'application/dash+xml';
            ...
          }
        });
      });
    });
Once you complete this step you can proceed to Testing It Out to try loading with DASH content. If you would like to test loading with HLS content instead check out the next step.
Using the Sample API HLS Content
The sample API includes HLS content as well as DASH. In addition to setting the contentType like we did in the previous step, the load request will need some additional properties in order to use the sample API's HLS urls. When the receiver is configured to play HLS streams, the default container type expected is transport stream (TS). As a result, the receiver will try to open the sample MP4 streams in TS format if only the contentUrl property is modified. In the load request, the MediaInformation object should be modified with additional properties so that the receiver knows that the content is of type MP4 and not TS. Add the following code to your js/receiver.js file in the load interceptor to modify the contentUrl and contentType properties. Additionally add the HlsSegmentFormat and HlsVideoSegmentFormat properties.
...
playerManager.setMessageInterceptor(
    cast.framework.messages.MessageType.LOAD,
    request => {
      return new Promise((resolve, reject) => {
          ...
          } else {
            // Adjusting request to make requested content playable
            request.media.contentUrl = item.stream.hls;
            request.media.contentType = 'application/x-mpegurl';
            request.media.hlsSegmentFormat = cast.framework.messages.HlsSegmentFormat.FMP4;
            request.media.hlsVideoSegmentFormat = cast.framework.messages.HlsVideoSegmentFormat.FMP4;
            ...
          }
        });
      });
    });
Testing It Out
Again, open the Command and Control (CaC) Tool and set your App ID to your receiver's App ID. Select your device using the Cast button.
Navigate to the "Load Media" tab. This time delete the text in the "Content URL" field beside the "Load by Content" button, which will force our application to send a LOAD request containing only the contentId reference to our media.
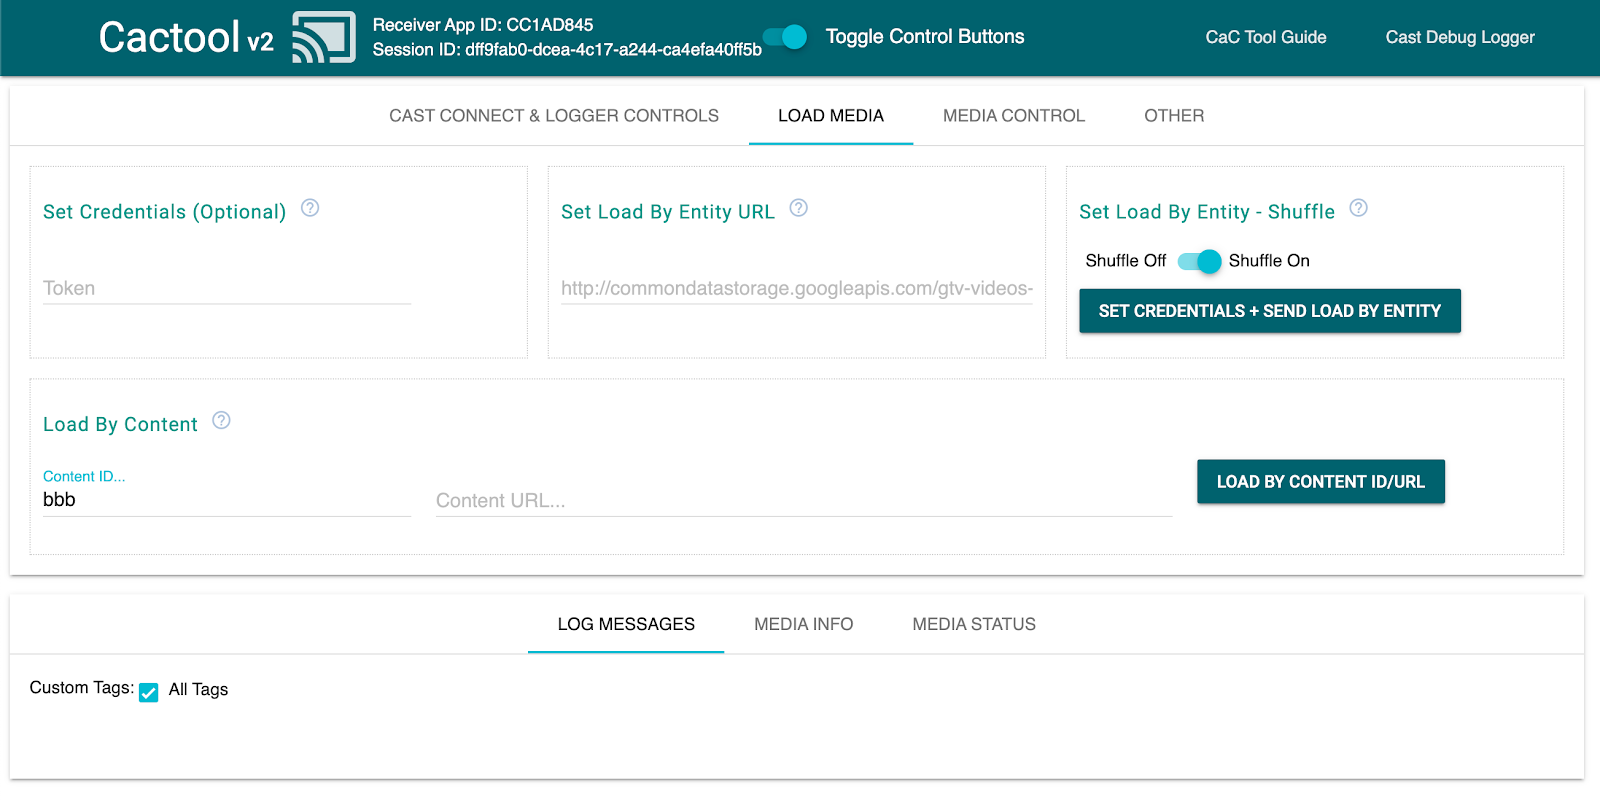
Assuming everything worked fine with your modifications to the receiver, the interceptor should take care of shaping the MediaInfo object into something the SDK can play on the screen.
Click the "Load by Content" button to see if your media plays properly. Feel free to change the Content ID to another ID in the content.json file.
10. Optimizing for smart displays
Smart displays are devices with touch functionality which allow receiver applications to support touch-enabled controls.
This section explains how to optimize your receiver application when launched on smart displays, and how to customize the player controls.
Accessing UI Controls
The UI Controls object for Smart Displays can be accessed using cast.framework.ui.Controls.GetInstance(). Add the following code to your js/receiver.js file above context.start():
...

// Optimizing for smart displays
const touchControls = cast.framework.ui.Controls.getInstance();

context.start();
If you don't use the <cast-media-player> element, you will need to set touchScreenOptimizedApp in CastReceiverOptions. In this codelab we are using the <cast-media-player> element.
context.start({ touchScreenOptimizedApp: true });
Default control buttons are assigned to each slot based on MetadataType and MediaStatus.supportedMediaCommands.
Video Controls
For MetadataType.MOVIE, MetadataType.TV_SHOW, and MetadataType.GENERIC, the UI Controls object for Smart Displays will be displayed as in the example below.
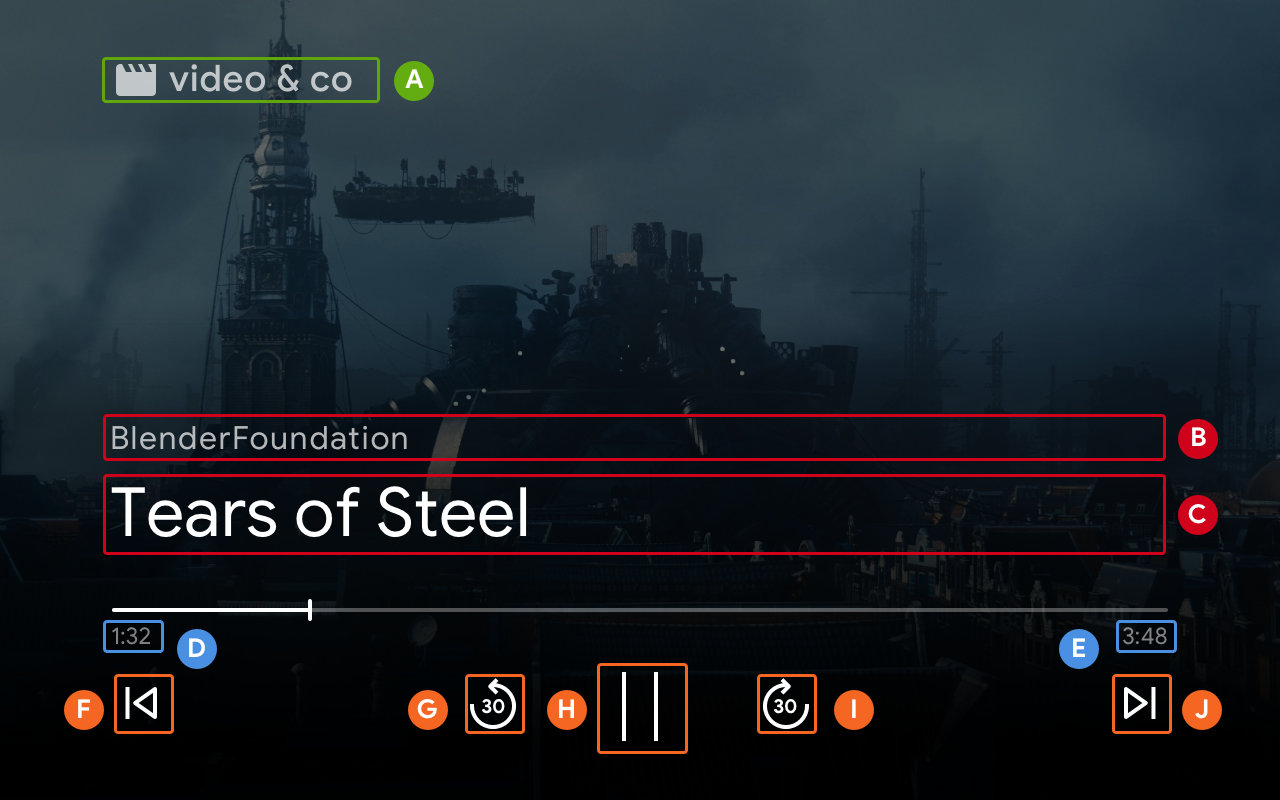
--playback-logo-imageMediaMetadata.subtitleMediaMetadata.titleMediaStatus.currentTimeMediaInformation.durationControlsSlot.SLOT_SECONDARY_1:ControlsButton.QUEUE_PREVControlsSlot.SLOT_PRIMARY_1:ControlsButton.SEEK_BACKWARD_30PLAY/PAUSEControlsSlot.SLOT_PRIMARY_2:ControlsButton.SEEK_FORWARD_30ControlsSlot.SLOT_SECONDARY_2:ControlsButton.QUEUE_NEXT
Audio Controls
For MetadataType.MUSIC_TRACK, the UI Controls object for Smart Displays will be displayed as below:
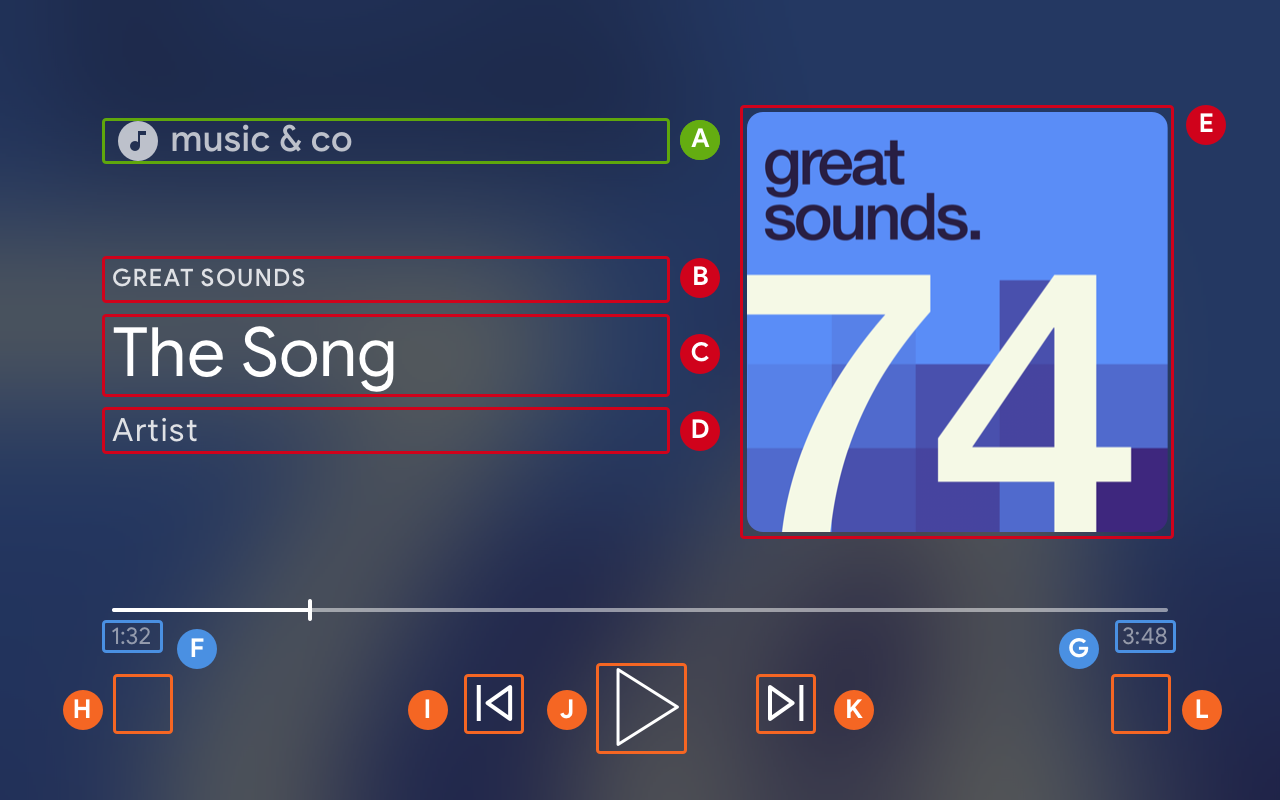
--playback-logo-imageMusicTrackMediaMetadata.albumNameMusicTrackMediaMetadata.titleMusicTrackMediaMetadata.albumArtistMusicTrackMediaMetadata.images[0]MediaStatus.currentTimeMediaInformation.durationControlsSlot.SLOT_SECONDARY_1:ControlsButton.NO_BUTTONControlsSlot.SLOT_PRIMARY_1:ControlsButton.QUEUE_PREVPLAY/PAUSEControlsSlot.SLOT_PRIMARY_2:ControlsButton.QUEUE_NEXTControlsSlot.SLOT_SECONDARY_2:ControlsButton.NO_BUTTON
Updating Supported Media Commands
The UI Controls object also determines if a ControlsButton is shown or not based on MediaStatus.supportedMediaCommands.
When the value of supportedMediaCommands is equal to ALL_BASIC_MEDIA, the default control layout will display as below:

When the value of supportedMediaCommands is equal to ALL_BASIC_MEDIA | QUEUE_PREV | QUEUE_NEXT, the default control layout will display as below:

When the value of supportedMediaCommands equals PAUSE | QUEUE_PREV | QUEUE_NEXT, the default control layout will display as below:

When text tracks are available, the closed caption button will always be shown at SLOT_1.

To dynamically change the value of supportedMediaCommands after starting a receiver context, you can call PlayerManager.setSupportedMediaCommands to override the value. Also, you can add a new command by using addSupportedMediaCommands or remove an existing command by using removeSupportedMediaCommands.
Customizing Control Buttons
You can customize the controls by using PlayerDataBinder. Add the following code to your js/receiver.js file below the touchControls to set the first slot of your controls:
...

// Optimizing for smart displays
const touchControls = cast.framework.ui.Controls.getInstance();
const playerData = new cast.framework.ui.PlayerData();
const playerDataBinder = new cast.framework.ui.PlayerDataBinder(playerData);

playerDataBinder.addEventListener(
  cast.framework.ui.PlayerDataEventType.MEDIA_CHANGED,
  (e) => {
    if (!e.value) return;

    // Clear default buttons and re-assign
    touchControls.clearDefaultSlotAssignments();
    touchControls.assignButton(
      cast.framework.ui.ControlsSlot.SLOT_PRIMARY_1,
      cast.framework.ui.ControlsButton.SEEK_BACKWARD_30
    );
  });

context.start();
11. Implementing media browse on smart displays
Media Browse is a CAF Receiver feature that allows users to explore additional content on touch devices. In order to implement this you will use PlayerDataBinder to set the BrowseContent UI. You can then populate it with BrowseItems based on the content you want to display.
BrowseContent
Below is an example of the BrowseContent UI and its properties:
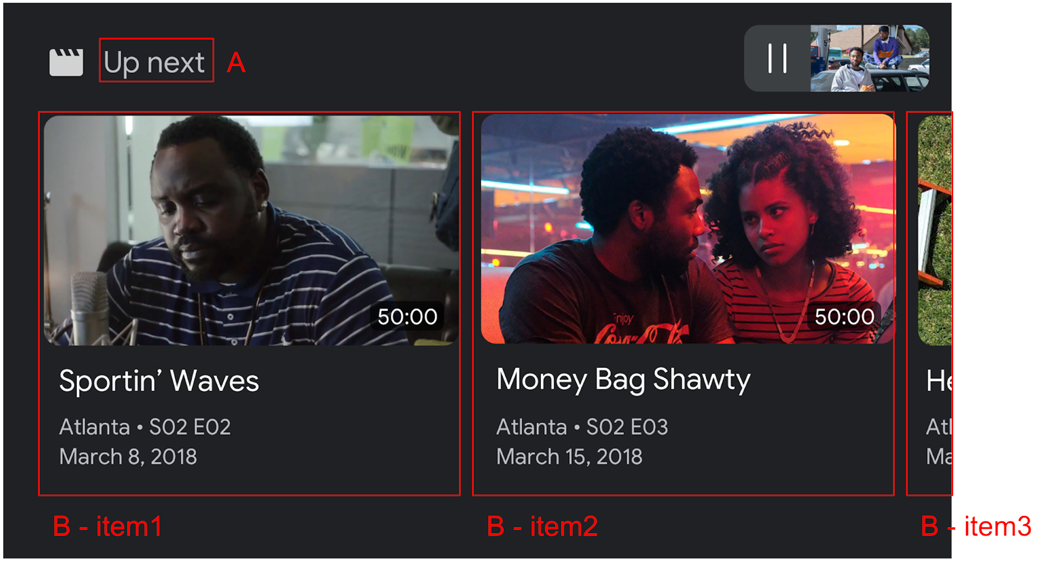
BrowseContent.titleBrowseContent.items
Aspect Ratio
Use the targetAspectRatio property to select the best aspect ratio for your image assets. Three aspect ratios are supported by the CAF Receiver SDK: SQUARE_1_TO_1, PORTRAIT_2_TO_3, LANDSCAPE_16_TO_9.
BrowseItem
Use BrowseItem to display title, subtitle, duration, and image for each item:
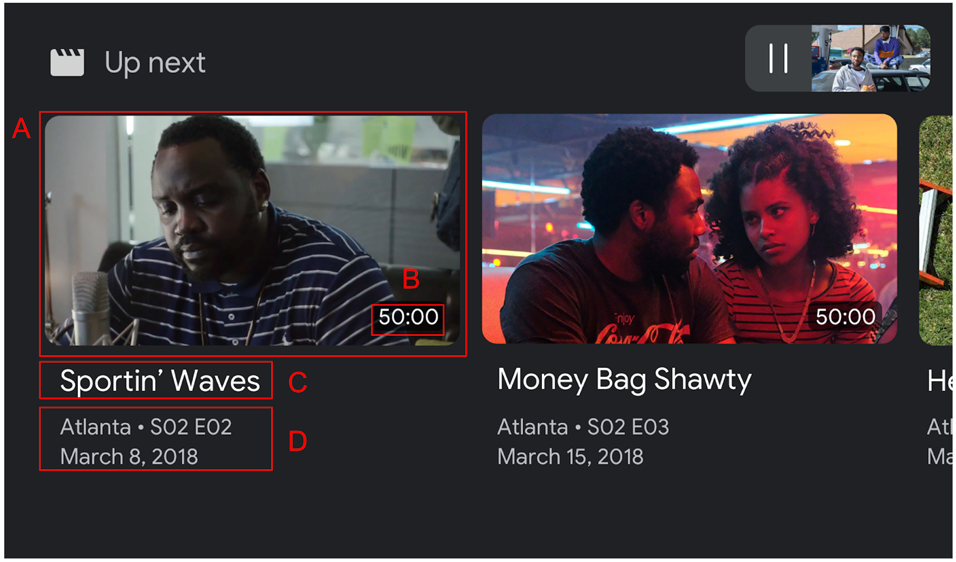
BrowseItem.imageBrowseItem.durationBrowseItem.titleBrowseItem.subtitle
Set Media Browse data
You can provide a list of media content for browsing by calling setBrowseContent. Add the following code to your js/receiver.js file below your playerDataBinder and in your MEDIA_CHANGED event listener to set the browse items with a title of "Up Next".
// Optimizing for smart displays
const touchControls = cast.framework.ui.Controls.getInstance();
const playerData = new cast.framework.ui.PlayerData();
const playerDataBinder = new cast.framework.ui.PlayerDataBinder(playerData);

...

let browseItems = getBrowseItems();

function getBrowseItems() {
  let browseItems = [];
  makeRequest('GET', 'https://storage.googleapis.com/cpe-sample-media/content.json')
  .then(function (data) {
    for (let key in data) {
      let item = new cast.framework.ui.BrowseItem();
      item.entity = key;
      item.title = data[key].title;
      item.subtitle = data[key].description;
      item.image = new cast.framework.messages.Image(data[key].poster);
      item.imageType = cast.framework.ui.BrowseImageType.MOVIE;
      browseItems.push(item);
    }
  });
  return browseItems;
}

let browseContent = new cast.framework.ui.BrowseContent();
browseContent.title = 'Up Next';
browseContent.items = browseItems;
browseContent.targetAspectRatio = cast.framework.ui.BrowseImageAspectRatio.LANDSCAPE_16_TO_9;

playerDataBinder.addEventListener(
  cast.framework.ui.PlayerDataEventType.MEDIA_CHANGED,
  (e) => {
    if (!e.value) return;

    ....

    // Media browse
    touchControls.setBrowseContent(browseContent);
  });
Clicking on a media browse item will trigger the LOAD interceptor. Add the following code to your LOAD interceptor to map the request.media.contentId to the request.media.entity from media browse item:
playerManager.setMessageInterceptor(
    cast.framework.messages.MessageType.LOAD,
    request => {
      ...

      // Map contentId to entity
      if (request.media && request.media.entity) {
        request.media.contentId = request.media.entity;
      }

      return new Promise((resolve, reject) => {
            ...
        });
    });
You can also set the BrowseContent object to null to remove the Media Browse UI.
12. Debugging Receiver Apps
The Cast Receiver SDK provides another option for developers to easily debug receiver apps by using the CastDebugLogger API and a companion Command and Control (CaC) Tool to capture logs.
Initialization
To incorporate the API add the CastDebugLogger source script in your index.html file. The source should be declared in the <head> tag after the Cast Receiver SDK declaration.
<head>
  ...
  <script src="//www.gstatic.com/cast/sdk/libs/caf_receiver/v3/cast_receiver_framework.js"></script>
  <!-- Cast Debug Logger -->
  <script src="//www.gstatic.com/cast/sdk/libs/devtools/debug_layer/caf_receiver_logger.js"></script>
</head>
In js/receiver.js at the top of the file and below the playerManager, add the following code to retrieve the CastDebugLogger instance and enable the logger:
const context = cast.framework.CastReceiverContext.getInstance();
const playerManager = context.getPlayerManager();

// Debug Logger
const castDebugLogger = cast.debug.CastDebugLogger.getInstance();
const LOG_TAG = 'MyAPP.LOG';

// Enable debug logger and show a 'DEBUG MODE' overlay at top left corner.
context.addEventListener(cast.framework.system.EventType.READY, () => {
  if (!castDebugLogger.debugOverlayElement_) {
      castDebugLogger.setEnabled(true);
  }
});
When the debug logger is enabled, an overlay displaying DEBUG MODE will show on the receiver.

Log Player Events
Using CastDebugLogger you can easily log player events that are fired by the CAF Receiver SDK and use different logger levels to log the event data. The loggerLevelByEvents config uses cast.framework.events.EventType and cast.framework.events.category to specify which events will be logged.
Add the following code below the castDebugLogger declaration to log when a player CORE event is triggered or a mediaStatus change is broadcast:
// Debug Logger
const castDebugLogger = cast.debug.CastDebugLogger.getInstance();

// Enable debug logger and show a 'DEBUG MODE' overlay at top left corner.
context.addEventListener(cast.framework.system.EventType.READY, () => {
  if (!castDebugLogger.debugOverlayElement_) {
      castDebugLogger.setEnabled(true);
  }
});

// Set verbosity level for Core events.
castDebugLogger.loggerLevelByEvents = {
  'cast.framework.events.category.CORE': cast.framework.LoggerLevel.INFO,
  'cast.framework.events.EventType.MEDIA_STATUS': cast.framework.LoggerLevel.DEBUG
}
Log Messages and Custom Tags
The CastDebugLogger API allows you to create log messages that appear on the receiver debug overlay with different colors. The following log methods are available, listed in order from highest to lowest priority:
castDebugLogger.error(custom_tag, message);castDebugLogger.warn(custom_tag, message);castDebugLogger.info(custom_tag, message);castDebugLogger.debug(custom_tag, message);
For each log method, the first parameter is a custom tag. This can be any identifying string that you find meaningful. The CastDebugLogger uses tags to filter the logs. Usage of tags is explained in detail further below. The second parameter is the log message.
To show logs in action, add logs to your LOAD interceptor.
playerManager.setMessageInterceptor(
  cast.framework.messages.MessageType.LOAD,
  request => {
    castDebugLogger.info(LOG_TAG, 'Intercepting LOAD request');

    // Map contentId to entity
    if (request.media && request.media.entity) {
      request.media.contentId = request.media.entity;
    }

    return new Promise((resolve, reject) => {
      // Fetch content repository by requested contentId
      makeRequest('GET', 'https://storage.googleapis.com/cpe-sample-media/content.json')
        .then(function (data) {
          let item = data[request.media.contentId];
          if(!item) {
            // Content could not be found in repository
            castDebugLogger.error(LOG_TAG, 'Content not found');
            reject();
          } else {
            // Adjusting request to make requested content playable
            request.media.contentUrl = item.stream.dash;
            request.media.contentType = 'application/dash+xml';
            castDebugLogger.warn(LOG_TAG, 'Playable URL:', request.media.contentUrl);

            // Add metadata
            let metadata = new cast.framework.messages.MovieMediaMetadata();
            metadata.metadataType = cast.framework.messages.MetadataType.MOVIE;
            metadata.title = item.title;
            metadata.subtitle = item.author;

            request.media.metadata = metadata;

            // Resolve request
            resolve(request);
          }
      });
    });
  });
You can control which messages appear on the debug overlay by setting the log level in loggerLevelByTags for each custom tag. For example, enabling a custom tag with log level cast.framework.LoggerLevel.DEBUG will display all messages added with error, warn, info, and debug log messages. Enabling a custom tag with WARNING level will only display error and warn log messages.
The loggerLevelByTags config is optional. If a custom tag is not configured for its logger level, all log messages will display on the debug overlay.
Add the following code below the CORE event logger:
// Set verbosity level for Core events.
castDebugLogger.loggerLevelByEvents = {
  'cast.framework.events.category.CORE': cast.framework.LoggerLevel.INFO,
  'cast.framework.events.EventType.MEDIA_STATUS': cast.framework.LoggerLevel.DEBUG
}

// Set verbosity level for custom tags.
castDebugLogger.loggerLevelByTags = {
    [LOG_TAG]: cast.framework.LoggerLevel.DEBUG,
};
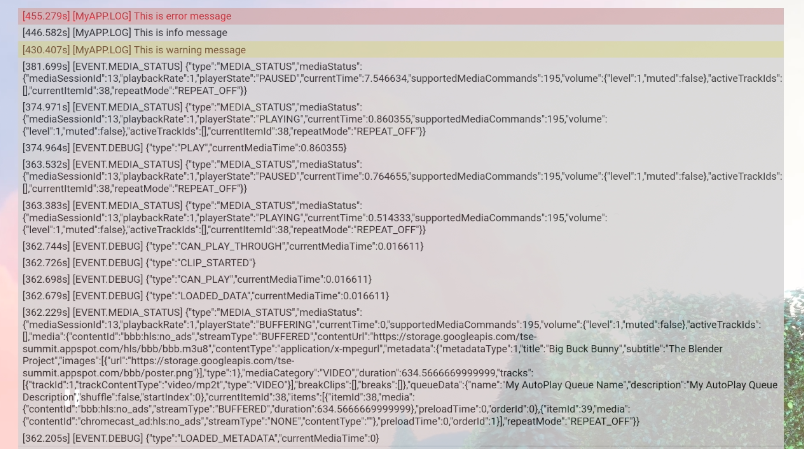
Debug Overlay
The Cast Debug Logger provides a debug overlay on the receiver to display your custom log messages on the cast device. Use showDebugLogs to toggle the debug overlay and clearDebugLogs to clear log messages on the overlay.
Add the following code to preview the debug overlay on your receiver.
context.addEventListener(cast.framework.system.EventType.READY, () => {
  if (!castDebugLogger.debugOverlayElement_) {
      // Enable debug logger and show a 'DEBUG MODE' overlay at top left corner.
      castDebugLogger.setEnabled(true);

      // Show debug overlay
      castDebugLogger.showDebugLogs(true);

      // Clear log messages on debug overlay
      castDebugLogger.clearDebugLogs();
  }
});
13. Congratulations
You now know how to create a custom web receiver application using the Cast Web Receiver SDK.
For more details, see the Web Receiver developer guide.