
I progetti Google Apps Script associati a Documenti Google, Fogli Google o Moduli Google possono visualizzare elementi dell'interfaccia utente, come avvisi, prompt, toast, finestre di dialogo e barre laterali predefiniti. Questi elementi in genere contengono contenuti personalizzati del servizio HTML e vengono spesso aperti da voci di menu. In Moduli, gli elementi dell'interfaccia utente sono visibili solo a un editor che apre il modulo per modificarlo, non a un rispondente.
Finestre di dialogo di avviso
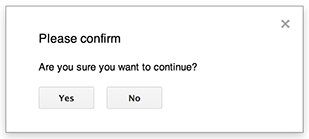
Un avviso è una finestra di dialogo predefinita che si apre all'interno di un editor di Documenti,
Fogli, Presentazioni o Moduli. Visualizza un messaggio e un pulsante Ok; un titolo e pulsanti alternativi sono facoltativi. È simile alla chiamata di
window.alert
in JavaScript lato client all'interno di un browser web.
Gli avvisi sospendono lo script lato server mentre la finestra di dialogo è aperta. Lo script riprende dopo che l'utente chiude la finestra di dialogo, ma le connessioni JDBC non vengono mantenute durante la sospensione.
Come mostrato nell'esempio seguente, Documenti, Moduli,
Presentazioni e Fogli utilizzano tutti il metodo
Ui.alert, disponibile
in tre varianti. Per sostituire il pulsante Ok predefinito, passa un valore dall'enumerazione
Ui.ButtonSet come argomento buttons. Per valutare su quale pulsante ha fatto clic l'utente, confronta il valore restituito
per alert con l'enumerazione Ui.Button.
function onOpen() {
  SpreadsheetApp.getUi() // Or DocumentApp or SlidesApp or FormApp.
    .createMenu("Custom Menu")
    .addItem("Show alert", "showAlert")
    .addToUi();
}

function showAlert() {
  const ui = SpreadsheetApp.getUi(); // Same variations.

  const result = ui.alert(
    "Please confirm",
    "Are you sure you want to continue?",
    ui.ButtonSet.YES_NO,
  );

  // Process the user's response.
  if (result === ui.Button.YES) {
    // User clicked "Yes".
    ui.alert("Confirmation received.");
  } else {
    // User clicked "No" or X in the title bar.
    ui.alert("Permission denied.");
  }
}
Finestre di dialogo di richiesta
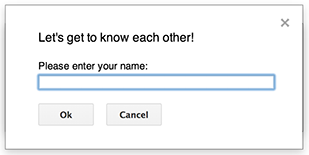
Un prompt è una finestra di dialogo predefinita che si apre all'interno di un editor di Documenti,
Fogli, Presentazioni o Moduli. Visualizza
un messaggio, un campo di immissione di testo e un pulsante Ok; un titolo e
pulsanti alternativi sono facoltativi. È simile alla chiamata di
window.prompt
in JavaScript lato client all'interno di un browser web.
I prompt sospendono lo script lato server mentre la finestra di dialogo è aperta. Lo script riprende dopo che l'utente chiude la finestra di dialogo, ma le connessioni JDBC non vengono mantenute durante la sospensione.
Come mostrato nell'esempio seguente, Documenti, Moduli,
Presentazioni e Fogli utilizzano tutti il metodo
Ui.prompt, disponibile
in tre varianti. Per sostituire il pulsante predefinito Ok, passa un valore
dall'enumerazione Ui.ButtonSet come
argomento buttons. Per valutare la risposta dell'utente, acquisisci il valore restituito
per prompt, quindi chiama
PromptResponse.getResponseText
per recuperare l'input dell'utente e confronta il valore restituito per
PromptResponse.getSelectedButton
con l'enumerazione Ui.Button.
function onOpen() {
  SpreadsheetApp.getUi() // Or DocumentApp or SlidesApp or FormApp.
    .createMenu("Custom Menu")
    .addItem("Show prompt", "showPrompt")
    .addToUi();
}

function showPrompt() {
  const ui = SpreadsheetApp.getUi(); // Same variations.

  const result = ui.prompt(
    "Let's get to know each other!",
    "Please enter your name:",
    ui.ButtonSet.OK_CANCEL,
  );

  // Process the user's response.
  const button = result.getSelectedButton();
  const text = result.getResponseText();
  if (button === ui.Button.OK) {
    // User clicked "OK".
    ui.alert("Your name is " + text + ".");
  } else if (button === ui.Button.CANCEL) {
    // User clicked "Cancel".
    ui.alert("I didn't get your name.");
  } else if (button === ui.Button.CLOSE) {
    // User clicked X in the title bar.
    ui.alert("You closed the dialog.");
  }
}
Notifiche dei fogli di lavoro
Un "toast" è una piccola finestra di dialogo nell'angolo in basso a destra di un editor Fogli che mostra un messaggio ma non sospende lo script. È un buon modo per mostrare messaggi di stato o aggiornamenti che non richiedono l'interazione dell'utente.
Come mostrato nell'esempio seguente, Fogli utilizza il metodo
Spreadsheet.toast.
I toast sono disponibili solo in Fogli.
function showToast() {
  SpreadsheetApp.getActiveSpreadsheet().toast("Task completed successfully.");
}
Finestre di dialogo personalizzate
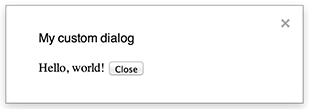
Una finestra di dialogo personalizzata può visualizzare un'interfaccia utente HTML service all'interno di un editor di Documenti, Fogli, Presentazioni o Moduli.
Le finestre di dialogo personalizzate non sospendono lo script lato server mentre la finestra di dialogo è aperta.
Poiché sono asincrone, la funzione lato server che apre la finestra di dialogo
termina immediatamente. Per trasferire i dati dalla finestra di dialogo personalizzata al server,
utilizza l'API google.script nel codice lato client.
La finestra di dialogo può chiudersi chiamando
google.script.host.close
nel lato client di un'interfaccia di servizio HTML. La finestra di dialogo non può essere chiusa da
altre interfacce, ma solo dall'utente o da se stessa.
Come mostrato nell'esempio seguente, Documenti, Moduli,
Presentazioni e Fogli utilizzano tutti il metodo
Ui.showModalDialog
per aprire la finestra di dialogo.
Code.gs
function onOpen() {
  SpreadsheetApp.getUi() // Or DocumentApp or SlidesApp or FormApp.
      .createMenu('Custom Menu')
      .addItem('Show dialog', 'showDialog')
      .addToUi();
}

function showDialog() {
  const html = HtmlService.createHtmlOutputFromFile('Page')
      .setWidth(400)
      .setHeight(300);
  SpreadsheetApp.getUi() // Or DocumentApp or SlidesApp or FormApp.
      .showModalDialog(html, 'My custom dialog');
}
Page.html
Hello, world! <input type="button" value="Close" onclick="google.script.host.close()" />
Barre laterali personalizzate

Una barra laterale può visualizzare un'interfaccia utente del servizio HTML all'interno di un editor di Documenti, Moduli, Presentazioni e Fogli.
Le barre laterali non sospendono lo script lato server mentre la finestra di dialogo è aperta. Il componente lato client può effettuare chiamate asincrone allo script lato server utilizzando l'API google.script per le interfacce del servizio HTML.
La barra laterale può chiudersi chiamando
google.script.host.close
nel lato client di un'interfaccia di servizio HTML. La barra laterale non può essere chiusa da
altre interfacce, ma solo dall'utente o da se stessa.
Come mostrato nell'esempio seguente, Documenti, Moduli,
Presentazioni e Fogli utilizzano tutti il metodo
Ui.showSidebar per aprire
la barra laterale.
Code.gs
function onOpen() {
  SpreadsheetApp.getUi() // Or DocumentApp or SlidesApp or FormApp.
      .createMenu('Custom Menu')
      .addItem('Show sidebar', 'showSidebar')
      .addToUi();
}

function showSidebar() {
  const html = HtmlService.createHtmlOutputFromFile('Page')
      .setTitle('My custom sidebar');
  SpreadsheetApp.getUi() // Or DocumentApp or SlidesApp or FormApp.
      .showSidebar(html);
}
Page.html
Hello, world! <input type="button" value="Close" onclick="google.script.host.close()" />
Finestre di dialogo di apertura file
Google Picker è un'API JavaScript che consente agli utenti di selezionare o caricare file di Google Drive. Utilizza la libreria Google Picker nel servizio HTML per creare una finestra di dialogo personalizzata che consenta agli utenti di selezionare file esistenti o caricarne di nuovi, quindi passa la selezione allo script.
Requisiti
L'utilizzo di Google Picker con Google Apps Script presenta diversi requisiti:
Configura l'ambiente per Google Picker.
Il progetto di script deve utilizzare un progetto Google Cloud standard.
Passa lo stesso numero di progetto cloud a
PickerBuilder.setAppIdse utilizzi l'ambitodrive.file.Il manifest del progetto Apps Script deve specificare gli ambiti di autorizzazione richiesti dall'API Google Picker in modo che
ScriptApp.getOAuthTokenrestituisca il token corretto perPickerBuilder.setOauthtoken.Limita la chiave API impostata in
PickerBuilder.setDeveloperKeyad Apps Script. Nella sezione Restrizioni delle applicazioni, segui questi passaggi:- Seleziona Referrer HTTP (siti web).
- Nella sezione Limitazioni relative ai siti web, fai clic su Aggiungi un elemento.
- Fai clic su Referrer e inserisci
*.google.com. - Aggiungi un altro elemento e inserisci
*.googleusercontent.comcome referrer. - Fai clic su Fine.
Chiama
PickerBuilder.setOrigin.
Esempio
Il seguente esempio mostra Google Picker in Apps Script.