Google Workspace ドキュメントのダイアログとサイドバー

Google ドキュメントにバインドされているスクリプト スプレッドシートとフォームでは、さまざまな種類のユーザー インターフェース要素を表示できます。たとえば、 事前構築済みのアラートとプロンプトに加え、カスタム ワークフローを含む HTML サービスのページ。通常、これらの要素はメニュー項目から開きます。(Google フォームでは、 ユーザー インターフェース要素は、フォームを開く編集者にのみ表示されます 変更することはできません。フォームを開いて回答したユーザーには影響しません)。

アラート ダイアログ

アラートはあらかじめ用意されたダイアログ ボックスで、Google ドキュメント、スプレッドシート、 スライド、フォームエディタです。メッセージと「OK」というメッセージが表示されます。ボタンタイトルと オプション ボタンです。これは、ウェブブラウザ内のクライアントサイド JavaScript で window.alert() を呼び出す場合と同様です。

ダイアログが開いている間は、アラートによりサーバー側スクリプトが停止します。スクリプト ユーザーがダイアログを閉じた後に再開されるが、JDBC 接続は停止している間は維持されません。

以下の例に示すように、Google ドキュメント、Google フォーム、Google スライド、 そしてスプレッドシートはすべて、メソッド Ui.alert() を使用しています。 3 つのバリエーションがありますデフォルトの「OK」をオーバーライドするにはボタン、 Ui.ButtonSet 列挙型の値 buttons 引数として渡します。ユーザーがクリックしたボタンを評価するには alert() の戻り値 Ui.Button 列挙値。

function onOpen() {
  SpreadsheetApp.getUi() // Or DocumentApp or SlidesApp or FormApp.
      .createMenu('Custom Menu')
      .addItem('Show alert', 'showAlert')
      .addToUi();
}

function showAlert() {
  var ui = SpreadsheetApp.getUi(); // Same variations.

  var result = ui.alert(
     'Please confirm',
     'Are you sure you want to continue?',
      ui.ButtonSet.YES_NO);

  // Process the user's response.
  if (result == ui.Button.YES) {
    // User clicked "Yes".
    ui.alert('Confirmation received.');
  } else {
    // User clicked "No" or X in the title bar.
    ui.alert('Permission denied.');
  }
}

プロンプト ダイアログ

プロンプトはあらかじめ用意されたダイアログ ボックスで、Google ドキュメント、スプレッドシート、 スライド、フォームエディタです。メッセージ、テキスト入力フィールド、「OK」の文字が表示されます。 ボタンタイトルと代替ボタンは省略可能です。これは、通常の window.prompt() クライアントサイドの JavaScript で呼び出すことができます。

ダイアログが開いている間、プロンプトによりサーバーサイド スクリプトは一時停止します。スクリプト ユーザーがダイアログを閉じた後に再開されるが、JDBC 接続は停止している間は維持されません。

以下の例に示すように、Google ドキュメント、Google フォーム、Google スライド、Google スプレッドシートはすべて、Ui.prompt() メソッドを使用します。 3 つのバリエーションがありますデフォルトの「OK」をオーバーライドするには] ボタンを Ui.ButtonSet から値を渡す buttons 引数として指定します。ユーザーのレスポンスを評価するには、prompt() の戻り値をキャプチャし、PromptResponse.getResponseText() を呼び出してユーザーの入力を取得し、PromptResponse.getSelectedButton() の戻り値を Ui.Button 列挙型と比較します。

function onOpen() {
  SpreadsheetApp.getUi() // Or DocumentApp or SlidesApp or FormApp.
      .createMenu('Custom Menu')
      .addItem('Show prompt', 'showPrompt')
      .addToUi();
}

function showPrompt() {
  var ui = SpreadsheetApp.getUi(); // Same variations.

  var result = ui.prompt(
      'Let\'s get to know each other!',
      'Please enter your name:',
      ui.ButtonSet.OK_CANCEL);

  // Process the user's response.
  var button = result.getSelectedButton();
  var text = result.getResponseText();
  if (button == ui.Button.OK) {
    // User clicked "OK".
    ui.alert('Your name is ' + text + '.');
  } else if (button == ui.Button.CANCEL) {
    // User clicked "Cancel".
    ui.alert('I didn\'t get your name.');
  } else if (button == ui.Button.CLOSE) {
    // User clicked X in the title bar.
    ui.alert('You closed the dialog.');
  }
}

カスタム ダイアログ

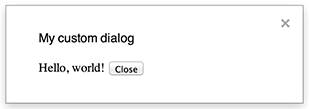
カスタム ダイアログで HTML サービス ユーザーを表示可能 インターフェースを使用してみましょう。

カスタム ダイアログでは、ダイアログが開いている間、サーバーサイド スクリプトが停止されません。クライアントサイド コンポーネントは、サーバーサイド スクリプトを非同期で呼び出すことができます。 google.script API を使用する 使用します。

このダイアログを閉じるには、 google.script.host.close() クライアントサイドに配置する必要があります。このダイアログを閉じることができません ユーザーまたは自身で行うことができます。

以下の例に示すように、Google ドキュメント、フォーム、スライド、スプレッドシートはすべて、メソッド Ui.showModalDialog() を使用してダイアログを開きます。

コード.gs

function onOpen() {
  SpreadsheetApp.getUi() // Or DocumentApp or SlidesApp or FormApp.
      .createMenu('Custom Menu')
      .addItem('Show dialog', 'showDialog')
      .addToUi();
}

function showDialog() {
  var html = HtmlService.createHtmlOutputFromFile('Page')
      .setWidth(400)
      .setHeight(300);
  SpreadsheetApp.getUi() // Or DocumentApp or SlidesApp or FormApp.
      .showModalDialog(html, 'My custom dialog');
}

Page.html

Hello, world! <input type="button" value="Close" onclick="google.script.host.close()" />

カスタム サイドバー

サイドバーに HTML サービス ユーザーを表示できる インターフェース。

ダイアログの開いている間は、サイドバーによってサーバー側スクリプトが一時停止されません。クライアントサイド コンポーネントは、HTML サービス インターフェースの google.script API を使用して、サーバーサイド スクリプトを非同期で呼び出すことができます。

サイドバーは、 google.script.host.close() クライアントサイドに配置する必要があります。サイドバーを閉じることはできません ユーザーまたは自身で行うことができます。

以下の例に示すように、Google ドキュメント、フォーム、スライド、スプレッドシートはすべて、Ui.showSidebar() メソッドを使用してサイドバーを開きます。

コード.gs

function onOpen() {
  SpreadsheetApp.getUi() // Or DocumentApp or SlidesApp or FormApp.
      .createMenu('Custom Menu')
      .addItem('Show sidebar', 'showSidebar')
      .addToUi();
}

function showSidebar() {
  var html = HtmlService.createHtmlOutputFromFile('Page')
      .setTitle('My custom sidebar');
  SpreadsheetApp.getUi() // Or DocumentApp or SlidesApp or FormApp.
      .showSidebar(html);
}

Page.html

Hello, world! <input type="button" value="Close" onclick="google.script.host.close()" />

ファイル開きダイアログ

Google Picker は「ファイルを開く」保存されている情報のダイアログ Google サーバー(Google ドライブ、Google 画像検索、Google ビデオなど) 検索など。

以下の例に示すように、Picker のクライアントサイドの JavaScript API を使用できます。 HTML サービスでカスタム ダイアログを作成し、 ユーザーが既存のファイルを選択するか、新しいファイルをアップロードしてから、その選択内容を 使用できます。

Picker を有効にして API キーを取得する手順は次のとおりです。

  1. スクリプト プロジェクトが標準の GCP プロジェクトを使用していることを確認します。
  2. 「Google Picker API」を有効にする必要があります
  3. Google Cloud プロジェクトが開いたままの状態で、[API とサービス] に移動し、 [認証情報] をクリックします。
  4. [認証情報を作成] &gt; [API キー] をクリックします。この操作によりキーが作成されますが、キーを編集してアプリケーションの制限と API の制限の両方をキーに追加する必要があります。
  5. API キー ダイアログで [閉じる] をクリックします。
  6. 作成した API キーの横にあるその他アイコン その他アイコン> [API キーを編集] をクリックします。
  7. [アプリケーションの制限] で、次の手順を行います。

    1. [HTTP リファラー(ウェブサイト)] を選択します。
    2. [ウェブサイトの制限] で [項目を追加] をクリックします。
    3. [参照 URL] をクリックし、*.google.com を入力します。
    4. 別のアイテムを追加し、参照元として *.googleusercontent.com と入力します。
    5. [完了] をクリックします。
  8. [API の制限] で、次の操作を行います。

    1. [キーを制限] を選択します。
    2. [API を選択] セクションで [Google Picker API] を選択し、[OK] をクリックします。

      注: 有効にしないと Google Picker API は表示されません。 Cloud Logging が有効になっている API のみがリストに表示されるためです。 できます。

  9. [API キー] で、[クリップボードにコピー] 「クリップボードにコピー」アイコン をクリックします。

  10. 下部にある [保存] をクリックします。

code.gs

選択ツール/コード.gs
/**
 * Creates a custom menu in Google Sheets when the spreadsheet opens.
 */
function onOpen() {
  try {
    SpreadsheetApp.getUi().createMenu('Picker')
        .addItem('Start', 'showPicker')
        .addToUi();
  } catch (e) {
    // TODO (Developer) - Handle exception
    console.log('Failed with error: %s', e.error);
  }
}

/**
 * Displays an HTML-service dialog in Google Sheets that contains client-side
 * JavaScript code for the Google Picker API.
 */
function showPicker() {
  try {
    const html = HtmlService.createHtmlOutputFromFile('dialog.html')
        .setWidth(600)
        .setHeight(425)
        .setSandboxMode(HtmlService.SandboxMode.IFRAME);
    SpreadsheetApp.getUi().showModalDialog(html, 'Select a file');
  } catch (e) {
    // TODO (Developer) - Handle exception
    console.log('Failed with error: %s', e.error);
  }
}

/**
 * Gets the user's OAuth 2.0 access token so that it can be passed to Picker.
 * This technique keeps Picker from needing to show its own authorization
 * dialog, but is only possible if the OAuth scope that Picker needs is
 * available in Apps Script. In this case, the function includes an unused call
 * to a DriveApp method to ensure that Apps Script requests access to all files
 * in the user's Drive.
 *
 * @return {string} The user's OAuth 2.0 access token.
 */
function getOAuthToken() {
  try {
    DriveApp.getRootFolder();
    return ScriptApp.getOAuthToken();
  } catch (e) {
    // TODO (Developer) - Handle exception
    console.log('Failed with error: %s', e.error);
  }
}

dialog.html

picker/dialog.html
<!DOCTYPE html>
<html>
<head>
  <link rel="stylesheet" href="https://ssl.gstatic.com/docs/script/css/add-ons.css">
  <script>
    // IMPORTANT: Replace the value for DEVELOPER_KEY with the API key obtained
    // from the Google Developers Console.
    var DEVELOPER_KEY = 'ABC123 ... ';
    var DIALOG_DIMENSIONS = {width: 600, height: 425};
    var pickerApiLoaded = false;

    /**
     * Loads the Google Picker API.
     */
    function onApiLoad() {
      gapi.load('picker', {'callback': function() {
        pickerApiLoaded = true;
      }});
     }

    /**
     * Gets the user's OAuth 2.0 access token from the server-side script so that
     * it can be passed to Picker. This technique keeps Picker from needing to
     * show its own authorization dialog, but is only possible if the OAuth scope
     * that Picker needs is available in Apps Script. Otherwise, your Picker code
     * will need to declare its own OAuth scopes.
     */
    function getOAuthToken() {
      google.script.run.withSuccessHandler(createPicker)
          .withFailureHandler(showError).getOAuthToken();
    }

    /**
     * Creates a Picker that can access the user's spreadsheets. This function
     * uses advanced options to hide the Picker's left navigation panel and
     * default title bar.
     *
     * @param {string} token An OAuth 2.0 access token that lets Picker access the
     *     file type specified in the addView call.
     */
    function createPicker(token) {
      if (pickerApiLoaded && token) {
        var picker = new google.picker.PickerBuilder()
            // Instruct Picker to display only spreadsheets in Drive. For other
            // views, see https://developers.google.com/picker/docs/#otherviews
            .addView(google.picker.ViewId.SPREADSHEETS)
            // Hide the navigation panel so that Picker fills more of the dialog.
            .enableFeature(google.picker.Feature.NAV_HIDDEN)
            // Hide the title bar since an Apps Script dialog already has a title.
            .hideTitleBar()
            .setOAuthToken(token)
            .setDeveloperKey(DEVELOPER_KEY)
            .setCallback(pickerCallback)
            .setOrigin(google.script.host.origin)
            // Instruct Picker to fill the dialog, minus 2 pixels for the border.
            .setSize(DIALOG_DIMENSIONS.width - 2,
                DIALOG_DIMENSIONS.height - 2)
            .build();
        picker.setVisible(true);
      } else {
        showError('Unable to load the file picker.');
      }
    }

    /**
     * A callback function that extracts the chosen document's metadata from the
     * response object. For details on the response object, see
     * https://developers.google.com/picker/docs/result
     *
     * @param {object} data The response object.
     */
    function pickerCallback(data) {
      var action = data[google.picker.Response.ACTION];
      if (action == google.picker.Action.PICKED) {
        var doc = data[google.picker.Response.DOCUMENTS][0];
        var id = doc[google.picker.Document.ID];
        var url = doc[google.picker.Document.URL];
        var title = doc[google.picker.Document.NAME];
        document.getElementById('result').innerHTML =
            '<b>You chose:</b><br>Name: <a href="' + url + '">' + title +
            '</a><br>ID: ' + id;
      } else if (action == google.picker.Action.CANCEL) {
        document.getElementById('result').innerHTML = 'Picker canceled.';
      }
    }

    /**
     * Displays an error message within the #result element.
     *
     * @param {string} message The error message to display.
     */
    function showError(message) {
      document.getElementById('result').innerHTML = 'Error: ' + message;
    }
  </script>
</head>
<body>
  <div>
    <button onclick="getOAuthToken()">Select a file</button>
    <p id="result"></p>
  </div>
  <script src="https://apis.google.com/js/api.js?onload=onApiLoad"></script>
</body>
</html>