Page Summary
-
This tutorial guides you through setting up a
purchaseevent on your website to track purchase data in Google Analytics. -
You need a Google Analytics account, web data stream, the Google tag on your site, access to source code, and Editor role or above.
-
You can trigger the
purchaseevent when the purchase page loads or when a "Purchase" button is clicked. -
Use the DebugView report to verify that you are collecting the purchase event data correctly in real time.
-
After approximately 24 hours, the purchase data will be available in your Google Analytics reports, explorations, and API.
This tutorial shows you how to set up a purchase event on your website so you
can measure when someone makes a purchase. The tutorial includes the dimensions,
metrics, and reports that Analytics populates with data from the event. To learn
more about the ecommerce events, see Measure ecommerce.
Before you begin
This tutorial assumes that you've done the following:
- Create a Google Analytics account and property
- Create a web data stream for your website
- Place the Google Analytics tag on your website
It also assumes that you have the following:
- Access to your website source code
- The Editor (or above) role to the Google Analytics account
Step 1: Add the event to your website
You should place the purchase event on the page of your website where
someone makes a purchase. For example, you could add the event on the
confirmation page that appears when someone makes a purchase. This tutorial
shows you how to add the event to a page where someone clicks a "Purchase"
button.
Place the event in a <script> tag at the end of the <body> tag. Placing the
event directly in the <script> tag triggers the event when the page loads. The
next section describes how to trigger the event when someone clicks "Purchase".
<!--
  Note: In the following code sample, make sure to
  replace "TAG_ID" with your tag ID.
  Learn more: https://support.google.com/tagmanager/answer/12326985
-->
<!DOCTYPE html>
<html lang="en">
<head>
    <!-- Google tag (gtag.js) -->
    <script async src="https://www.googletagmanager.com/gtag/js?id=TAG_ID"></script>
    <script>
        window.dataLayer = window.dataLayer || [];
        function gtag(){dataLayer.push(arguments);}
        gtag('js', new Date());

        gtag('config', 'TAG_ID');
    </script>
</head>
<body>
    <div>This is where the purchase form would go</div>
    <button>Submit</button>
    <script>
    gtag("event", "purchase", {
        transaction_id: "T_12345_1",
        value: 30.03,
        tax: 4.90,
        shipping: 5.99,
        currency: "USD",
        coupon: "SUMMER_SALE",
        items: [
        // If someone purchases more than one item,
        // you can add those items to the items array
         {
          item_id: "SKU_12345",
          item_name: "Stan and Friends Tee",
          affiliation: "Google Merchandise Store",
          coupon: "SUMMER_FUN",
          discount: 2.22,
          index: 0,
          item_brand: "Google",
          item_category: "Apparel",
          item_category2: "Adult",
          item_category3: "Shirts",
          item_category4: "Crew",
          item_category5: "Short sleeve",
          item_list_id: "related_products",
          item_list_name: "Related Products",
          item_variant: "green",
          location_id: "ChIJIQBpAG2ahYAR_6128GcTUEo",
          price: 10.01,
          quantity: 3
        }]
    });
    </script>
</body>
</html>
Step 2: Connect the event to a button
You can set up the purchase event so it triggers when someone clicks a
"Purchase" button in a few ways. One way is to add an ID to the "Purchase"
button and then place the event code in an event listener. In the following
example, the event is only sent when someone clicks a button with the ID
purchase.
<!--
  Note: In the following code sample, make sure to
  replace "TAG_ID" with your tag ID.
  Learn more: https://support.google.com/tagmanager/answer/12326985
-->
<!DOCTYPE html>
<html lang="en">
<head>
    <!-- Google tag (gtag.js) -->
    <script async src="https://www.googletagmanager.com/gtag/js?id=TAG_ID"></script>
    <script>
        window.dataLayer = window.dataLayer || [];
        function gtag(){dataLayer.push(arguments);}
        gtag('js', new Date());

        gtag('config', 'TAG_ID');
    </script>
</head>
<body>
    <div>This is where the purchase form would go</div>
    <button id="purchase">Purchase</button>
    <script>
    document.getElementById("purchase").addEventListener("click", function () {
        gtag("event", "purchase", {
                // This purchase event uses a different transaction ID
                // from the previous purchase event so Analytics
                // doesn't deduplicate the events.
                // Learn more: https://support.google.com/analytics/answer/12313109
                transaction_id: "T_12345_2",
                value: 30.03,
                tax: 4.90,
                shipping: 5.99,
                currency: "USD",
                coupon: "SUMMER_SALE",
                items: [
                {
                  item_id: "SKU_12345",
                  item_name: "Stan and Friends Tee",
                  affiliation: "Google Merchandise Store",
                  coupon: "SUMMER_FUN",
                  discount: 2.22,
                  index: 0,
                  item_brand: "Google",
                  item_category: "Apparel",
                  item_category2: "Adult",
                  item_category3: "Shirts",
                  item_category4: "Crew",
                  item_category5: "Short sleeve",
                  item_list_id: "related_products",
                  item_list_name: "Related Products",
                  item_variant: "green",
                  location_id: "ChIJIQBpAG2ahYAR_6128GcTUEo",
                  price: 10.01,
                  quantity: 3
                }]
          });
      });
    </script>
</body>
</html>
Step 3: Verify that you're collecting the data
The DebugView report shows realtime data from your website so you can make
sure you're setting up events correctly. To enable debug mode on a web page, add
the following debug_mode parameter to the config command:
<!--
  Note: In the following code sample, make sure to
  replace "TAG_ID" with your tag ID.
  Learn more: https://support.google.com/tagmanager/answer/12326985
-->
<!DOCTYPE html>
<html lang="en">
<head>
    <!-- Google tag (gtag.js) -->
    <script async src="https://www.googletagmanager.com/gtag/js?id=TAG_ID"></script>
    <script>
        window.dataLayer = window.dataLayer || [];
        function gtag(){dataLayer.push(arguments);}
        gtag('js', new Date());

        gtag('config', 'TAG_ID',{ 'debug_mode': true });
    </script>
</head>
<body>
    <div>This is where the purchase form would go</div>
    <button id="purchase">Purchase</button>
    <script>
    document.getElementById("purchase").addEventListener("click", function () {
        gtag("event", "purchase", {
                // This purchase event uses a different transaction ID
                // from the previous purchase event so Analytics
                // doesn't deduplicate the events.
                // Learn more: https://support.google.com/analytics/answer/12313109
                transaction_id: "T_12345_3",
                value: 30.03,
                tax: 4.90,
                shipping: 5.99,
                currency: "USD",
                coupon: "SUMMER_SALE",
                items: [
                {
                  item_id: "SKU_12345",
                  item_name: "Stan and Friends Tee",
                  affiliation: "Google Merchandise Store",
                  coupon: "SUMMER_FUN",
                  discount: 2.22,
                  index: 0,
                  item_brand: "Google",
                  item_category: "Apparel",
                  item_category2: "Adult",
                  item_category3: "Shirts",
                  item_category4: "Crew",
                  item_category5: "Short sleeve",
                  item_list_id: "related_products",
                  item_list_name: "Related Products",
                  item_variant: "green",
                  location_id: "ChIJIQBpAG2ahYAR_6128GcTUEo",
                  price: 10.01,
                  quantity: 3
                }]
        });
    });
    </script>
</body>
</html>
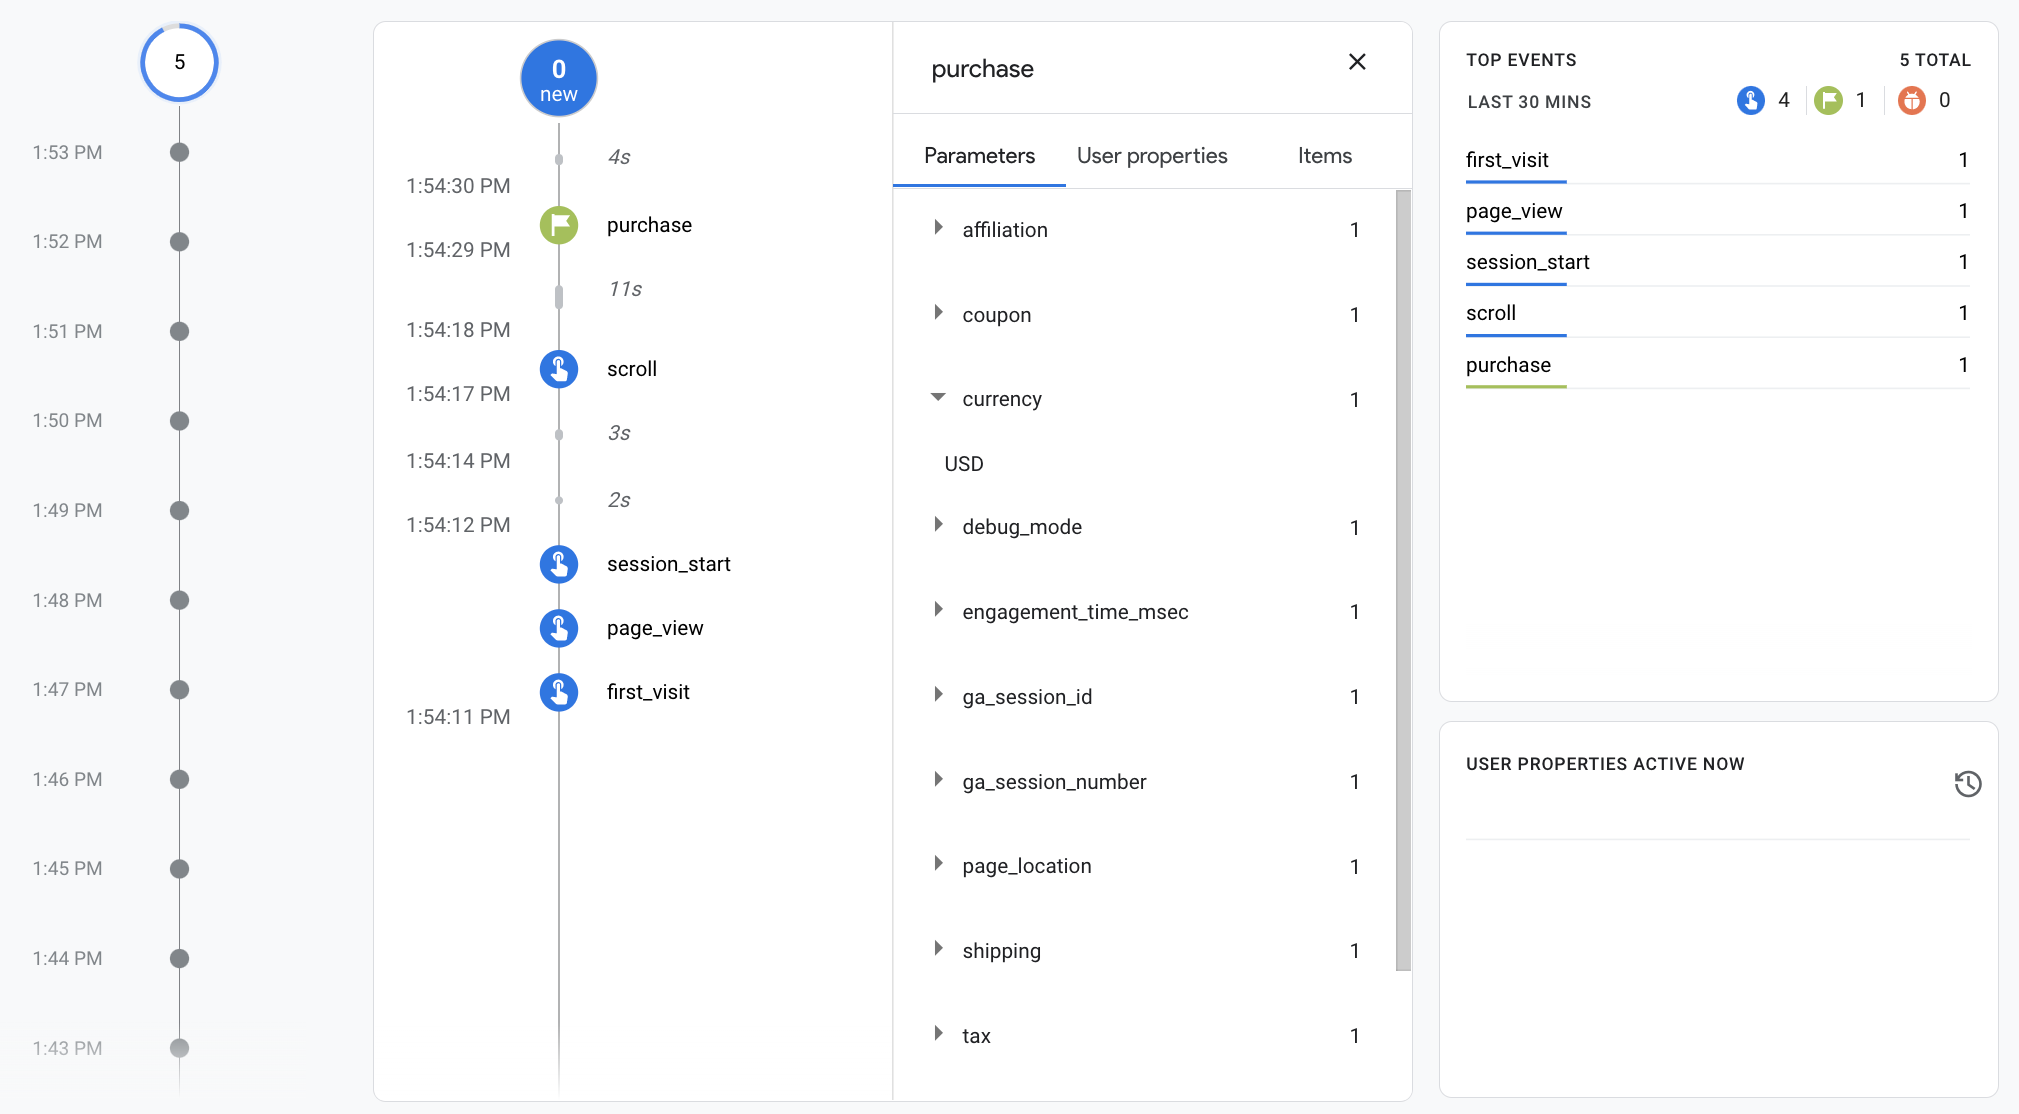
Once you enable debug mode, you will start to see events populate the DebugView report as people use your website. For example, clicking the "Purchase" button on your website populates the report with the following data. You can select an event to see the parameters, user properties, and items associated with the event.
Step 4: See your ecommerce data
After about 24 hours, the data you sent with the purchase event becomes
available in your reports, explorations, and Google Analytics Data API.
You can also access the data in BigQuery when you set up BigQuery Export.
The "purchase" event automatically populates a variety of prebuilt dimensions
and metrics, which are used in reports and explorations. The
following are some of the dimensions that are populated with data from the
purchase event in the first step:
| Parameter | Dimension | Value |
|---|---|---|
affiliation |
Item affiliation | Google Merchandise Store |
currency |
Currency | USD |
discount |
Item discount amount | 2.22 |
index |
Item list position | 0 |
item_brand |
Item brand | |
item_category |
Item category | Apparel |
item_id |
Item ID | SKU_12345 |
item_list_id |
Item list ID | related_products |
item_list_name |
Item list name | Related Products |
item_name |
Item name | Stan and Friends Tee |
item_variant |
Item variant | green |
location_id |
Item location ID | ChIJIQBpAG2ahYAR_6128GcTUEo (the Google Place ID for San Francisco) |
shipping |
Shipping amount | 5.99 |
tax |
Tax amount | 4.90 |
transaction_id |
Transaction ID | T_12345 |
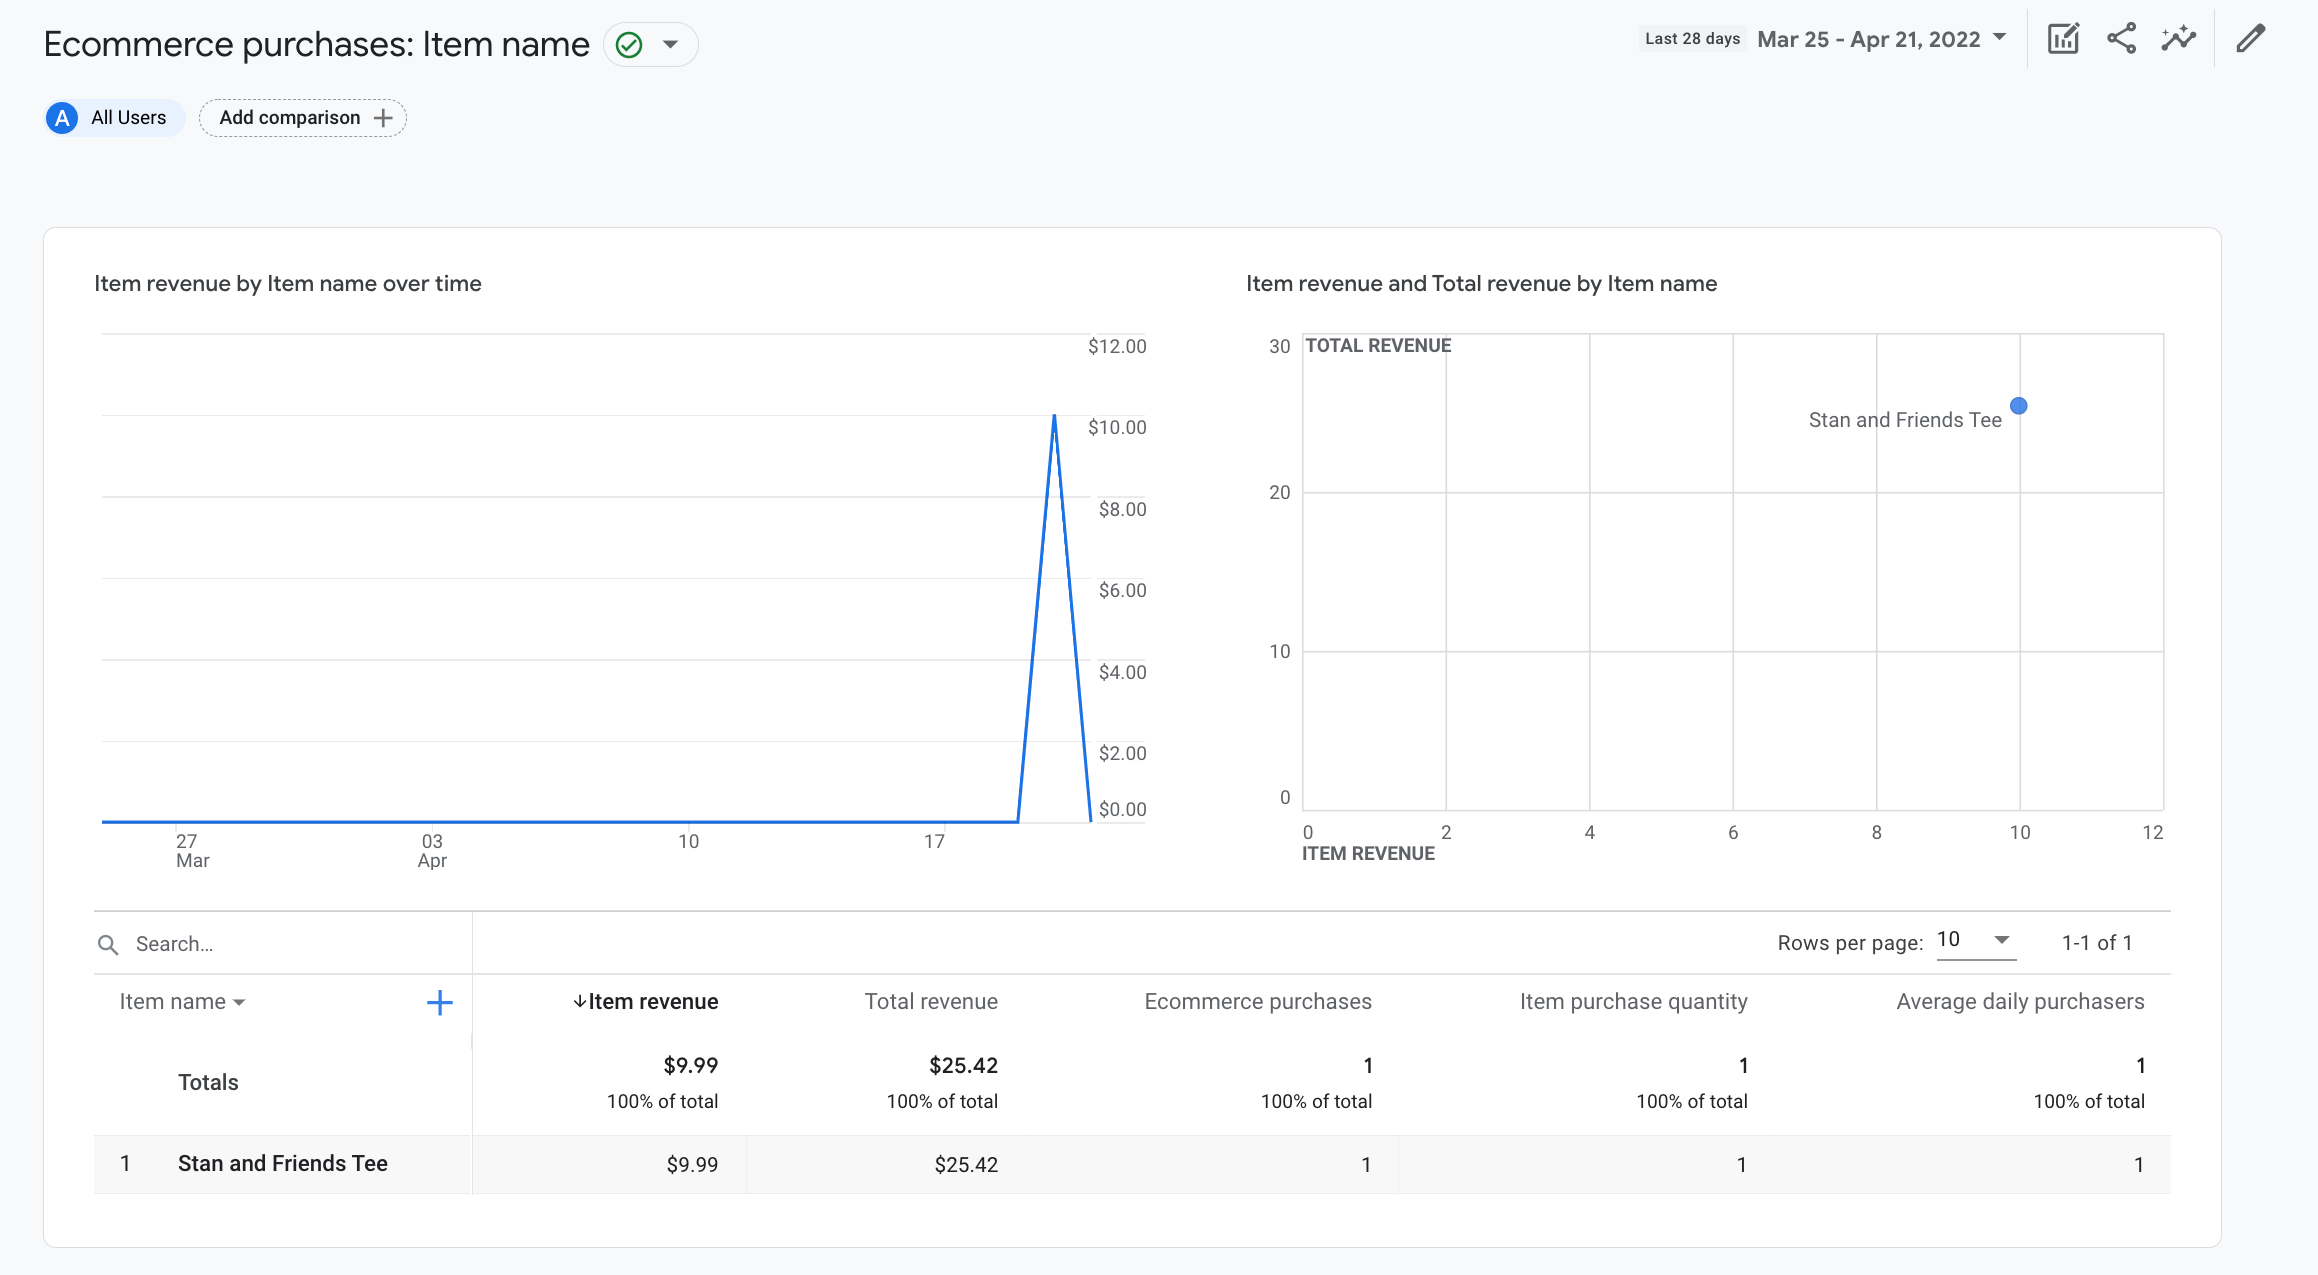
In addition to the dimensions, Google Analytics populates a number of ecommerce and revenue-related metrics. For example, if a user clicks the "Purchase" button once, then the following metrics are populated in Google Analytics:
- Item revenue metric has a value of $30.03
- Total revenue metric has a value of $30.03
- Ecommerce purchases metric has a value of 1
You can use these dimensions and metrics to build explorations and custom reports, but you can also use the following prebuilt Ecommerce purchases report to see your ecommerce data: