Google 사용자 메시지 플랫폼 (UMP) SDK는 개인 정보 보호 옵션을 관리하는 데 도움이 되는 개인 정보 보호 및 메시지 도구입니다. 자세한 내용은 개인 정보 보호 및 메시지에 대한 정보를 참고하세요.
메시지 유형 만들기
Ad Manager 계정의 개인 정보 보호 및 메시지 탭에서 사용 가능한 사용자 메시지 유형 중 하나를 사용하여 사용자 메시지를 만듭니다. UMP SDK는 프로젝트에 설정된 Ad Manager 애플리케이션 ID에서 생성된 개인 정보 보호 메시지를 표시하려고 시도합니다.
자세한 내용은 개인 정보 보호 및 메시지에 대한 정보를 참고하세요.
SDK 가져오기
CocoaPods (권장)
SDK를 iOS 프로젝트로 가져오는 가장 쉬운 방법은 CocoaPods를 사용하는 것입니다. 프로젝트의 Podfile을 열고 다음 행을 앱의 타겟에 추가하세요.
pod 'GoogleUserMessagingPlatform'
그런 후 다음 명령어를 실행하세요.
pod install --repo-updateCocoaPods를 처음 사용하는 경우에는 CocoaPods 사용에서 Podfile을 만들고 사용하는 방법을 참고하세요.
Swift Package Manager
UMP SDK는 Swift Package Manager도 지원합니다. Swift 패키지를 가져오려면 다음 단계를 따르세요.
Xcode에서 File(파일) > Add Packages(패키지 추가)...로 이동하여 UMP SDK Swift 패키지를 설치합니다.
표시되는 메시지에서 UMP SDK Swift 패키지 GitHub 저장소를 검색합니다.
https://github.com/googleads/swift-package-manager-google-user-messaging-platform.git사용할 UMP SDK Swift 패키지의 버전을 선택합니다. 새 프로젝트의 경우 Up to Next Major Version(최대 다음 메이저 버전)을 사용하는 것이 좋습니다.
그러면 Xcode에서 패키지 종속 항목을 확인하고 백그라운드에서 다운로드합니다. 패키지 종속 항목을 추가하는 방법에 대한 자세한 내용은 Apple 도움말을 참고하세요.
수동 다운로드
SDK를 가져오는 다른 방법은 수동으로 다운로드하는 것입니다.
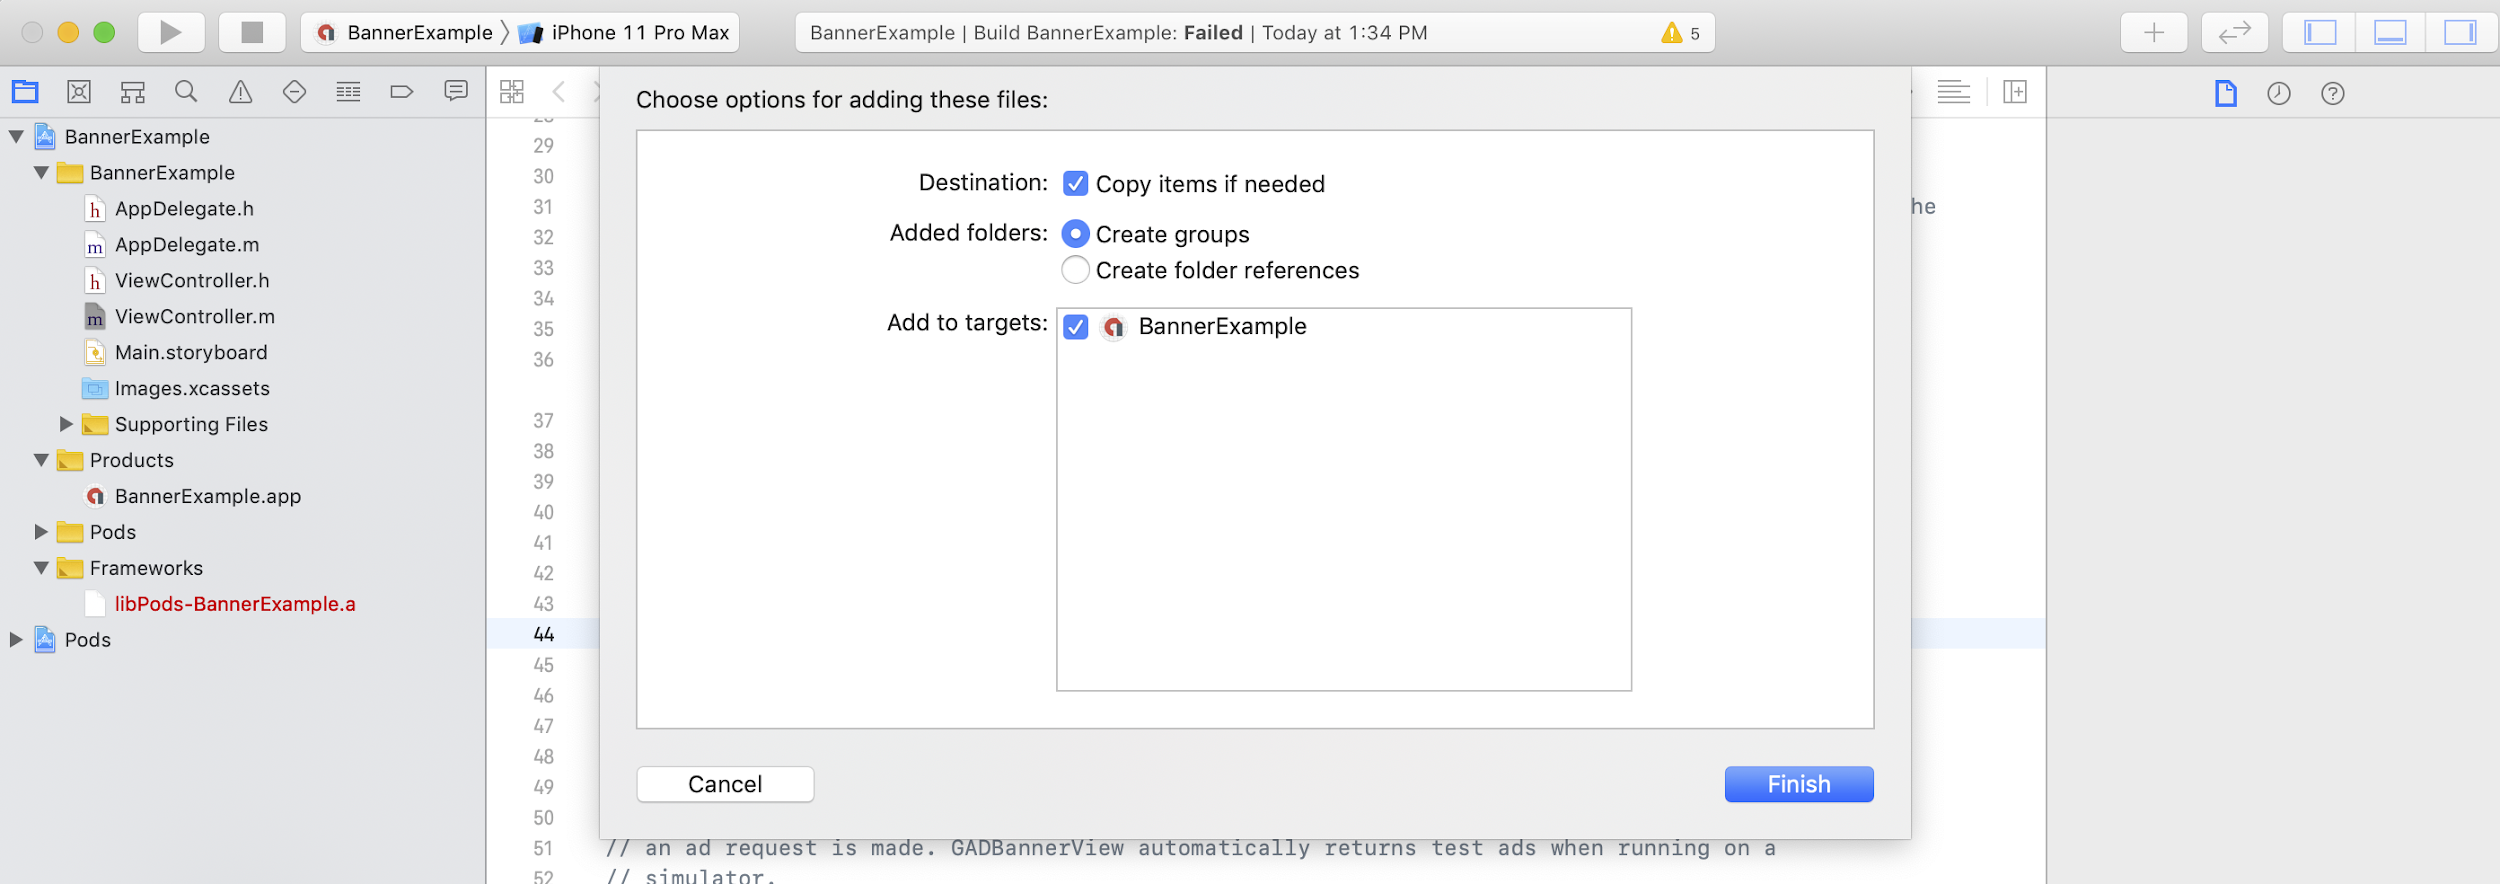
그런 다음 프레임워크를 Xcode 프로젝트로 드래그하여 Copy items if needed(필요한 경우 항목 복사)를 선택합니다.

그러면 다음을 사용하여 필요한 모든 파일에 프레임워크를 포함할 수 있습니다.
Swift
import UserMessagingPlatform
Objective-C
#include <UserMessagingPlatform/UserMessagingPlatform.h>
애플리케이션 ID 추가
Ad Manager UI에서 애플리케이션 ID를 확인할 수 있습니다.
다음 코드 스니펫을 사용하여 Info.plist에 ID를 추가합니다.
<key>GADApplicationIdentifier</key>
<string>ca-app-pub-xxxxxxxxxxxxxxxx~yyyyyyyyyy</string>
사용자의 동의 정보 가져오기
앱을 실행할 때마다
requestConsentInfoUpdate(with:completionHandler:)를 사용하여 사용자 동의 정보 업데이트를 요청해야 합니다. 이 요청은 다음을 확인합니다.
- 동의가 필요한지 여부 예를 들어 처음으로 동의가 필요하거나 이전 동의 결정이 만료된 경우입니다.
- 개인 정보 보호 옵션 진입점이 필요한지 여부 일부 개인 정보 보호 메시지에서는 앱이 사용자가 언제든지 개인 정보 보호 옵션을 수정할 수 있도록 허용해야 합니다.
Swift
// Requesting an update to consent information should be called on every app launch.
ConsentInformation.shared.requestConsentInfoUpdate(with: parameters) {
requestConsentError in
// ...
}
SwiftUI
// Requesting an update to consent information should be called on every app launch.
ConsentInformation.shared.requestConsentInfoUpdate(with: parameters) {
requestConsentError in
// ...
}
Objective-C
// Requesting an update to consent information should be called on every app launch.
[UMPConsentInformation.sharedInstance
requestConsentInfoUpdateWithParameters:parameters
completionHandler:^(NSError *_Nullable requestConsentError) {
// ...
}];
개인 정보 보호 메시지 양식을 로드하고 표시
최신 동의 상태를 수신한 후
loadAndPresentIfRequired(from:)를 호출하여 사용자 동의를 수집하는 데 필요한 양식을 로드합니다. 양식은 로드 후 즉시 표시됩니다.
Swift
try await ConsentForm.loadAndPresentIfRequired(from: viewController)
SwiftUI
try await ConsentForm.loadAndPresentIfRequired(from: nil)
Objective-C
[UMPConsentForm
loadAndPresentIfRequiredFromViewController:viewController
completionHandler:^(NSError *_Nullable loadAndPresentError) {
// Consent gathering process is complete.
}];
개인 정보 보호 옵션
일부 개인 정보 보호 메시지 양식은 게시자가 렌더링한 개인 정보 보호 옵션 진입점에서 표시되므로 사용자가 언제든지 개인 정보 보호 옵션을 관리할 수 있습니다. 개인 정보 보호 옵션 진입점에서 사용자에게 표시되는 메시지에 대해 자세히 알아보려면 사용 가능한 사용자 메시지 유형을 참고하세요.
개인 정보 보호 옵션 진입점이 필요한지 확인
requestConsentInfoUpdate(with:completionHandler:)를 호출한 후
UMPConsentInformation.sharedInstance.privacyOptionsRequirementStatus를 확인하여 앱에 개인 정보 보호 옵션 진입점이 필요한지 확인합니다. 진입점이 필요한 경우 개인 정보 보호 옵션 양식을 표시하는 표시되고 상호작용 가능한 UI 요소를 앱에 추가합니다. 개인 정보 보호 진입점이 필요하지 않은 경우 UI 요소가 표시되지 않고 상호작용할 수 없도록 구성하세요.
Swift
var isPrivacyOptionsRequired: Bool {
return ConsentInformation.shared.privacyOptionsRequirementStatus == .required
}
Objective-C
- (BOOL)isPrivacyOptionsRequired {
return UMPConsentInformation.sharedInstance.privacyOptionsRequirementStatus ==
UMPPrivacyOptionsRequirementStatusRequired;
}
개인 정보 보호 옵션 요구사항 상태의 전체 목록은
UMPPrivacyOptionsRequirementStatus를 참고하세요.
개인 정보 보호 옵션 양식 표시
사용자가 요소와 상호작용하면 개인 정보 보호 옵션 양식을 표시합니다.
Swift
try await ConsentForm.presentPrivacyOptionsForm(from: viewController)
SwiftUI
try await ConsentForm.presentPrivacyOptionsForm(from: nil)
Objective-C
[UMPConsentForm presentPrivacyOptionsFormFromViewController:viewController
completionHandler:completionHandler];
사용자 동의를 얻어 광고 요청
광고를 요청하기 전에
UMPConsentInformation.sharedInstance.canRequestAds를 사용하여 사용자로부터 동의를 얻었는지 확인합니다.
Swift
ConsentInformation.shared.canRequestAds
Objective-C
UMPConsentInformation.sharedInstance.canRequestAds;
동의를 수집하는 동안 광고를 요청할 수 있는지 확인해야 하는 위치는 다음과 같습니다.
- UMP SDK가 현재 세션에서 동의를 수집한 후
requestConsentInfoUpdate(with:completionHandler:)를 호출한 직후 UMP SDK가 이전 앱 세션에서 동의를 획득했을 수 있습니다.
동의 수집 프로세스 중에 오류가 발생하면 광고를 요청할 수 있는지 확인하세요. UMP SDK는 이전 앱 세션의 동의 상태를 사용합니다.
중복 광고 요청 작업 방지
동의를 수집한 후와
requestConsentInfoUpdate(with:completionHandler:)를 호출한 후에
UMPConsentInformation.sharedInstance.canRequestAds를 확인할 때 두 검사 모두 true를 반환할 수 있는 중복 광고 요청을 방지하는 로직을 사용해야 합니다. 예를 들어 불리언 변수를 사용합니다.
테스트
개발하면서 앱에서 통합을 테스트하려는 경우에는 다음 단계에 따라 테스트 기기를 프로그래매틱 방식으로 등록하세요. 앱을 출시하기 전에 이러한 테스트 기기 ID를 설정하는 코드를 반드시 삭제하세요.
requestConsentInfoUpdate(with:completionHandler:)를 호출합니다.로그 출력에서 기기 ID 및 기기를 테스트 기기로 추가하는 방법을 보여주는 다음 예와 유사한 메시지를 확인합니다.
<UMP SDK>To enable debug mode for this device, set: UMPDebugSettings.testDeviceIdentifiers = @[2077ef9a63d2b398840261c8221a0c9b]테스트 기기 ID를 클립보드에 복사합니다.
UMPDebugSettings().testDeviceIdentifiers를 호출하고 테스트 기기 ID 목록을 전달하도록 코드를 수정합니다.Swift
let parameters = RequestParameters()
let debugSettings = DebugSettings()

debugSettings.testDeviceIdentifiers = ["TEST-DEVICE-HASHED-ID"]
parameters.debugSettings = debugSettings

// Include the UMPRequestParameters in your consent request.
ConsentInformation.shared.requestConsentInfoUpdate(
    with: parameters,
    completionHandler: { error in
      // ...
    })
Objective-C
UMPRequestParameters *parameters = [[UMPRequestParameters alloc] init];
UMPDebugSettings *debugSettings = [[UMPDebugSettings alloc] init];

debugSettings.testDeviceIdentifiers = @[ @"TEST-DEVICE-HASHED-ID" ];
parameters.debugSettings = debugSettings;

// Include the UMPRequestParameters in your consent request.
[UMPConsentInformation.sharedInstance
    requestConsentInfoUpdateWithParameters:parameters
                        completionHandler:^(NSError *_Nullable error){
                          // ...
}];
지역 강제 설정
UMP SDK는
geography를 사용하여 기기가 EEA 또는 영국과 같은 다양한 지역에 있는 것처럼 앱 동작을 테스트할 수 있는 방법을 제공합니다. 디버그 설정은 테스트 기기에서만 작동합니다.
Swift
let parameters = RequestParameters()
let debugSettings = DebugSettings()

debugSettings.testDeviceIdentifiers = ["TEST-DEVICE-HASHED-ID"]
debugSettings.geography = .EEA
parameters.debugSettings = debugSettings

// Include the UMPRequestParameters in your consent request.
ConsentInformation.shared.requestConsentInfoUpdate(
    with: parameters,
    completionHandler: { error in
      // ...
    })
Objective-C
UMPRequestParameters *parameters = [[UMPRequestParameters alloc] init];
UMPDebugSettings *debugSettings = [[UMPDebugSettings alloc] init];

debugSettings.testDeviceIdentifiers = @[ @"TEST-DEVICE-HASHED-ID" ];
debugSettings.geography = UMPDebugGeographyEEA;
parameters.debugSettings = debugSettings;

// Include the UMPRequestParameters in your consent request.
[UMPConsentInformation.sharedInstance
    requestConsentInfoUpdateWithParameters:parameters
                         completionHandler:^(NSError *_Nullable error){
                           // ...
}];
동의 상태 재설정
UMP SDK로 앱을 테스트할 때 사용자의 첫 설치 경험을 시뮬레이션할 수 있도록 SDK의 상태를 재설정하면 유용합니다.
SDK에서는 이를 위한 reset 메서드를 제공합니다.
Swift
ConsentInformation.shared.reset()
Objective-C
[UMPConsentInformation.sharedInstance reset];
GitHub의 예
이 페이지에서 다루는 UMP SDK 통합의 전체 예는

