Muestra un formato de anuncio nativo definido por el sistema
Cuando se cargue un anuncio nativo, tu app recibirá un objeto de anuncio nativo a través de uno de los mensajes del protocolo GADAdLoaderDelegate. Luego, tu app debe mostrar el anuncio (aunque no necesariamente de inmediato).
Para facilitar la visualización de los formatos de anuncios definidos por el sistema, el SDK ofrece algunos recursos útiles.
GADNativeAdView
A GADNativeAd le corresponde la clase de "vista de anuncio" GADNativeAdView,
un objeto UIView que los publicadores deben usar para mostrar el anuncio.
Por ejemplo, un solo objeto GADNativeAdView puede mostrar una instancia única de un GADNativeAd. Cada uno de los objetos UIView que se usan para mostrar los recursos de ese anuncio debe ser una vista secundaria de ese objeto GADNativeAdView.
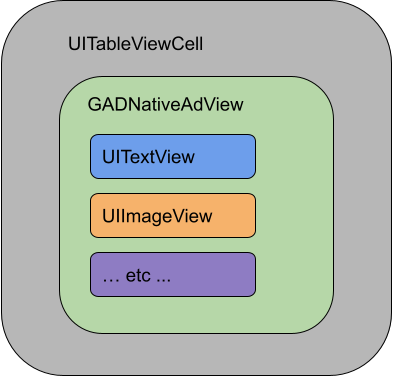
Si mostraras un anuncio en un objeto UITableView, por ejemplo, la jerarquía de vistas de una de las celdas podría verse de la siguiente manera:

La clase GADNativeAdView también proporciona IBOutlets para registrar la vista que se usa para cada recurso individual y un método para registrar el objeto GADNativeAd en sí. Registrar las vistas de esta manera permite que el SDK controle automáticamente tareas como las siguientes:
- Registrar clics
- Registrar impresiones (cuando el primer píxel es visible en la pantalla)
- Mostrar la superposición de AdChoices
Superposición de AdChoices
En el caso de los anuncios nativos indirectos (publicados a través del reabastecimiento de Ad Manager o a través de Ad Exchange o AdSense), el SDK agrega una superposición de AdChoices. Deja espacio en la esquina que prefieras de la vista de tu anuncio nativo para el logotipo de AdChoices que se inserta automáticamente. Además, asegúrate de que la superposición de AdChoices se coloque en contenido que permita ver el ícono con claridad. Para obtener más información sobre la apariencia y la función de la superposición, consulta los lineamientos para la implementación de anuncios programáticos nativos.
Atribución de anuncios programáticos nativos
Cuando se publican anuncios programáticos nativos, se debe mostrar una atribución de anuncio para indicar que la vista es un anuncio. Obtén más información en nuestros lineamientos de políticas.Ejemplo de código
En esta sección, se indica cómo mostrar anuncios nativos con vistas cargadas de forma dinámica desde archivos XIB. Este puede ser un enfoque muy útil al utilizar objetos GADAdLoaders configurados para solicitar varios formatos.
Diseña las vistas UIView
El primer paso es diseñar las vistas UIViews que mostrarán los recursos del anuncio nativo.
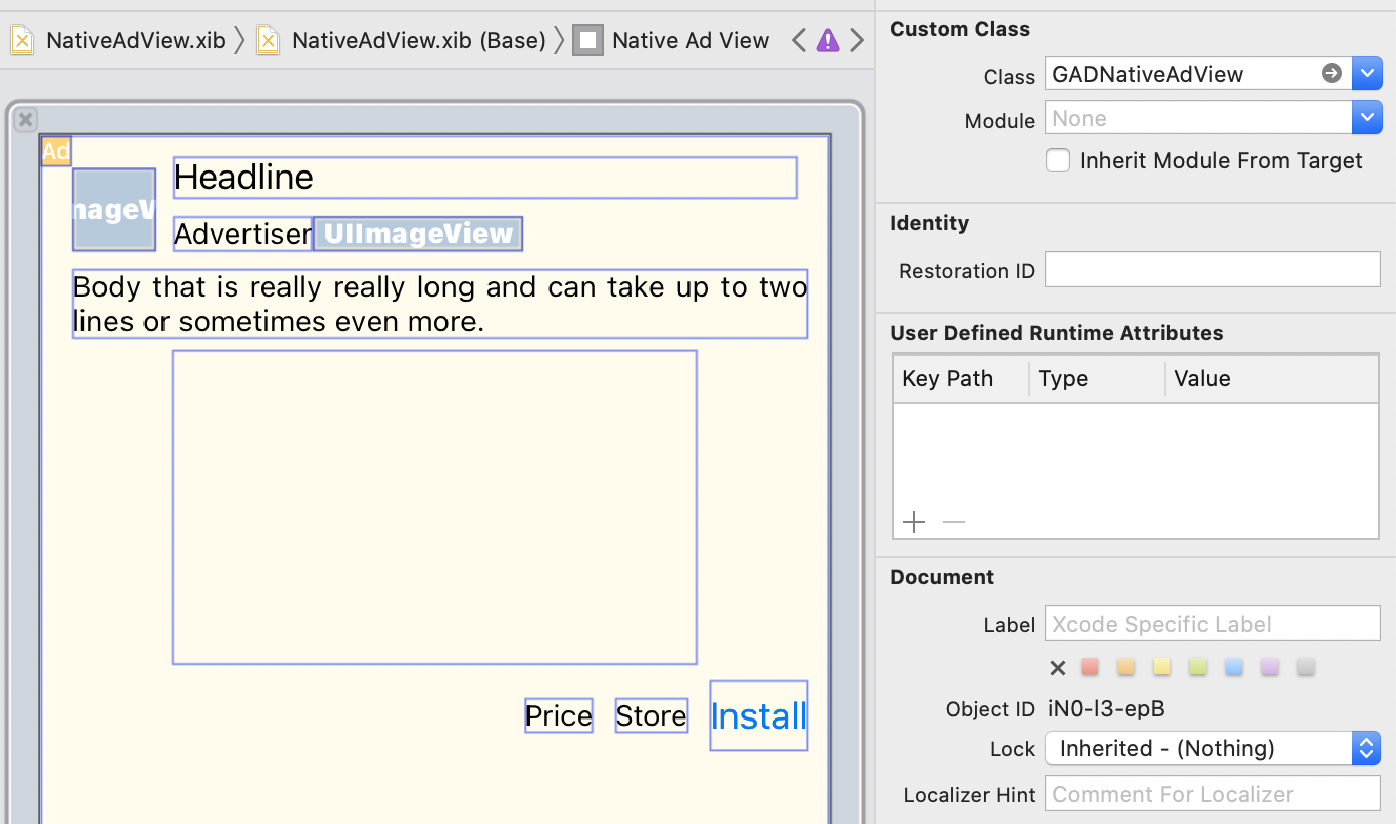
Puedes hacerlo en Interface Builder como lo harías para crear cualquier otro archivo XIB. Así es como podría verse el diseño de un anuncio nativo:

Observa el valor de la clase personalizada en la parte superior derecha de la imagen. Está configurado como
GADNativeAdView.
Esta es la clase de vista de anuncio que se usa para mostrar un GADNativeAd.
También deberás establecer la clase personalizada para GADMediaView, que se usa para mostrar el video o la imagen del anuncio.
Vincula elementos de salida a las vistas
Una vez que las vistas estén configuradas y hayas asignado la clase de vista de anuncio correcta para el diseño, vincula los elementos de salida del recurso de la vista de anuncio a los objetos UIViews que creaste para el anuncio.
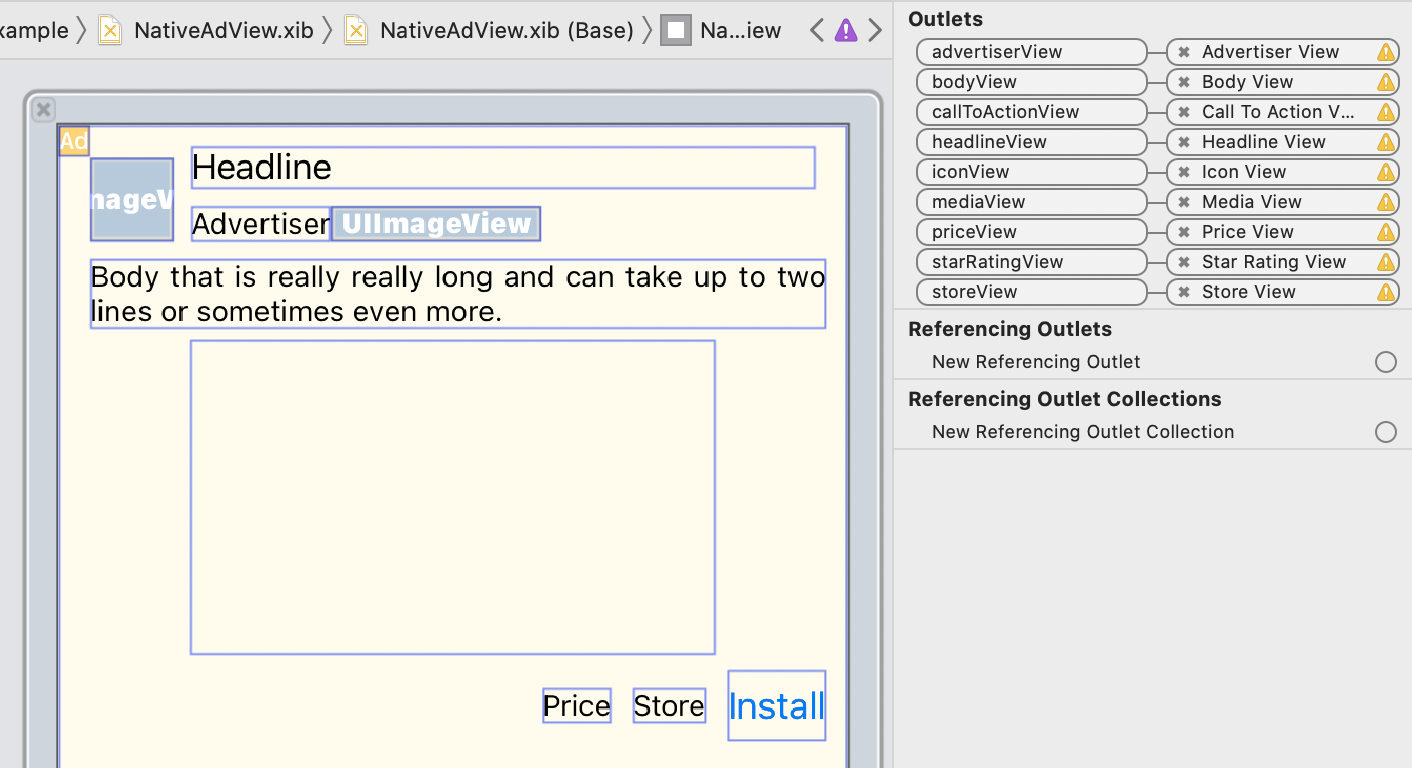
A continuación, se muestra cómo hacerlo:

En el panel de elementos de salida, los elementos de GADNativeAdView se vincularon a los objetos UIViews diseñados en Interface Builder. Esto permite que el SDK sepa qué recurso se muestra en cada UIView.
También es importante recordar que estos elementos de salida representan las vistas del anuncio en las que se puede hacer clic.
Muestra el anuncio
Después de completar el diseño y vincular los elementos de salida, agrega el siguiente código a tu app para que muestre un anuncio una vez que se haya cargado:
Swift
func adLoader(_ adLoader: AdLoader, didReceive nativeAd: NativeAd) {
// ...
// Set ourselves as the native ad delegate to be notified of native ad events.
nativeAd.delegate = self
// Populate the native ad view with the native ad assets.
// The headline and mediaContent are guaranteed to be present in every native ad.
(nativeAdView.headlineView as? UILabel)?.text = nativeAd.headline
nativeAdView.mediaView?.mediaContent = nativeAd.mediaContent
// Some native ads will include a video asset, while others do not. Apps can use the
// GADVideoController's hasVideoContent property to determine if one is present, and adjust their
// UI accordingly.
let mediaContent = nativeAd.mediaContent
if mediaContent.hasVideoContent {
// By acting as the delegate to the GADVideoController, this ViewController receives messages
// about events in the video lifecycle.
mediaContent.videoController.delegate = self
videoStatusLabel.text = "Ad contains a video asset."
} else {
videoStatusLabel.text = "Ad does not contain a video."
}
// This app uses a fixed width for the GADMediaView and changes its height to match the aspect
// ratio of the media it displays.
if let mediaView = nativeAdView.mediaView, nativeAd.mediaContent.aspectRatio > 0 {
let aspectRatioConstraint = NSLayoutConstraint(
item: mediaView,
attribute: .width,
relatedBy: .equal,
toItem: mediaView,
attribute: .height,
multiplier: CGFloat(nativeAd.mediaContent.aspectRatio),
constant: 0)
mediaView.addConstraint(aspectRatioConstraint)
nativeAdView.layoutIfNeeded()
}
// These assets are not guaranteed to be present. Check that they are before
// showing or hiding them.
(nativeAdView.bodyView as? UILabel)?.text = nativeAd.body
nativeAdView.bodyView?.isHidden = nativeAd.body == nil
(nativeAdView.callToActionView as? UIButton)?.setTitle(nativeAd.callToAction, for: .normal)
nativeAdView.callToActionView?.isHidden = nativeAd.callToAction == nil
(nativeAdView.iconView as? UIImageView)?.image = nativeAd.icon?.image
nativeAdView.iconView?.isHidden = nativeAd.icon == nil
(nativeAdView.starRatingView as? UIImageView)?.image = imageOfStars(from: nativeAd.starRating)
nativeAdView.starRatingView?.isHidden = nativeAd.starRating == nil
(nativeAdView.storeView as? UILabel)?.text = nativeAd.store
nativeAdView.storeView?.isHidden = nativeAd.store == nil
(nativeAdView.priceView as? UILabel)?.text = nativeAd.price
nativeAdView.priceView?.isHidden = nativeAd.price == nil
(nativeAdView.advertiserView as? UILabel)?.text = nativeAd.advertiser
nativeAdView.advertiserView?.isHidden = nativeAd.advertiser == nil
// In order for the SDK to process touch events properly, user interaction should be disabled.
nativeAdView.callToActionView?.isUserInteractionEnabled = false
// Associate the native ad view with the native ad object. This is
// required to make the ad clickable.
// Note: this should always be done after populating the ad views.
nativeAdView.nativeAd = nativeAd
}
SwiftUI
Crea un modelo de vista
Crea un modelo de vista que cargue un anuncio nativo y publique los cambios en los datos de ese anuncio:
import GoogleMobileAds
class NativeAdViewModel: NSObject, ObservableObject, NativeAdLoaderDelegate {
@Published var nativeAd: NativeAd?
private var adLoader: AdLoader!
func refreshAd() {
adLoader = AdLoader(
adUnitID: "ca-app-pub-3940256099942544/3986624511",
// The UIViewController parameter is optional.
rootViewController: nil,
adTypes: [.native], options: nil)
adLoader.delegate = self
adLoader.load(Request())
}
func adLoader(_ adLoader: AdLoader, didReceive nativeAd: NativeAd) {
// Native ad data changes are published to its subscribers.
self.nativeAd = nativeAd
nativeAd.delegate = self
}
func adLoader(_ adLoader: AdLoader, didFailToReceiveAdWithError error: Error) {
print("\(adLoader) failed with error: \(error.localizedDescription)")
}
}
Crea un objeto UIViewRepresentable
Crea un objeto UIViewRepresentable para NativeView y suscríbete a los cambios de datos en la clase ViewModel:
private struct NativeAdViewContainer: UIViewRepresentable {
typealias UIViewType = NativeAdView
// Observer to update the UIView when the native ad value changes.
@ObservedObject var nativeViewModel: NativeAdViewModel
func makeUIView(context: Context) -> NativeAdView {
return
Bundle.main.loadNibNamed(
"NativeAdView",
owner: nil,
options: nil)?.first as! NativeAdView
}
func updateUIView(_ nativeAdView: NativeAdView, context: Context) {
guard let nativeAd = nativeViewModel.nativeAd else { return }
// Each UI property is configurable using your native ad.
(nativeAdView.headlineView as? UILabel)?.text = nativeAd.headline
nativeAdView.mediaView?.mediaContent = nativeAd.mediaContent
(nativeAdView.bodyView as? UILabel)?.text = nativeAd.body
(nativeAdView.iconView as? UIImageView)?.image = nativeAd.icon?.image
(nativeAdView.starRatingView as? UIImageView)?.image = imageOfStars(from: nativeAd.starRating)
(nativeAdView.storeView as? UILabel)?.text = nativeAd.store
(nativeAdView.priceView as? UILabel)?.text = nativeAd.price
(nativeAdView.advertiserView as? UILabel)?.text = nativeAd.advertiser
(nativeAdView.callToActionView as? UIButton)?.setTitle(nativeAd.callToAction, for: .normal)
// For the SDK to process touch events properly, user interaction should be disabled.
nativeAdView.callToActionView?.isUserInteractionEnabled = false
// Associate the native ad view with the native ad object. This is required to make the ad
// clickable.
// Note: this should always be done after populating the ad views.
nativeAdView.nativeAd = nativeAd
}
Agrega la vista a la jerarquía de vistas
En el siguiente código, se muestra cómo agregar UIViewRepresentable a la jerarquía de vistas:
struct NativeContentView: View {
// Single source of truth for the native ad data.
@StateObject private var nativeViewModel = NativeAdViewModel()
var body: some View {
ScrollView {
VStack(spacing: 20) {
// Updates when the native ad data changes.
NativeAdViewContainer(nativeViewModel: nativeViewModel)
.frame(minHeight: 300) // minHeight determined from xib.
Objective-C
- (void)adLoader:(GADAdLoader *)adLoader didReceiveNativeAd:(GADNativeAd *)nativeAd {
// ...
GADNativeAdView *nativeAdView = self.nativeAdView;
// Set ourselves as the ad delegate to be notified of native ad events.
nativeAd.delegate = self;
// Populate the native ad view with the native ad assets.
// The headline and mediaContent are guaranteed to be present in every native ad.
((UILabel *)nativeAdView.headlineView).text = nativeAd.headline;
nativeAdView.mediaView.mediaContent = nativeAd.mediaContent;
// This app uses a fixed width for the GADMediaView and changes its height
// to match the aspect ratio of the media content it displays.
if (nativeAdView.mediaView != nil && nativeAd.mediaContent.aspectRatio > 0) {
NSLayoutConstraint *aspectRatioConstraint =
[NSLayoutConstraint constraintWithItem:nativeAdView.mediaView
attribute:NSLayoutAttributeWidth
relatedBy:NSLayoutRelationEqual
toItem:nativeAdView.mediaView
attribute:NSLayoutAttributeHeight
multiplier:(nativeAd.mediaContent.aspectRatio)
constant:0];
[nativeAdView.mediaView addConstraint:aspectRatioConstraint];
[nativeAdView layoutIfNeeded];
}
if (nativeAd.mediaContent.hasVideoContent) {
// By acting as the delegate to the GADVideoController, this ViewController
// receives messages about events in the video lifecycle.
nativeAd.mediaContent.videoController.delegate = self;
self.videoStatusLabel.text = @"Ad contains a video asset.";
} else {
self.videoStatusLabel.text = @"Ad does not contain a video.";
}
// These assets are not guaranteed to be present. Check that they are before
// showing or hiding them.
((UILabel *)nativeAdView.bodyView).text = nativeAd.body;
nativeAdView.bodyView.hidden = nativeAd.body ? NO : YES;
[((UIButton *)nativeAdView.callToActionView) setTitle:nativeAd.callToAction
forState:UIControlStateNormal];
nativeAdView.callToActionView.hidden = nativeAd.callToAction ? NO : YES;
((UIImageView *)nativeAdView.iconView).image = nativeAd.icon.image;
nativeAdView.iconView.hidden = nativeAd.icon ? NO : YES;
((UIImageView *)nativeAdView.starRatingView).image = [self imageForStars:nativeAd.starRating];
nativeAdView.starRatingView.hidden = nativeAd.starRating ? NO : YES;
((UILabel *)nativeAdView.storeView).text = nativeAd.store;
nativeAdView.storeView.hidden = nativeAd.store ? NO : YES;
((UILabel *)nativeAdView.priceView).text = nativeAd.price;
nativeAdView.priceView.hidden = nativeAd.price ? NO : YES;
((UILabel *)nativeAdView.advertiserView).text = nativeAd.advertiser;
nativeAdView.advertiserView.hidden = nativeAd.advertiser ? NO : YES;
// In order for the SDK to process touch events properly, user interaction
// should be disabled.
nativeAdView.callToActionView.userInteractionEnabled = NO;
// Associate the native ad view with the native ad object. This is
// required to make the ad clickable.
// Note: this should always be done after populating the ad views.
nativeAdView.nativeAd = nativeAd;
}
Ejemplo completo en GitHub
Sigue el vínculo correspondiente de GitHub para ver el ejemplo completo de la integración de anuncios nativos en Swift, SwiftUI y Objective-C.
Ejemplo de renderización personalizada en Swift Ejemplo de anuncios nativos en SwiftUI Ejemplo de renderización personalizada en Objective-C
GADMediaView
Los recursos de imagen y video se muestran a los usuarios a través de GADMediaView.
Es un objeto UIView que se puede definir en un archivo XIB o construir de forma dinámica.
Se debe incluir en la jerarquía de vistas de un objeto GADNativeAdView, tal como cualquier otra vista de recursos.
Al igual que todas las vistas de recursos, la vista de medios debe estar completa con su contenido. Esto se establece con la propiedad mediaContent en GADMediaView. La propiedad mediaContent de GADNativeAd incluye contenido multimedia que se puede pasar a un objeto GADMediaView.
Este es un fragmento del ejemplo de renderización personalizada (Swift | Objective-C), que muestra cómo completar el objeto GADMediaView con los recursos del anuncio nativo usando GADMediaContent de GADNativeAd:
Swift
nativeAdView.mediaView?.mediaContent = nativeAd.mediaContent
Objective-C
nativeAdView.mediaView.mediaContent = nativeAd.mediaContent;
Asegúrate de que, en el archivo de Interface Builder de tu vista de anuncio nativo, la clase personalizada de las vistas esté configurada como GADMediaView y se encuentre conectada al elemento de salida mediaView.
Cambia el modo de contenido de la imagen
La clase GADMediaView respeta la propiedad UIView contentMode cuando muestra imágenes. Si quieres cambiar la forma en que se ajusta una imagen en GADMediaView, establece la opción UIViewContentMode correspondiente en la propiedad contentMode de GADMediaView.
Por ejemplo, para completar el objeto GADMediaView cuando se muestra una imagen (si el anuncio no tiene video), haz lo siguiente:
Swift
nativeAdView.mediaView?.contentMode = .scaleAspectFit
Objective-C
nativeAdView.mediaView.contentMode = UIViewContentModeScaleAspectFit;
GADMediaContent
La clase GADMediaContent contiene los datos relacionados con el contenido multimedia del anuncio nativo, que se muestra con la clase GADMediaView. Cuando se configura en la propiedad mediaContent de GADMediaView:
Si hay un recurso de video disponible, se almacena en búfer y comienza a reproducirse dentro de
GADMediaView. Para saber si un recurso de video está disponible, verificahasVideoContent.Si el anuncio no contiene un recurso de video, en su lugar, se descarga el recurso
mainImagey se coloca dentro deGADMediaView.
Próximos pasos
Obtén más información sobre la privacidad del usuario.

