iOS용 Places SDK의 자동 완성 서비스는 사용자 검색어에 대한 응답으로 장소 예상 검색어를 반환합니다. 사용자가 입력하면 자동 완성 서비스가 비즈니스, 주소, 플러스 코드, 관심 장소와 같은 장소에 대한 추천을 반환합니다.
다음과 같은 방식으로 자동완성을 앱에 추가할 수 있습니다.
- 자동 완성 UI 컨트롤을 추가하여 개발 시간을 절약하고 일관된 사용자 환경을 보장합니다.
- 프로그래매틱 방식으로 장소 예측을 가져와 맞춤 사용자 환경을 만드세요.
자동 완성 UI 컨트롤 추가

자동 완성 UI 컨트롤은 자동 완성 기능이 내장된 검색 대화상자입니다. 사용자가 검색어를 입력하면 컨트롤에 선택할 수 있는 예상 장소 목록이 표시됩니다. 사용자가 선택하면 GMSPlace 인스턴스가 반환되며, 앱에서 이를 사용하여 선택한 장소에 관한 세부정보를 가져올 수 있습니다.
다음과 같은 방식으로 자동완성 UI 컨트롤을 앱에 추가할 수 있습니다.
전체 화면 컨트롤 추가
사용자가 선택할 때까지 자동 완성 UI가 앱의 UI를 일시적으로 대체하는 모달 컨텍스트가 필요한 경우 전체 화면 컨트롤을 사용합니다. 이 기능은 GMSAutocompleteViewController 클래스에서 제공합니다. 사용자가 장소를 선택하면 앱이 콜백을 수신합니다.
전체 화면 컨트롤을 앱에 추가하려면:
- 기본 앱에서 자동 완성 UI 컨트롤을 실행하는 UI 요소를 만듭니다(예:
UIButton의 터치 핸들러). - 상위 뷰 컨트롤러에서
GMSAutocompleteViewControllerDelegate프로토콜을 구현합니다. GMSAutocompleteViewController의 인스턴스를 만들고 상위 뷰 컨트롤러를 위임 속성으로 할당합니다.- 반환할 장소 데이터 유형을 정의하는
GMSPlaceField를 만듭니다. GMSAutocompleteFilter를 추가하여 쿼리를 특정 장소 유형으로 제한합니다.[self presentViewController...]를 사용하여GMSAutocompleteViewController를 표시합니다.didAutocompleteWithPlace위임 메서드에서 사용자의 선택을 처리합니다.didAutocompleteWithPlace,didFailAutocompleteWithError,wasCancelled대리자 메서드에서 컨트롤러를 닫습니다.
다음 예는 사용자가 버튼을 탭할 때 이에 응답하여 GMSAutocompleteViewController를 실행하는 한 가지 방법을 보여줍니다.
Swift
import UIKit
import GooglePlaces

class ViewController: UIViewController {

  override func viewDidLoad() {
    makeButton()
  }

  // Present the Autocomplete view controller when the button is pressed.
  @objc func autocompleteClicked(_ sender: UIButton) {
    let autocompleteController = GMSAutocompleteViewController()
    autocompleteController.delegate = self

    // Specify the place data types to return.
    let fields: GMSPlaceField = GMSPlaceField(rawValue: UInt(GMSPlaceField.name.rawValue) |
      UInt(GMSPlaceField.placeID.rawValue))!
    autocompleteController.placeFields = fields

    // Specify a filter.
    let filter = GMSAutocompleteFilter()
    filter.types = [.address]
    autocompleteController.autocompleteFilter = filter

    // Display the autocomplete view controller.
    present(autocompleteController, animated: true, completion: nil)
  }

  // Add a button to the view.
  func makeButton() {
    let btnLaunchAc = UIButton(frame: CGRect(x: 5, y: 150, width: 300, height: 35))
    btnLaunchAc.backgroundColor = .blue
    btnLaunchAc.setTitle("Launch autocomplete", for: .normal)
    btnLaunchAc.addTarget(self, action: #selector(autocompleteClicked), for: .touchUpInside)
    self.view.addSubview(btnLaunchAc)
  }

}

extension ViewController: GMSAutocompleteViewControllerDelegate {

  // Handle the user's selection.
  func viewController(_ viewController: GMSAutocompleteViewController, didAutocompleteWith place: GMSPlace) {
    print("Place name: \(place.name)")
    print("Place ID: \(place.placeID)")
    print("Place attributions: \(place.attributions)")
    dismiss(animated: true, completion: nil)
  }

  func viewController(_ viewController: GMSAutocompleteViewController, didFailAutocompleteWithError error: Error) {
    // TODO: handle the error.
    print("Error: ", error.localizedDescription)
  }

  // User canceled the operation.
  func wasCancelled(_ viewController: GMSAutocompleteViewController) {
    dismiss(animated: true, completion: nil)
  }

  // Turn the network activity indicator on and off again.
  func didRequestAutocompletePredictions(_ viewController: GMSAutocompleteViewController) {
    UIApplication.shared.isNetworkActivityIndicatorVisible = true
  }

  func didUpdateAutocompletePredictions(_ viewController: GMSAutocompleteViewController) {
    UIApplication.shared.isNetworkActivityIndicatorVisible = false
  }

}
Objective-C
#import "ViewController.h"
@import GooglePlaces;

@interface ViewController () <GMSAutocompleteViewControllerDelegate>

@end

@implementation ViewController {
  GMSAutocompleteFilter *_filter;
}

-   (void)viewDidLoad {
  [super viewDidLoad];
  [self makeButton];
}

  // Present the autocomplete view controller when the button is pressed.
-   (void)autocompleteClicked {
  GMSAutocompleteViewController *acController = [[GMSAutocompleteViewController alloc] init];
  acController.delegate = self;

  // Specify the place data types to return.
  GMSPlaceField fields = (GMSPlaceFieldName | GMSPlaceFieldPlaceID);
  acController.placeFields = fields;

  // Specify a filter.
  _filter = [[GMSAutocompleteFilter alloc] init];
  _filter.types = @[ kGMSPlaceTypeBank ];
  acController.autocompleteFilter = _filter;

  // Display the autocomplete view controller.
  [self presentViewController:acController animated:YES completion:nil];
}

  // Add a button to the view.
-   (void)makeButton{
  UIButton *btnLaunchAc = [UIButton buttonWithType:UIButtonTypeCustom];
  [btnLaunchAc addTarget:self
             action:@selector(autocompleteClicked) forControlEvents:UIControlEventTouchUpInside];
  [btnLaunchAc setTitle:@"Launch autocomplete" forState:UIControlStateNormal];
  btnLaunchAc.frame = CGRectMake(5.0, 150.0, 300.0, 35.0);
  btnLaunchAc.backgroundColor = [UIColor blueColor];
  [self.view addSubview:btnLaunchAc];
}

  // Handle the user's selection.
-   (void)viewController:(GMSAutocompleteViewController *)viewController
didAutocompleteWithPlace:(GMSPlace *)place {
  [self dismissViewControllerAnimated:YES completion:nil];
  // Do something with the selected place.
  NSLog(@"Place name %@", place.name);
  NSLog(@"Place ID %@", place.placeID);
  NSLog(@"Place attributions %@", place.attributions.string);
}

-   (void)viewController:(GMSAutocompleteViewController *)viewController
didFailAutocompleteWithError:(NSError *)error {
  [self dismissViewControllerAnimated:YES completion:nil];
  // TODO: handle the error.
  NSLog(@"Error: %@", [error description]);
}

  // User canceled the operation.
-   (void)wasCancelled:(GMSAutocompleteViewController *)viewController {
  [self dismissViewControllerAnimated:YES completion:nil];
}

  // Turn the network activity indicator on and off again.
-   (void)didRequestAutocompletePredictions:(GMSAutocompleteViewController *)viewController {
  [UIApplication sharedApplication].networkActivityIndicatorVisible = YES;
}

-   (void)didUpdateAutocompletePredictions:(GMSAutocompleteViewController *)viewController {
  [UIApplication sharedApplication].networkActivityIndicatorVisible = NO;
}

@end
결과 컨트롤러 추가
텍스트 입력 UI보다 더 많은 제어를 원한다면 결과 컨트롤러를 사용하세요. 결과 컨트롤러는 입력 UI 포커스에 따라 결과 목록의 공개 상태를 동적으로 전환합니다.
결과 컨트롤러를 앱에 추가하려면:
GMSAutocompleteResultsViewController을 만듭니다.- 상위 뷰 컨트롤러에서
GMSAutocompleteResultsViewControllerDelegate프로토콜을 구현하고 상위 뷰 컨트롤러를 위임 속성으로 할당합니다.
- 상위 뷰 컨트롤러에서
UISearchController객체를 만들고GMSAutocompleteResultsViewController를 결과 컨트롤러 인수로 전달합니다.GMSAutocompleteResultsViewController을UISearchController의searchResultsUpdater속성으로 설정합니다.UISearchController의searchBar를 앱의 UI에 추가합니다.didAutocompleteWithPlace위임 메서드에서 사용자의 선택을 처리합니다.
UISearchController의 검색창을 앱의 UI에 배치하는 방법에는 여러 가지가 있습니다.
탐색 메뉴에 검색창 추가
다음 코드 예시는 결과 컨트롤러를 추가하고, 탐색 메뉴에 searchBar을 추가하고, 사용자의 선택을 처리하는 것을 보여줍니다.
Swift
class ViewController: UIViewController {

  var resultsViewController: GMSAutocompleteResultsViewController?
  var searchController: UISearchController?
  var resultView: UITextView?

  override func viewDidLoad() {
    super.viewDidLoad()

    resultsViewController = GMSAutocompleteResultsViewController()
    resultsViewController?.delegate = self

    searchController = UISearchController(searchResultsController: resultsViewController)
    searchController?.searchResultsUpdater = resultsViewController

    // Put the search bar in the navigation bar.
    searchController?.searchBar.sizeToFit()
    navigationItem.titleView = searchController?.searchBar

    // When UISearchController presents the results view, present it in
    // this view controller, not one further up the chain.
    definesPresentationContext = true

    // Prevent the navigation bar from being hidden when searching.
    searchController?.hidesNavigationBarDuringPresentation = false
  }
}

// Handle the user's selection.
extension ViewController: GMSAutocompleteResultsViewControllerDelegate {
  func resultsController(_ resultsController: GMSAutocompleteResultsViewController,
                         didAutocompleteWith place: GMSPlace) {
    searchController?.isActive = false
    // Do something with the selected place.
    print("Place name: \(place.name)")
    print("Place address: \(place.formattedAddress)")
    print("Place attributions: \(place.attributions)")
  }

  func resultsController(_ resultsController: GMSAutocompleteResultsViewController,
                         didFailAutocompleteWithError error: Error){
    // TODO: handle the error.
    print("Error: ", error.localizedDescription)
  }

  // Turn the network activity indicator on and off again.
  func didRequestAutocompletePredictions(_ viewController: GMSAutocompleteViewController) {
    UIApplication.shared.isNetworkActivityIndicatorVisible = true
  }

  func didUpdateAutocompletePredictions(_ viewController: GMSAutocompleteViewController) {
    UIApplication.shared.isNetworkActivityIndicatorVisible = false
  }
}
Objective-C
-   (void)viewDidLoad {
  _resultsViewController = [[GMSAutocompleteResultsViewController alloc] init];
  _resultsViewController.delegate = self;

  _searchController = [[UISearchController alloc]
                       initWithSearchResultsController:_resultsViewController];
  _searchController.searchResultsUpdater = _resultsViewController;

  // Put the search bar in the navigation bar.
  [_searchController.searchBar sizeToFit];
  self.navigationItem.titleView = _searchController.searchBar;

  // When UISearchController presents the results view, present it in
  // this view controller, not one further up the chain.
  self.definesPresentationContext = YES;

  // Prevent the navigation bar from being hidden when searching.
  _searchController.hidesNavigationBarDuringPresentation = NO;
}

// Handle the user's selection.
-   (void)resultsController:(GMSAutocompleteResultsViewController *)resultsController
  didAutocompleteWithPlace:(GMSPlace *)place {
    _searchController.active = NO;
    // Do something with the selected place.
    NSLog(@"Place name %@", place.name);
    NSLog(@"Place address %@", place.formattedAddress);
    NSLog(@"Place attributions %@", place.attributions.string);
}

-   (void)resultsController:(GMSAutocompleteResultsViewController *)resultsController
didFailAutocompleteWithError:(NSError *)error {
  [self dismissViewControllerAnimated:YES completion:nil];
  // TODO: handle the error.
  NSLog(@"Error: %@", [error description]);
}

// Turn the network activity indicator on and off again.
-   (void)didRequestAutocompletePredictionsForResultsController:
    (GMSAutocompleteResultsViewController *)resultsController {
  [UIApplication sharedApplication].networkActivityIndicatorVisible = YES;
}

-   (void)didUpdateAutocompletePredictionsForResultsController:
    (GMSAutocompleteResultsViewController *)resultsController {
  [UIApplication sharedApplication].networkActivityIndicatorVisible = NO;
}
뷰 상단에 검색창 추가
다음 코드 예시에서는 searchBar을 뷰 상단에 추가하는 방법을 보여줍니다.
Swift
import UIKit
import GooglePlaces

class ViewController: UIViewController {

  var resultsViewController: GMSAutocompleteResultsViewController?
  var searchController: UISearchController?
  var resultView: UITextView?

  override func viewDidLoad() {
    super.viewDidLoad()

    resultsViewController = GMSAutocompleteResultsViewController()
    resultsViewController?.delegate = self

    searchController = UISearchController(searchResultsController: resultsViewController)
    searchController?.searchResultsUpdater = resultsViewController

    let subView = UIView(frame: CGRect(x: 0, y: 65.0, width: 350.0, height: 45.0))

    subView.addSubview((searchController?.searchBar)!)
    view.addSubview(subView)
    searchController?.searchBar.sizeToFit()
    searchController?.hidesNavigationBarDuringPresentation = false

    // When UISearchController presents the results view, present it in
    // this view controller, not one further up the chain.
    definesPresentationContext = true
  }
}

// Handle the user's selection.
extension ViewController: GMSAutocompleteResultsViewControllerDelegate {
  func resultsController(_ resultsController: GMSAutocompleteResultsViewController,
                         didAutocompleteWith place: GMSPlace) {
    searchController?.isActive = false
    // Do something with the selected place.
    print("Place name: \(place.name)")
    print("Place address: \(place.formattedAddress)")
    print("Place attributions: \(place.attributions)")
  }

  func resultsController(_ resultsController: GMSAutocompleteResultsViewController,
                         didFailAutocompleteWithError error: Error){
    // TODO: handle the error.
    print("Error: ", error.localizedDescription)
  }

  // Turn the network activity indicator on and off again.
  func didRequestAutocompletePredictions(forResultsController resultsController: GMSAutocompleteResultsViewController) {
    UIApplication.shared.isNetworkActivityIndicatorVisible = true
  }

  func didUpdateAutocompletePredictions(forResultsController resultsController: GMSAutocompleteResultsViewController) {
    UIApplication.shared.isNetworkActivityIndicatorVisible = false
  }
}
Objective-C
-   (void)viewDidLoad {
    [super viewDidLoad];

    _resultsViewController = [[GMSAutocompleteResultsViewController alloc] init];
    _resultsViewController.delegate = self;

    _searchController = [[UISearchController alloc]
                             initWithSearchResultsController:_resultsViewController];
    _searchController.searchResultsUpdater = _resultsViewController;

    UIView *subView = [[UIView alloc] initWithFrame:CGRectMake(0, 65.0, 250, 50)];

    [subView addSubview:_searchController.searchBar];
    [_searchController.searchBar sizeToFit];
    [self.view addSubview:subView];

    // When UISearchController presents the results view, present it in
    // this view controller, not one further up the chain.
    self.definesPresentationContext = YES;
}

// Handle the user's selection.
-   (void)resultsController:(GMSAutocompleteResultsViewController *)resultsController
didAutocompleteWithPlace:(GMSPlace *)place {
  [self dismissViewControllerAnimated:YES completion:nil];
  // Do something with the selected place.
  NSLog(@"Place name %@", place.name);
  NSLog(@"Place address %@", place.formattedAddress);
  NSLog(@"Place attributions %@", place.attributions.string);
}

-   (void)resultsController:(GMSAutocompleteResultsViewController *)resultsController
didFailAutocompleteWithError:(NSError *)error {
  [self dismissViewControllerAnimated:YES completion:nil];
  // TODO: handle the error.
  NSLog(@"Error: %@", [error description]);
}

// Turn the network activity indicator on and off again.
-   (void)didRequestAutocompletePredictionsForResultsController:
    (GMSAutocompleteResultsViewController *)resultsController {
  [UIApplication sharedApplication].networkActivityIndicatorVisible = YES;
}

-   (void)didUpdateAutocompletePredictionsForResultsController:
    (GMSAutocompleteResultsViewController *)resultsController {
  [UIApplication sharedApplication].networkActivityIndicatorVisible = NO;
}
기본적으로 UISearchController은 발표 시 탐색 메뉴를 숨깁니다 (사용 중지 가능). 탐색 메뉴가 표시되고 불투명한 경우 UISearchController가 배치 위치를 올바르게 설정하지 않습니다.
해결 방법으로 다음 코드를 사용하세요.
Swift
navigationController?.navigationBar.translucent = false
searchController?.hidesNavigationBarDuringPresentation = false

// This makes the view area include the nav bar even though it is opaque.
// Adjust the view placement down.
self.extendedLayoutIncludesOpaqueBars = true
self.edgesForExtendedLayout = .top
Objective-C
self.navigationController.navigationBar.translucent = NO;
_searchController.hidesNavigationBarDuringPresentation = NO;

// This makes the view area include the nav bar even though it is opaque.
// Adjust the view placement down.
self.extendedLayoutIncludesOpaqueBars = YES;
self.edgesForExtendedLayout = UIRectEdgeTop;
팝오버 결과를 사용하여 검색창 추가
다음 코드 예시는 탐색 메뉴 오른쪽에 검색창을 배치하고 팝오버에 결과를 표시하는 방법을 보여줍니다.
Swift
import UIKit
import GooglePlaces

class ViewController: UIViewController {

  var resultsViewController: GMSAutocompleteResultsViewController?
  var searchController: UISearchController?
  var resultView: UITextView?

  override func viewDidLoad() {
    super.viewDidLoad()

    resultsViewController = GMSAutocompleteResultsViewController()
    resultsViewController?.delegate = self

    searchController = UISearchController(searchResultsController: resultsViewController)
    searchController?.searchResultsUpdater = resultsViewController

    // Add the search bar to the right of the nav bar,
    // use a popover to display the results.
    // Set an explicit size as we don't want to use the entire nav bar.
    searchController?.searchBar.frame = (CGRect(x: 0, y: 0, width: 250.0, height: 44.0))
    navigationItem.rightBarButtonItem = UIBarButtonItem(customView: (searchController?.searchBar)!)

    // When UISearchController presents the results view, present it in
    // this view controller, not one further up the chain.
    definesPresentationContext = true

    // Keep the navigation bar visible.
    searchController?.hidesNavigationBarDuringPresentation = false
    searchController?.modalPresentationStyle = .popover
  }
}
// Handle the user's selection.
extension ViewController: GMSAutocompleteResultsViewControllerDelegate {
  func resultsController(_ resultsController: GMSAutocompleteResultsViewController,
                         didAutocompleteWith place: GMSPlace) {
    searchController?.isActive = false
    // Do something with the selected place.
    print("Place name: \(place.name)")
    print("Place address: \(place.formattedAddress)")
    print("Place attributions: \(place.attributions)")
  }

  func resultsController(_ resultsController: GMSAutocompleteResultsViewController,
                         didFailAutocompleteWithError error: Error){
    // TODO: handle the error.
    print("Error: ", error.localizedDescription)
  }

  // Turn the network activity indicator on and off again.
  func didRequestAutocompletePredictions(forResultsController resultsController: GMSAutocompleteResultsViewController) {
    UIApplication.shared.isNetworkActivityIndicatorVisible = true
  }

  func didUpdateAutocompletePredictions(forResultsController resultsController: GMSAutocompleteResultsViewController) {
    UIApplication.shared.isNetworkActivityIndicatorVisible = false
  }
}
Objective-C
-   (void)viewDidLoad {
  [super viewDidLoad];

  _resultsViewController = [[GMSAutocompleteResultsViewController alloc] init];
  _resultsViewController.delegate = self;

  _searchController = [[UISearchController alloc]
                           initWithSearchResultsController:_resultsViewController];
  _searchController.searchResultsUpdater = _resultsViewController;

  // Add the search bar to the right of the nav bar,
  // use a popover to display the results.
  // Set an explicit size as we don't want to use the entire nav bar.
  _searchController.searchBar.frame = CGRectMake(0, 0, 250.0f, 44.0f);
  self.navigationItem.rightBarButtonItem =
  [[UIBarButtonItem alloc] initWithCustomView:_searchController.searchBar];

  // When UISearchController presents the results view, present it in
  // this view controller, not one further up the chain.
  self.definesPresentationContext = YES;

  // Keep the navigation bar visible.
  _searchController.hidesNavigationBarDuringPresentation = NO;

  _searchController.modalPresentationStyle = UIModalPresentationPopover;
}

// Handle the user's selection.
-   (void)resultsController:(GMSAutocompleteResultsViewController *)resultsController
didAutocompleteWithPlace:(GMSPlace *)place {
  [self dismissViewControllerAnimated:YES completion:nil];
  NSLog(@"Place name %@", place.name);
  NSLog(@"Place address %@", place.formattedAddress);
  NSLog(@"Place attributions %@", place.attributions.string);
}

-   (void)resultsController:(GMSAutocompleteResultsViewController *)resultsController
didFailAutocompleteWithError:(NSError *)error {
  [self dismissViewControllerAnimated:YES completion:nil];
  // TODO: handle the error.
  NSLog(@"Error: %@", [error description]);
}

// Turn the network activity indicator on and off again.
-   (void)didRequestAutocompletePredictionsForResultsController:
    (GMSAutocompleteResultsViewController *)resultsController {
  [UIApplication sharedApplication].networkActivityIndicatorVisible = YES;
}

-   (void)didUpdateAutocompletePredictionsForResultsController:
    (GMSAutocompleteResultsViewController *)resultsController {
  [UIApplication sharedApplication].networkActivityIndicatorVisible = NO;
}
표 데이터 소스 사용
앱에 맞춤 검색 텍스트 UI가 있는 경우 GMSAutocompleteTableDataSource 클래스를 사용하여 뷰 컨트롤러에 결과를 표시하는 테이블 뷰를 구동할 수 있습니다.
뷰 컨트롤러에서 GMSAutocompleteTableDataSource을 데이터 소스 및 UITableView의 대리자로 사용하려면 다음을 따르세요.
- 뷰 컨트롤러에서
GMSAutocompleteTableDataSourceDelegate및UISearchBarDelegate프로토콜을 구현합니다. GMSAutocompleteTableDataSource인스턴스를 만들고 뷰 컨트롤러를 위임 속성으로 할당합니다.GMSAutocompleteTableDataSource을 뷰 컨트롤러의UITableView인스턴스의 데이터 소스 및 대리자 속성으로 설정합니다.- 검색 텍스트 입력 핸들러에서
GMSAutocompleteTableDataSource에sourceTextHasChanged를 호출합니다.didAutocompleteWithPlace위임 메서드에서 사용자의 선택을 처리합니다.
didAutocompleteWithPlace,didFailAutocompleteWithError,wasCancelled대리자 메서드에서 컨트롤러를 닫습니다.
다음 코드 예에서는 UISearchBar이 별도로 추가될 때 GMSAutocompleteTableDataSource 클래스를 사용하여 UIViewController의 표 뷰를 제어하는 방법을 보여줍니다.
Swift
// Copyright 2020 Google LLC
//
// Licensed under the Apache License, Version 2.0 (the "License");
// you may not use this file except in compliance with the License.
// You may obtain a copy of the License at
//
//      http://www.apache.org/licenses/LICENSE-2.0
//
// Unless required by applicable law or agreed to in writing, software
// distributed under the License is distributed on an "AS IS" BASIS,
// WITHOUT WARRANTIES OR CONDITIONS OF ANY KIND, either express or implied.
// See the License for the specific language governing permissions and
// limitations under the License.

import GooglePlaces
import UIKit

class PlaceAutocompleteViewController: UIViewController {

  private var tableView: UITableView!
  private var tableDataSource: GMSAutocompleteTableDataSource!

  override func viewDidLoad() {
    super.viewDidLoad()

    let searchBar = UISearchBar(frame: CGRect(x: 0, y: 20, width: self.view.frame.size.width, height: 44.0))
    searchBar.delegate = self
    view.addSubview(searchBar)

    tableDataSource = GMSAutocompleteTableDataSource()
    tableDataSource.delegate = self

    tableView = UITableView(frame: CGRect(x: 0, y: 64, width: self.view.frame.size.width, height: self.view.frame.size.height - 44))
    tableView.delegate = tableDataSource
    tableView.dataSource = tableDataSource

    view.addSubview(tableView)
  }
}

extension PlaceAutocompleteViewController: UISearchBarDelegate {
  func searchBar(_ searchBar: UISearchBar, textDidChange searchText: String) {
    // Update the GMSAutocompleteTableDataSource with the search text.
    tableDataSource.sourceTextHasChanged(searchText)
  }
}

extension PlaceAutocompleteViewController: GMSAutocompleteTableDataSourceDelegate {
  func didUpdateAutocompletePredictions(for tableDataSource: GMSAutocompleteTableDataSource) {
    // Turn the network activity indicator off.
    UIApplication.shared.isNetworkActivityIndicatorVisible = false
    // Reload table data.
    tableView.reloadData()
  }

  func didRequestAutocompletePredictions(for tableDataSource: GMSAutocompleteTableDataSource) {
    // Turn the network activity indicator on.
    UIApplication.shared.isNetworkActivityIndicatorVisible = true
    // Reload table data.
    tableView.reloadData()
  }

  func tableDataSource(_ tableDataSource: GMSAutocompleteTableDataSource, didAutocompleteWith place: GMSPlace) {
    // Do something with the selected place.
    print("Place name: \(place.name)")
    print("Place address: \(place.formattedAddress)")
    print("Place attributions: \(place.attributions)")
  }

  func tableDataSource(_ tableDataSource: GMSAutocompleteTableDataSource, didFailAutocompleteWithError error: Error) {
    // Handle the error.
    print("Error: \(error.localizedDescription)")
  }

  func tableDataSource(_ tableDataSource: GMSAutocompleteTableDataSource, didSelect prediction: GMSAutocompletePrediction) -> Bool {
    return true
  }
}
Objective-C
// Copyright 2020 Google LLC
//
// Licensed under the Apache License, Version 2.0 (the "License");
// you may not use this file except in compliance with the License.
// You may obtain a copy of the License at
//
//      http://www.apache.org/licenses/LICENSE-2.0
//
// Unless required by applicable law or agreed to in writing, software
// distributed under the License is distributed on an "AS IS" BASIS,
// WITHOUT WARRANTIES OR CONDITIONS OF ANY KIND, either express or implied.
// See the License for the specific language governing permissions and
// limitations under the License.

#import "PlaceAutocompleteViewController.h"
@import GooglePlaces;
@import UIKit;

@interface PlaceAutocompleteViewController () <GMSAutocompleteTableDataSourceDelegate, UISearchBarDelegate>

@end

@implementation PlaceAutocompleteViewController {
  UITableView *tableView;
  GMSAutocompleteTableDataSource *tableDataSource;
}

- (void)viewDidLoad {
  [super viewDidLoad];

  UISearchBar *searchBar = [[UISearchBar alloc] initWithFrame:CGRectMake(0, 20, self.view.frame.size.width, 44)];
  searchBar.delegate = self;

  [self.view addSubview:searchBar];

  tableDataSource = [[GMSAutocompleteTableDataSource alloc] init];
  tableDataSource.delegate = self;

  tableView = [[UITableView alloc] initWithFrame:CGRectMake(0, 64, self.view.frame.size.width, self.view.frame.size.height - 44)];
  tableView.delegate = tableDataSource;
  tableView.dataSource = tableDataSource;

  [self.view addSubview:tableView];
}

#pragma mark - GMSAutocompleteTableDataSourceDelegate

- (void)didUpdateAutocompletePredictionsForTableDataSource:(GMSAutocompleteTableDataSource *)tableDataSource {
  // Turn the network activity indicator off.
  UIApplication.sharedApplication.networkActivityIndicatorVisible = NO;

  // Reload table data.
  [tableView reloadData];
}

- (void)didRequestAutocompletePredictionsForTableDataSource:(GMSAutocompleteTableDataSource *)tableDataSource {
  // Turn the network activity indicator on.
  UIApplication.sharedApplication.networkActivityIndicatorVisible = YES;

  // Reload table data.
  [tableView reloadData];
}

- (void)tableDataSource:(GMSAutocompleteTableDataSource *)tableDataSource didAutocompleteWithPlace:(GMSPlace *)place {
  // Do something with the selected place.
  NSLog(@"Place name: %@", place.name);
  NSLog(@"Place address: %@", place.formattedAddress);
  NSLog(@"Place attributions: %@", place.attributions);
}

- (void)tableDataSource:(GMSAutocompleteTableDataSource *)tableDataSource didFailAutocompleteWithError:(NSError *)error {
  // Handle the error
  NSLog(@"Error %@", error.description);
}

- (BOOL)tableDataSource:(GMSAutocompleteTableDataSource *)tableDataSource didSelectPrediction:(GMSAutocompletePrediction *)prediction {
  return YES;
}

#pragma mark - UISearchBarDelegate

- (void)searchBar:(UISearchBar *)searchBar textDidChange:(NSString *)searchText {
  // Update the GMSAutocompleteTableDataSource with the search text.
  [tableDataSource sourceTextHasChanged:searchText];
}

@end
텍스트 및 배경 색상 맞춤설정
자동 완성 UI 컨트롤의 모든 텍스트와 배경의 색상을 설정하여 위젯이 앱의 시각적 모양과 더 일치하도록 할 수 있습니다. UI 컨트롤 색상을 설정하는 두 가지 방법이 있습니다.
- 가능한 경우 내장된 iOS UIAppearance 프로토콜을 사용하여 UI 컨트롤의 스타일을 전역적으로 지정합니다. 이 설정은 일부 UI 컨트롤 요소를 제외한 대부분의 UI 컨트롤 요소에 적용됩니다.
- 위젯 클래스에서 SDK 메서드를 사용하여 UIAppearance 프로토콜에서 지원하지 않는 속성을 설정합니다.
일반적으로 앱은 UIAppearance 프로토콜과 SDK 메서드를 조합하여 사용합니다. 다음 다이어그램은 스타일 지정이 가능한 요소를 나타냅니다.
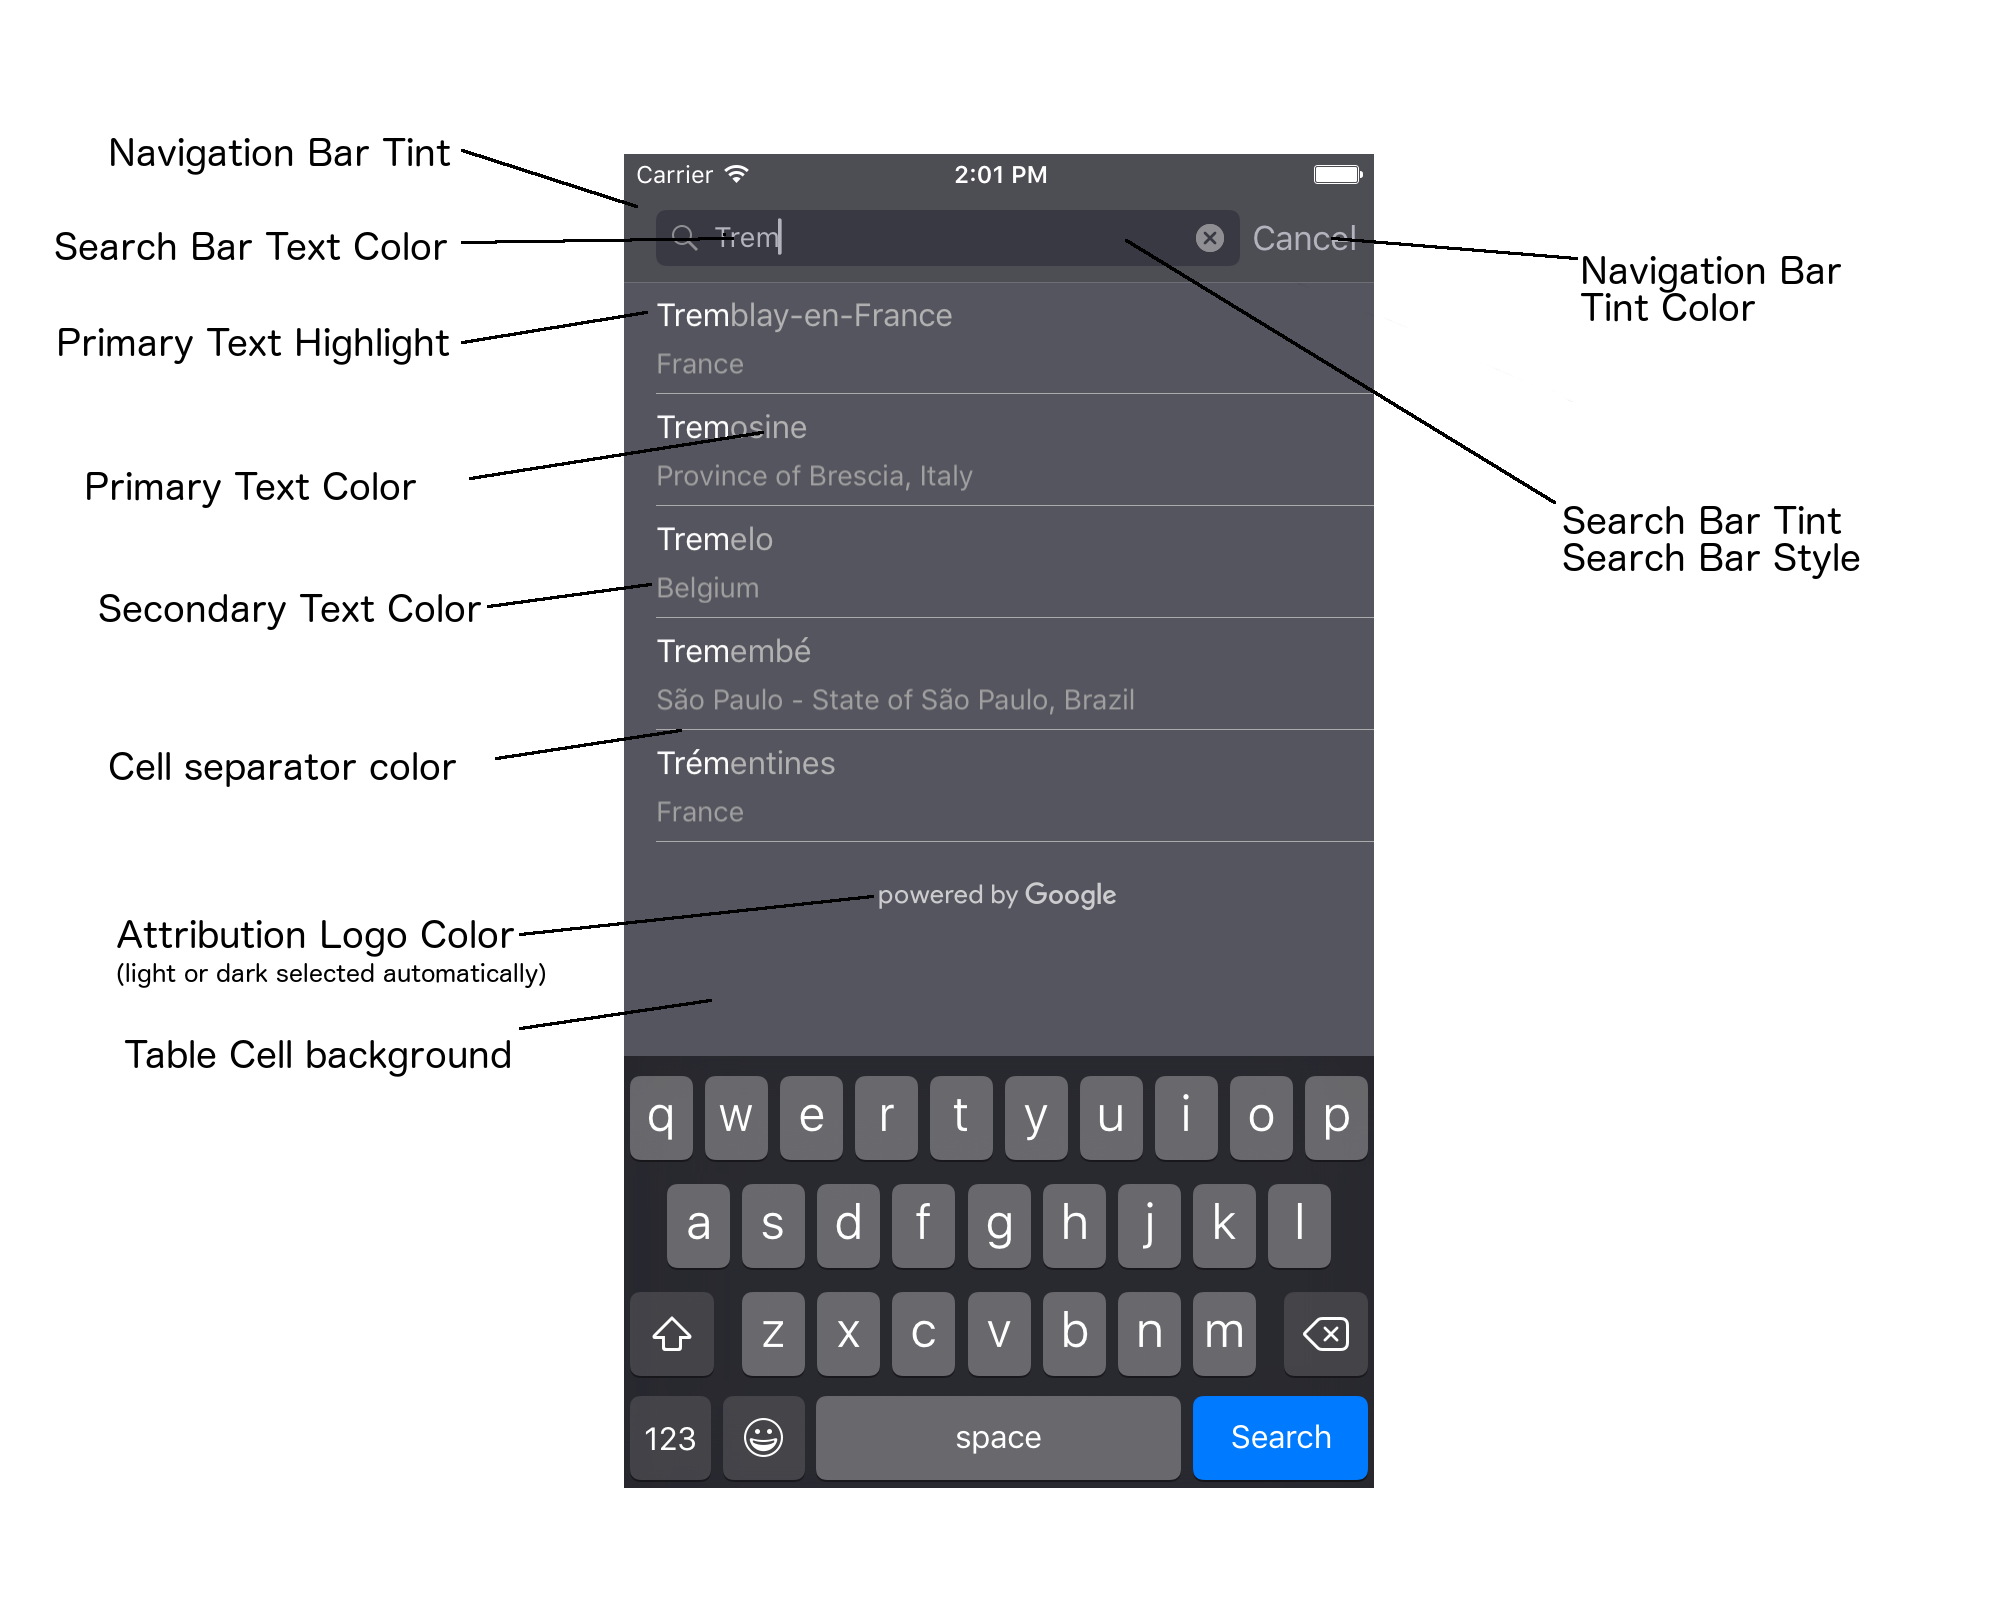
다음 표에는 모든 UI 요소가 나열되어 있으며 각 요소의 스타일을 지정하는 방법 (UIAppearance 프로토콜 또는 SDK 메서드)이 표시되어 있습니다.
| UI 요소 | 메서드 | 스타일링 가이드 |
|---|---|---|
| 탐색 메뉴 색조 (배경) | UIAppearance 프로토콜 | UINavigationBar 프록시에서 setBarTintColor 호출 |
| 탐색 메뉴 색조 색상 (검색창 텍스트 캐럿 및 취소 버튼) | UIAppearance 프로토콜 | UINavigationBar 프록시에서 setTintColor 호출 |
| 검색창 텍스트 색상 | UIAppearance 프로토콜 | searchBarTextAttributes에서 NSForegroundColorAttributeName를 설정합니다. |
| 검색창 색조 색상 | 해당 사항 없음 | 검색창은 반투명하며 탐색 메뉴의 음영 처리된 버전으로 표시됩니다. |
| 검색창 자리표시자 텍스트 색상 (기본 검색 텍스트) | UIAppearance 프로토콜 | placeholderAttributes에서 NSForegroundColorAttributeName를 설정합니다. |
| 기본 텍스트 (오류 및 메시지 텍스트에도 적용됨) | SDK 메서드 | primaryTextColor를 호출합니다. |
| 기본 텍스트 강조 표시 | SDK 메서드 | primaryTextHighlightColor를 호출합니다. |
| 보조 텍스트 | SDK 메서드 | secondaryTextColor를 호출합니다. |
| 오류 및 메시지 텍스트 | SDK 메서드 | primaryTextColor를 호출합니다. |
| 표 셀 배경 | SDK 메서드 | tableCellBackgroundColor를 호출합니다. |
| 표 셀 구분선 색상 | SDK 메서드 | tableCellSeparatorColor를 호출합니다. |
| '다시 시도' 버튼 | SDK 메서드 | tintColor를 호출합니다. |
| 활동 표시기 (진행률 스피너) | UIAppearance 프로토콜 | UIActivityIndicatorView 프록시에서 setColor 호출 |
| 'Powered by Google' 로고, 슬픈 구름 이미지 | 해당 사항 없음 | 배경 대비에 따라 흰색 또는 회색 버전이 자동으로 선택됩니다. |
| 검색창 텍스트 필드의 돋보기 및 텍스트 지우기 아이콘 | 해당 사항 없음 | 스타일을 지정하려면 기본 이미지를 원하는 색상의 이미지로 바꿉니다. |
UIAppearance 프로토콜 사용
UIAppearance 프로토콜을 사용하여 지정된 UI 요소의 모양 프록시를 가져올 수 있으며, 이를 사용하여 UI 요소의 색상을 설정할 수 있습니다. 수정하면 지정된 UI 요소의 모든 인스턴스가 영향을 받습니다. 예를 들어 다음 예에서는 UITextField 클래스가 UISearchBar에 포함된 경우 UITextField 클래스의 텍스트 색상을 녹색으로 전역적으로 변경합니다.
[[UITextField appearanceWhenContainedIn:[UISearchBar class], nil]
    setDefaultTextAttributes:@{NSForegroundColorAttributeName:[UIColor greenColor]}];
색상 값 정의에 관한 자세한 내용은 UIColor 클래스 참조를 참고하세요.
다음 코드 스니펫은 전체 화면 자동 완성 UI 컨트롤에서 모든 항목의 스타일을 지정하는 데 필요한 모든 프록시 명령어를 보여줍니다. Appdelegate.m의 didFinishLaunchingWithOptions 메서드에 다음 코드를 추가합니다.
// Define some colors.
UIColor *darkGray = [UIColor darkGrayColor];
UIColor *lightGray = [UIColor lightGrayColor];

// Navigation bar background.
[[UINavigationBar appearance] setBarTintColor:darkGray];
[[UINavigationBar appearance] setTintColor:lightGray];

// Color of typed text in the search bar.
NSDictionary *searchBarTextAttributes = @{
                                          NSForegroundColorAttributeName: lightGray,
                                          NSFontAttributeName : [UIFont systemFontOfSize:[UIFont systemFontSize]]
                                          };
[UITextField appearanceWhenContainedInInstancesOfClasses:@[[UISearchBar class]]]
    .defaultTextAttributes = searchBarTextAttributes;

// Color of the placeholder text in the search bar prior to text entry.
NSDictionary *placeholderAttributes = @{
                                        NSForegroundColorAttributeName: lightGray,
                                        NSFontAttributeName : [UIFont systemFontOfSize:[UIFont systemFontSize]]
                                        };

// Color of the default search text.
// NOTE: In a production scenario, "Search" would be a localized string.
NSAttributedString *attributedPlaceholder =
[[NSAttributedString alloc] initWithString:@"Search"
                                attributes:placeholderAttributes];
[UITextField appearanceWhenContainedInInstancesOfClasses:@[[UISearchBar class]]]
    .attributedPlaceholder = attributedPlaceholder;

// Color of the in-progress spinner.
[[UIActivityIndicatorView appearance] setColor:lightGray];

// To style the two image icons in the search bar (the magnifying glass
// icon and the 'clear text' icon), replace them with different images.
[[UISearchBar appearance] setImage:[UIImage imageNamed:@"custom_clear_x_high"]
                  forSearchBarIcon:UISearchBarIconClear
                            state:UIControlStateHighlighted];
[[UISearchBar appearance] setImage:[UIImage imageNamed:@"custom_clear_x"]
                  forSearchBarIcon:UISearchBarIconClear
                            state:UIControlStateNormal];
[[UISearchBar appearance] setImage:[UIImage imageNamed:@"custom_search"]
                    forSearchBarIcon:UISearchBarIconSearch
                            state:UIControlStateNormal];

// Color of selected table cells.
UIView *selectedBackgroundView = [[UIView alloc] init];
selectedBackgroundView.backgroundColor = [UIColor lightGrayColor];
[UITableViewCell appearanceWhenContainedIn:[GMSAutocompleteViewController class], nil]
    .selectedBackgroundView = selectedBackgroundView;
UI 컨트롤 스타일 속성 설정
UI 컨트롤 요소의 일부에는 UIAppearance 프로토콜의 영향을 받지 않는 속성이 있으므로 직접 설정해야 합니다. 다음 코드 예시에서는 전경색과 배경색을 정의하고 acController라는 UI 컨트롤 인스턴스에 적용하는 방법을 보여줍니다. ViewController.m의 onLaunchClicked 메서드에 다음 코드를 추가합니다.
UIColor *darkGray = [UIColor darkGrayColor];
UIColor *lightGray = [UIColor lightGrayColor];

acController.secondaryTextColor = [UIColor colorWithWhite:1.0f alpha:0.5f];
acController.primaryTextColor = lightGray;
acController.primaryTextHighlightColor = [UIColor grayColor];
acController.tableCellBackgroundColor = darkGray;
acController.tableCellSeparatorColor = lightGray;
acController.tintColor = lightGray;
프로그래매틱 방식으로 장소 예상 검색어 가져오기
자동 완성 위젯에서 제공하는 UI 대신 맞춤 검색 UI를 만들 수 있습니다. 이렇게 하려면 앱이 프로그래매틱 방식으로 장소 예측을 가져와야 합니다. 앱은 다음 방법 중 하나로 예측된 장소 이름 또는 주소 목록을 가져올 수 있습니다.
GMSPlacesClient findAutocompletePredictionsFromQuery:님에게 전화 거는 중
예측된 장소 이름 또는 주소 목록을 가져오려면 먼저 GMSPlacesClient를 인스턴스화한 다음 다음 매개변수를 사용하여 GMSPlacesClient
findAutocompletePredictionsFromQuery: 메서드를 호출합니다.
- 사용자가 입력한 텍스트가 포함된
autocompleteQuery문자열입니다. - 각 개별 세션을 식별하는 데 사용되는
GMSAutocompleteSessionToken앱은 각 자동 완성 요청 호출에 동일한 토큰을 전달한 다음,fetchPlacefromPlaceID:에 대한 후속 호출에서 해당 토큰을 장소 ID와 함께 전달하여 사용자가 선택한 장소의 장소 세부정보를 가져와야 합니다. - A
GMSAutocompleteFilterto:- 결과를 특정 지역으로 편향시키거나 제한합니다.
- 결과를 특정 장소 유형으로 제한합니다.
- 위도 및 경도 경계로 지정된 특정 지역으로 결과를 편향시키는
GMSPlaceLocationBias/제한 객체입니다.
- 반환된 예측을 처리하는 콜백 메서드입니다.
아래 코드 예에서는 findAutocompletePredictionsFromQuery: 호출을 보여줍니다.
Swift
/**
 *   Create a new session token. Be sure to use the same token for calling
 *   findAutocompletePredictions, as well as the subsequent place details request.
 *   This ensures that the user's query and selection are billed as a single session.
 */
let token = GMSAutocompleteSessionToken.init()

// Create a type filter.
let filter = GMSAutocompleteFilter()
filter.types = [.bank]
filter.locationBias = GMSPlaceRectangularLocationOption( northEastBounds,
                                   southWestBounds);

placesClient?.findAutocompletePredictions(fromQuery: "cheesebu",

                                          filter: filter,
                                          sessionToken: token,
                                          callback: { (results, error) in
    if let error = error {
      print("Autocomplete error: \(error)")
      return
    }
    if let results = results {
      for result in results {
        print("Result \(result.attributedFullText) with placeID \(result.placeID)")
      }
    }
})
Objective-C
/**
 *   Create a new session token. Be sure to use the same token for calling
 *   findAutocompletePredictionsFromQuery:, as well as the subsequent place details request.
 *   This ensures that the user's query and selection are billed as a single session.
 */
GMSAutocompleteSessionToken *token = [[GMSAutocompleteSessionToken alloc] init];

// Create a type filter.
GMSAutocompleteFilter *_filter = [[GMSAutocompleteFilter alloc] init];
_filter.types = @[ kGMSPlaceTypeBank ];

[_placesClient findAutocompletePredictionsFromQuery:@"cheesebu"
filter:_filter sessionToken:token callback:^(NSArray<GMSAutocompletePrediction *> * _Nullable results, NSError * _Nullable error) {
  if (error != nil) {
    NSLog(@"An error occurred %@", [error localizedDescription]);
    return;
  }
  if (results != nil) {
    for (GMSAutocompletePrediction *result in results) {
      NSLog(@"Result %@ with PlaceID %@", result.attributedFullText, result.placeID);
    }
  }
}];
API는 지정된 콜백 메서드를 호출하여 GMSAutocompletePrediction 객체의 배열을 전달합니다.
각 GMSAutocompletePrediction 객체에는 다음 정보가 포함됩니다.
attributedFullText: 예측의 전체 텍스트입니다.NSAttributedString형식입니다. 예를 들어 '시드니 오페라 하우스, 시드니, 뉴사우스웨일스, 오스트레일리아'입니다. 사용자 입력과 일치하는 모든 텍스트 범위에는kGMSAutocompleteMatchAttribute속성이 있습니다. 이 속성을 사용하여 아래와 같이 사용자의 쿼리에서 일치하는 텍스트를 강조 표시할 수 있습니다.placeID: 예측된 장소의 장소 ID입니다. 장소 ID는 장소를 고유하게 나타내는 텍스트 식별자입니다. 장소 ID에 대한 자세한 내용은 장소 ID 개요를 참고하세요.distanceMeters– 지정된origin에서 목적지까지의 직선 거리입니다.origin속성이 설정되지 않은 경우 거리 값이 반환되지 않습니다.
다음 코드 예에서는 enumerateAttribute를 사용하여 사용자 쿼리의 텍스트와 일치하는 결과 부분을 굵은 텍스트로 강조 표시하는 방법을 보여줍니다.
Swift
let regularFont = UIFont.systemFont(ofSize: UIFont.labelFontSize)
let boldFont = UIFont.boldSystemFont(ofSize: UIFont.labelFontSize)

let bolded = prediction.attributedFullText.mutableCopy() as! NSMutableAttributedString
bolded.enumerateAttribute(kGMSAutocompleteMatchAttribute, in: NSMakeRange(0, bolded.length), options: []) {
  (value, range: NSRange, stop: UnsafeMutablePointer<ObjCBool>) -> Void in
    let font = (value == nil) ? regularFont : boldFont
    bolded.addAttribute(NSFontAttributeName, value: font, range: range)
}

label.attributedText = bolded
Objective-C
UIFont *regularFont = [UIFont systemFontOfSize:[UIFont labelFontSize]];
UIFont *boldFont = [UIFont boldSystemFontOfSize:[UIFont labelFontSize]];

NSMutableAttributedString *bolded = [prediction.attributedFullText mutableCopy];
[bolded enumerateAttribute:kGMSAutocompleteMatchAttribute
                   inRange:NSMakeRange(0, bolded.length)
                   options:0
                usingBlock:^(id value, NSRange range, BOOL *stop) {
                  UIFont *font = (value == nil) ? regularFont : boldFont;
                  [bolded addAttribute:NSFontAttributeName value:font range:range];
                }];

label.attributedText = bolded;
Fetcher 사용
처음부터 자동 완성 컨트롤을 빌드하려면 GMSPlacesClient에서 autocompleteQuery 메서드를 래핑하는 GMSAutocompleteFetcher를 사용하면 됩니다. 패처는 요청을 제한하여 가장 최근에 입력된 검색 텍스트의 결과만 반환합니다. UI 요소는 제공하지 않습니다.
GMSAutocompleteFetcher을 구현하려면 다음 단계를 따르세요.
GMSAutocompleteFetcherDelegate프로토콜을 구현합니다.GMSAutocompleteFetcher객체를 만듭니다.- 사용자가 입력할 때 가져오기 도구에서
sourceTextHasChanged를 호출합니다. didAutcompleteWithPredictions및didFailAutocompleteWithError프로토콜 메서드를 사용하여 예측과 오류를 처리합니다.
다음 코드 예에서는 가져오기를 사용하여 사용자 입력을 가져오고 텍스트 뷰에 장소 일치 항목을 표시하는 방법을 보여줍니다. 장소 선택 기능이 생략되었습니다. FetcherSampleViewController는 FetcherSampleViewController.h에서 UIViewController에서 파생됩니다.
Swift
import UIKit
import GooglePlaces

class ViewController: UIViewController {

  var textField: UITextField?
  var resultText: UITextView?
  var fetcher: GMSAutocompleteFetcher?

  override func viewDidLoad() {
    super.viewDidLoad()

    view.backgroundColor = .white
    edgesForExtendedLayout = []

    // Set bounds to inner-west Sydney Australia.
    let neBoundsCorner = CLLocationCoordinate2D(latitude: -33.843366,
                                                longitude: 151.134002)
    let swBoundsCorner = CLLocationCoordinate2D(latitude: -33.875725,
                                                longitude: 151.200349)

    // Set up the autocomplete filter.
    let filter = GMSAutocompleteFilter()
    filter.locationRestriction = GMSPlaceRectangularLocationOption(neBoundsCorner, swBoundsCorner)

    // Create a new session token.
    let token: GMSAutocompleteSessionToken = GMSAutocompleteSessionToken.init()

    // Create the fetcher.
    fetcher = GMSAutocompleteFetcher(bounds: nil, filter: filter)
    fetcher?.delegate = self
    fetcher?.provide(token)

    textField = UITextField(frame: CGRect(x: 5.0, y: 10.0,
                                          width: view.bounds.size.width - 5.0,
                                          height: 64.0))
    textField?.autoresizingMask = .flexibleWidth
    textField?.addTarget(self, action: #selector(textFieldDidChange(textField:)),
                         for: .editingChanged)
    let placeholder = NSAttributedString(string: "Type a query...")

    textField?.attributedPlaceholder = placeholder

    resultText = UITextView(frame: CGRect(x: 0, y: 65.0,
                                          width: view.bounds.size.width,
                                          height: view.bounds.size.height - 65.0))
    resultText?.backgroundColor = UIColor(white: 0.95, alpha: 1.0)
    resultText?.text = "No Results"
    resultText?.isEditable = false

    self.view.addSubview(textField!)
    self.view.addSubview(resultText!)
  }

  @objc func textFieldDidChange(textField: UITextField) {
    fetcher?.sourceTextHasChanged(textField.text!)
  }

}

extension ViewController: GMSAutocompleteFetcherDelegate {
  func didAutocomplete(with predictions: [GMSAutocompletePrediction]) {
    let resultsStr = NSMutableString()
    for prediction in predictions {
      resultsStr.appendFormat("\n Primary text: %@\n", prediction.attributedPrimaryText)
      resultsStr.appendFormat("Place ID: %@\n", prediction.placeID)
    }

    resultText?.text = resultsStr as String
  }

  func didFailAutocompleteWithError(_ error: Error) {
    resultText?.text = error.localizedDescription
  }
}
Objective-C
#import "FetcherSampleViewController.h"
#import <GooglePlaces/GooglePlaces.h>

@interface FetcherSampleViewController () <GMSAutocompleteFetcherDelegate>

@end

@implementation FetcherSampleViewController {
  UITextField *_textField;
  UITextView *_resultText;
  GMSAutocompleteFetcher* _fetcher;
}

-   (void)viewDidLoad {
  [super viewDidLoad];

  self.view.backgroundColor = [UIColor whiteColor];
  self.edgesForExtendedLayout = UIRectEdgeNone;

  // Set bounds to inner-west Sydney Australia.
  CLLocationCoordinate2D neBoundsCorner = CLLocationCoordinate2DMake(-33.843366, 151.134002);
  CLLocationCoordinate2D swBoundsCorner = CLLocationCoordinate2DMake(-33.875725, 151.200349);

  GMSAutocompleteFilter *autocompleteFilter = [[GMSAutocompleteFilter alloc] init];
  autocompleteFilter.locationRestriction =
        GMSPlaceRectangularLocationOption(neBoundsCorner, swBoundsCorner);

  // Create the fetcher.
  _fetcher = [[GMSAutocompleteFetcher alloc] initWithBounds:nil
                                                     filter:filter];
  _fetcher.delegate = self;

  // Set up the UITextField and UITextView.
  _textField = [[UITextField alloc] initWithFrame:CGRectMake(5.0f,
                                                             0,
                                                             self.view.bounds.size.width - 5.0f,
                                                             44.0f)];
  _textField.autoresizingMask = UIViewAutoresizingFlexibleWidth;
  [_textField addTarget:self
                 action:@selector(textFieldDidChange:)
       forControlEvents:UIControlEventEditingChanged];
  _resultText =[[UITextView alloc] initWithFrame:CGRectMake(0,
                                                            45.0f,
                                                            self.view.bounds.size.width,
                                                            self.view.bounds.size.height - 45.0f)];
  _resultText.backgroundColor = [UIColor colorWithWhite:0.95f alpha:1.0f];
  _resultText.text = @"No Results";
  _resultText.editable = NO;
  [self.view addSubview:_textField];
  [self.view addSubview:_resultText];
}

-   (void)textFieldDidChange:(UITextField *)textField {
  NSLog(@"%@", textField.text);
  [_fetcher sourceTextHasChanged:textField.text];
}

#pragma mark - GMSAutocompleteFetcherDelegate
-   (void)didAutocompleteWithPredictions:(NSArray *)predictions {
  NSMutableString *resultsStr = [NSMutableString string];
  for (GMSAutocompletePrediction *prediction in predictions) {
      [resultsStr appendFormat:@"%@\n", [prediction.attributedPrimaryText string]];
  }
  _resultText.text = resultsStr;
}

-   (void)didFailAutocompleteWithError:(NSError *)error {
  _resultText.text = [NSString stringWithFormat:@"%@", error.localizedDescription];
}

@end
세션 토큰
세션 토큰은 사용자 자동 완성 검색의 쿼리 및 선택 단계를 결제 목적의 개별 세션으로 그룹화합니다. 세션은 사용자가 쿼리를 입력하기 시작하면 시작되고 장소를 선택하면 종료됩니다. 세션마다 여러 개의 쿼리가 포함될 수 있으며 하나의 장소가 선택됩니다. 세션이 종료되면 토큰이 더 이상 유효하지 않습니다. 앱에서 각 세션에 대해 새 토큰을 생성해야 합니다. 모든 프로그래매틱 자동 완성 세션에 세션 토큰을 사용하는 것이 좋습니다 (전체 화면 컨트롤러 또는 결과 컨트롤러를 사용하는 경우 API에서 자동으로 처리함).
iOS용 Places SDK는 GMSAutocompleteSessionToken를 사용하여 각 세션을 식별합니다. 앱은 새 세션을 시작할 때마다 새 세션 토큰을 전달한 다음, 후속 fetchPlacefromPlaceID: 호출에서 동일한 토큰을 장소 ID와 함께 전달하여 사용자가 선택한 장소의 장소 세부정보를 가져와야 합니다.
다음 코드를 사용하여 새 세션 토큰을 생성합니다.
let token: GMSAutocompleteSessionToken = GMSAutocompleteSessionToken.init()
사용량 한도
GMSPlacesClient findAutocompletePredictionsFromQuery메서드 사용에는 등급별 쿼리 한도가 적용됩니다. 사용량 한도에 관한 문서를 참고하세요.
앱에 저작자 표시 표시
- 앱에서 자동 완성 서비스를 프로그래매틱 방식으로 사용하는 경우 UI에 'Google 제공' 저작자 표시를 표시하거나 Google 브랜드 지도 내에 표시해야 합니다.
- 앱에서 자동 완성 UI 컨트롤을 사용하는 경우 추가 조치가 필요하지 않습니다 (필요한 저작자 표시가 기본적으로 표시됨).
- ID로 장소를 가져온 후 추가 장소 정보를 가져와 표시하는 경우 서드 파티 저작자 표시도 표시해야 합니다.
자세한 내용은 저작자 표시에 관한 문서를 참고하세요.
네트워크 활동 표시기 제어
애플리케이션 상태 표시줄의 네트워크 활동 표시기를 제어하려면 사용 중인 자동 완성 클래스에 적절한 선택적 대리자 메서드를 구현하고 네트워크 표시기를 직접 켜고 꺼야 합니다.
GMSAutocompleteViewController의 경우 대리자 메서드didRequestAutocompletePredictions:및didUpdateAutocompletePredictions:을 구현해야 합니다.GMSAutocompleteResultsViewController의 경우 대리자 메서드didRequestAutocompletePredictionsForResultsController:및didUpdateAutocompletePredictionsForResultsController:를 구현해야 합니다.GMSAutocompleteTableDataSource의 경우 대리자 메서드didRequestAutocompletePredictionsForTableDataSource:및didUpdateAutocompletePredictionsForTableDataSource:를 구현해야 합니다.
이러한 메서드를 구현하고 [UIApplication
sharedApplication].networkActivityIndicatorVisible을 각각 YES 및 NO로 설정하면 상태 표시줄이 자동 완성 UI와 올바르게 일치합니다.
자동 완성 결과 제한
자동 완성 UI 컨트롤을 설정하여 결과를 특정 지리적 지역으로 제한하거나 결과를 하나 이상의 장소 유형 또는 특정 국가로 필터링할 수 있습니다. 결과를 제한하려면 다음을 수행하세요.
- 정의된 지역 내 결과를 선호 (편향)하려면
GMSAutocompleteFilter에서locationBias를 설정합니다 (정의된 지역 외부의 결과가 여전히 반환될 수 있음).locationRestriction도 설정된 경우locationBias이 무시됩니다. 정의된 지역 내의 결과만 표시 (제한)하려면
GMSAutocompleteFilter에서locationRestriction를 설정합니다 (정의된 지역 내의 결과만 반환됨).- 참고: 이 제한은 경로 전체에만 적용됩니다. 직사각형 경계 외부에 있는 종합적인 결과는 위치 제한과 겹치는 경로를 기반으로 반환될 수도 있습니다.
특정 장소 유형을 준수하는 결과만 반환하려면
GMSAutocompleteFilter에서types를 설정합니다(예: TypeFilter.ADDRESS를 지정하면 위젯이 정확한 주소가 있는 결과만 반환함).최대 5개의 지정된 국가 내의 결과만 반환하려면
GMSAutocompleteFilter에서countries를 설정합니다.
특정 지역에 편중된 결과
정의된 지역 내의 결과를 선호 (편향)하려면 다음과 같이 GMSAutocompleteFilter에서 locationBias를 설정합니다.
northEast = CLLocationCoordinate2DMake(39.0, -95.0);  southWest =
CLLocationCoordinate2DMake(37.5, -100.0);  GMSAutocompleteFilter *filter =
[[GMSAutocompleteFilter alloc] init];  filter.locationBias =
GMSPlaceRectangularLocationOption(northEast, southWest);
결과를 특정 지역으로 제한
정의된 지역 내의 결과만 표시 (제한)하려면 다음과 같이 GMSAutocompleteFilter에서 locationRestriction을 설정합니다.
northEast = CLLocationCoordinate2DMake(39.0, -95.0);  southWest =
CLLocationCoordinate2DMake(37.5, -100.0);  GMSAutocompleteFilter *filter =
[[GMSAutocompleteFilter alloc] init];  filter.locationRestriction =
GMSPlaceRectangularLocationOption(northEast, southWest);
국가별로 결과 필터링
최대 5개의 지정된 국가 내에서 결과를 필터링하려면 다음과 같이 GMSAutocompleteFilter에서 countries를 설정합니다.
GMSAutocompleteFilter *filter = [[GMSAutocompleteFilter alloc] init];
filter.countries = @[ @"au", @"nz" ];
장소 유형 또는 유형 컬렉션으로 결과 필터링
GMSAutoCompleteFilter의 types 속성을 설정하여 결과를 특정 유형 또는 유형 모음으로 제한합니다.
이 속성을 사용하여 장소 유형의 표 1, 2, 3에 나열된 필터를 지정합니다. 유형을 지정하지 않으면 모든 유형이 반환됩니다.
유형 또는 유형 컬렉션 필터를 지정하려면 다음 단계를 따르세요.
types속성을 사용하여 장소 유형에 표시된 표 1과 표 2의 type 값을 최대 5개까지 지정합니다. 유형 값은GMSPlaceType의 상수로 정의됩니다.types속성을 사용하여 장소 유형에 표시된 표 3에서 유형 컬렉션을 지정합니다. 유형 컬렉션 값은GMSPlaceType의 상수로 정의됩니다.이 요청에서는 표 3의 단일 유형만 허용됩니다. 표 3의 값을 지정하는 경우 표 1이나 표 2의 값은 지정할 수 없습니다. 이 경우 오류가 발생합니다.
예를 들어 특정 장소 유형을 준수하는 결과만 반환하려면 GMSAutocompleteFilter에서 types을 설정합니다. 다음 예시는 정확한 주소가 있는 결과만 반환하도록 필터를 설정하는 방법을 보여줍니다.
GMSAutocompleteFilter *filter = [[GMSAutocompleteFilter alloc] init];
filter.types = @[ kGMSPlaceTypeAirport, kGMSPlaceTypeAmusementPark ];
Place Autocomplete (기존) 최적화
이 섹션에서는 Place Autocomplete (Legacy) 서비스를 최대한 활용하는 데 도움이 되는 권장사항을 설명합니다.
다음은 일반 가이드라인입니다.
- 작동하는 사용자 인터페이스를 개발하는 가장 빠른 방법은 Maps JavaScript API 장소 자동 완성 (기존) 위젯, Android용 Places SDK 장소 자동 완성 (기존) 위젯 또는 iOS용 Places SDK 장소 자동 완성 (기존) UI 컨트롤을 사용하는 것입니다.
- 처음부터 기본적인 Place Autocomplete (Legacy) 데이터 필드를 이해합니다.
- 위치 상세 검색 및 위치 제한 필드는 선택사항이지만 자동 완성 성능에 상당한 영향을 미칠 수 있습니다.
- API가 오류를 반환하는 경우 오류 처리를 사용하여 앱의 성능이 적절히 저하되도록 합니다.
- 선택된 항목이 없을 때 앱에서 처리하고 사용자에게 계속할 수 있는 방법을 제공하도록 합니다.
비용 최적화 권장사항
기본 비용 최적화
Place Autocomplete (Legacy) 서비스 사용 비용을 최적화하려면 장소 세부정보 (Legacy) 및 Place Autocomplete (Legacy) 위젯에서 필드 마스크를 사용하여 필요한 장소 데이터 필드만 반환하세요.
고급 비용 최적화
요청당 가격에 액세스하고 장소 세부정보 (기존) 대신 선택된 장소에 대한 Geocoding API 결과를 요청하려면 Place Autocomplete (기존)를 프로그래매틱 방식으로 구현해 보세요. Geocoding API와 연결된 요청당 가격은 다음 두 조건이 모두 충족되는 경우 세션당(세션 기반) 가격보다 비용 효과적입니다.
- 사용자가 선택한 장소의 위도/경도 또는 주소만 필요한 경우 Geocoding API는 장소 세부정보 (기존) 호출보다 낮은 비용으로 이 정보를 제공합니다.
- 사용자가 평균 네 개 이하의 Place Autocomplete (레거시) 예상 검색어 요청 내에서 자동 완성 예상 검색어를 선택하면 요청당 가격이 세션당 가격보다 비용 효과적일 수 있습니다.
애플리케이션에 선택된 예상 검색어의 주소 및 위도/경도 이외의 정보가 필요한가요?
예, 추가 세부정보가 필요합니다.
세션 기반 Place Autocomplete (이전)를 장소 세부정보 (이전)와 함께 사용
애플리케이션에 장소 이름, 비즈니스 상태, 영업시간과 같은 Place Details (레거시)가 필요하므로 Place Autocomplete (레거시) 구현에서는 세션 토큰 (프로그래매틱 방식 또는 JavaScript, Android, iOS 위젯에 내장)을 사용해야 합니다. 요청하는 장소 데이터 필드에 따라 세션당 요금과 해당 장소 데이터 SKU가 청구됩니다.1
위젯 구현
세션 관리는 JavaScript, Android 또는 iOS에 자동으로 내장됩니다. 여기에는 선택된 예상 검색어에 대한 Place Autocomplete (Legacy) 요청 및 Place Details (Legacy) 요청이 모두 포함됩니다. 필요한 장소 데이터 필드만 요청하도록 하려면 fields 매개변수를 지정해야 합니다.
프로그래매틱 구현
Place Autocomplete (기존) 요청에 세션 토큰을 사용합니다. 선택된 예상 검색어에 대해 장소 세부정보 (기존)를 요청할 때 다음 매개변수를 포함합니다.
- Place Autocomplete (기존) 응답의 장소 ID
- Place Autocomplete (기존) 요청에 사용되는 세션 토큰
- 필요한 장소 데이터 필드를 지정하는
fields매개변수
아니요, 주소와 위치만 필요합니다.
Place Autocomplete (레거시)의 사용 성능에 따라 Geocoding API가 장소 세부정보 (레거시)보다 애플리케이션에 비용 효과적일 수 있습니다. 모든 애플리케이션의 Place Autocomplete (Legacy) 효율성은 사용자가 입력하는 내용, 애플리케이션이 사용되는 위치, 성능 최적화 권장사항이 구현되었는지 여부에 따라 다릅니다.
다음 질문에 답변하려면 애플리케이션에서 Place Autocomplete (Legacy) 예상 검색어를 선택하기 전에 사용자가 평균적으로 입력하는 문자 수를 분석하세요.
사용자가 평균 네 개 이하의 요청에서 Place Autocomplete (Legacy) 예상 검색어를 선택하나요?
예
세션 토큰 없이 프로그래매틱 방식으로 Place Autocomplete (레거시)를 구현하고 선택한 장소 예상 검색어에 대해 Geocoding API 호출
Geocoding API는 주소 및 위도/경도 좌표를 제공합니다. Place Autocomplete (Legacy) - Per Request를 4회 요청하고 선택된 장소 예상 검색어에 대해 Geocoding API를 호출하는 비용은 세션당 Place Autocomplete (Legacy) 비용보다 저렴합니다.1
성능 권장사항을 사용하여 사용자가 훨씬 적은 수의 문자로 원하는 예상 검색어를 가져올 수 있도록 도와주세요.
아니요
세션 기반 Place Autocomplete (이전)를 장소 세부정보 (이전)와 함께 사용
사용자가 Place Autocomplete (레거시) 예측을 선택하기 전에 이루어질 것으로 예상되는 평균 요청 수가 세션당 가격의 비용을 초과하므로 Place Autocomplete (레거시) 구현에서는 Place Autocomplete (레거시) 요청과 관련 Place Details (레거시) 요청 모두에 세션당 세션 토큰을 사용해야 합니다.1
위젯 구현
세션 관리는 JavaScript, Android 또는 iOS에 자동으로 내장됩니다. 여기에는 선택된 예상 검색어에 대한 Place Autocomplete (Legacy) 요청 및 Place Details (Legacy) 요청이 모두 포함됩니다. 기본 데이터 필드만 요청하도록 하려면 fields 매개변수를 지정해야 합니다.
프로그래매틱 구현
Place Autocomplete (기존) 요청에 세션 토큰을 사용합니다. 선택된 예상 검색어에 대해 장소 세부정보 (기존)를 요청할 때 다음 매개변수를 포함합니다.
- Place Autocomplete (기존) 응답의 장소 ID
- Place Autocomplete (기존) 요청에 사용되는 세션 토큰
- 주소 및 도형과 같은 기본 데이터 필드를 지정하는
fields매개변수
Place Autocomplete (Legacy) 요청 지연 고려
사용자가 처음 3~4자를 입력할 때까지 Place Autocomplete (Legacy) 요청을 지연하는 것과 같은 전략을 채택하여 애플리케이션에서 요청하는 횟수를 줄일 수 있습니다. 예를 들어 사용자가 세 번째 문자를 입력한 후에 각 문자에 대해 Place Autocomplete (Legacy) 요청을 하면 사용자가 7개의 문자를 입력한 후 Geocoding API 요청을 한 예상 검색어를 선택하는 경우 총비용은 Place Autocomplete (Legacy) Per Request 4회 + Geocoding이 됩니다.1
요청을 지연하면 평균 프로그래매틱 요청 수가 네 개 미만이 될 수 있는 경우 Geocoding API를 사용한 고성능 Place Autocomplete (기존) 구현을 위한 안내를 따르세요. 키를 입력할 때마다 예상 검색어가 표시될 것이라고 예상하는 사용자는 요청 지연을 지연 시간으로 인식할 수 있습니다.
성능 권장사항을 사용하여 사용자가 더 적은 수의 문자로 원하는 예상 검색어를 가져올 수 있도록 도와주세요.
-
비용은 Google Maps Platform 가격 목록을 참고하세요.
성능 권장사항
다음 가이드라인에서는 Place Autocomplete (기존) 성능을 최적화하는 방법을 설명합니다.
- Place Autocomplete (Legacy) 구현에 국가별 제한사항, 위치 상세 검색, (프로그래매틱 구현의 경우) 언어 환경설정을 추가합니다. 위젯은 사용자의 브라우저 또는 휴대기기에서 언어 환경설정을 선택하므로 언어 환경설정이 필요하지 않습니다.
- Place Autocomplete (기존)에 지도와 함께 제공된 경우 지도 표시 영역별로 위치를 상세 검색할 수 있습니다.
- 예상 검색어 중 원하는 결과 주소가 없어 사용자가 Place Autocomplete (Legacy) 예상 검색어 중 하나를 선택하지 않는 경우 원래 사용자 입력을 재사용하여 더 관련성 높은 결과를 얻을 수 있습니다.
- 사용자가 주소 정보만 입력할 것으로 예상되는 경우 Geocoding API 호출 시 원래 사용자 입력을 재사용합니다.
- 사용자가 이름 또는 주소로 특정 장소에 대한 쿼리를 입력할 것으로 예상되는 경우 Find Place (Legacy) 요청을 사용합니다. 특정 지역에서만 결과가 예상되는 경우 위치 상세 검색을 사용합니다.
- 건물 내 특정 단위 또는 아파트 주소와 같은 하위 구역 주소를 입력하는 사용자 예를 들어 체코 주소인 'Stroupežnického 3191/17, Praha'를 바탕으로 Place Autocomplete (기존)에서 부분 예측이 이루어집니다.
- 사용자가 뉴욕시의 '23-30 29th St, Queens' 또는 하와이 카우아이섬의 '47-380 Kamehameha Hwy, Kaneohe'처럼 도로 구간 접두사가 있는 주소를 입력하는 경우
문제 해결
다양한 오류가 발생할 수 있지만 앱에서 경험할 가능성이 가장 큰 오류는 일반적으로 구성 오류 (예: 잘못된 API 키가 사용되었거나 API 키가 잘못 구성됨) 또는 할당량 오류 (앱이 할당량을 초과함)로 인해 발생합니다. 할당량에 대한 자세한 내용은 사용량 한도를 참고하세요.
자동 완성 컨트롤 사용 시 발생하는 오류는 다양한 위임 프로토콜의 didFailAutocompleteWithError() 메서드에 반환됩니다. 제공된 NSError 객체의 code 속성이 GMSPlacesErrorCode 열거형의 값 중 하나로 설정됩니다.