本節將介紹 SimpleExampleServlet,這是程式庫提供的最簡單資料來源實作範例。本節也會逐步說明如何執行及測試 SimpleExampleServlet。
隆重推出 SimpleExampleServlet
SimpleExampleServlet 類別位於 examples 套件中。這個類別提供最簡單的資料來源實作範例。SimpleExampleServlet 會從 DataSourceServlet 繼承、實作 generateDataTable(),且必須在 Servlet 容器中執行。
以下提供 SimpleExampleServlet 的程式碼片段。generateDataTable 函式會向程式庫公開資料。這個函式會建立資料表說明、定義資料表欄,並填入資料表。程式庫會處理所有其他動作,將資料表傳回查詢的視覺化項目。
// This example extends DataSourceServlet public class SimpleExampleServlet extends DataSourceServlet { @Override public DataTable generateDataTable(Query query, HttpServletRequest request) { // Create a data table, DataTable data = new DataTable(); ArrayListcd = new ArrayList (); cd.add(new ColumnDescription("name", ValueType.TEXT, "Animal name")); cd.add(new ColumnDescription("link", ValueType.TEXT, "Link to wikipedia")); cd.add(new ColumnDescription("population", ValueType.NUMBER, "Population size")); cd.add(new ColumnDescription("vegeterian", ValueType.BOOLEAN, "Vegetarian?")); data.addColumns(cd); // Fill the data table. try { data.addRowFromValues("Aye-aye", "http://en.wikipedia.org/wiki/Aye-aye", 100, true); data.addRowFromValues("Sloth", "http://en.wikipedia.org/wiki/Sloth", 300, true); data.addRowFromValues("Leopard", "http://en.wikipedia.org/wiki/Leopard", 50, false); data.addRowFromValues("Tiger", "http://en.wikipedia.org/wiki/Tiger", 80, false); } catch (TypeMismatchException e) { System.out.println("Invalid type!"); } return data; } }
執行及測試 SimpleExampleServlet
本節說明如何執行及測試 SimpleExampleServlet。
如果尚未完成,請參閱「安裝」一節,瞭解先決條件,以及如何下載及建構程式庫。如果系統上沒有網路伺服器,請務必安裝可做為 Servlet 容器的網路伺服器,例如 Apache Tomcat。本節的操作說明適用於 Windows 系統上的 Apache Tomcat。
如要執行及測試 SimpleExampleServlet,請建立執行 SimpleExampleServlet 資料來源的網路應用程式,然後執行範例網頁,並顯示從資料來源查詢的資料。詳情請參閱下列章節:
在 Apache Tomcat 上建立網頁應用程式
請按照或調整下列操作說明,在 Apache Tomcat 上建立網頁應用程式。以下操作說明適用於 Windows 系統上的 Apache Tomcat:
- 前往安裝 Tomcat 的目錄。本文將此寫為
<tomcat_home>。
- 前往
webapps子目錄。
- 建立名為
myWebApp的子目錄。
- 切換至剛建立的子目錄,然後建立另一個名為
WEB-INF的子目錄。
- 切換至
WEB-INF子目錄,然後建立名為lib的另一個子目錄。
完整路徑應為<tomcat_home>/webapps/myWebApp/WEB-INF/lib。
- 將
web.xml從<data_source_library_install>/examples/src/html複製到WEB-INF目錄。其中<data_source_library_install>是您安裝資料來源程式庫的目錄。web.xml中的下列程式碼會定義及對應SimpleExampleServlet:
<servlet>
  <servlet-name>My Servlet</servlet-name>
  <description>My servlet description.</description>
  <servlet-class>SimpleExampleServlet</servlet-class>
</servlet>

<servlet-mapping>
  <servlet-name>My Servlet</servlet-name>
  <url-pattern>/simpleexample</url-pattern>
</servlet-mapping>
- 前往安裝資料來源程式庫的目錄。
本文將此值寫為
<data_source_library_install>。
- 將所有依附元件套件複製到
<tomcat_home>/webapps/myWebApp/WEB-INF/lib。除非您將套件放在其他目錄中,否則套件會安裝在<data_source_library_install>/lib中。
- 如果您自行建構程式庫,請從
<data_source_library_install>/build複製visualization-datasource-1.0.2.jar和visualization-datasource-examples.jar
到<tomcat_home>/webapps/myWebApp/WEB-INF/lib。
如果已解壓縮 zip 檔案,請從<data_source_library_install>複製visualization-datasource-1.0.2.jar和visualization-datasource-examples.jar
到<tomcat_home>/webapps/myWebApp/WEB-INF/lib。
請注意,jar 檔案名稱中的版本號碼可能會因最新版本號碼而異。 - 啟動 Tomcat,或重新啟動 Tomcat (如果已在執行)。
- 按一下下列連結:
http://localhost:8080/myWebApp/simpleexample
畫面上會顯示 6 到 7 行文字,視螢幕寬度而定。
文字開頭為google.visualization.Query.setResponse
結尾為/Tiger'},{v:80.0},{v:false}]}]}});
這是資料來源傳回給查詢視覺化內容的資料。
使用視覺化效果查看資料
您可以使用 <data_source_library_install>/examples/src/html 目錄中的 getting_started.html 檔案,查看資料的視覺化效果。以下取自 getting_started.html 的程式碼行指定要使用的 Servlet。Servlet 對應是在「在 Apache Tomcat 上建立網路應用程式」的步驟 8 中設定。
var query = new google.visualization.Query('simpleexample');
如要進一步瞭解如何指定視覺化效果及使用查詢語言,請參閱「使用圖表」和「查詢語言參考資料」。
請按照或調整下列操作說明,查看資料來源提供的資料視覺化呈現:
- 將
getting_started.html檔案從<data_source_library_install>/examples/src/html目錄
複製到<tomcat_home>/webapps/myWebApp/目錄。
- 按一下下列連結:http://localhost:8080/myWebApp/getting_started.html,您應該會看到以下內容:
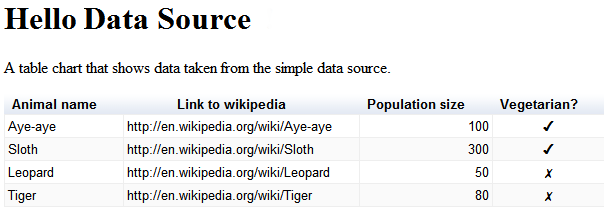
這樣就完成了!您已設定第一個資料來源。
後續步驟
下一個範例請參閱「使用外部資料儲存區」一節。或者,您也可以返回「簡介」,或瀏覽下列連結:
- 如要瞭解程式庫最常用的類別,請參閱「主要類別」。
- 如要查看如何實作自己的事件流程和查詢功能,請參閱「定義功能和事件流程」。
- 如不想從
DataSourceServlet繼承,可以按照「使用自己的 Servlet」一文所述,實作資料來源。舉例來說,如果您從其他類別繼承 Servlet,可能就不想從DataSourceServlet繼承。 - 如果不想使用 Servlet,請參閱「實作非 Servlet 資料來源」。
- 如要瞭解如何將參數從應用程式傳遞至資料來源,請參閱「將參數傳遞至
DataTableGenerator.generateDataTable」。