本節介紹 CsvDataSourceServlet。CsvDataSourceServlet 是使用 CSV 檔案做為外部資料儲存庫的實作範例。本節也會提供執行及測試 CsvDataSourceServlet 的逐步操作說明。
注意事項:在開始本節之前,請先完成「開始使用資料來源」一節。
隆重介紹 CsvDataSourceServlet
CsvDataSourceServlet 類別位於 examples 套件中。這個類別提供使用 CSV 檔案做為外部資料儲存庫的實作範例。CsvDataSourceServlet 繼承自 DataSourceServlet、實作 generateDataTable(),且必須在 ko 容器內執行。
下方提供 CsvDataSourceServlet 的程式碼片段。generateDataTable 函式會向程式庫公開資料。這個函式會建立資料表說明、定義資料表的資料欄,並在資料表內填入從 CSV 檔案取得的資料。系統會從要求圖表查詢中指定的網址讀取 CSV 檔案。這個程式庫可處理將資料表傳回查詢視覺化作業所需的所有其他動作。
/**
 * A demo servlet for serving a simple, constant data table.
 * This servlet extends DataSourceServlet, but does not override the default
 * empty implementation of method getCapabilities(). This servlet therefore ignores the
 * user query (as passed in the 'tq' url parameter), leaving the
 * query engine to apply it to the data table created here.
 *
 * @author Nimrod T.
 */
public class CsvDataSourceServlet extends DataSourceServlet {

  /**
   * Log.
   */
  private static final Log log = LogFactory.getLog(CsvDataSourceServlet.class.getName());

  /**
   * The name of the parameter that contains the url of the CSV to load.
   */
  private static final String URL_PARAM_NAME = "url";

  /**
   * Generates the data table.
   * This servlet assumes a special parameter that contains the CSV URL from which to load
   * the data.
   */
  @Override
  public DataTable generateDataTable(Query query, HttpServletRequest request)
      throws DataSourceException {
    String url = request.getParameter(URL_PARAM_NAME);
    if (StringUtils.isEmpty(url)) {
      log.error("url parameter not provided.");
      throw new DataSourceException(ReasonType.INVALID_REQUEST, "url parameter not provided");
    }

    Reader reader;
    try {
      reader = new BufferedReader(new InputStreamReader(new URL(url).openStream()));
    } catch (MalformedURLException e) {
      log.error("url is malformed: " + url);
      throw new DataSourceException(ReasonType.INVALID_REQUEST, "url is malformed: " + url);
    } catch (IOException e) {
      log.error("Couldn't read from url: " + url, e);
      throw new DataSourceException(ReasonType.INVALID_REQUEST, "Couldn't read from url: " + url);
    }
    DataTable dataTable = null;
    ULocale requestLocale = DataSourceHelper.getLocaleFromRequest(request);
    try {
      // Note: We assume that all the columns in the CSV file are text columns. In cases where the
      // column types are known in advance, this behavior can be overridden by passing a list of
      // ColumnDescription objects specifying the column types. See CsvDataSourceHelper.read() for
      // more details.
      dataTable = CsvDataSourceHelper.read(reader, null, true, requestLocale);
    } catch (IOException e) {
      log.error("Couldn't read from url: " + url, e);
      throw new DataSourceException(ReasonType.INVALID_REQUEST, "Couldn't read from url: " + url);
    }
    return dataTable;
  }
}
執行與測試 CsvDataSourceServlet
本節說明如何執行及測試 CsvDataSourceServlet。
如要執行及測試 CsvDataSourceServlet,請建立 CSV 檔案、更新網頁應用程式,並設定查詢資料來源的視覺化內容,如以下各節所述:
建立 CSV 檔案
csv_example.csv 檔案會在 <data_source_library_install>/examples/src/html 目錄中提供。其中包含下列值:
Employee,Manager
Roger,John
Robert,John
Jane,Roger
Jack,Jane
Bob,Jane
請將這個檔案複製到您在開始使用一節中建立的 <tomcat_home>/webapps/myWebApp 目錄。
在 Apache Tomcat 上更新網頁應用程式
按照或調整下列操作說明,更新 Apache Tomcat 上的網頁應用程式。以下操作說明僅適用於 Windows 系統上的 Apache Tomcat:
- 您先前複製到
WEB-INF目錄的web.xml檔案已包含本範例所需的定義和對應。定義此行的行如下:
<servlet>
  <servlet-name>CSV Example</servlet-name>
  <description>
  CsvDataSourceServlet
  </description>
  <servlet-class>CsvDataSourceServlet</servlet-class>
</servlet>

<servlet-mapping>
  <servlet-name>CSV Example</servlet-name>
  <url-pattern>/csv</url-pattern>
</servlet-mapping>
- 啟動 Tomcat。如果 Tomcat 已在執行,請重新啟動。
- 點擊以下連結:
http://localhost:8080/myWebApp/csv?url=http://localhost:8080/myWebApp/csv_example.csv
系統會根據您螢幕寬度,顯示 6 到 7 行文字。
文字開頭為google.visualization.Query.setResponse
,結尾則是{c:[{v:'Bob'},{v:'Jane'}]}]}});
這是範例 CSV 資料來源傳送給視覺化呈現的回應。
使用視覺化呈現查看資料
<data_source_library_install>/examples/src/html 目錄中的 all_examples.html 檔案可用來檢視資料的視覺化效果。
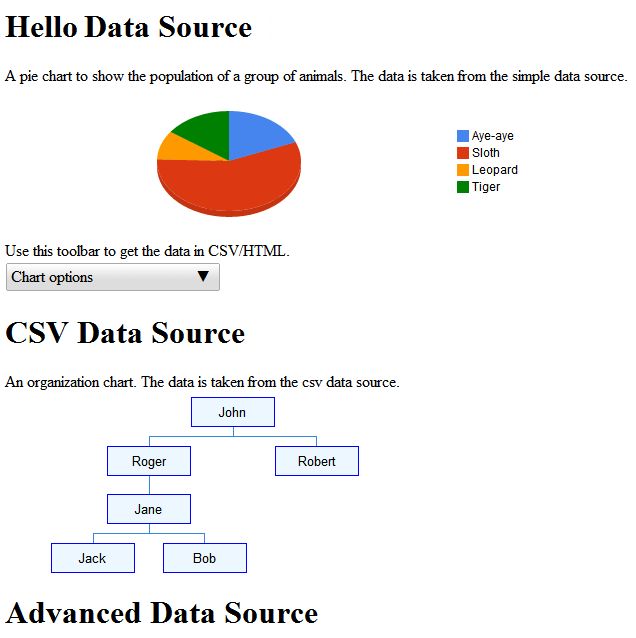
如果您查看 all_examples.html 檔案的來源,就會看到檔案中包含三個視覺化內容。以下程式碼片段可重現這些視覺化的規格。
- 以下這行程式碼會指定本節涵蓋的
csv範例:
query = new google.visualization.Query('csv?url=http://localhost:8080/myWebApp/csv_example.csv');以下這行程式碼指定組織圖的視覺化呈現:var chart = new google.visualization.OrgChart(document.getElementById('csv_div')); - 以下這行程式碼會指定「Getting Started」(開始使用) 部分涵蓋的
simpleexample:
var query = new google.visualization.Query('simpleexample?tq=select name,population');以下這行程式碼會指定圓餅圖視覺化:var chart = new google.visualization.PieChart(document.getElementById('simple_div')); - 以下這行程式碼指定「定義功能與事件流程」一節涵蓋的
advanced範例:
query = new google.visualization.Query('advanced?tableId=planets&tq=select planet,mass');以下這行程式碼指定了視覺化的長條圖:var chart = new google.visualization.BarChart(document.getElementById('advanced_div'));
如要進一步瞭解如何指定圖表及使用查詢語言,請參閱「圖表工具使用簡介」和「查詢語言參考資料」。
請按照下列操作說明,以視覺化方式查看 CsvDataSourceServlet 提供的資料,並視需要調整:
- 將
all_examples.html檔案從<data_source_library_install>/examples/src/html目錄複製到<tomcat_home>/webapps/myWebApp/目錄。 - 按一下下列連結:http://localhost:8080/myWebApp/all_examples.html,您應該會看到下列視覺化內容。
進階資料來源範例在定義功能和事件流一文中討論。
後續步驟
下例請參閱「定義功能和事件流程 」一節。您也可以點選下列連結:
- 如需程式庫最常用的類別簡介,請參閱金鑰類別。
- 您可以讓資料來源沿用其他類別,而不讓資料來源沿用
DataSourceServlet。詳情請參閱使用您自己的 UDP。 - 如要瞭解如何將參數從應用程式傳送至資料來源,請參閱將參數傳送至
DataTableGenerator.generateDataTable。