Google uses AI technology to translate content into your preferred language. AI translations can contain errors.
ติดตั้งฮาร์ดแวร์ (ไม่บังคับ)
จัดทุกอย่างให้เป็นระเบียบอยู่เสมอด้วยคอลเล็กชัน
บันทึกและจัดหมวดหมู่เนื้อหาตามค่ากำหนดของคุณ
ตอนนี้คุณมี Assistant ทำงานอยู่ในอุปกรณ์แล้ว ก็ถึงเวลาขยายการใช้งานด้วยการทำงานของอุปกรณ์ การทำงานของอุปกรณ์ช่วยให้คุณควบคุมอุปกรณ์ผ่านเสียงได้
สำหรับตัวอย่างนี้ คุณจะใช้การดำเนินการของอุปกรณ์ในตัวเพื่อเปิดหรือปิดไฟ
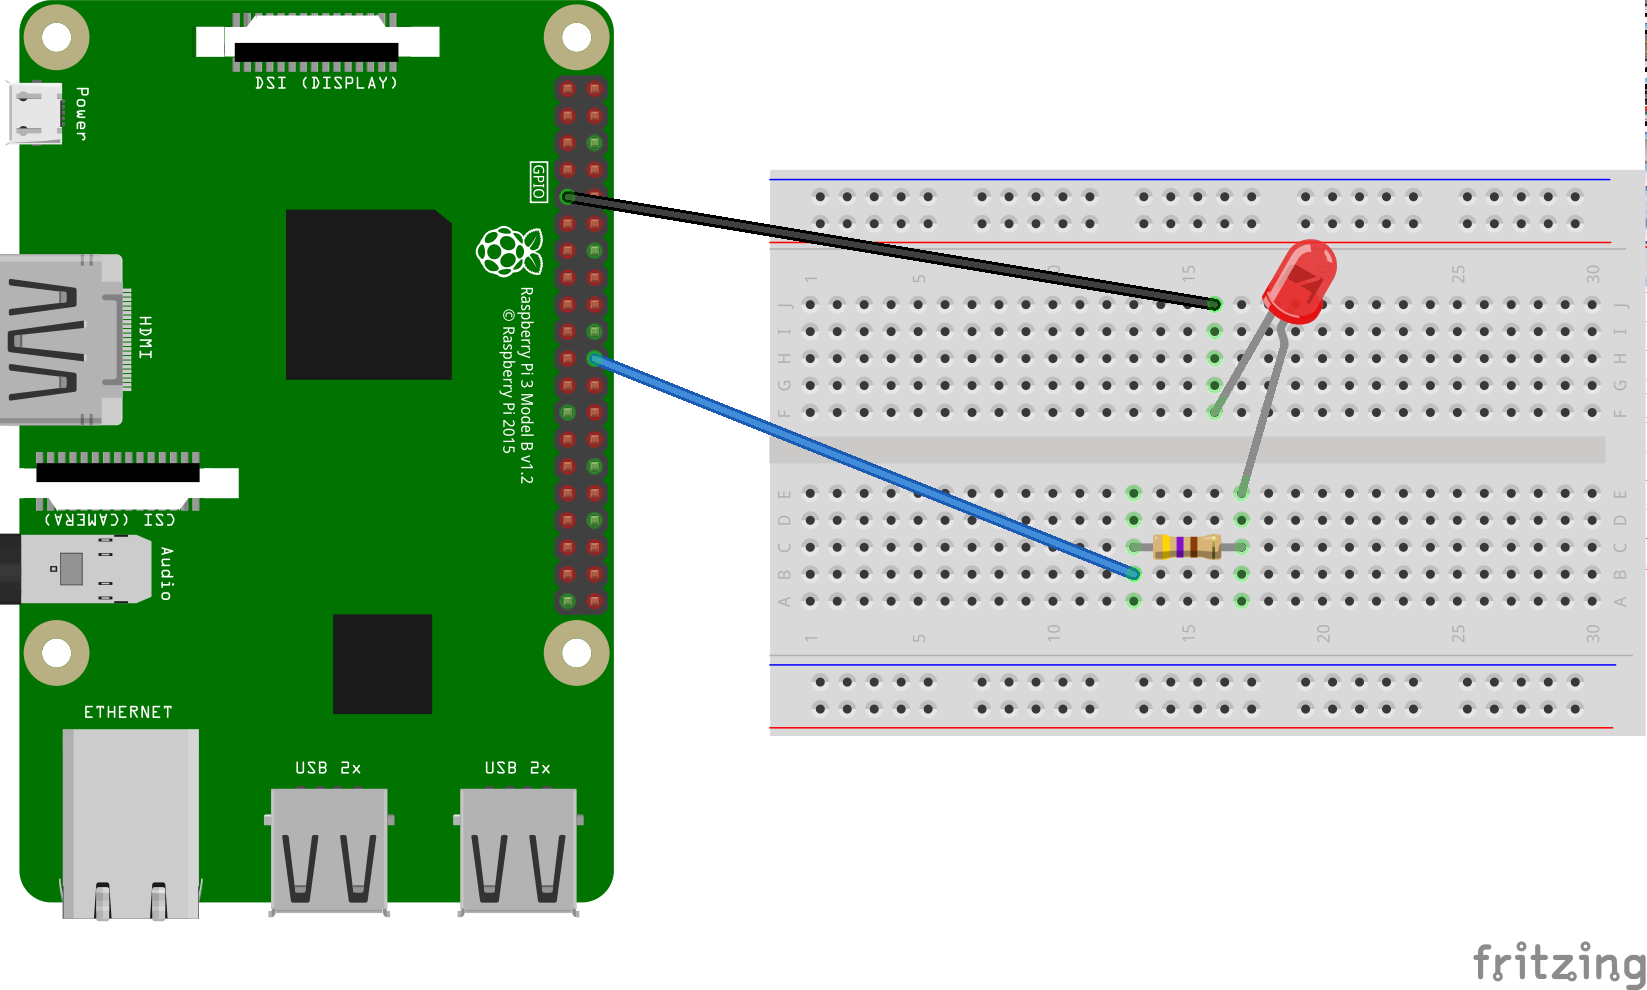
ทำตามวิธีการต่อไปนี้เพื่อติดตั้ง LED ใน Raspberry Pi 3 รุ่น B ในขั้นตอนต่อมา คุณจะต้องแก้ไขโค้ดตัวอย่างเพื่อให้ไฟ LED สว่างขึ้นด้วยคำสั่งเสียง
ข้อกำหนดเกี่ยวกับฮาร์ดแวร์
ก่อนเริ่มต้นตัวอย่างนี้ คุณจะต้องมีคอมโพเนนต์ต่อไปนี้
- แผงวงจรทดลอง
- ไฟ LED
- ตัวต้านทานกระแสไฟฟ้าแบบอนุกรม
- สายจัมพ์ 2 เส้นที่มีทั้งขั้วต่อตัวผู้และตัวเมีย
ความต้านทานไฟฟ้าของตัวต้านทานควรสัมพันธ์กับไฟ LED ที่เจาะจง
หากต้องการค้นหาค่าที่ถูกต้อง ให้ใช้เครื่องคิดเลขออนไลน์ (หรือซื้อชุดอุปกรณ์)
เชื่อมต่อคอมโพเนนต์
- เชื่อมต่อ PIN เอาต์พุต GPIO BCM25
กับด้านหนึ่งของตัวต้านทานกระแสไฟฟ้าซีรีส์ โปรดทราบว่านี่เป็น PIN 22 บน
Raspberry Pi 3
- ต่อตัวต้านทานอีกด้านหนึ่งกับด้านขั้วบวก (ตัวนำยาวขึ้น) ของ LED
- ต่อสายแคโทด (ตัวนำที่สั้นกว่า) ของ LED กับพื้น
ขั้นตอนถัดไป
ลงทะเบียนลักษณะ
เนื้อหาของหน้าเว็บนี้ได้รับอนุญาตภายใต้ใบอนุญาตที่ต้องระบุที่มาของครีเอทีฟคอมมอนส์ 4.0 และตัวอย่างโค้ดได้รับอนุญาตภายใต้ใบอนุญาต Apache 2.0 เว้นแต่จะระบุไว้เป็นอย่างอื่น โปรดดูรายละเอียดที่นโยบายเว็บไซต์ Google Developers Java เป็นเครื่องหมายการค้าจดทะเบียนของ Oracle และ/หรือบริษัทในเครือ
อัปเดตล่าสุด 2025-07-25 UTC
[[["เข้าใจง่าย","easyToUnderstand","thumb-up"],["แก้ปัญหาของฉันได้","solvedMyProblem","thumb-up"],["อื่นๆ","otherUp","thumb-up"]],[["ไม่มีข้อมูลที่ฉันต้องการ","missingTheInformationINeed","thumb-down"],["ซับซ้อนเกินไป/มีหลายขั้นตอนมากเกินไป","tooComplicatedTooManySteps","thumb-down"],["ล้าสมัย","outOfDate","thumb-down"],["ปัญหาเกี่ยวกับการแปล","translationIssue","thumb-down"],["ตัวอย่าง/ปัญหาเกี่ยวกับโค้ด","samplesCodeIssue","thumb-down"],["อื่นๆ","otherDown","thumb-down"]],["อัปเดตล่าสุด 2025-07-25 UTC"],[],[]]