Zadbaj o dobrą organizację dzięki kolekcji
Zapisuj i kategoryzuj treści zgodnie ze swoimi preferencjami.
Aby Asystent Google reagował na polecenia odpowiednie dla Twojego
i w danym kontekście, Asystent potrzebuje informacji o Twoim
konkretne urządzenie. Te informacje podajesz w polach, takich jak
typ i producent urządzenia. Ten model można określić
ogólnej klasy urządzeń, takich jak światło, głośnik lub zabawkowy robot.
Te informacje są następnie dostępne dla Asystenta.
powiązane z Twoim
Projekt w Konsoli Actions.
Żadne inne projekty nie mają dostępu do informacji o Twoim modelu i urządzeniu.
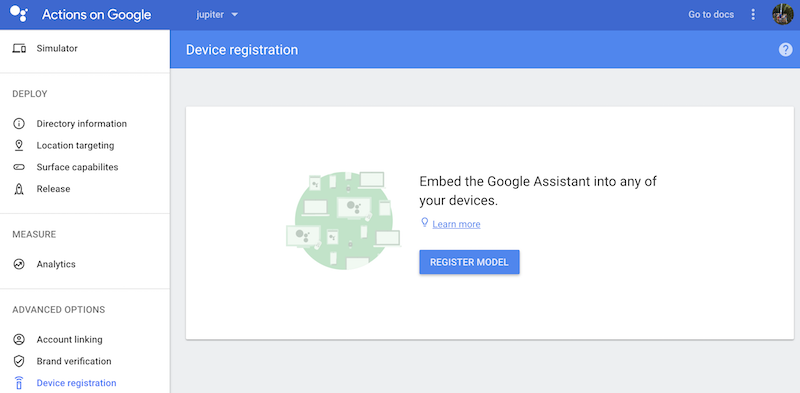
Korzystanie z interfejsu rejestracji
Skorzystaj z interfejsu rejestracji w Konsoli Actions.
aby zarejestrować model urządzenia.
Kliknij przycisk ZAREJESTRUJ MODEL.
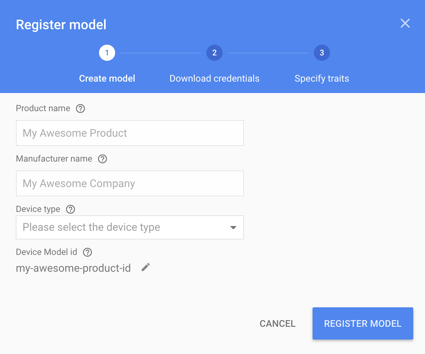
Utwórz model
Wypełnij wszystkie pola dotyczące urządzenia. Wybierz dowolny typ urządzenia, na przykład
Jasny.
Zobacz model urządzenia w formacie JSON
odniesienie
.
Gdy skończysz, kliknij ZAREJESTRUJ MODEL.
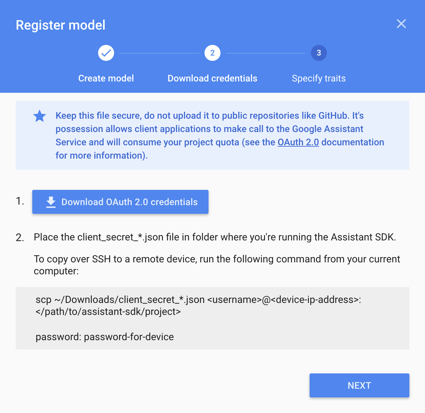
Pobierz dane logowania
Plik client_secret_<client-id>.json musi znajdować się na urządzeniu. Ten plik zawiera
identyfikator klienta i tajny klucz klienta, ale nie token dostępu. Później przeprowadzisz
i użyj tego pliku w celu autoryzacji Google
Przykładowy pakiet SDK Asystenta do tworzenia zapytań do Asystenta Google (zobacz OAuth 2.0).
dokumentacji). Nie zmieniaj nazwy tego pliku.
Pobierz ten plik i przenieś go na urządzenie. Kliknij DALEJ.
Tylko Raspberry Pi
Upewnij się, że ten plik znajduje się w lokalizacji /home/pi. Przesyłanie pliku
, wykonaj te czynności:
Otwórz nowe okno terminala. Uruchom to polecenie w nowym terminalu:
Później określisz różne umiejętności obsługiwane przez urządzenie
ten ekran. Na razie kliknij przycisk POMIŃ.
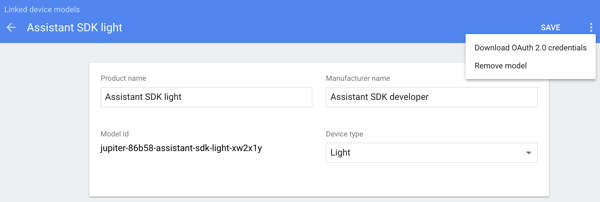
Edytuj model
Jeśli musisz edytować model, kliknij jego wiersz na liście. Pamiętaj, aby kliknąć ZAPISZ.
po wprowadzeniu zmian.
Jeśli chcesz ponownie pobrać plik danych logowania, kliknij wielokropki. Dostępne opcje
usuń również model z tego menu.
Alternatywne sposoby rejestracji
Możesz też skorzystać z narzędzia do rejestracji
(dostępne w przykładach pakietu SDK Asystenta Google) lub API REST
aby zarejestrować model urządzenia.
Aby się zarejestrować, musisz być właścicielem lub edytującym danego projektu w Konsoli Actions
dla wielu różnych modeli. Dodaj te role dla innych użytkowników w konsoli Cloud Platform – zapoznaj się z
Dokumentacja uprawnień.
[[["Łatwo zrozumieć","easyToUnderstand","thumb-up"],["Rozwiązało to mój problem","solvedMyProblem","thumb-up"],["Inne","otherUp","thumb-up"]],[["Brak potrzebnych mi informacji","missingTheInformationINeed","thumb-down"],["Zbyt skomplikowane / zbyt wiele czynności do wykonania","tooComplicatedTooManySteps","thumb-down"],["Nieaktualne treści","outOfDate","thumb-down"],["Problem z tłumaczeniem","translationIssue","thumb-down"],["Problem z przykładami/kodem","samplesCodeIssue","thumb-down"],["Inne","otherDown","thumb-down"]],["Ostatnia aktualizacja: 2025-07-26 UTC."],[[["\u003cp\u003eDevice models provide the Google Assistant with necessary information about your device, such as type and manufacturer, to enable appropriate responses.\u003c/p\u003e\n"],["\u003cp\u003eYou can register your device model through the Actions Console, using a registration UI that requires prior project setup with device registration enabled.\u003c/p\u003e\n"],["\u003cp\u003eAfter registration, you'll need to download a credentials file containing a client ID and secret, placing it on your device for authorization purposes, particularly crucial for Raspberry Pi setups.\u003c/p\u003e\n"],["\u003cp\u003eThe process involves specifying device traits, editing the model if needed, and utilizing alternative registration methods like the registration tool or REST API, all within the permissions of project Owners or Editors.\u003c/p\u003e\n"],["\u003cp\u003eOnce registered, the device model allows the Google Assistant to interact with your device according to its capabilities and context.\u003c/p\u003e\n"]]],["To enable the Google Assistant, register a device model in the Actions Console, providing details like device type and manufacturer. Click \"REGISTER MODEL,\" complete the required fields, and then save. Download the `client_secret_.json` file, which contains necessary credentials, and transfer it to the device, for example, to `/home/pi/` on a Raspberry Pi using `scp`. Later you will be able to edit the model, skip specifying traits and can download the credentials file.\n"],null,["# Register the Device Model\n\nIn order for the Google Assistant to respond to commands appropriate to your\ndevice and the given context, the Assistant needs information about your\nparticular device. You provide this information, which includes fields like\ndevice type and manufacturer, as a device model. You can think of this model as\na general class of device -- such as a light, speaker, or toy robot.\n\nThis information is then accessible to the Assistant and is\nassociated with your\n\nActions Console project.\n\nNo other projects have access to your model and device information.\n\nUse the registration UI\n-----------------------\n\nUse the registration UI in the [Actions Console](https://console.actions.google.com/)\nto register a device model.\n| **Note:** The registration UI will not appear if you did not click the **Device\n| registration** box when creating the project (see the previous step).\n\nClick the **REGISTER MODEL** button.\n\n### Create model\n\n1. Fill out all of the fields for your device. Select any device type, such as\n **Light**.\n\n See the device model JSON\n\n [reference](/assistant/sdk/reference/device-registration/model-and-instance-schemas#device_model_json)\n\n for more information on these fields.\n2. When you are finished, click **REGISTER MODEL**.\n\n### Download credentials\n\nThe `client_secret_\u003cclient-id\u003e.json` file must be located on the device. This file contains\na client ID and client secret, but no access token. Later, you will run an\nauthorization tool and reference this file in order to authorize the Google\nAssistant SDK sample to make Google Assistant queries (see the [OAuth 2.0](/identity/protocols/OAuth2)\ndocumentation for more information). Do not rename this file.\n\nDownload this file and transfer it to the device. Click **NEXT**.\n\n#### For the Raspberry Pi only\n\nMake sure this file is located in `/home/pi`. If you want to upload the file\nto the device, do the following:\n\n1. Open a new terminal window. Run the following command in this new terminal:\n\n **Note:** Do **not** run the following command in an SSH session connected to the device. This command transfers the JSON file from a directory on your development machine to the device. An SSH session cannot access your local directories. \n\n ```\n scp ~/Downloads/client_secret_client-id.json pi@raspberry-pi-ip-address:/home/pi/\n ``` \n\n ```\n password: password-for-device\n ```\n2. Close this terminal window.\n\n### Specify traits\n\nLater, you will specify the different abilities that your device supports on\nthis screen. But for now, click the **SKIP** button.\n\n### Edit the model\n\nIf you need to edit the model, click its row in the list. Make sure to click **SAVE**\nafter any edits.\n\nIf you need to download the credentials file again, click the ellipses. You can\ndelete the model from this menu as well.\n\nAlternative ways to register\n----------------------------\n\nYou can also use the [registration tool](/assistant/sdk/reference/device-registration/device-tool)\n(included with the Google Assistant SDK samples) or the [REST API](/assistant/sdk/reference/device-registration/register-device-manual)\nto register a device model.\n\nYou must be an Owner or Editor of a given Actions Console project to register\nmodels for it. Add these roles for other users in the Cloud Platform Console---see the\n[IAM documentation](https://cloud.google.com/iam/docs/granting-changing-revoking-access).\n\nNext step\n---------\n\n[Install the SDK and Sample Code](/assistant/sdk/guides/service/python/embed/install-sample)"]]