
Google Asistan'ın ve sağlanan bağlam bilgisine göre, Asistan'ın kontrol edebilirsiniz. Aşağıdaki gibi alanları içeren bu bilgiyi sağlarsınız: cihaz modeli olarak cihaz türünü ve üreticisi olarak belirtin. Bu modeli genel hatlarıyla veya oyuncak robot gibi genel bir cihaz sınıfıdır.
Böylece bu bilgiler Asistan tarafından erişilebilir ve şununla ilişkilidir: . Actions Console projesi. . Modelinize ve cihaz bilgilerinize başka hiçbir projenin erişimi yok.
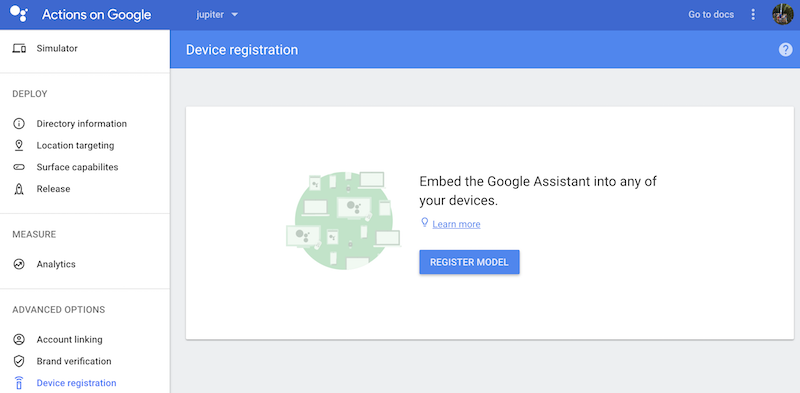
Kayıt kullanıcı arayüzünü kullanma
Actions Console'daki kayıt kullanıcı arayüzünü kullanın. cihaz modeli kaydettirmek için.
MODELİ KAYDOL düğmesini tıklayın.
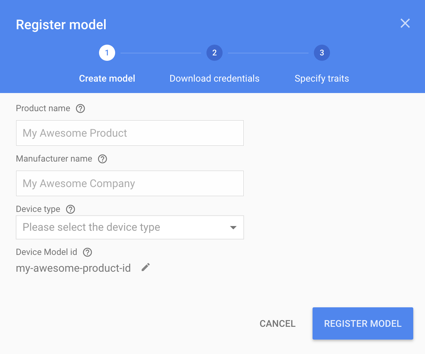
Model oluşturma
Cihazınızla ilgili tüm alanları doldurun. Herhangi bir cihaz türünü seçin, örneğin Açık.
JSON cihaz modelini inceleyin referans ziyaret edin.
İşlemi tamamladığınızda MODELİ KAYDEDİN'i tıklayın.
Kimlik bilgilerini indirin
client_secret_<client-id>.json dosyası cihazda bulunmalıdır. Bu dosya şunu içeriyor:
istemci kimliği ve istemci gizli anahtarı vardır ancak erişim jetonu yoktur. Daha sonra, bir
yetkilendirme aracını kullanın ve Google
Google Asistan sorguları yapmak için Asistan SDK'sı örneği (OAuth 2.0'a bakın)
dokümanlarına bakın). Bu dosyayı yeniden adlandırma.
Bu dosyayı indirip cihaza aktarın. İLERİ'yi tıklayın.

Yalnızca Raspberry Pi için
Bu dosyanın /home/pi konumunda bulunduğundan emin olun. Dosyayı yüklemek istiyorsanız
aşağıdakileri yapın:
Yeni bir terminal penceresi açın. Bu yeni terminalde aşağıdaki komutu çalıştırın:
scp ~/Downloads/client_secret_client-id.json pi@raspberry-pi-ip-address:/home/pi/
password: password-for-device
Bu terminal penceresini kapatın.
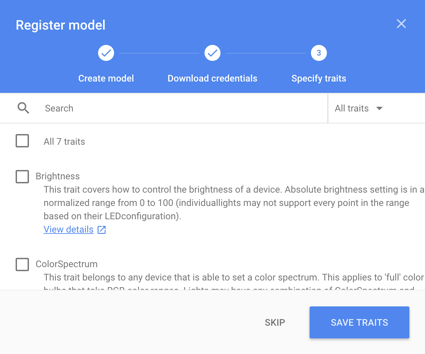
Özellikleri belirtin
Daha sonra, cihazınızın desteklediği farklı yetenekleri bu ekrana gidin. Ancak şimdilik ATLA düğmesini tıklayın.
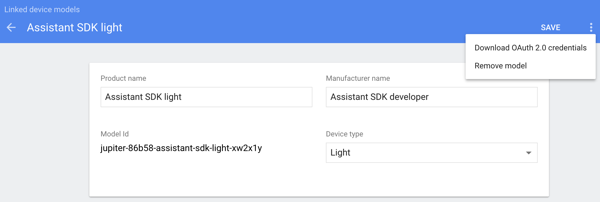
Modeli düzenleme
Modeli düzenlemeniz gerekiyorsa listede modelin satırını tıklayın. KAYDET'i tıkladığınızdan emin olun tıklayın.

Kimlik bilgileri dosyasını tekrar indirmeniz gerekirse üç nokta simgesini tıklayın. Şunları yapabilirsiniz: modeli de bu menüden silebilirsiniz.
Alternatif kayıt yöntemleri
Kayıt aracını da kullanabilirsiniz (Google Asistan SDK örneklerine dahildir) veya REST API cihaz modeli kaydettirmek için.
Kaydolmak için belirli bir Actions Console projesinin Sahibi veya Düzenleyicisi olmanız gerekir modeller. Cloud Platform Console'da diğer kullanıcılar için bu rolleri ekleyin: IAM belgeleri.