
يتوافق نوع ربط حساب OAuth مع مسارَي OAuth 2.0 وفقًا للمعيار المتّبع في المجال، وهما مسار الربط الضمني ومسار رمز التفويض.
في مسار الرمز الضمني، تفتح Google نقطة نهاية التفويض في متصفّح المستخدم. بعد تسجيل الدخول بنجاح، يمكنك إرجاع رمز الدخول الطويل الأمد إلى Google. يتم الآن تضمين رمز الدخول هذا في كل طلب يتم إرساله من "مساعد Google" إلى الإجراء.
في مسار رمز التفويض، ستحتاج إلى نقطتَي نهاية:
- نقطة نهاية التفويض المسؤولة عن تقديم واجهة مستخدم تسجيل الدخول للمستخدمين الذين لم يسجّلوا الدخول وتسجيل الموافقة على الوصول المطلوب في شكل رمز تفويض قصير الأجل.
- نقطة نهاية تبادل الرموز المسؤولة عن نوعَين من عمليات التبادل:
- تبادل رمز التفويض لرمز مميز لإعادة التحميل طويل الأجل ورمز دخول قصير الأجل وتتم عملية التبادل هذه عندما يجري المستخدم عملية ربط الحساب.
- لتبادل رمز مميز لإعادة التحميل طويل الأمد لرمز دخول قصير الأجل وتتم عملية التبادل هذه عندما تحتاج Google إلى رمز دخول جديد لأنّ الرمز الذي انتهت صلاحيته.
على الرغم من بساطة تنفيذ الرمز الضمني، تنصح Google بعدم انتهاء صلاحية رموز الدخول الضمنية التي تم إصدارها باستخدام التدفّق الضمني، لأنّ انتهاء صلاحية الرمز المميّز مع المسار الضمني يفرض على المستخدم ربط حسابه مرة أخرى. إذا كنت بحاجة إلى انتهاء صلاحية الرمز المميَّز لأسباب تتعلق بالأمان، ننصحك بشدة باستخدام تدفق رمز المصادقة بدلاً من ذلك.
تنفيذ عملية ربط حساب OAuth
ضبط إعدادات المشروع
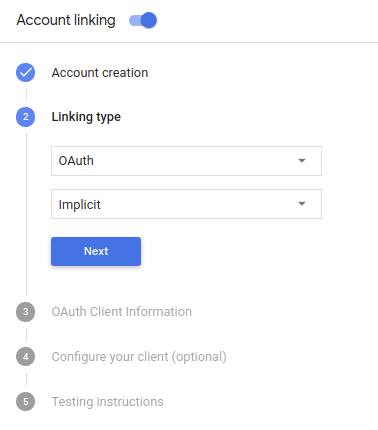
لضبط مشروعك لاستخدام ميزة ربط الحسابات عبر OAuth، اتّبِع الخطوات التالية:
- افتح Actions Console واختَر المشروع الذي تريد استخدامه.
- انقر على علامة التبويب تطوير واختَر ربط الحساب.
- فعِّل مفتاح التبديل بجانب ربط الحساب.
- في قسم إنشاء الحساب، اختَر لا، أريد فقط السماح بإنشاء الحساب على موقعي الإلكتروني.
في نوع الربط، اختَر OAuth وضمنيّ.
في معلومات العميل:
- عيِّن قيمة لمعرّف العميل الصادر عن "إجراءات على Google" لتحديد الطلبات الواردة من Google.
- أدرِج عناوين URL لنقاط نهاية التفويض وتبادل الرموز المميزة.
- انقر على حفظ.
تنفيذ خادم OAuth
لدعم تدفق OAuth 2.0 الضمني، تُجري خدمتك تفويضًا. نقطة النهاية متوفرة عبر HTTPS. نقطة النهاية هذه مسؤولة عن مصادقة الحصول على موافقة من المستخدمين للوصول إلى البيانات. نقطة نهاية التفويض توفّر واجهة مستخدم لتسجيل الدخول للمستخدمين الذين لم يسجّلوا الدخول إلى حساباتهم الموافقة على الوصول المطلوب.
عندما يحتاج الإجراء الخاص بك إلى استدعاء إحدى واجهات برمجة التطبيقات المعتمَدة لخدمتك، تستخدمها Google. نقطة النهاية هذه للحصول على إذن من المستخدمين بطلب واجهات برمجة التطبيقات هذه على بالنيابة عنك.
تتضمن جلسة مسار OAuth 2.0 الضمني النموذجية التي تبدأها Google التدفق التالي:
- تفتح Google نقطة نهاية التفويض في متصفّح المستخدم. تشير رسالة الأشكال البيانية تسجيل دخول المستخدم إذا لم يكن مسجّلاً الدخول، ويمنح Google إذنًا بالوصول بياناته من خلال واجهة برمجة التطبيقات إذا لم يسبق له منحها الإذن بذلك.
- تنشئ الخدمة رمز دخول وتعيده إلى Google عن طريق إعادة توجيه متصفّح المستخدم إلى Google باستخدام رمز الدخول المرفق بالطلب.
- تستدعي Google واجهات برمجة التطبيقات التابعة لخدمتك، وترفق رمز الدخول المميز لكل طلب. تتحقّق خدمتك من أنّ رمز الدخول يمنح Google. للوصول إلى واجهة برمجة التطبيقات ثم يُكمل طلب البيانات من واجهة برمجة التطبيقات.
التعامل مع طلبات التفويض
عندما يحتاج الإجراء الخاص بك إلى ربط الحساب من خلال مسار OAuth 2.0 الضمني، ترسل Google المستخدم إلى نقطة نهاية التفويض من خلال طلب يتضمن المعلمات التالية:
| مَعلمات نقطة نهاية التفويض | |
|---|---|
client_id |
معرِّف العميل الذي عيّنته لـ Google. |
redirect_uri |
عنوان URL الذي ترسل إليه الرد على هذا الطلب. |
state |
يشير هذا المصطلح إلى قيمة محاسبة يتم إرسالها إلى Google بدون أي تغيير في معرّف الموارد المنتظم (URI) لإعادة التوجيه. |
response_type |
نوع القيمة المطلوب عرضها في الرد. بالنسبة إلى بروتوكول OAuth 2.0 الضمني
يكون نوع الاستجابة دائمًا token. |
على سبيل المثال، إذا كانت نقطة نهاية التفويض متاحة على https://myservice.example.com/auth،
قد يبدو الطلب كما يلي:
GET https://myservice.example.com/auth?client_id=GOOGLE_CLIENT_ID&redirect_uri=REDIRECT_URI&state=STATE_STRING&response_type=token
لكي تعالج نقطة نهاية التفويض طلبات تسجيل الدخول، عليك اتّباع الخطوات التالية:
يُرجى التحقّق من القيمتَين
client_idوredirect_uriمن أجل: منع منح الوصول إلى تطبيقات العميل غير المقصودة أو التي تم إعدادها بشكلٍ غير صحيح:- تأكَّد من أنّ
client_idيتطابق مع معرّف العميل الذي أدخلته. تعيينه إلى Google. - تأكَّد من أنّ عنوان URL المحدّد من قِبل
redirect_uriعلى النحو التالي:https://oauth-redirect.googleusercontent.com/r/YOUR_PROJECT_ID
- تأكَّد من أنّ
تحقق مما إذا كان المستخدم قد سجّل الدخول إلى خدمتك. في حال لم يكن المستخدم مسجِّلاً الدخول أو أكمل عملية تسجيل الدخول أو الاشتراك في الخدمة.
أنشئ رمز الدخول المميز الذي ستستخدمه Google للوصول إلى واجهة برمجة التطبيقات الخاصة بك. تشير رسالة الأشكال البيانية يمكن أن يكون رمز الدخول أي قيمة سلسلة، ولكن يجب أن يمثل المستخدم والعميل الذي يرتبط به الرمز المميز ويجب ألا يكون من الممكن تخمينه.
إرسال استجابة HTTP تؤدي إلى إعادة توجيه متصفّح المستخدم إلى عنوان URL التي تحددها المعلمة
redirect_uri. تضمين جميع المعلمات التالية في جزء عنوان URL:access_token: رمز الدخول الذي أنشأته للتوtoken_type: السلسلةbearerstate: قيمة الحالة غير المعدَّلة من القيمة الأصلية طلب في ما يلي مثال على عنوان URL الناتج:https://oauth-redirect.googleusercontent.com/r/YOUR_PROJECT_ID#access_token=ACCESS_TOKEN&token_type=bearer&state=STATE_STRING
سيستلم معالج إعادة التوجيه OAuth 2.0 من Google رمز الدخول وسيتأكد من ذلك
أن قيمة state لم تتغير. بعد حصول Google على
رمز الدخول لخدمتك، فستلحق Google الرمز المميز بالمكالمات اللاحقة
إلى الإجراء الخاص بك كجزء من AppRequest.
تصميم واجهة المستخدم الصوتية لمسار المصادقة
التحقّق من إثبات هوية المستخدم وبدء عملية ربط الحساب
- افتح مشروعك في Actions Builder في Actions Console.
- أنشئ مشهدًا جديدًا لبدء ربط الحساب في تطبيقك:
- انقر على المشاهد.
- انقر على رمز إضافة (+) لإضافة مشهد جديد.
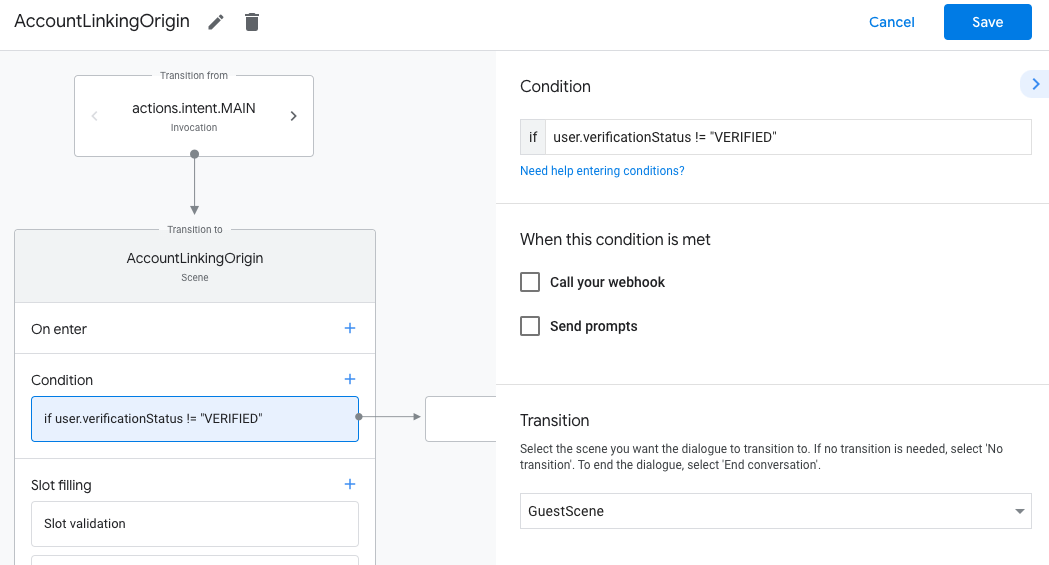
- في المشهد الذي تم إنشاؤه حديثًا، انقر على رمز الإضافة add الشروط.
- أضِف شرطًا يتحقّق مما إذا كان المستخدم المرتبط بالمحادثة مستخدمًا تم التحقّق منه. إذا لم تنجح عملية التحقّق، لن تتمكّن مهمتك من ربط الحساب أثناء المحادثة، ويجب أن تعود إلى توفير إمكانية الوصول إلى الوظائف التي لا تتطلّب ربط الحساب.
- في الحقل
Enter new expressionضِمن الشرط، أدخِل المنطق التالي:user.verificationStatus != "VERIFIED" - ضمن الانتقال، اختَر مشهدًا لا يتطلّب ربط الحساب أو مشهدًا يشكّل نقطة دخول إلى الوظائف المتاحة للضيوف فقط.
- في الحقل
- انقر على رمز الإضافة add في الشروط.
- أضِف شرطًا لتفعيل مسار ربط الحساب إذا لم يكن لدى المستخدم هوية مرتبطة.
- في الحقل
Enter new expressionضِمن الشرط، أدخِل المنطق التالي:user.verificationStatus == "VERIFIED" - ضمن الانتقال، اختَر مشهد نظام ربط الحساب.
- انقر على حفظ.
- في الحقل
![]()
بعد الحفظ، تتم إضافة مشهد جديد لنظام ربط الحسابات باسم <SceneName>_AccountLinking
إلى مشروعك.
تخصيص مشهد ربط الحساب
- ضمن المشاهد، اختَر مشهد نظام ربط الحساب.
- انقر على إرسال الطلب وأضِف جملة قصيرة لتوضيح سبب حاجة الإجراء إلى الوصول إلى هوية المستخدم (مثلاً "لحفظ إعداداتك المفضّلة").
- انقر على حفظ.

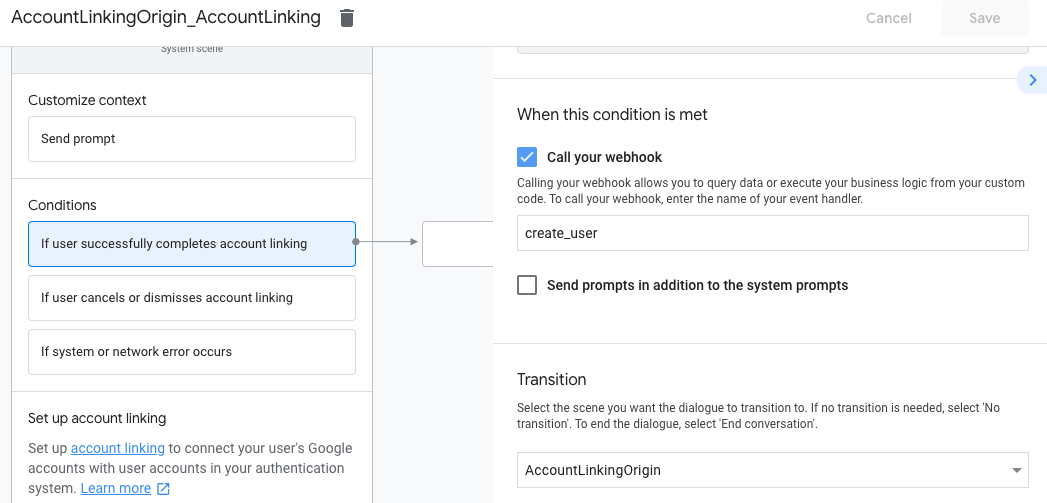
- ضمن الشروط، انقر على في حال أكمل المستخدم ربط الحساب بنجاح.
- اضبط كيفية سير العملية إذا وافق المستخدم على ربط حسابه. على سبيل المثال، يمكنك استدعاء Webhook لمعالجة أي منطق مخصّص للنشاط التجاري مطلوب والعودة إلى المشهد الأصلي.
- انقر على حفظ.
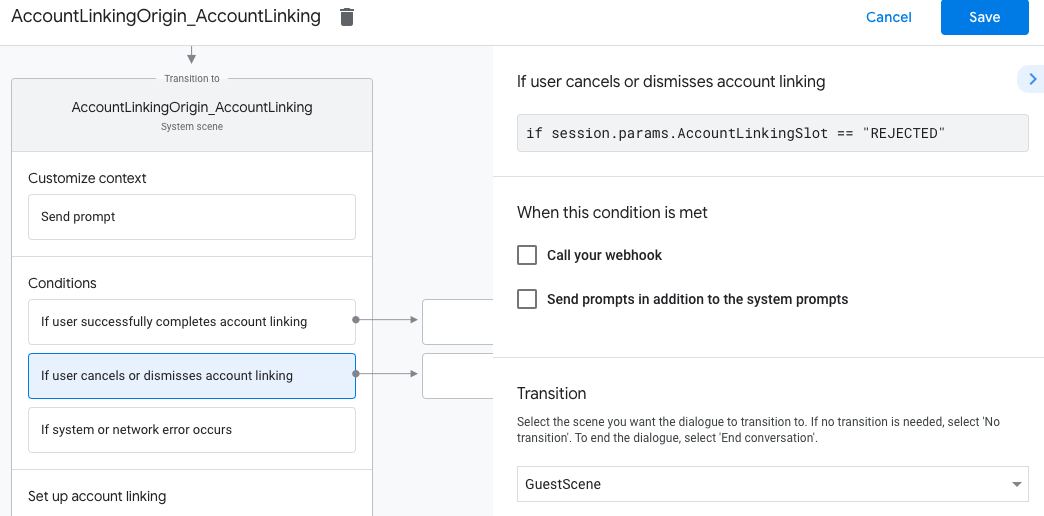
- ضمن الشروط، انقر على في حال ألغى المستخدم ربط الحساب أو رفضه.
- اضبط طريقة سير العملية إذا لم يوافق المستخدم على ربط حسابه. على سبيل المثال، أرسِل رسالة تأكيد وأعِد التوجيه إلى مشاهد توفّر وظائف لا تتطلّب ربط الحساب.
- انقر على حفظ.
- ضمن الشروط، انقر على في حال حدوث خطأ في النظام أو الشبكة.
- اضبط كيفية سير العملية إذا تعذّر إكمال عملية ربط الحساب بسبب أخطاء في النظام أو الشبكة. على سبيل المثال، أرسِل رسالة تأكيد وأعِد التوجيه إلى مشاهد توفّر وظائف لا تتطلّب ربط الحساب.
- انقر على حفظ.
التعامل مع طلبات الوصول إلى البيانات
إذا كان طلب "مساعد Google" يتضمّن رمز دخول، عليك أولاً التأكّد من أنّ رمز الدخول صالح (ولم تنتهِ صلاحيته)، ثم استرداد حساب المستخدم المرتبط من قاعدة البيانات.