Typ łączenia OAuth obsługuje 2 standardowe przepływy OAuth 2.0: niejawny i autoryzacji.
W pośrednim przepływie kodu Google otwiera punkt końcowy autoryzacji w przeglądarce użytkownika. Po udanym logowaniu zwracasz token dostępu o długim czasie do Google. Ten token dostępu jest teraz dołączany do każdego żądania wysyłanego przez Asystenta do działania.
W ramach procesu kodu autoryzacji potrzebujesz 2 punktów końcowych:
- Punkt końcowy autoryzacji, który odpowiada za wyświetlanie interfejsu logowania użytkownikom, którzy nie są jeszcze zalogowani, i rejestrowanie zgody w żądanym terminie w postaci kodu o ograniczonym czasie ważności.
- Punkt końcowy giełdy tokenów odpowiedzialny za 2 typy giełd:
- Wymienia kod autoryzacji tokena długoterminowego i tokena dostępu o ograniczonym czasie ważności. Ta wymiana ma miejsce, gdy użytkownik przechodzi przez proces łączenia kont.
- Wymienia długotrwały token odświeżania na token dostępu o ograniczonym czasie ważności. Ta giełda ma miejsce, gdy Google potrzebuje nowego tokena dostępu, ponieważ wygasł.
Implementacja niejawnego przepływu kodu jest prostsza, ale Google zaleca, aby tokeny dostępu wydane z wykorzystaniem niejawnego przepływu nigdy nie wygasały, ponieważ korzystanie z tożsamości w wyniku takiego działania wymusza na użytkowniku ponowne połączenie konta. Jeśli ze względów bezpieczeństwa zależy Ci na wygaśnięciu tokena, rozważ użycie kodu uwierzytelniania.
Wdrażanie połączenia konta przez protokół OAuth
Konfigurowanie projektu
Aby skonfigurować projekt do korzystania z łączenia OAuth, wykonaj te czynności:
- Otwórz Konsolę Actions i wybierz projekt, którego chcesz użyć.
- Kliknij kartę Tworzenie i wybierz Łączenie kont.
- Włącz przełącznik obok opcji Powiązanie kont.
- W sekcji Tworzenie konta wybierz Nie, chcę zezwolić na tworzenie kont tylko w mojej witrynie.
W sekcji Typ połączenia wybierz OAuth i Kod autoryzacji.
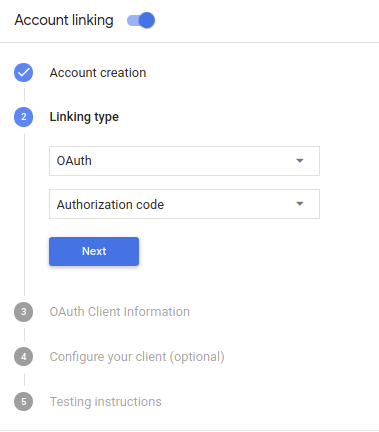
W sekcji Informacje o kliencie:
- Przypisz wartość do pola Identyfikator klienta wydany przez Twoje działania w Google, aby identyfikować żądania pochodzące z Google.
- Zanotuj wartość identyfikatora klienta wydanego przez Google dla Twoich działań.
- Wstaw adresy URL punktów końcowych autoryzacji i wymiany tokenów.
- Kliknij Zapisz.
Wdrażanie serwera OAuth
Implementacja przepływu kodu autoryzacji przez serwer OAuth 2.0 składa się z tych elementów: dwa punkty końcowe, które Twoja usługa udostępnia przez HTTPS. Pierwszy punkt końcowy to punkt końcowy autoryzacji, który odpowiada za znalezienie lub uzyskanie zgody użytkowników na dostęp do danych. Punkt końcowy autoryzacji wyświetla logowanie niezalogowani użytkownicy, którzy wyrażają zgodę na poproszono o dostęp. Drugi punkt końcowy to punkt końcowy wymiany tokenów, który jest służy do uzyskiwania zaszyfrowanych ciągów znaków zwanych tokenami, które autoryzują użytkownika działania aby uzyskać dostęp do usługi.
Gdy akcja musi wywołać jeden z interfejsów API Twojej usługi, Google używa tych punktów końcowych, aby uzyskać od użytkowników uprawnienia do wywoływania tych interfejsów w imieniu Google.
Sesja przepływu kodu autoryzacji OAuth 2.0 zainicjowana przez Google wygląda tak:
- Google otworzy punkt końcowy autoryzacji w przeglądarce użytkownika. Jeśli przepływ na urządzeniu z włączonym głosem dla akcji, Google prześle na telefon.
Użytkownik loguje się (jeśli jeszcze nie jest zalogowany) i zezwala Google na uzyskać dostęp do swoich danych za pomocą Twojego interfejsu API, jeśli nie przyznał on jeszcze odpowiednich uprawnień.
Usługa tworzy kod autoryzacji i zwraca go do Google przez przekierowanie przeglądarki użytkownika z powrotem do Google z kodem autoryzacji; do żądania.
Google wysyła kod autoryzacji do punktu końcowego wymiany tokenów, który weryfikuje autentyczność kodu i zwraca token dostępu oraz token odświeżania. Token dostępu to token o ograniczonym czasie ważności, który jest blokowany to dane logowania umożliwiające dostęp do interfejsów API. Token odświeżania jest trwały który Google może przechowywać i wykorzystywać do pozyskiwania nowych tokenów dostępu, gdy tracą ważność.
Gdy użytkownik zakończy proces łączenia kont, każdy kolejny żądanie wysłane z Asystenta do webhooka realizacji zamówienia zawiera element token dostępu.
Obsługa żądań autoryzacji
Gdy akcja musi połączyć konta za pomocą kodu autoryzacji OAuth 2.0 Google wysyła użytkownika do punktu końcowego autoryzacji z żądaniem, które zawiera następujące parametry:
| Parametry punktu końcowego autoryzacji | |
|---|---|
client_id |
Identyfikator klienta Google zarejestrowany przez Ciebie w Google. |
redirect_uri |
Adres URL, na który została wysłana odpowiedź na to żądanie. |
state |
wartości księgowej, która jest przesyłana do Google bez zmian w identyfikator URI przekierowania. |
scope |
Opcjonalnie: rozdzielany spacjami zestaw ciągów tekstowych zakresu, które określają danych, w przypadku których Google żąda autoryzacji. |
response_type |
Ciąg code. |
Jeśli na przykład punkt końcowy autoryzacji jest dostępny pod adresem https://myservice.example.com/auth,
żądanie może wyglądać tak:
GET https://myservice.example.com/auth?client_id=GOOGLE_CLIENT_ID&redirect_uri=REDIRECT_URI&state=STATE_STRING&scope=REQUESTED_SCOPES&response_type=code
Aby punkt końcowy autoryzacji mógł obsługiwać żądania logowania, wykonaj te czynności:
Sprawdź, czy identyfikator
client_idjest zgodny z identyfikatorem klienta Google użytym podczas rejestracji Google oraz żeredirect_urijest zgodny z przekierowaniem Google za Twoją usługę. Te kontrole są ważne, ponieważ uniemożliwiają przyznawanie dostępu niezamierzonych lub nieprawidłowo skonfigurowanych aplikacji klienckich.Jeśli obsługujesz wiele przepływów OAuth 2.0, sprawdź też, czy Obecny stan „
response_type”:code.Sprawdź, czy użytkownik jest zalogowany w Twojej usłudze. Jeśli użytkownik nie jest zalogowany, zalogować się w usłudze lub zarejestrować się w niej.
Wygeneruj kod autoryzacji, którego Google będzie używać do uzyskiwania dostępu do Twojego interfejsu API. Kod autoryzacji może być dowolnym ciągiem znaków, ale musi być unikalny reprezentuje użytkownika, klienta, dla którego jest przeznaczony token, i datę ważności kodu. i nie może być odgadywany. Zwykle zajmujesz się autoryzacją które wygasają po około 10 minutach.
Sprawdź, czy adres URL określony przez parametr
redirect_urima taki format:https://oauth-redirect.googleusercontent.com/r/YOUR_PROJECT_ID
Przekieruj przeglądarkę użytkownika do adresu URL określonego w atrybucie
redirect_uri. Dołącz kod autoryzacji właśnie wygenerowano oraz pierwotną, niezmodyfikowaną wartość stanu w przypadku przekierowania. , dołączając parametrycodeistate. Oto przykład. uzyskanego adresu URL:https://oauth-redirect.googleusercontent.com/r/YOUR_PROJECT_ID?code=AUTHORIZATION_CODE&state=STATE_STRING
Obsługa żądań wymiany tokenów
Punkt końcowy wymiany tokenów Twojej usługi odpowiada za 2 rodzaje tokenów giełdy:
- Wymiana kodów autoryzacji dla tokenów dostępu i tokenów odświeżania
- Wymiana tokenów odświeżania tokenów dostępu
Żądania wymiany tokenów zawierają te parametry:
| Parametry punktu końcowego wymiany tokenów | |
|---|---|
client_id |
Ciąg tekstowy identyfikujący źródło żądania jako Google. Ten ciąg musi: być zarejestrowany w Twoim systemie jako unikalny identyfikator Google. |
client_secret |
Ciąg znaków tajny zarejestrowany w Google na potrzeby usługi. |
grant_type |
Typ wymienianego tokena. Oba modele
authorization_code lub refresh_token. |
code |
Gdy grant_type=authorization_code, kod Google
odebrane z punktu końcowego logowania lub wymiany tokenów. |
redirect_uri |
Jeśli parametr ma wartość grant_type=authorization_code, tym parametrem jest
Adres URL użyty w wstępnym żądaniu autoryzacji. |
refresh_token |
Gdy grant_type=refresh_token, token odświeżania Google
odebrane z punktu końcowego wymiany tokenów. |
Wymiana kodów autoryzacji dla tokenów dostępu i tokenów odświeżania
Gdy użytkownik się zaloguje, a punkt końcowy autoryzacji zwróci autoryzację krótkotrwałą do Google, wyślemy żądanie do punktu końcowego wymiany tokenów dla tokena dostępu i tokenu odświeżania.
W przypadku tych żądań wartość grant_type wynosi authorization_code, a wartość
wynosi code to wartość kodu autoryzacji przydzielonego wcześniej firmie Google.
Oto przykład żądania wymiany kodu autoryzacji dla
token dostępu i token odświeżania:
POST /token HTTP/1.1
Host: oauth2.example.com
Content-Type: application/x-www-form-urlencoded

client_id=GOOGLE_CLIENT_ID&client_secret=GOOGLE_CLIENT_SECRET&grant_type=authorization_code&code=AUTHORIZATION_CODE&redirect_uri=REDIRECT_URI
Aby wymienić kody autoryzacji na token dostępu i token odświeżania,
Punkt końcowy wymiany tokenów odpowiada na żądania POST wykonujące te kroki:
- Sprawdź, czy
client_ididentyfikuje źródło żądania jako autoryzowane źródło. i żeclient_secretjest zgodna z oczekiwaną wartością. - Zweryfikuj te kwestie:
- Kod autoryzacji jest prawidłowy i nie stracił ważności, a klient Identyfikator określony w żądaniu jest zgodny z identyfikatorem klienta powiązanym z kodu autoryzacji.
- Adres URL określony przez parametr
redirect_urijest identyczny do wartości użytej we wstępnym żądaniu autoryzacji.
- Jeśli nie możesz sprawdzić wszystkich powyższych kryteriów, zwróć żądanie HTTP
Błąd 400 Nieprawidłowe żądanie z treścią
{"error": "invalid_grant"}. - W przeciwnym razie wygeneruj odświeżenie, używając identyfikatora użytkownika z kodu autoryzacji. token i token dostępu. Tokeny te mogą mieć dowolną wartość w postaci ciągu znaków, ale muszą jednoznacznie reprezentuje użytkownika i klienta, dla którego jest przeznaczony token. Nie mogą być łatwe do odgadnięcia. W przypadku tokenów dostępu zanotuj też czas ważności tokena (zwykle godzinę po wydaniu tokena). Tokeny odświeżania nie wygasają.
- Zwróć następujący obiekt JSON w treści odpowiedzi HTTPS:
{
"token_type": "Bearer",
"access_token": "ACCESS_TOKEN",
"refresh_token": "REFRESH_TOKEN",
"expires_in": SECONDS_TO_EXPIRATION
}
Google przechowuje token dostępu i token odświeżania użytkownika oraz rejestruje gdy upłynie okres ważności tokena dostępu. Gdy token dostępu wygaśnie, Google użyje odświeżenia , aby uzyskać nowy token dostępu z punktu końcowego wymiany tokenów.
Wymiana tokenów odświeżania tokenów dostępu
Gdy token dostępu wygaśnie, Google wysyła żądanie do punktu końcowego wymiany tokenów w celu wymiany tokena odświeżania na nowy token dostępu.
W przypadku tych żądań wartość grant_type wynosi refresh_token, a wartość
refresh_token to wartość tokena odświeżania, który został przez Ciebie wcześniej przyznany Google.
Poniżej znajdziesz przykład żądania wymiany tokena odświeżania dla
token dostępu:
POST /token HTTP/1.1
Host: oauth2.example.com
Content-Type: application/x-www-form-urlencoded

client_id=GOOGLE_CLIENT_ID&client_secret=GOOGLE_CLIENT_SECRET&grant_type=refresh_token&refresh_token=REFRESH_TOKEN
Aby można było wymienić token odświeżania na token dostępu, punkt końcowy wymiany tokenów
odpowiada na żądania (POST) wykonujące te czynności:
- Sprawdź, czy
client_ididentyfikuje źródło żądania jako Google i żeclient_secretjest zgodny z oczekiwanym, . - Sprawdź, czy token odświeżania jest prawidłowy i czy identyfikator klienta określony w żądanie pasuje do identyfikatora klienta powiązanego z tokenem odświeżania.
- Jeśli nie możesz sprawdzić wszystkich powyższych kryteriów, zwróć żądanie HTTP
Błąd 400 Nieprawidłowe żądanie z treścią
{"error": "invalid_grant"}. - W przeciwnym razie użyj identyfikatora użytkownika z tokena odświeżania, aby wygenerować dostęp token. Tokeny te mogą mieć dowolną wartość w postaci ciągu znaków, ale muszą jednoznacznie reprezentować użytkownika i klienta, dla których jest przeznaczony token. Nie mogą być one trudne do odgadnięcia. W przypadku tokenów dostępu zanotuj też czas ważności tokena (zwykle godzinę po wydaniu tokena).
- Zwróć następujący obiekt JSON w treści protokołu HTTPS
odpowiedź:
{
"token_type": "Nośnik",
"access_token": "ACCESS_TOKEN",
"expires_in": SECONDS_TO_EXPIRATION
Zaprojektuj interfejs głosowy dla procesu uwierzytelniania.
Sprawdź, czy użytkownik jest zweryfikowany, i rozpocznij proces łączenia konta.
- Otwórz projekt w Actions Builder w konsoli Actions.
- Utwórz nową scenę, aby rozpocząć łączenie kont w swojej akcji:
- Kliknij Sceny.
- Kliknij ikonę dodawania (+), aby dodać nową scenę.
- W nowo utworzonej scenie kliknij ikonę dodawania add obok Warunków.
- Dodaj warunek, który sprawdza, czy użytkownik powiązany z rozmową jest zweryfikowany. Jeśli weryfikacja się nie powiedzie, Akcja nie będzie mogła połączyć kont podczas rozmowy i powinna wrócić do udostępniania funkcji, które nie wymagają łączenia kont.
- W polu
Enter new expressionw sekcji Warunek wpisz tę logikę:user.verificationStatus != "VERIFIED" - W sekcji Przejście wybierz scenę, która nie wymaga połączenia konta, lub scenę, która jest punktem wejścia do funkcji dostępnych tylko dla gości.
- W polu
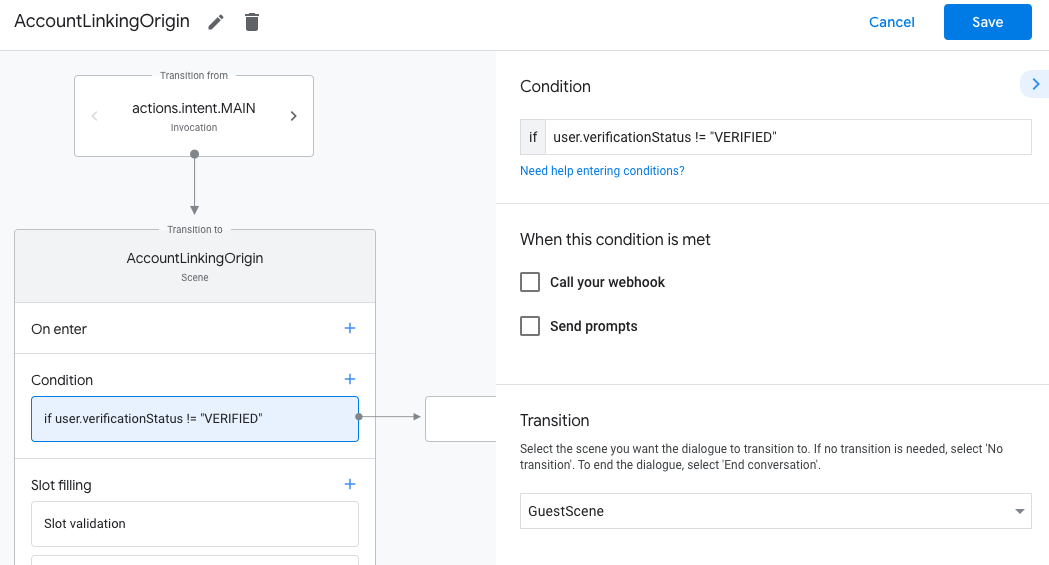
- Kliknij ikonę dodawania add obok pozycji Warunki.
- Dodaj warunek, który uruchomi proces łączenia kont, jeśli użytkownik nie ma powiązanej tożsamości.
- W polu
Enter new expressionw sekcji Warunek wpisz tę logikę:user.verificationStatus == "VERIFIED" - W sekcji Przejście wybierz scenę systemową Łączenie kont.
- Kliknij Zapisz.
- W polu
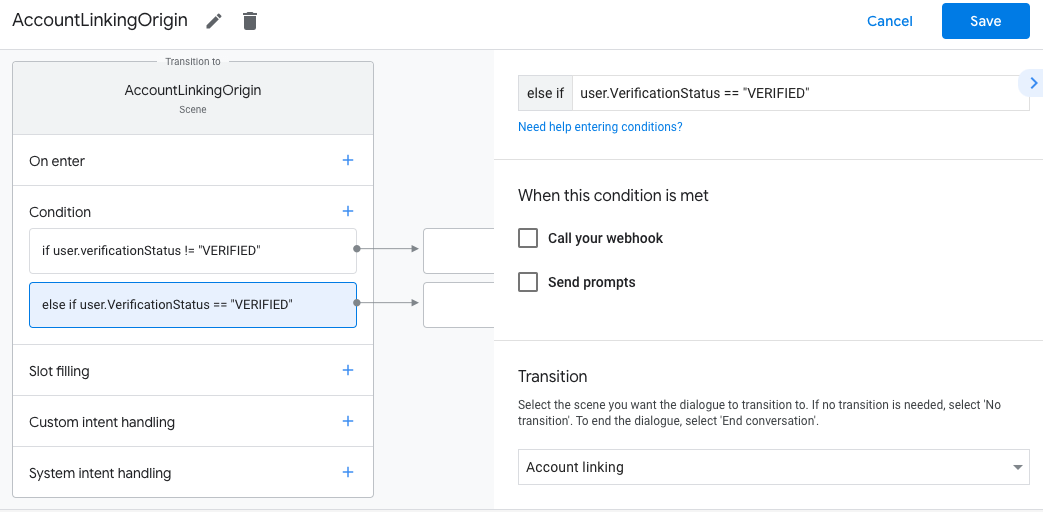
Po zapisaniu do projektu zostanie dodana nowa scena systemu łączenia kont o nazwie <SceneName>_AccountLinking.
Dostosowywanie sceny łączenia kont
- W sekcji Sceny wybierz scenę systemu łączenia kont.
- Kliknij Wyślij prompt i dodaj krótkie zdanie, aby wyjaśnić użytkownikowi, dlaczego działanie potrzebuje dostępu do jego tożsamości (np. „Aby zapisać Twoje ustawienia”).
- Kliknij Zapisz.
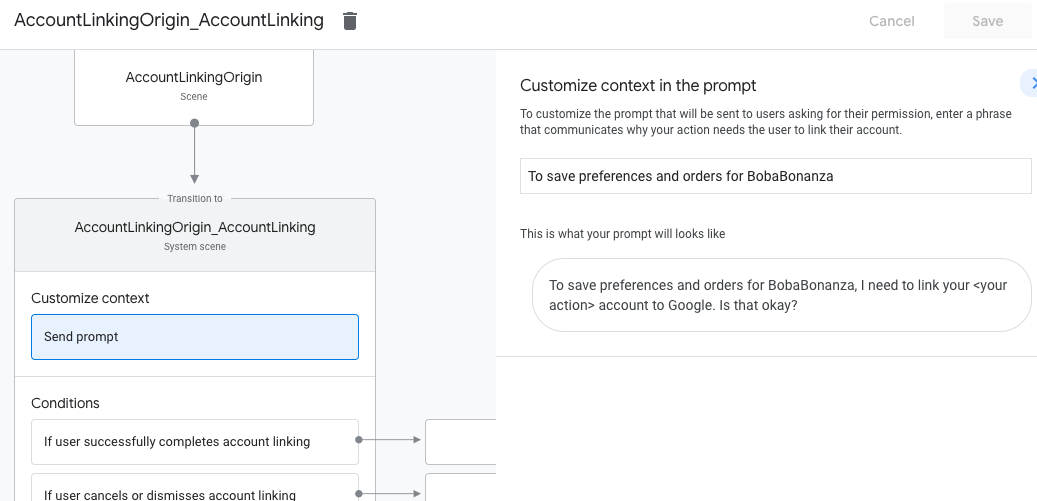
- W sekcji Warunki kliknij Jeśli użytkownik pomyślnie połączy konta.
- Skonfiguruj, jak ma przebiegać proces, jeśli użytkownik zgodzi się na połączenie konta. Możesz na przykład wywołać webhooka, aby przetworzyć dowolną niestandardową logikę biznesową i wrócić do pierwotnej sceny.
- Kliknij Zapisz.
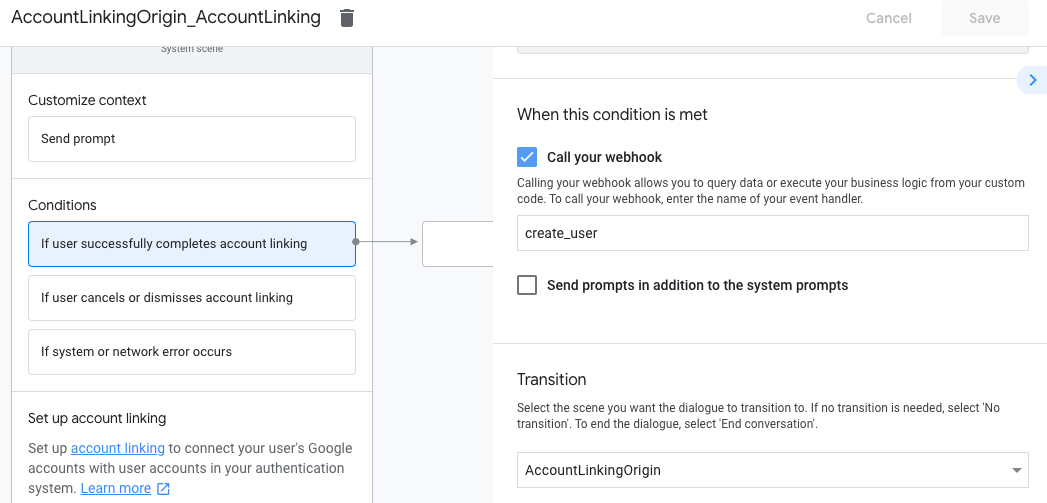
- W sekcji Warunki kliknij Jeśli użytkownik anuluje połączenie konta lub je odrzuci.
- Skonfiguruj, jak ma przebiegać proces, jeśli użytkownik nie zgodzi się na połączenie konta. Możesz na przykład wysłać wiadomość z potwierdzeniem i przekierować użytkownika do scen, które zapewniają funkcje niewymagające połączenia kont.
- Kliknij Zapisz.
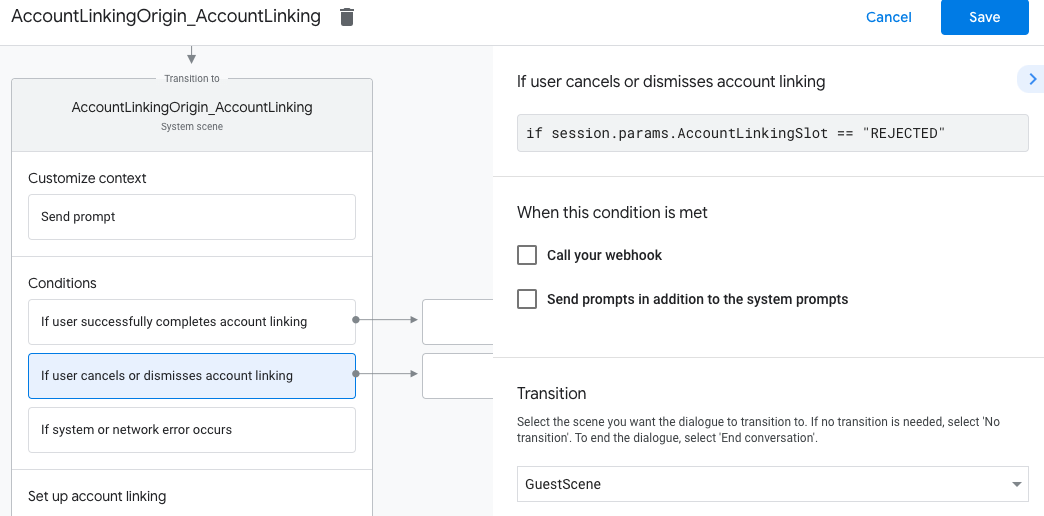
- W sekcji Warunki kliknij Jeśli wystąpi błąd systemu lub sieci.
- Skonfiguruj, jak ma przebiegać proces, jeśli nie można go ukończyć z powodu błędów systemu lub sieci. Możesz na przykład wysłać wiadomość z potwierdzeniem i przekierować użytkownika do scen, które zapewniają funkcje niewymagające połączenia kont.
- Kliknij Zapisz.
Obsługa próśb o dostęp do danych
Jeśli żądanie Asystenta zawiera token dostępu, najpierw sprawdź, czy jest on prawidłowy (i nie wygasł), a następnie pobierz powiązane konto użytkownika z bazy danych.
