
OAuth リンクタイプは、インプリシット フローと認可コードフローの 2 通りの業界標準 OAuth 2.0 フローをサポートします。
In the implicit code flow, Google opens your authorization endpoint in the user's browser. After successful sign in, you return a long-lived access token to Google. This access token is now included in every request sent from the Assistant to your Action.
In the authorization code flow, you need two endpoints:
- The authorization endpoint, which is responsible for presenting the sign-in UI to your users that aren't already signed in and recording consent to the requested access in the form of a short-lived authorization code.
- The token exchange endpoint, which is responsible for two types of exchanges:
- Exchanges an authorization code for a long-lived refresh token and a short-lived access token. This exchange happens when the user goes through the account linking flow.
- Exchanges a long-lived refresh token for a short-lived access token. This exchange happens when Google needs a new access token because the one it had expired.
Although the implicit code flow is simpler to implement, Google recommends that access tokens issued using the implicit flow never expire, because using token expiration with the implicit flow forces the user to link their account again. If you need token expiration for security reasons, you should strongly consider using the auth code flow instead.
OAuth によるアカウント リンクを実装する
プロジェクトを構成する
プロジェクトで OAuth リンクを使用するよう構成するには、次の手順に従います。
- アクション コンソールを開き、使用するプロジェクトを選択します。
- [Develop](開発)タブをクリックして、[Account linking](アカウント リンク)を選択します。
- [アカウントのリンク] の横にあるスイッチをオンにします。
- [Account creation](アカウントの作成)セクションで、[No, I only want to allow account creation on my website](いいえ、自分のウェブサイトでのアカウントの作成のみを許可します)を選択します。
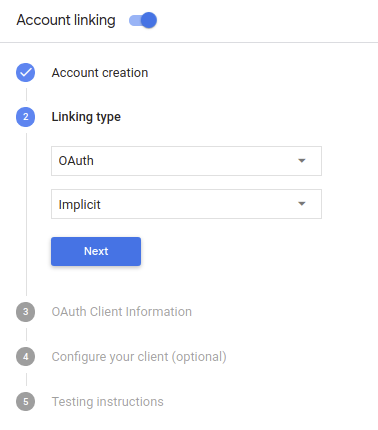
[Linking type] で、[OAuth] と [Implicit](インプリシット)を選択します。
[Client Information](クライアント情報)で、次のことを行います。
- [Client ID issued by your Actions to Google] に、Google からのリクエストを識別する値を割り当てます。
- 認可エンドポイントとトークン交換エンドポイントの URL を挿入します。
- [保存] をクリックします。
OAuth サーバーを実装する
To support the OAuth 2.0 implicit flow, your service makes an authorization endpoint available by HTTPS. This endpoint is responsible for authenticating and obtaining consent from users for data access. The authorization endpoint presents a sign-in UI to your users that aren't already signed in and records consent to the requested access.
When your Action needs to call one of your service's authorized APIs, Google uses this endpoint to get permission from your users to call these APIs on their behalf.
A typical OAuth 2.0 implicit flow session initiated by Google has the following flow:
- Google opens your authorization endpoint in the user's browser. The user signs in if not signed in already, and grants Google permission to access their data with your API if they haven't already granted permission.
- Your service creates an access token and returns it to Google by redirecting the user's browser back to Google with the access token attached to the request.
- Google calls your service's APIs, and attaches the access token with each request. Your service verifies that the access token grants Google authorization to access the API and then completes the API call.
Handle authorization requests
When your Action needs to perform account linking via an OAuth 2.0 implicit flow, Google sends the user to your authorization endpoint with a request that includes the following parameters:
| Authorization endpoint parameters | |
|---|---|
client_id |
The client ID you assigned to Google. |
redirect_uri |
The URL to which you send the response to this request. |
state |
A bookkeeping value that is passed back to Google unchanged in the redirect URI. |
response_type |
The type of value to return in the response. For the OAuth 2.0 implicit
flow, the response type is always token. |
For example, if your authorization endpoint is available at https://myservice.example.com/auth,
a request might look like:
GET https://myservice.example.com/auth?client_id=GOOGLE_CLIENT_ID&redirect_uri=REDIRECT_URI&state=STATE_STRING&response_type=token
For your authorization endpoint to handle sign-in requests, do the following steps:
Verify the
client_idandredirect_urivalues to prevent granting access to unintended or misconfigured client apps:- Confirm that the
client_idmatches the client ID you assigned to Google. - Confirm that the URL specified by the
redirect_uriparameter has the following form:https://oauth-redirect.googleusercontent.com/r/YOUR_PROJECT_ID
- Confirm that the
Check if the user is signed in to your service. If the user isn't signed in, complete your service's sign-in or sign-up flow.
Generate an access token that Google will use to access your API. The access token can be any string value, but it must uniquely represent the user and the client the token is for and must not be guessable.
Send an HTTP response that redirects the user's browser to the URL specified by the
redirect_uriparameter. Include all of the following parameters in the URL fragment:access_token: the access token you just generatedtoken_type: the stringbearerstate: the unmodified state value from the original request The following is an example of the resulting URL:https://oauth-redirect.googleusercontent.com/r/YOUR_PROJECT_ID#access_token=ACCESS_TOKEN&token_type=bearer&state=STATE_STRING
Google's OAuth 2.0 redirect handler will receive the access token and confirm
that the state value hasn't changed. After Google has obtained an
access token for your service, Google will attach the token to subsequent calls
to your Action as part of the AppRequest.
認証フローの音声ユーザー インターフェースを設計する
ユーザーが確認済みかどうかを確認し、アカウントのリンクフローを開始する
- Actions Console で Actions Builder プロジェクトを開きます。
- アクションでアカウント リンクを開始する新しいシーンを作成します。
- [シーン] をクリックします。
- [追加](+)アイコンをクリックして、新しいシーンを追加します。
- 新しく作成したシーンで、[条件] の追加アイコン add をクリックします。
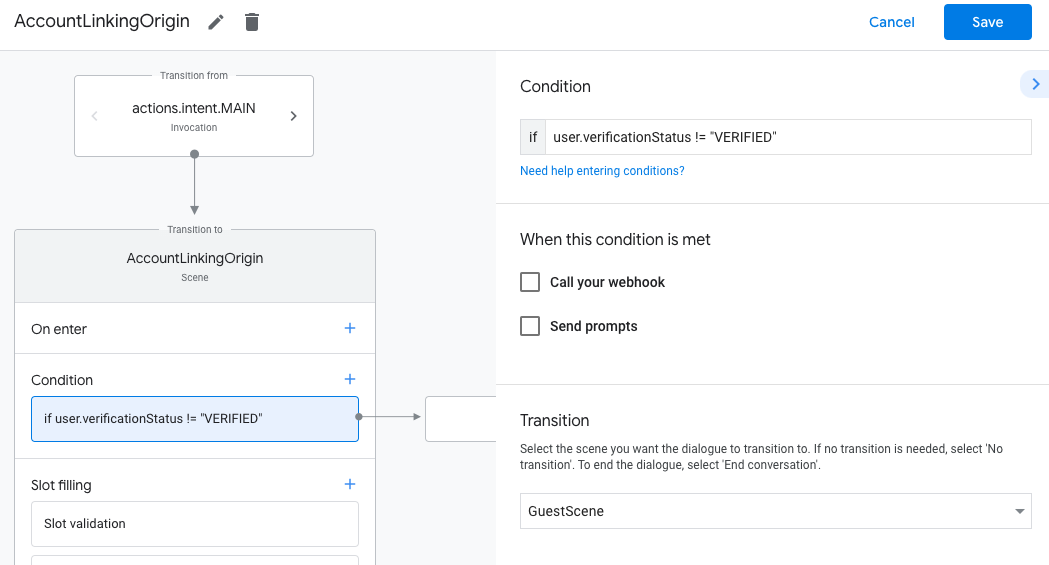
- 会話に関連付けられているユーザーが確認済みのユーザーかどうかを確認する条件を追加します。チェックに失敗した場合、アクションは会話中にアカウント リンクを実行できず、アカウント リンクを必要としない機能へのアクセスを提供するようにフォールバックする必要があります。
- [条件] の
Enter new expressionフィールドに、次のロジックを入力します。user.verificationStatus != "VERIFIED" - [Transition] で、アカウント リンクを必要としないシーン、またはゲスト専用機能のエントリ ポイントとなるシーンを選択します。
- [条件] の
- [条件] の追加アイコン add をクリックします。
- ユーザーに関連付けられた ID がない場合にアカウント リンクフローをトリガーする条件を追加します。
- [条件] の
Enter new expressionフィールドに、次のロジックを入力します。user.verificationStatus == "VERIFIED" - [移行] で、[アカウント リンク] システム シーンを選択します。
- [保存] をクリックします。
- [条件] の
![]()
保存すると、<SceneName>_AccountLinking という新しいアカウント リンク システム シーンがプロジェクトに追加されます。
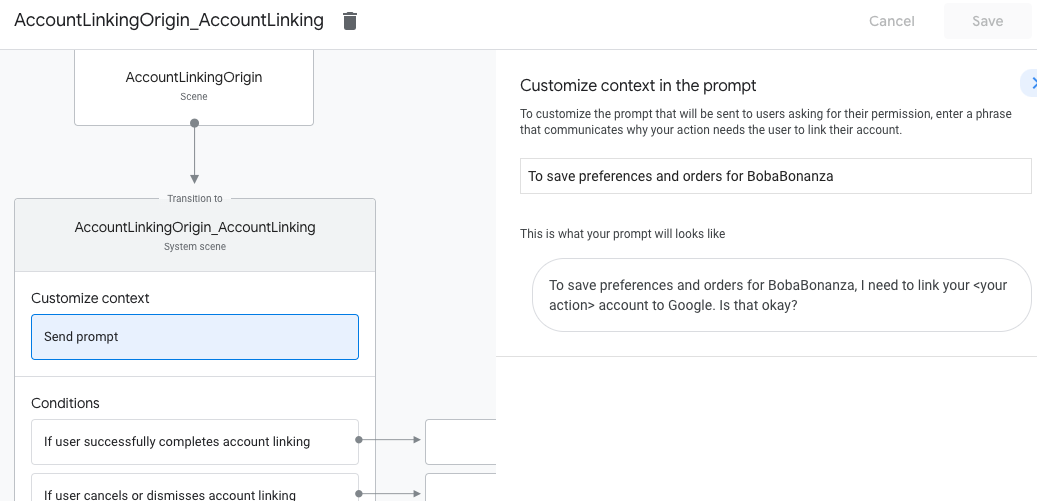
アカウント リンク シーンをカスタマイズする
- [Scenes] で、アカウント リンク システム シーンを選択します。
- [プロンプトを送信] をクリックし、アクションがユーザーの ID にアクセスする必要がある理由を説明する短い文言を追加します(例: 「設定を保存するため」)。
- [保存] をクリックします。
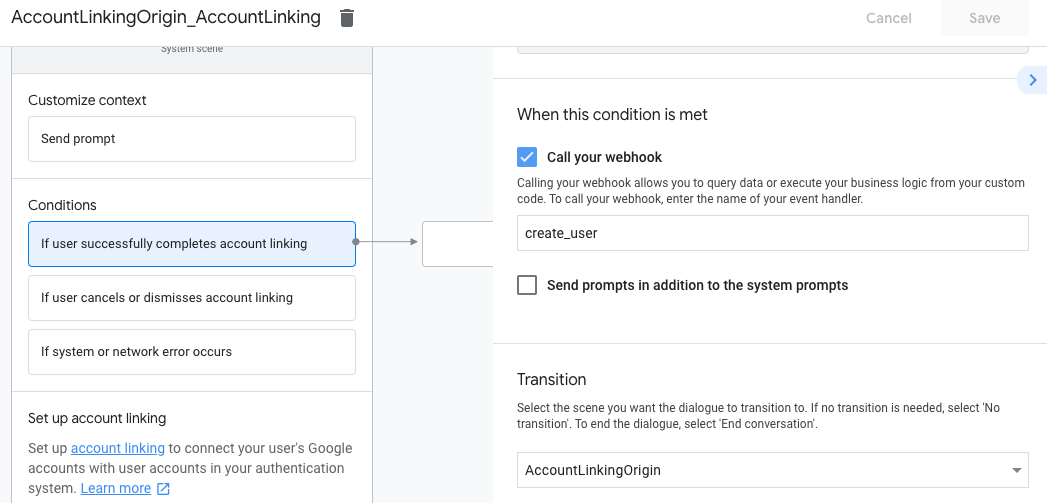
- [条件] で [ユーザーがアカウントのリンクを正常に完了した場合] をクリックします。
- ユーザーがアカウントのリンクに同意した場合のフローの進行方法を設定します。たとえば、Webhook を呼び出して必要なカスタム ビジネス ロジックを処理し、元のシーンに戻ります。
- [保存] をクリックします。
- [条件] で、[ユーザーがアカウントのリンクをキャンセルまたは閉じた場合] をクリックします。
- ユーザーがアカウントのリンクに同意しない場合のフローの進行方法を設定します。たとえば、確認メッセージを送信し、アカウントのリンクを必要としない機能を提供するシーンにリダイレクトします。
- [保存] をクリックします。

- [条件] で [システムエラーまたはネットワーク エラーが発生した場合] をクリックします。
- システム エラーやネットワーク エラーが原因でアカウント リンクフローを完了できない場合に、フローをどのように続行するかを設定します。たとえば、確認メッセージを送信し、アカウントのリンクを必要としない機能を提供するシーンにリダイレクトします。
- [保存] をクリックします。
データアクセス リクエストを処理する
アシスタントのリクエストにアクセス トークンが含まれている場合は、まずそのアクセス トークンが有効で期限切れになっていないことを確認してから、関連付けられているユーザー アカウントをデータベースから取得します。