
نوع پیوند OAuth از دو جریان استاندارد صنعتی OAuth 2.0 پشتیبانی می کند، جریان کد ضمنی و مجوز .
در جریان کد ضمنی، Google نقطه پایانی مجوز شما را در مرورگر کاربر باز میکند. پس از ورود موفقیت آمیز به سیستم، یک توکن دسترسی طولانی مدت به Google برمی گردانید. این نشانه دسترسی اکنون در هر درخواست ارسال شده از دستیار به Action شما گنجانده شده است.
در جریان کد مجوز، به دو نقطه پایانی نیاز دارید:
- نقطه پایانی مجوز ، که مسئول ارائه رابط کاربری ورود به سیستم به کاربرانی است که قبلاً وارد سیستم نشدهاند و رضایت دسترسی درخواستی را در قالب یک کد مجوز کوتاه مدت ثبت میکند.
- نقطه پایانی تبادل توکن ، که مسئول دو نوع مبادله است:
- یک کد مجوز را برای یک نشانه رفرش طولانی مدت و یک رمز دسترسی کوتاه مدت مبادله می کند. این تبادل زمانی اتفاق میافتد که کاربر از جریان پیوند حساب عبور کند.
- یک نشانه رفرش طولانی مدت را با یک توکن دسترسی کوتاه مدت مبادله می کند. این مبادله زمانی اتفاق میافتد که گوگل به یک توکن دسترسی جدید نیاز دارد، زیرا رمز دسترسی منقضی شده است.
اگرچه اجرای جریان کد ضمنی سادهتر است، اما گوگل توصیه میکند که توکنهای دسترسی صادر شده با استفاده از جریان ضمنی هرگز منقضی نمیشوند، زیرا استفاده از انقضای رمز با جریان ضمنی کاربر را مجبور میکند تا حساب خود را دوباره پیوند دهد. اگر به دلایل امنیتی نیاز به انقضای توکن دارید، باید قویاً از جریان کد تأیید استفاده کنید.
پیوند حساب OAuth را پیاده سازی کنید
پروژه را پیکربندی کنید
برای پیکربندی پروژه خود برای استفاده از پیوند OAuth، این مراحل را دنبال کنید:
- Actions Console را باز کنید و پروژه ای را که می خواهید استفاده کنید انتخاب کنید.
- روی تب Develop کلیک کنید و Account linking را انتخاب کنید.
- سوئیچ کنار Account linking را فعال کنید.
- در بخش ایجاد حساب ، خیر را انتخاب کنید، من فقط میخواهم اجازه ایجاد حساب در وبسایت خود را بدهم .
در نوع پیوند ، OAuth و کد مجوز را انتخاب کنید.
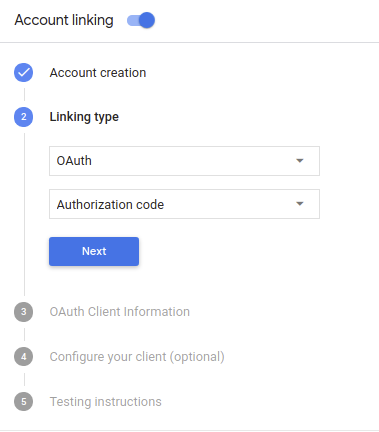
در اطلاعات مشتری :
- یک مقدار به Client ID صادر شده توسط Actions شما به Google اختصاص دهید تا درخواستهای ارسالی از Google را شناسایی کنید.
- به ارزش شناسه مشتری صادر شده توسط Google برای Actions خود توجه داشته باشید.
- آدرسهای اینترنتی را برای نقاط پایانی مجوز و مبادله رمز خود وارد کنید.
- روی ذخیره کلیک کنید.
سرور OAuth خود را پیاده سازی کنید
اجرای سرور OAuth 2.0 از جریان کد مجوز شامل دو نقطه پایانی است که سرویس شما توسط HTTPS در دسترس قرار می گیرد. اولین نقطه پایانی، نقطه پایانی مجوز است که مسئول یافتن یا کسب رضایت از کاربران برای دسترسی به داده است. نقطه پایانی مجوز یک رابط کاربری برای ورود به سیستم به کاربرانی که قبلاً وارد سیستم نشدهاند ارائه میکند و رضایت را برای دسترسی درخواستی ثبت میکند. نقطه پایانی دوم نقطه پایانی تبادل توکن است که برای به دست آوردن رشته های رمزگذاری شده به نام توکن ها استفاده می شود که به کاربر Action اجازه دسترسی به سرویس شما را می دهد.
هنگامی که Action شما نیاز به تماس با یکی از APIهای سرویس شما دارد، Google از این نقاط پایانی با هم استفاده می کند تا از کاربران شما اجازه بگیرد تا از طرف آنها با این APIها تماس بگیرند.
جلسه جریان کد احراز هویت OAuth 2.0 که توسط Google آغاز شده است دارای جریان زیر است:
- Google نقطه پایانی مجوز شما را در مرورگر کاربر باز می کند. اگر جریان در یک دستگاه فقط صوتی برای یک Action شروع شود، Google اجرا را به تلفن منتقل میکند.
کاربر وارد سیستم میشود (اگر قبلاً وارد سیستم نشده باشد) و به Google اجازه میدهد تا با API شما به دادههای خود دسترسی داشته باشد، اگر قبلاً مجوز نداده باشد.
سرویس شما یک کد مجوز ایجاد میکند و با هدایت مرورگر کاربر به Google با کد مجوز پیوست شده به درخواست، آن را به Google برمیگرداند.
Google کد مجوز را به نقطه پایانی تبادل رمز شما میفرستد، که صحت کد را تأیید میکند و یک نشانه دسترسی و یک نشانه تازهسازی را برمیگرداند. نشانه دسترسی یک توکن کوتاه مدت است که سرویس شما آن را به عنوان اعتبار برای دسترسی به APIها می پذیرد. توکن رفرش یک توکن با عمر طولانی است که گوگل می تواند آن را ذخیره کرده و از آن برای بدست آوردن توکن های دسترسی جدید پس از انقضا استفاده کند.
پس از اینکه کاربر جریان پیوند دادن حساب را کامل کرد، هر درخواست بعدی که از دستیار به وبکهک انجام شما ارسال میشود حاوی یک نشانه دسترسی است.
رسیدگی به درخواست های مجوز
هنگامی که Action شما باید پیوند حساب را از طریق جریان کد مجوز OAuth 2.0 انجام دهد، Google کاربر را با درخواستی که شامل پارامترهای زیر است به نقطه پایانی مجوز شما می فرستد:
| پارامترهای نقطه پایانی مجوز | |
|---|---|
client_id | شناسه مشتری Google که در Google ثبت کرده اید. |
redirect_uri | آدرس اینترنتی که پاسخ این درخواست را به آن ارسال می کنید. |
state | یک مقدار حسابداری که بدون تغییر در URI تغییر مسیر به Google بازگردانده می شود. |
scope | اختیاری : مجموعهای از رشتههای محدوده محدود شده با فاصله که دادههایی را که Google درخواست مجوز میکند، مشخص میکند. |
response_type | code رشته. |
برای مثال، اگر نقطه پایانی مجوز شما در https://myservice.example.com/auth موجود باشد، ممکن است یک درخواست به این صورت باشد:
GET https://myservice.example.com/auth?client_id=GOOGLE_CLIENT_ID&redirect_uri=REDIRECT_URI&state=STATE_STRING&scope=REQUESTED_SCOPES&response_type=code
برای اینکه نقطه پایانی مجوز شما به درخواستهای ورود به سیستم رسیدگی کند، مراحل زیر را انجام دهید:
بررسی کنید که
client_idبا شناسه مشتری Google که در Google ثبت کرده اید مطابقت داشته باشد وredirect_uriبا URL تغییر مسیر ارائه شده توسط Google برای سرویس شما مطابقت داشته باشد. این بررسی ها برای جلوگیری از اعطای دسترسی به برنامه های مشتری ناخواسته یا پیکربندی نادرست مهم هستند.اگر از چند جریان OAuth 2.0 پشتیبانی می کنید، همچنین تأیید کنید که
response_typecodeاست.بررسی کنید که آیا کاربر به سرویس شما وارد شده است یا خیر. اگر کاربر وارد سیستم نشده است، جریان ورود به سیستم یا ثبت نام سرویس خود را تکمیل کنید.
یک کد مجوز ایجاد کنید که Google از آن برای دسترسی به API شما استفاده خواهد کرد. کد مجوز میتواند هر مقدار رشتهای باشد، اما باید بهطور منحصربهفرد نشاندهنده کاربر، کلاینت توکن و زمان انقضای کد باشد، و نباید قابل حدس زدن باشد. شما معمولاً کدهای مجوز صادر می کنید که پس از تقریباً 10 دقیقه منقضی می شوند.
تأیید کنید که URL مشخص شده توسط پارامتر
redirect_uriشکل زیر را دارد:https://oauth-redirect.googleusercontent.com/r/YOUR_PROJECT_ID
مرورگر کاربر را به URL مشخص شده توسط پارامتر
redirect_uriهدایت کنید. هنگام تغییر مسیر با افزودنcodeو پارامترهایstate، کد مجوزی را که به تازگی ایجاد کردهاید و مقدار حالت اصلی و اصلاح نشده را وارد کنید. مثال زیر نمونه ای از URL به دست آمده است:https://oauth-redirect.googleusercontent.com/r/YOUR_PROJECT_ID?code=AUTHORIZATION_CODE&state=STATE_STRING
رسیدگی به درخواست های مبادله توکن
نقطه پایانی تبادل توکن سرویس شما مسئول دو نوع مبادله توکن است:
- کدهای مجوز را برای توکن های دسترسی و رفرش کردن نشانه ها مبادله کنید
- توکنهای تازهسازی را برای توکنهای دسترسی مبادله کنید
درخواست های مبادله توکن شامل پارامترهای زیر است:
| پارامترهای نقطه پایانی تبادل توکن | |
|---|---|
client_id | رشته ای که مبدا درخواست را به عنوان Google مشخص می کند. این رشته باید در سیستم شما به عنوان شناسه منحصر به فرد Google ثبت شود. |
client_secret | یک رشته مخفی که در Google برای سرویس خود ثبت کرده اید. |
grant_type | نوع توکن رد و بدل شده یا authorization_code یا refresh_token . |
code | وقتی grant_type=authorization_code ، کدی است که Google از نقطه پایانی ورود به سیستم یا تبادل رمز شما دریافت کرده است. |
redirect_uri | وقتی grant_type=authorization_code ، این پارامتر URL مورد استفاده در درخواست مجوز اولیه است. |
refresh_token | هنگامی که grant_type=refresh_token ، نشانه تازهسازی Google از نقطه پایانی تبادل توکن شما دریافت میکند. |
کدهای مجوز را برای توکن های دسترسی و رفرش کردن نشانه ها مبادله کنید
پس از اینکه کاربر وارد سیستم شد و نقطه پایان مجوز شما یک کد مجوز کوتاه مدت را به Google برگرداند، Google درخواستی را به نقطه پایانی مبادله رمز شما ارسال میکند تا کد مجوز را با یک نشانه دسترسی و یک نشانه تازهسازی مبادله کند.
برای این درخواستها، مقدار grant_type authorization_code است و مقدار code مقدار کد مجوزی است که قبلاً به Google دادهاید. در زیر نمونه ای از درخواست مبادله یک کد مجوز برای یک نشانه دسترسی و یک نشانه تازه سازی است:
POST /token HTTP/1.1
Host: oauth2.example.com
Content-Type: application/x-www-form-urlencoded

client_id=GOOGLE_CLIENT_ID&client_secret=GOOGLE_CLIENT_SECRET&grant_type=authorization_code&code=AUTHORIZATION_CODE&redirect_uri=REDIRECT_URI
برای مبادله کدهای مجوز برای یک نشانه دسترسی و یک نشانه تجدید، نقطه پایانی تبادل توکن شما با اجرای مراحل زیر به درخواستهای POST پاسخ میدهد:
- بررسی کنید که
client_idمبدا درخواست را به عنوان یک منبع مجاز شناسایی می کند، و اینکهclient_secretبا مقدار مورد انتظار مطابقت دارد. - موارد زیر را تأیید کنید:
- کد مجوز معتبر است و منقضی نشده است و شناسه مشتری مشخص شده در درخواست با شناسه مشتری مرتبط با کد مجوز مطابقت دارد.
- URL مشخص شده توسط پارامتر
redirect_uriبا مقدار مورد استفاده در درخواست مجوز اولیه یکسان است.
- اگر نمی توانید همه معیارهای بالا را تأیید کنید، یک خطای HTTP 400 Bad Request را با
{"error": "invalid_grant"}به عنوان متن بازگردانید. - در غیر این صورت، با استفاده از شناسه کاربری از کد مجوز، یک نشانه رفرش و یک نشانه دسترسی ایجاد کنید. این توکنها میتوانند هر مقدار رشتهای باشند، اما باید بهطور منحصربهفرد نشاندهنده کاربر و مشتریای باشند که توکن برای آن است، و نباید قابل حدس زدن باشند. برای توکن های دسترسی، زمان انقضای توکن را نیز ثبت کنید (معمولا یک ساعت پس از صدور توکن). توکنهای Refresh منقضی نمیشوند.
- شی JSON زیر را در بدنه پاسخ HTTPS برگردانید:
{
"token_type": "Bearer",
"access_token": "ACCESS_TOKEN",
"refresh_token": "REFRESH_TOKEN",
"expires_in": SECONDS_TO_EXPIRATION
}
گوگل توکن دسترسی و نشانه رفرش را برای کاربر ذخیره می کند و انقضای نشانه دسترسی را ثبت می کند. هنگامی که نشانه دسترسی منقضی میشود، Google از نشانه تازهسازی برای دریافت رمز دسترسی جدید از نقطه پایانی تبادل توکن شما استفاده میکند.
توکنهای تازهسازی را برای توکنهای دسترسی مبادله کنید
هنگامی که یک نشانه دسترسی منقضی میشود، Google درخواستی را به نقطه پایانی تبادل توکن شما میفرستد تا یک نشانه تازهسازی را با یک نشانه دسترسی جدید مبادله کند.
برای این درخواستها، مقدار grant_type refresh_token است و مقدار refresh_token ، مقدار نشانهی تازهسازی است که قبلاً به Google دادهاید. در زیر نمونه ای از درخواست مبادله یک نشانه رفرش با یک توکن دسترسی است:
POST /token HTTP/1.1
Host: oauth2.example.com
Content-Type: application/x-www-form-urlencoded

client_id=GOOGLE_CLIENT_ID&client_secret=GOOGLE_CLIENT_SECRET&grant_type=refresh_token&refresh_token=REFRESH_TOKEN
برای مبادله یک نشانه رفرش با یک نشانه دسترسی، نقطه پایانی تبادل توکن شما با اجرای مراحل زیر به درخواستهای POST پاسخ میدهد:
- بررسی کنید که
client_idمبدا درخواست را به عنوان Google شناسایی میکند، و اینکهclient_secretبا مقدار مورد انتظار مطابقت دارد. - بررسی کنید که کد بازخوانی معتبر است، و شناسه مشتری مشخص شده در درخواست با شناسه مشتری مرتبط با نشانه بازخوانی مطابقت دارد.
- اگر نمی توانید همه معیارهای بالا را تأیید کنید، یک خطای HTTP 400 Bad Request را با
{"error": "invalid_grant"}به عنوان متن بازگردانید. - در غیر این صورت، از شناسه کاربری موجود در نشانه رفرش برای ایجاد یک نشانه دسترسی استفاده کنید. این توکنها میتوانند هر مقدار رشتهای باشند، اما باید بهطور منحصربهفرد نشاندهنده کاربر و مشتریای باشند که توکن برای آن است، و نباید قابل حدس زدن باشند. برای توکن های دسترسی، زمان انقضای توکن را نیز ثبت کنید (معمولا یک ساعت پس از صدور توکن).
- شی JSON زیر را در بدنه پاسخ HTTPS برگردانید:
{
"token_type": "Bearer",
"access_token": " ACCESS_TOKEN ",
"expires_in": SECONDS_TO_EXPIRATION
}
رابط کاربری صوتی را برای جریان احراز هویت طراحی کنید
بررسی کنید که آیا کاربر تأیید شده است و جریان پیوند حساب را شروع کنید
- پروژه Actions Builder خود را در Actions Console باز کنید.
- یک صحنه جدید برای شروع پیوند دادن حساب در Action خود ایجاد کنید:
- روی صحنه ها کلیک کنید.
- برای افزودن یک صحنه جدید، روی نماد افزودن (+) کلیک کنید.
- در صحنه جدید ایجاد شده، روی نماد افزودن add برای Conditions کلیک کنید.
- شرطی اضافه کنید که بررسی کند آیا کاربر مرتبط با مکالمه یک کاربر تأیید شده است یا خیر. اگر بررسی ناموفق باشد، Action شما نمیتواند پیوند حساب را در طول مکالمه انجام دهد و باید به ارائه دسترسی به عملکردی که نیازی به پیوند حساب ندارد بازگردد.
- در قسمت
Enter new expressionدر Condition ، منطق زیر را وارد کنید:user.verificationStatus != "VERIFIED" - در بخش انتقال ، صحنهای را انتخاب کنید که نیازی به پیوند دادن حساب ندارد یا صحنهای که نقطه ورود به عملکرد فقط مهمان است.
- در قسمت

- روی نماد افزودن add برای شرایط کلیک کنید.
- در صورتی که کاربر هویت مرتبطی نداشته باشد، شرطی را برای فعال کردن جریان پیوند حساب اضافه کنید.
- در قسمت
Enter new expressionدر Condition ، منطق زیر را وارد کنید:user.verificationStatus == "VERIFIED" - در بخش Transition ، صحنه سیستم پیوند حساب را انتخاب کنید.
- روی ذخیره کلیک کنید.
- در قسمت
![]()
پس از ذخیره، یک صحنه سیستم پیوند حساب جدید به نام <SceneName>_AccountLinking به پروژه شما اضافه می شود.
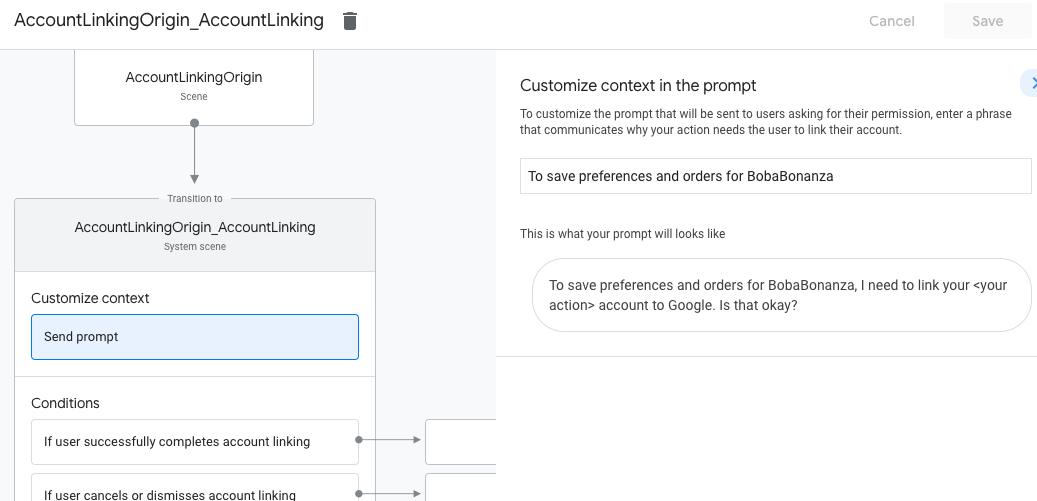
صحنه پیوند حساب را سفارشی کنید
- در بخش صحنهها ، صحنه سیستم پیوند دهنده حساب را انتخاب کنید.
- روی Send prompt کلیک کنید و یک جمله کوتاه اضافه کنید تا به کاربر توضیح دهد که چرا Action باید به هویت او دسترسی داشته باشد (به عنوان مثال "برای ذخیره تنظیمات برگزیده").
- روی ذخیره کلیک کنید.
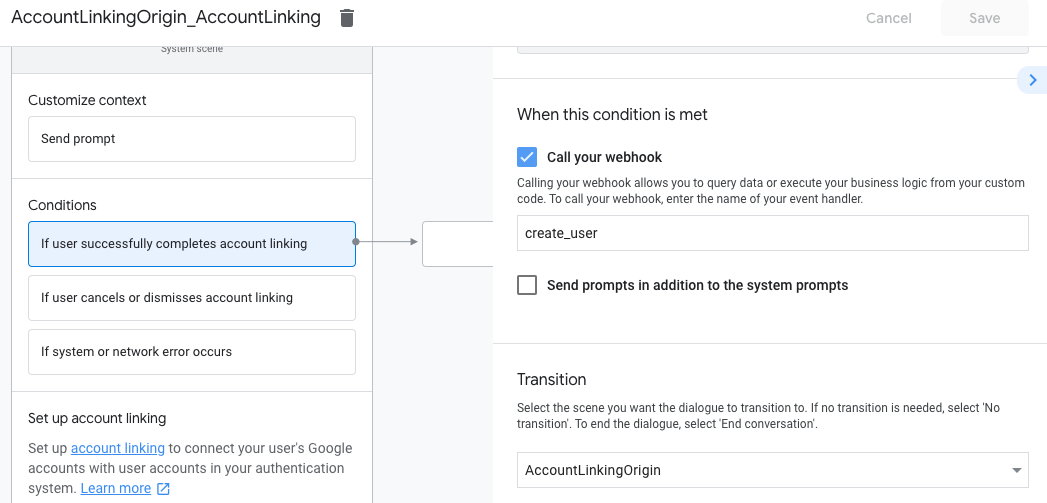
- در زیر شرایط ، روی اگر کاربر با موفقیت پیوند حساب را انجام دهد کلیک کنید.
- اگر کاربر موافقت کرد که حساب خود را پیوند دهد، نحوه جریان را پیکربندی کنید. به عنوان مثال، برای پردازش هرگونه منطق تجاری سفارشی مورد نیاز و انتقال به صحنه اصلی، با webhook تماس بگیرید.
- روی ذخیره کلیک کنید.
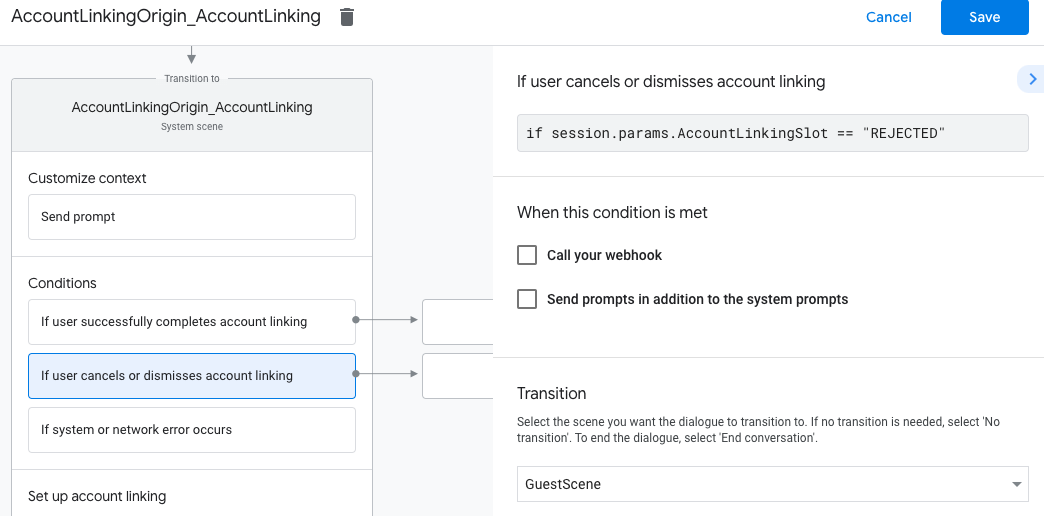
- در زیر شرایط ، روی اگر کاربر پیوند دادن حساب را لغو یا رد کرد، کلیک کنید.
- اگر کاربر با پیوند دادن حساب خود موافقت نکرد، نحوه جریان را پیکربندی کنید. به عنوان مثال، یک پیام تأیید ارسال کنید و به صحنههایی هدایت کنید که عملکردی را ارائه میکنند که نیازی به پیوند دادن حساب ندارد.
- روی ذخیره کلیک کنید.
- در قسمت Conditions ، روی If system or network error رخ می دهد کلیک کنید.
- اگر به دلیل خطاهای سیستم یا شبکه نمیتوان جریان پیوند حساب را تکمیل کرد، نحوه انجام جریان را پیکربندی کنید. به عنوان مثال، یک پیام تأیید ارسال کنید و به صحنههایی هدایت کنید که عملکردی را ارائه میکنند که نیازی به پیوند دادن حساب ندارد.
- روی ذخیره کلیک کنید.
رسیدگی به درخواست های دسترسی به داده ها
اگر درخواست دستیار حاوی یک نشانه دسترسی است ، ابتدا بررسی کنید که نشانه دسترسی معتبر است (و منقضی نشده است) و سپس حساب کاربری مرتبط را از پایگاه داده خود بازیابی کنید.