Le type Association OAuth est compatible avec deux flux OAuth 2.0 standards dans le secteur : le flux implicite et le flux avec code d'autorisation.
Dans le flux de code implicite, Google ouvre votre point de terminaison d'autorisation dans le navigateur de l'utilisateur. Une fois connecté, vous renvoyez un jeton d'accès de longue durée à Google. Ce jeton d'accès est désormais inclus dans chaque requête envoyée à l'action par l'Assistant.
Dans le flux de code d'autorisation, vous avez besoin de deux points de terminaison:
- Le point de terminaison authorization, qui consiste à présenter l'interface de connexion aux utilisateurs qui ne sont pas déjà connectés et à enregistrer le consentement demandé pour l'accès demandé sous la forme d'un code d'autorisation temporaire.
- Le point de terminaison d'échange de jetons, responsable de deux types d'échanges :
- Échange un code d'autorisation contre un jeton d'actualisation de longue durée et un jeton d'accès de courte durée. Cet échange se produit lorsque l'utilisateur suit la procédure d'association de comptes.
- Échange un jeton d'actualisation de longue durée contre un jeton d'accès de courte durée. Cet échange se produit lorsque Google a besoin d'un nouveau jeton d'accès, car celui-ci a expiré.
Bien que le flux de code implicite soit plus facile à mettre en œuvre, Google recommande que les jetons d'accès émis à l'aide du flux implicite n'expirent jamais, car l'expiration du jeton avec le flux implicite oblige l'utilisateur à associer de nouveau son compte. Si vous avez besoin d'un jeton expiré pour des raisons de sécurité, envisagez plutôt d'utiliser le flux de code d'autorisation.
Implémenter l'association de comptes OAuth
Configurer le projet
Pour configurer votre projet afin qu'il utilise l'association OAuth, procédez comme suit :
- Ouvrez la console Actions et sélectionnez le projet que vous souhaitez utiliser.
- Cliquez sur l'onglet Develop (Développer), puis sélectionnez Account linking (Association de comptes).
- Activez le bouton à côté de Association de compte.
- Dans la section Création de compte, sélectionnez Non, je ne veux autoriser la création de compte que sur mon site Web.
Dans Type d'association, sélectionnez OAuth et Code d'autorisation.
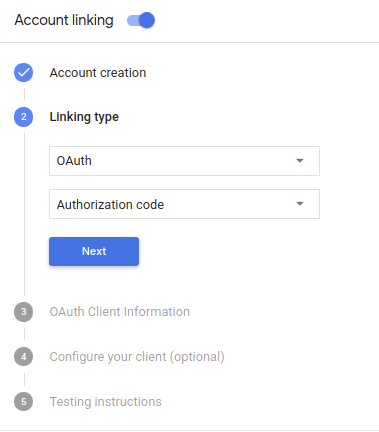
Dans Informations sur le client :
- Attribuez une valeur à ID client émis par vos Actions sur Google pour identifier les requêtes provenant de Google.
- Notez la valeur de l'ID client émis par Google pour vos actions.
- Insérez les URL de vos points de terminaison d'autorisation et d'échange de jetons.
- Cliquez sur Enregistrer.
Implémenter votre serveur OAuth
Une implémentation serveur OAuth 2.0 du flux avec code d'autorisation comprend les éléments suivants : deux points de terminaison, que votre service met à disposition via HTTPS. Le premier point de terminaison est le point de terminaison d'autorisation chargé de trouver ou d'obtenir le consentement des utilisateurs pour l'accès aux données. Le point de terminaison d'autorisation présente pour vos utilisateurs qui ne sont pas déjà connectés et enregistrent leur consentement a demandé l'accès. Le deuxième point de terminaison est le point de terminaison de l'échange de jetons, utilisés pour obtenir des chaînes chiffrées, appelés jetons, qui autorisent l'utilisateur Action pour accéder à votre service.
Lorsque votre action doit appeler l'une des API de votre service, Google utilise ces pour obtenir l'autorisation d'appeler ces API sur leurs au nom de l'utilisateur.
La session de flux de code d'autorisation OAuth 2.0 lancée par Google comporte le flux suivant:
- Google ouvre votre point de terminaison d'autorisation dans le navigateur de l'utilisateur. Si le flux sur un appareil à commande vocale pour une action, Google transfère l'exécution sur un téléphone.
L'utilisateur se connecte (s'il ne l'est pas déjà) et autorise Google à accéder à leurs données avec votre API s'ils ne l'ont pas déjà accordé.
Votre service crée un code d'autorisation et le renvoie à Google en redirigeant le navigateur de l'utilisateur vers Google avec le code d'autorisation. joint à la demande.
Google envoie le code d'autorisation au point de terminaison de votre échange de jetons, qui vérifie l'authenticité du code et renvoie un jeton d'accès et une jeton d'actualisation. Le jeton d'accès est un jeton de courte durée que votre service accepte comme identifiants d'accès aux API. Le jeton d'actualisation est un jeton que Google peut stocker et utiliser pour obtenir de nouveaux jetons d'accès arrive à expiration.
Une fois que l'utilisateur a terminé le processus d'association de compte, toutes les étapes suivantes envoyée par l'Assistant à votre webhook de fulfillment contient un jeton d'accès.
Gérer les requêtes d'autorisation
Lorsque votre action doit associer des comptes via un code d'autorisation OAuth 2.0 flux d'autorisation, Google redirige l'utilisateur vers votre point de terminaison d'autorisation avec une requête comprend les paramètres suivants:
| Paramètres du point de terminaison de l'autorisation | |
|---|---|
client_id |
ID client Google que vous avez enregistré auprès de Google. |
redirect_uri |
URL à laquelle vous envoyez la réponse à cette requête. |
state |
Une valeur de tenue de registre renvoyée à Google telle quelle dans le l'URI de redirection. |
scope |
Facultatif: ensemble de chaînes de champ d'application délimitées par un espace qui spécifient le pour lesquelles Google demande une autorisation. |
response_type |
Correspond à la chaîne code. |
Par exemple, si votre point de terminaison d'autorisation est disponible à l'adresse https://myservice.example.com/auth,
une requête peut se présenter comme suit:
GET https://myservice.example.com/auth?client_id=GOOGLE_CLIENT_ID&redirect_uri=REDIRECT_URI&state=STATE_STRING&scope=REQUESTED_SCOPES&response_type=code
Pour que votre point de terminaison d'autorisation traite les requêtes de connexion, procédez comme suit:
Vérifiez que
client_idcorrespond à l'ID client Google avec lequel vous vous êtes enregistré Google et queredirect_uricorrespond à l'URL de redirection fournie par Google pour votre service. Ces vérifications sont importantes pour empêcher d'accorder l'accès des applications clientes involontaires ou mal configurées.Si vous acceptez plusieurs flux OAuth 2.0, vérifiez également que
response_typeestcode.Vérifiez si l'utilisateur est connecté à votre service. Si l'utilisateur n'est pas connecté, terminer le processus de connexion ou d'inscription de votre service.
Générez un code d'autorisation que Google utilisera pour accéder à votre API. Le code d'autorisation peut être n'importe quelle valeur de chaîne, mais il doit être unique représenter l'utilisateur, le client auquel le jeton est destiné et la date d'expiration du code et ne doit pas être devinable. Vous émettez généralement une autorisation codes qui expirent au bout de 10 minutes environ.
Vérifiez que l'URL spécifiée par le paramètre
redirect_urise présente sous la forme suivante:https://oauth-redirect.googleusercontent.com/r/YOUR_PROJECT_ID
Redirigez le navigateur de l'utilisateur vers l'URL spécifiée par le paramètre Paramètre
redirect_uri. Indiquez le code d'autorisation généré et la valeur d'état non modifiée d'origine lorsque vous redirigez en ajoutant les paramètrescodeetstate. Voici un exemple : de l'URL obtenue:https://oauth-redirect.googleusercontent.com/r/YOUR_PROJECT_ID?code=AUTHORIZATION_CODE&state=STATE_STRING
Gérer les requêtes d'échange de jetons
Le point de terminaison de l'échange de jetons de votre service est responsable de deux types de jetons places de marché:
- Échangez des codes d'autorisation contre des jetons d'accès et d'actualisation
- Échanger des jetons d'actualisation contre des jetons d'accès
Les requêtes d'échange de jetons incluent les paramètres suivants:
| Paramètres du point de terminaison d'échange de jetons | |
|---|---|
client_id |
Chaîne identifiant Google à l'origine de la requête. Cette chaîne ne doit doit être enregistré dans votre système en tant qu'identifiant unique de Google. |
client_secret |
Chaîne secrète que vous avez enregistrée auprès de Google pour votre service. |
grant_type |
Type de jeton échangé. L'un ou l'autre
authorization_code ou refresh_token. |
code |
Lorsque grant_type=authorization_code, le code Google
provenant de votre point de terminaison de connexion ou d'échange de jetons. |
redirect_uri |
Si la valeur est grant_type=authorization_code, ce paramètre correspond au
URL utilisée dans la requête d'autorisation initiale. |
refresh_token |
Lorsque la valeur est grant_type=refresh_token, le jeton d'actualisation
du point de terminaison de votre échange de jetons. |
Échangez des codes d'autorisation contre des jetons d'accès et d'actualisation
Une fois que l'utilisateur s'est connecté et que votre point de terminaison d'autorisation a renvoyé une autorisation de courte durée code à Google, celui-ci envoie une demande au point de terminaison de votre échange de jetons le code d'autorisation d'un jeton d'accès et d'un jeton d'actualisation.
Pour ces requêtes, la valeur de grant_type est authorization_code, et la valeur
code correspond à la valeur du code d'autorisation que vous avez précédemment accordé à Google.
Voici un exemple de requête d'échange d'un code d'autorisation contre un
un jeton d'accès et un jeton d'actualisation:
POST /token HTTP/1.1
Host: oauth2.example.com
Content-Type: application/x-www-form-urlencoded

client_id=GOOGLE_CLIENT_ID&client_secret=GOOGLE_CLIENT_SECRET&grant_type=authorization_code&code=AUTHORIZATION_CODE&redirect_uri=REDIRECT_URI
Pour échanger des codes d'autorisation contre un jeton d'accès et un jeton d'actualisation, votre
Le point de terminaison de l'échange de jetons répond aux requêtes POST en exécutant les étapes suivantes:
- Vérifiez que
client_ididentifie l'origine de la requête en tant qu'origine autorisée. et queclient_secretcorrespond à la valeur attendue. - Vérifiez les points suivants:
<ph type="x-smartling-placeholder">
- </ph>
- Le code d'autorisation est valide et n'a pas expiré, et le client L'ID spécifié dans la requête correspond à l'ID client associé au d'autorisation.
- L'URL spécifiée par le paramètre
redirect_uriest identique. à la valeur utilisée dans la requête d'autorisation initiale.
- Si vous ne pouvez pas vérifier tous les critères ci-dessus, renvoyez une requête
Erreur 400 "Requête incorrecte" avec
{"error": "invalid_grant"}dans le corps. - Sinon, générez une actualisation à l'aide de l'ID utilisateur du code d'autorisation. et un jeton d'accès. Ces jetons peuvent correspondre à n'importe quelle valeur de chaîne, mais ils doivent représentent de manière unique l'utilisateur et le client auquel le jeton est destiné. Ils ne doivent pas être devinable. Enregistrer également l'heure d'expiration des jetons d'accès (généralement une heure après l'émission du jeton). Les jetons d'actualisation n'expirent pas.
- Renvoyez l'objet JSON suivant dans le corps de la réponse HTTPS:
{
"token_type": "Bearer",
"access_token": "ACCESS_TOKEN",
"refresh_token": "REFRESH_TOKEN",
"expires_in": SECONDS_TO_EXPIRATION
}
Google stocke le jeton d'accès et le jeton d'actualisation de l'utilisateur, et enregistre l'expiration du jeton d'accès. Lorsque le jeton d'accès expire, Google utilise le code d'actualisation pour obtenir un nouveau jeton d'accès à partir du point de terminaison de votre échange de jetons.
Échanger des jetons d'actualisation contre des jetons d'accès
Lorsqu'un jeton d'accès expire, Google envoie une requête au point de terminaison de votre échange de jetons pour échanger un jeton d'actualisation contre un nouveau jeton d'accès.
Pour ces requêtes, la valeur de grant_type est refresh_token, et la valeur
refresh_token correspond à la valeur du jeton d'actualisation que vous avez précédemment accordé à Google.
Voici un exemple de requête d'échange d'un jeton d'actualisation contre
jeton d'accès:
POST /token HTTP/1.1
Host: oauth2.example.com
Content-Type: application/x-www-form-urlencoded

client_id=GOOGLE_CLIENT_ID&client_secret=GOOGLE_CLIENT_SECRET&grant_type=refresh_token&refresh_token=REFRESH_TOKEN
Pour échanger un jeton d'actualisation contre un jeton d'accès, votre point de terminaison échange
répond aux requêtes POST en exécutant les étapes suivantes:
- Vérifiez que
client_ididentifie l'origine de la requête comme Google, et queclient_secretcorrespond aux valeurs . - Vérifiez que le jeton d'actualisation est valide et que l'ID client spécifié dans la requête correspond à l'ID client associé au jeton d'actualisation.
- Si vous ne pouvez pas vérifier tous les critères ci-dessus, renvoyez une requête
Erreur 400 "Requête incorrecte" avec
{"error": "invalid_grant"}dans le corps. - Sinon, utilisez l'ID utilisateur du jeton d'actualisation pour générer un accès à partir d'un jeton d'accès. Ces jetons peuvent être n'importe quelle valeur de chaîne, mais ils doivent représenter de manière unique l'utilisateur et le client auxquels le jeton est destiné, et ils ne doivent pas être devinables. Enregistrer également l'heure d'expiration des jetons d'accès (généralement une heure après l'émission du jeton).
- Renvoyez l'objet JSON suivant dans le corps de la requête
réponse:
{
"token_type": "Porteur",
"access_token": "ACCESS_TOKEN",
"expires_in": SECONDS_TO_EXPIRATION
}
Concevoir l'interface utilisateur vocale pour le flux d'authentification
Vérifiez si l'utilisateur est validé et lancez le processus d'association de compte.
- Ouvrez votre projet Actions Builder dans la console Actions.
- Créez une scène pour lancer l'association de compte dans votre action :
- Cliquez sur Scènes.
- Cliquez sur l'icône Ajouter (+) pour ajouter une scène.
- Dans la scène que vous venez de créer, cliquez sur l'icône Ajouter add pour Conditions.
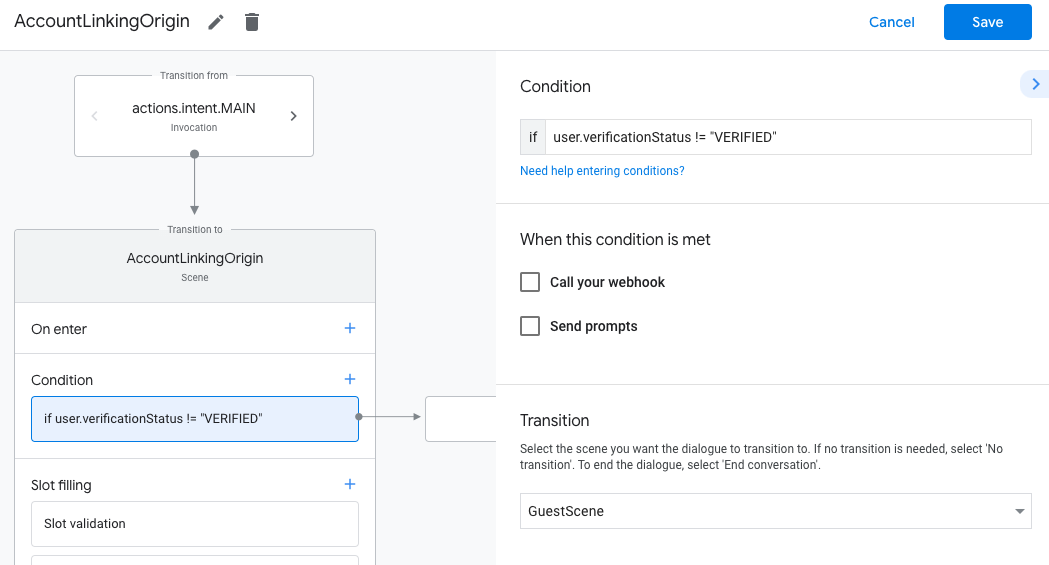
- Ajoutez une condition qui vérifie si l'utilisateur associé à la conversation est un utilisateur validé. Si la vérification échoue, votre action ne peut pas associer de compte pendant la conversation et doit revenir à l'accès aux fonctionnalités qui ne nécessitent pas d'association de compte.
- Dans le champ
Enter new expressionsous Condition, saisissez la logique suivante :user.verificationStatus != "VERIFIED" - Sous Transition, sélectionnez une scène qui ne nécessite pas d'association de compte ou une scène qui constitue le point d'entrée de la fonctionnalité réservée aux invités.
- Dans le champ
- Cliquez sur l'icône Ajouter add pour Conditions.
- Ajoutez une condition pour déclencher un parcours d'association de compte si l'utilisateur n'a pas d'identité associée.
- Dans le champ
Enter new expressionsous Condition, saisissez la logique suivante :user.verificationStatus == "VERIFIED" - Sous Transition, sélectionnez la scène système Association de compte.
- Cliquez sur Enregistrer.
- Dans le champ
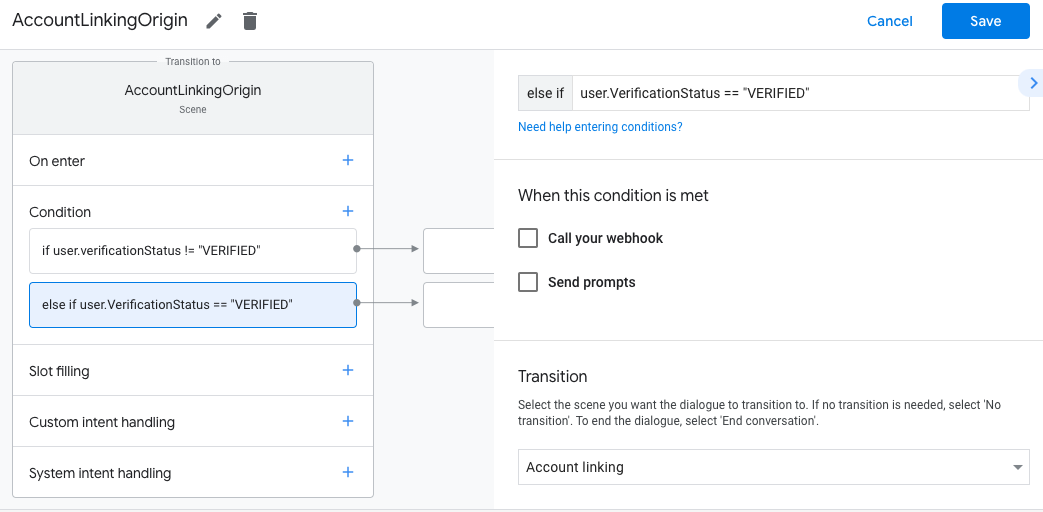
Une fois l'enregistrement effectué, une scène de système d'association de compte appelée <SceneName>_AccountLinking est ajoutée à votre projet.
Personnaliser la scène d'association de comptes
- Sous Scènes, sélectionnez la scène du système d'association de comptes.
- Cliquez sur Envoyer le prompt et ajoutez une brève phrase pour expliquer à l'utilisateur pourquoi l'action doit accéder à son identité (par exemple, "Pour enregistrer vos préférences").
- Cliquez sur Enregistrer.
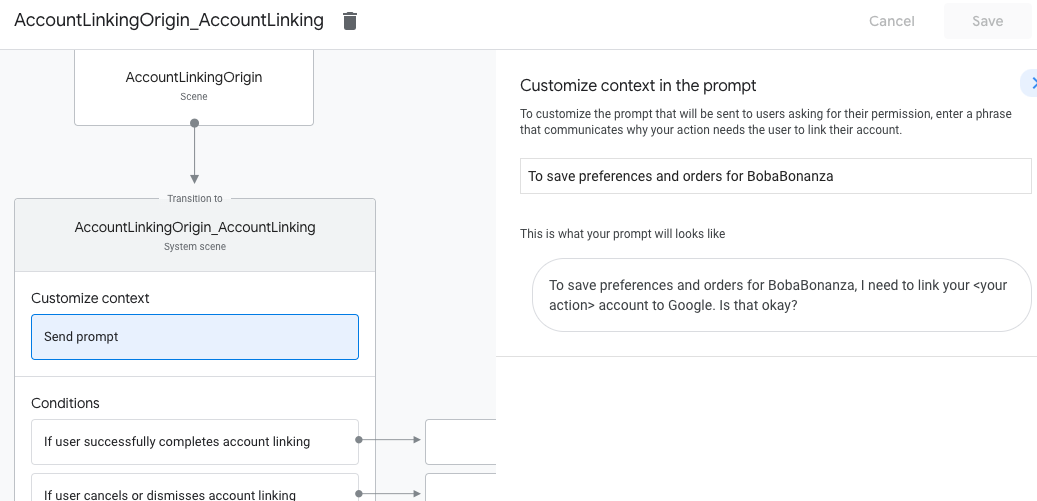
- Sous Conditions, cliquez sur Si l'utilisateur associe son compte.
- Configurez la façon dont le flux doit se dérouler si l'utilisateur accepte d'associer son compte. Par exemple, appelez le webhook pour traiter toute logique métier personnalisée requise et revenez à la scène d'origine.
- Cliquez sur Enregistrer.
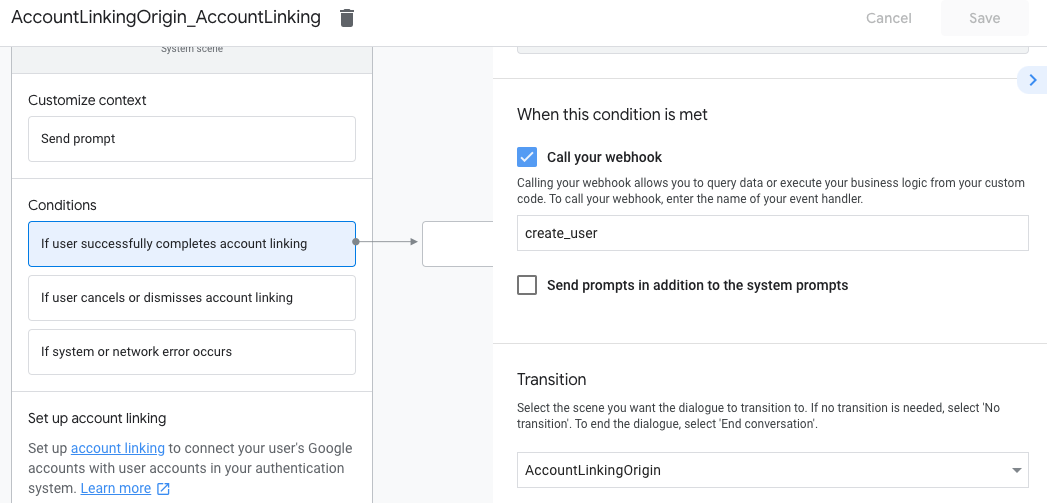
- Sous Conditions, cliquez sur Si l'utilisateur annule ou ignore l'association de compte.
- Configurez la façon dont le flux doit se dérouler si l'utilisateur n'accepte pas d'associer son compte. Par exemple, envoyez un message de confirmation et redirigez l'utilisateur vers des scènes qui fournissent des fonctionnalités ne nécessitant pas l'association de comptes.
- Cliquez sur Enregistrer.
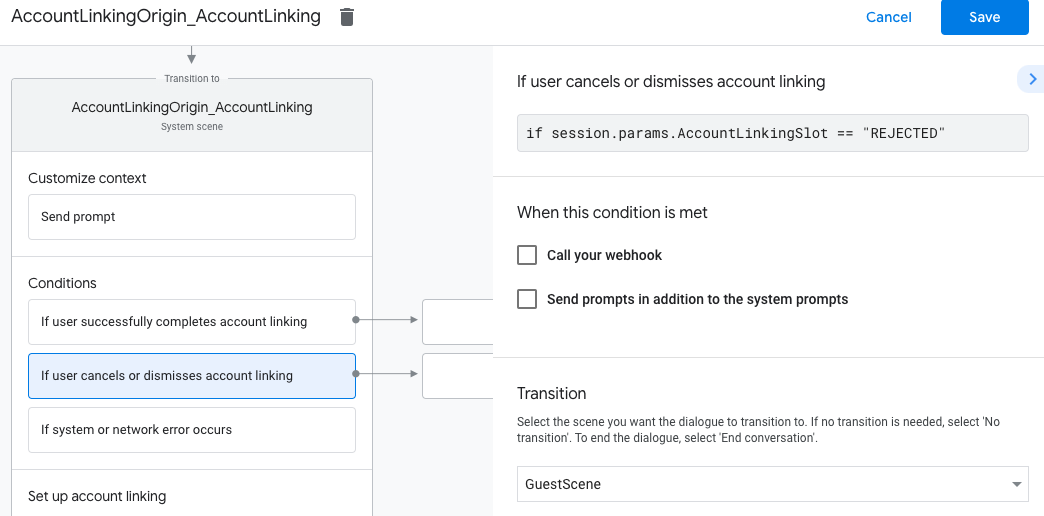
- Sous Conditions, cliquez sur En cas d'erreur système ou réseau.
- Configurez la façon dont le flux doit se dérouler si le flux d'association de compte ne peut pas être terminé en raison d'erreurs système ou réseau. Par exemple, envoyez un message de confirmation et redirigez l'utilisateur vers des scènes qui fournissent des fonctionnalités ne nécessitant pas l'association de comptes.
- Cliquez sur Enregistrer.
Gérer les demandes d'accès aux données
Si la requête de l'Assistant contient un jeton d'accès, vérifiez d'abord que le jeton d'accès est valide (et non expiré), puis récupérez le compte utilisateur associé à partir de votre base de données.
