Kể từ ngày 13 tháng 6 năm 2023, Hành động trò chuyện không còn được dùng nữa. Để biết thêm thông tin, hãy xem phần Hành động trò chuyện ngừng hoạt động.
Liên kết tài khoản với tính năng Đăng nhập bằng Google
Sử dụng bộ sưu tập để sắp xếp ngăn nắp các trang
Lưu và phân loại nội dung dựa trên lựa chọn ưu tiên của bạn.
Tính năng Đăng nhập bằng Google cho Trợ lý mang lại trải nghiệm người dùng đơn giản và dễ dàng nhất
cho người dùng và nhà phát triển cho cả việc liên kết tài khoản và tạo tài khoản. Hành động của bạn
có thể yêu cầu quyền truy cập vào hồ sơ trên Google của người dùng trong cuộc trò chuyện,
bao gồm tên, địa chỉ email và ảnh hồ sơ của người dùng.
Thông tin hồ sơ có thể được dùng để tạo trải nghiệm người dùng được cá nhân hoá
trong Hành động của bạn. Nếu bạn có ứng dụng trên các nền tảng khác và chúng sử dụng tính năng Đăng nhập bằng Google,
bạn cũng có thể tìm và liên kết với tài khoản của người dùng hiện có, tạo tài khoản mới,
và thiết lập một kênh liên lạc trực tiếp với người dùng.
Để liên kết tài khoản bằng tính năng Đăng nhập bằng Google, bạn phải yêu cầu người dùng đồng ý
để truy cập hồ sơ trên Google của họ. Sau đó, bạn sử dụng thông tin này trong hồ sơ của trẻ, để
ví dụ địa chỉ email của họ để xác định người dùng trong hệ thống của bạn.
Triển khai việc liên kết tài khoản Đăng nhập bằng Google
Làm theo các bước trong các phần sau để thêm tài khoản Đăng nhập bằng Google liên kết với
Hành động.
Định cấu hình dự án
Để định cấu hình dự án nhằm sử dụng tính năng liên kết tài khoản Đăng nhập bằng Google, hãy làm theo các bước sau:
Mở Actions Console rồi chọn một dự án.
Nhấp vào thẻ Phát triển rồi chọn Liên kết tài khoản.
Bật nút chuyển bên cạnh Liên kết tài khoản.
Trong phần Tạo tài khoản, hãy chọn Có.
Trong mục Loại liên kết, hãy chọn Đăng nhập bằng Google.
Mở Thông tin khách hàng và ghi lại giá trị Mã khách hàng do Google cấp cho Hành động của bạn.
Nhấp vào Lưu.
Thiết kế giao diện người dùng bằng giọng nói cho quy trình xác thực
Kiểm tra xem người dùng đã được xác minh hay chưa và bắt đầu quy trình liên kết tài khoản
Mở dự án Actions Builder (Trình tạo hành động) trong Actions Console.
Tạo một cảnh mới để bắt đầu liên kết tài khoản trong Hành động:
Nhấp vào Cảnh.
Nhấp vào biểu tượng thêm (+) để thêm một cảnh mới.
Trong cảnh mới tạo, hãy nhấp vào nút thêm add
biểu tượng cho Điều kiện.
Thêm một điều kiện kiểm tra xem người dùng được liên kết với cuộc trò chuyện có phải là
người dùng đã xác minh. Nếu quy trình kiểm tra không thành công, thì Hành động của bạn không thể thực hiện quá trình liên kết tài khoản
trong suốt cuộc trò chuyện và nên quay lại cung cấp quyền truy cập vào
không yêu cầu liên kết tài khoản.
Trong trường Enter new expression theo Điều kiện, hãy nhập logic sau:
user.verificationStatus != "VERIFIED"
Trong mục Chuyển đổi, hãy chọn một cảnh không yêu cầu liên kết tài khoản hoặc
một cảnh là điểm truy cập vào chức năng chỉ dành cho khách.
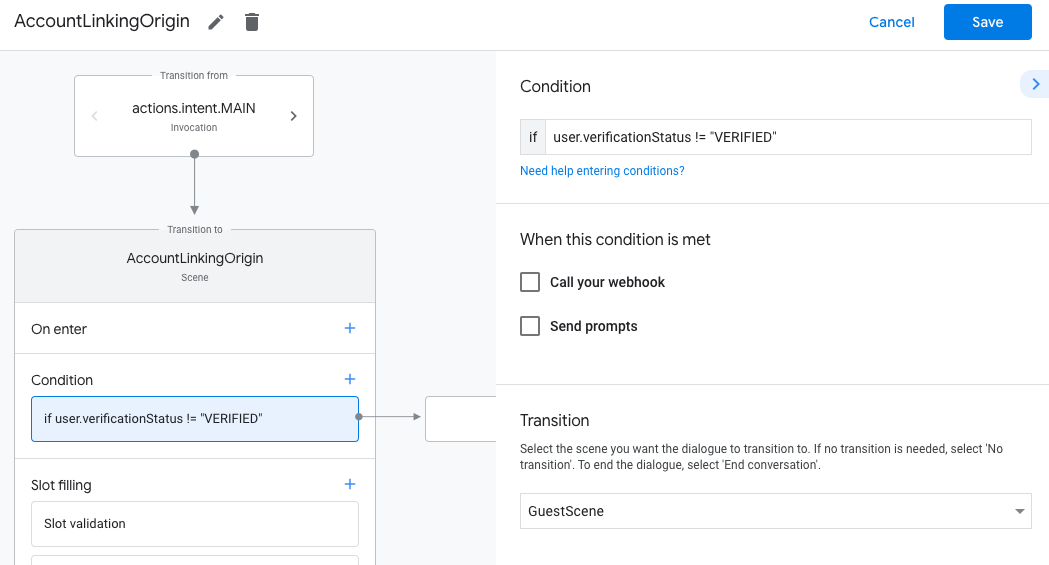
Nhấp vào biểu tượng thêm add cho Điều kiện.
Thêm một điều kiện để kích hoạt quy trình liên kết tài khoản nếu người dùng không có
danh tính có liên quan.
Trong trường Enter new expression theo Điều kiện, hãy nhập logic sau:
user.verificationStatus == "VERIFIED"
Trong Chuyển đổi, hãy chọn cảnh hệ thống Liên kết tài khoản.
Nhấp vào Lưu.
Sau khi lưu, một cảnh mới của hệ thống liên kết tài khoản có tên là <SceneName>_AccountLinking
sẽ được thêm vào dự án của bạn.
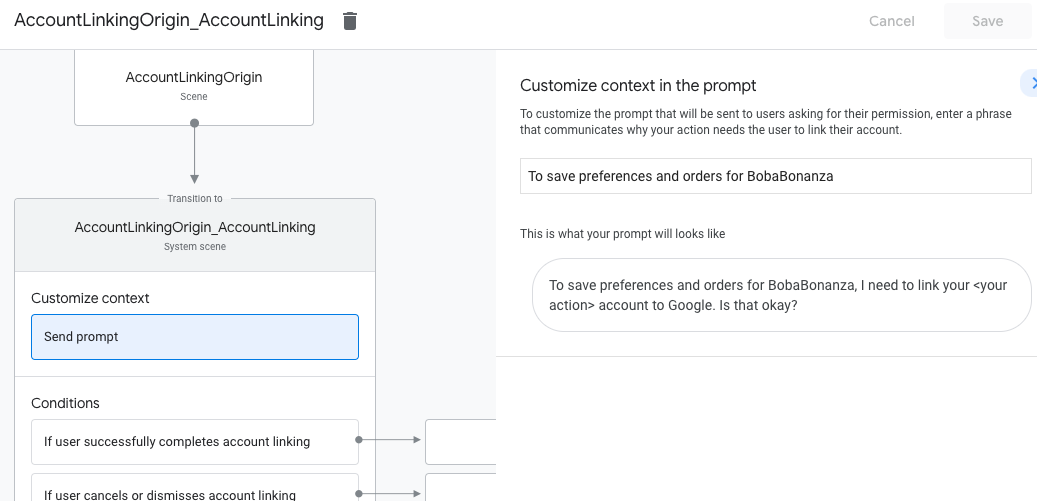
Tuỳ chỉnh cảnh liên kết tài khoản
Trong mục Cảnh, hãy chọn cảnh của hệ thống liên kết tài khoản.
Nhấp vào Gửi lời nhắc rồi thêm một câu ngắn để mô tả cho người dùng
lý do khiến Hành động cần truy cập vào danh tính của mình (ví dụ: "Để lưu các lựa chọn ưu tiên của bạn").
Nhấp vào Lưu.
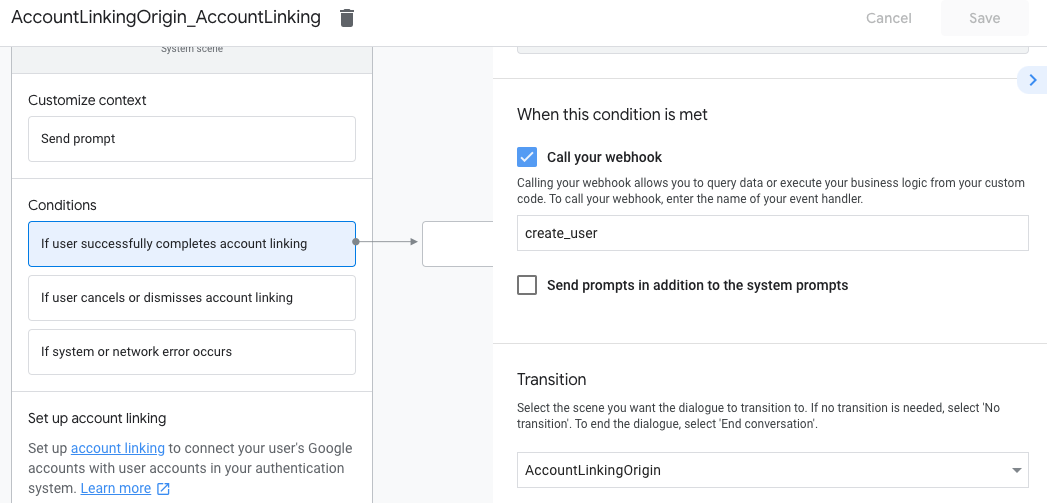
Trong mục Điều kiện, hãy nhấp vào Nếu người dùng hoàn tất thành công việc liên kết tài khoản.
Định cấu hình cách quy trình sẽ tiến hành nếu người dùng đồng ý liên kết tài khoản của họ.
Ví dụ: gọi webhook để xử lý mọi logic nghiệp vụ tuỳ chỉnh cần thiết
và chuyển lại về cảnh ban đầu.
Nhấp vào Lưu.
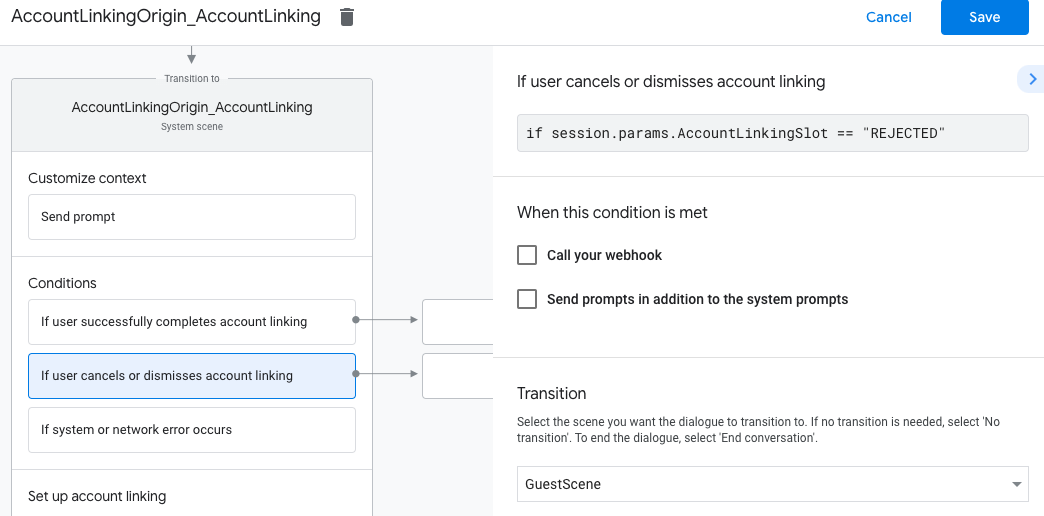
Trong mục Điều kiện, hãy nhấp vào Nếu người dùng huỷ hoặc loại bỏ việc liên kết tài khoản.
Định cấu hình cách quy trình sẽ tiến hành nếu người dùng không đồng ý liên kết
tài khoản. Ví dụ: gửi thông báo xác nhận và chuyển hướng đến các cảnh
cung cấp chức năng không yêu cầu liên kết tài khoản.
Nhấp vào Lưu.
Trong mục Điều kiện, hãy nhấp vào Nếu xảy ra lỗi hệ thống hoặc mạng.
Thiết lập cách quy trình sẽ tiến hành nếu không thể thực hiện quy trình liên kết tài khoản
hoàn tất do lỗi hệ thống hoặc lỗi mạng.
Ví dụ: gửi thông báo xác nhận và chuyển hướng đến các cảnh
cung cấp chức năng không yêu cầu liên kết tài khoản.
Nhấp vào Lưu.
Truy cập thông tin hồ sơ trong phần phụ trợ
Sau khi người dùng cho phép bạn truy cập vào hồ sơ trên Google của họ, bạn sẽ nhận được
mã thông báo ID Google chứa thông tin hồ sơ trên Google của người dùng trong mỗi
đối với hành động của bạn.
Để truy cập thông tin hồ sơ của người dùng, trước tiên bạn cần xác thực và giải mã mã thông báo này
bằng cách làm như sau:
Sử dụng thư viện giải mã JWT cho ngôn ngữ của bạn để giải mã
mã thông báo và sử dụng khoá công khai của Google (có trong JWK
hoặc định dạng PEM) để xác minh chữ ký của mã thông báo.
Xác minh rằng bên phát hành mã thông báo (trường iss trong mã thông báo đã giải mã) là https://accounts.google.com
và đối tượng (trường aud trong mã thông báo đã giải mã) là giá trị của
Mã ứng dụng khách do Google cấp cho Actions của bạn, được chỉ định cho dự án của bạn
trong bảng điều khiển Actions.
Sau đây là ví dụ về mã thông báo đã giải mã:
{"sub":1234567890,// The unique ID of the user's Google Account"iss":"https://accounts.google.com",// The token's issuer"aud":"123-abc.apps.googleusercontent.com",// Client ID assigned to your Actions project"iat":233366400,// Unix timestamp of the token's creation time"exp":233370000,// Unix timestamp of the token's expiration time"name":"Jan Jansen","given_name":"Jan","family_name":"Jansen","email":"jan@gmail.com",// If present, the user's email address"locale":"en_US"}
Để xử lý yêu cầu truy cập dữ liệu, chỉ cần xác minh rằng người dùng đã xác nhận bằng mã Google
đã có trong cơ sở dữ liệu của bạn. Đoạn mã sau đây cho thấy
ví dụ về cách kiểm tra xem đơn đặt hàng của một người dùng đã tồn tại trong cơ sở dữ liệu Firestore hay chưa:
...app.handle('Place_Order',asyncconv=>{constorder=conv.session.params.order;constuserDoc=dbs.user.doc(conv.user.params.uid);constorderHistory=userDoc.collection("orderHistory");if(orderHistory){//Orderhistoryexists,sotheuseralreadyplacedanorder.//Updatecounterforordertype.awaitorderHistory.doc(order).update({count:admin.firestore.FieldValue.increment(1)});}else{//FirstordertheyplaceawaitorderHistory.doc(order).set({option:order,count:1});options.forEach(opt=>{if(opt!=order){orderHistory.doc(opt).set({option:opt,count:0});}});}returnconv.add(`Your ${order} has been placed. `+'Thanks for using Boba Bonanza, see you soon!');});
[[["Dễ hiểu","easyToUnderstand","thumb-up"],["Giúp tôi giải quyết được vấn đề","solvedMyProblem","thumb-up"],["Khác","otherUp","thumb-up"]],[["Thiếu thông tin tôi cần","missingTheInformationINeed","thumb-down"],["Quá phức tạp/quá nhiều bước","tooComplicatedTooManySteps","thumb-down"],["Đã lỗi thời","outOfDate","thumb-down"],["Vấn đề về bản dịch","translationIssue","thumb-down"],["Vấn đề về mẫu/mã","samplesCodeIssue","thumb-down"],["Khác","otherDown","thumb-down"]],["Cập nhật lần gần đây nhất: 2025-07-25 UTC."],[[["\u003cp\u003eGoogle Sign-In for Assistant simplifies account linking and creation for both users and developers, enabling access to user profiles for personalized experiences.\u003c/p\u003e\n"],["\u003cp\u003eDevelopers can leverage Google Sign-In to link or create user accounts across platforms, facilitating seamless user journeys and communication.\u003c/p\u003e\n"],["\u003cp\u003eImplementing Google Sign-In involves configuring the project in Actions Console, designing the authentication flow in Actions Builder, and handling data access requests securely in your backend.\u003c/p\u003e\n"],["\u003cp\u003eUser profile information, such as name, email, and profile picture, can be accessed after user authorization and token validation, allowing for customized interactions within the Action.\u003c/p\u003e\n"],["\u003cp\u003eActions using account linking for financial information are subject to additional policies and review, requiring compliance with financial services policies before submission.\u003c/p\u003e\n"]]],[],null,["# Account linking with Google Sign-In\n\nGoogle Sign-In for the Assistant provides the simplest and easiest user experience\nto users and developers both for account linking and account creation. Your Action\ncan request access to your user's Google profile during a conversation,\nincluding the user's name, email address, and profile picture.\n\nThe profile information can be used to create a personalized user experience\nin your Action. If you have apps on other platforms and they use Google Sign-In,\nyou can also find and link to an existing user's account, create a new account,\nand establish a direct channel of communication to the user.\n\nTo perform account linking with Google Sign-In, you ask the user to give consent\nto access their Google profile. You then use the information in their profile, for\nexample their email address, to identify the user in your system.\n\nImplement Google Sign-In account linking\n----------------------------------------\n\nFollow the steps in the following sections to add Google Sign-In account linking to your\nAction.\n| **Note:** If you're implementing account linking to handle financial information, note that additional policies may apply to your Action. It can take us up to six weeks to review an Action with account linking for financial information, so factor that time in when planning your release schedule. To ease the review process, make sure you comply with the [financial services policies](/assistant/console/policies/general-policies#financial_services) before submitting your Action for review.\n\n### Configure the project\n\nTo configure your project to use Google Sign-In account linking, follow these steps:\n\n1. Open the Actions Console and select a project.\n2. Click the **Develop** tab and choose **Account linking**.\n3. Enable the switch next to **Account linking**.\n4. In the **Account creation** section, select **Yes**.\n5. In **Linking type** , select **Google Sign In**.\n\n6. Open **Client Information** and take note of the value of **Client ID issued by Google to your Actions**.\n\n7. Click **Save**.\n\n### Design the voice user interface for the authentication flow\n\n| **Warning:** Don't give users a required account linking prompt at the start of the conversation with your Action. Instead, give unauthenticated users a guest flow to show how your Action works, and then only ask for account linking if it's necessary to proceed. If users are leaving the Action consistently because of account linking issues, Google will not actively promote the Action, which may decrease the Action's user traffic.\n|\n|\n| **Note:** You must use [Actions Builder](/assistant/conversational/build#actions_builder) to build an Action that implements account linking.\n\n#### Check if the user is verified and start the account linking flow\n\n1. Open your Actions Builder project in the [Actions Console](https://console.actions.google.com).\n2. Create a new scene to start account linking in your Action:\n 1. Click **Scenes**.\n 2. Click the **add** (+) icon to add a new scene.\n3. In the newly created scene, click the add *add* icon for **Conditions**.\n4. Add a condition that checks if the user associated with the conversation is a a verified user. If the check fails, your Action can't perform account linking during the conversation, and should fall back to providing access to functionality that doesn't require account linking.\n 1. In the `Enter new expression` field under **Condition** , enter the following logic: `user.verificationStatus != \"VERIFIED\"`\n 2. Under **Transition**, select a scene that doesn't require account linking or a scene that is the entry point to guest-only functionality.\n\n1. Click the add *add* icon for **Conditions**.\n2. Add a condition to trigger an account linking flow if the user doesn't have an associated identity.\n 1. In the `Enter new expression` field under **Condition** , enter the following logic:: `user.verificationStatus == \"VERIFIED\"`\n 2. Under **Transition** , select the **Account Linking** system scene.\n 3. Click **Save**.\n\nAfter saving, a new account linking system scene called `\u003cSceneName\u003e_AccountLinking`\nis added to your project.\n\n#### Customize the account linking scene\n\n1. Under **Scenes**, select the account linking system scene.\n2. Click **Send prompt** and add a short sentence to describe to the user why the Action needs to access their identity (for example \"To save your preferences\").\n3. Click **Save**.\n\n1. Under **Conditions** , click **If user successfully completes account linking**.\n2. Configure how the flow should proceed if the user agrees to link their account. For example, call the webhook to process any custom business logic required and transition back to the originating scene.\n3. Click **Save**.\n\n1. Under **Conditions** , click **If user cancels or dismisses account linking**.\n2. Configure how the flow should proceed if the user doesn't agree to link their account. For example, send an acknowledging message and redirect to scenes that provide functionality that doesn't require account linking.\n3. Click **Save**.\n\n1. Under **Conditions** , click **If system or network error occurs**.\n2. Configure how the flow should proceed if the account linking flow can't be completed because of system or network errors. For example, send an acknowledging message and redirect to scenes that provide functionality that doesn't require account linking.\n3. Click **Save**.\n\n### Access profile information in your backend\n\nAfter the user authorizes your action to access their Google profile, you will receive\na Google ID token that contains the user's Google profile information in every subsequent\nrequest to your action.\n\nTo access the user's profile information, you need to first validate and decode the token\nby doing the following:\n\n1. Use a [JWT-decoding library](https://jwt.io/) for your language to decode the token, and use Google's public keys (available in [JWK](https://www.googleapis.com/oauth2/v3/certs) or [PEM](https://www.googleapis.com/oauth2/v1/certs) format) to verify the token's signature.\n2. Verify that the token's issuer (`iss` field in the decoded token) is `https://accounts.google.com` and that the audience (`aud` field in the decoded token) is the value of **Client ID issued by Google to your Actions**, which is assigned to your project in the Actions console.\n\nThe following is an example of a decoded token: \n\n```carbon\n{\n \"sub\": 1234567890, // The unique ID of the user's Google Account\n \"iss\": \"https://accounts.google.com\", // The token's issuer\n \"aud\": \"123-abc.apps.googleusercontent.com\", // Client ID assigned to your Actions project\n \"iat\": 233366400, // Unix timestamp of the token's creation time\n \"exp\": 233370000, // Unix timestamp of the token's expiration time\n \"name\": \"Jan Jansen\",\n \"given_name\": \"Jan\",\n \"family_name\": \"Jansen\",\n \"email\": \"jan@gmail.com\", // If present, the user's email address\n \"locale\": \"en_US\"\n}\n```\n\nIf you use the [Actions on Google Fulfillment library for Node.js](https://github.com/actions-on-google/assistant-conversation-nodejs),\nit takes care of validating and decoding the token for you, and gives you access to\nthe profile content, as shown in the following code snippets. \n\n```gdscript\n...\nconst app = conversation({\n // REPLACE THE PLACEHOLDER WITH THE CLIENT_ID OF YOUR ACTIONS PROJECT\n clientId: CLIENT_ID,\n});\n...\n// Invoked on successful completion of account linking flow, check if we need to\n// create a Firebase user.\napp.handle('linkAccount', async conv =\u003e {\n let payload = conv.headers.authorization;\n if (payload) {\n // Get UID for Firebase auth user using the email of the user\n const email = payload.email;\n if (!conv.user.params.uid && email) {\n try {\n conv.user.params.uid = (await auth.getUserByEmail(email)).uid;\n } catch (e) {\n if (e.code !== 'auth/user-not-found') {\n throw e;\n }\n // If the user is not found, create a new Firebase auth user\n // using the email obtained from Google Assistant\n conv.user.params.uid = (await auth.createUser({email})).uid;\n }\n }\n }\n});\n```\n\n### Handle data access requests\n\nTo handle data access request, just verify that the user asserted by the Google ID\ntoken is already present in your database. The following snippet of code shows\nan example of how to check if orders for a user already exist in a Firestore database: \n\n```perl\n...\napp.handle('Place_Order', async conv =\u003e {\n const order = conv.session.params.order;\n const userDoc = dbs.user.doc(conv.user.params.uid);\n const orderHistory = userDoc.collection(\"orderHistory\");\n if (orderHistory) {\n // Order history exists, so the user already placed an order.\n // Update counter for order type.\n await orderHistory.doc(order).update({ count: admin.firestore.FieldValue.increment(1)});\n } else {\n // First order they place\n await orderHistory.doc(order).set({ option: order, count: 1});\n options.forEach(opt =\u003e {\n if (opt != order) {\n orderHistory.doc(opt).set({ option: opt, count: 0});\n }\n });\n }\n return conv.add(`Your ${order} has been placed. ` +\n 'Thanks for using Boba Bonanza, see you soon!');\n});\n```\n\n\u003cbr /\u003e"]]