Mit Sammlungen den Überblick behalten
Sie können Inhalte basierend auf Ihren Einstellungen speichern und kategorisieren.
Google Log-in für Assistant ist die einfachste und einfachste Möglichkeit für Nutzer, sich anzumelden.
Nutzern und Entwicklern sowohl für die Kontoverknüpfung als auch für die Kontoerstellung zur Verfügung stehen. Deine Aktion
kann während einer Unterhaltung Zugriff auf das Google-Profil des Nutzers anfordern,
einschließlich Name, E-Mail-Adresse und Profilbild des Nutzers.
Die Profilinformationen können verwendet werden, um eine personalisierte Nutzererfahrung zu schaffen.
in Ihrer Aktion. Wenn Sie Apps auf anderen Plattformen haben und für diese Google Log-in verwendet wird,
Sie können auch bestehende Nutzerkonten suchen und verknüpfen, ein neues Konto erstellen
und einen direkten
Kommunikationskanal einrichten.
Um eine Kontoverknüpfung mit Google Log-in durchzuführen, bitten Sie den Nutzer, seine Einwilligung zu geben
um auf ihr Google-Profil zuzugreifen. Dann verwenden Sie die Informationen in ihrem Profil,
wie E-Mail-Adresse, um den Nutzer in Ihrem System zu identifizieren.
Google Log-in-Kontoverknüpfung implementieren
Folge der Anleitung in den folgenden Abschnitten, um eine Verknüpfung mit deinem Google Log-in-Konto hinzuzufügen:
Action –
Projekt konfigurieren
So konfigurieren Sie Ihr Projekt für die Verwendung der Google Log-in-Kontoverknüpfung:
Öffnen Sie die Actions Console und wählen Sie ein Projekt aus.
Klicken Sie auf den Tab Entwickeln und wählen Sie Kontoverknüpfung aus.
Aktivieren Sie den Schalter neben Kontoverknüpfung.
Wählen Sie im Abschnitt Kontoerstellung die Option Ja aus.
Wählen Sie unter Verknüpfungstyp die Option Google Log-in aus.
Öffnen Sie Client Information und notieren Sie sich den Wert der Client-ID, die Google für Ihre Aktionen ausgegeben hat.
Klicken Sie auf Speichern.
Die Sprachbenutzeroberfläche für den Authentifizierungsablauf entwerfen
Prüfen, ob der Nutzer bestätigt ist, und mit dem Kontoverknüpfungsvorgang beginnen
Öffnen Sie Ihr Actions Builder-Projekt in der Actions Console.
Erstelle eine neue Szene, um die Kontoverknüpfung in deiner Aktion zu starten:
<ph type="x-smartling-placeholder"></ph>
Klicken Sie auf Szenen.
Klicken Sie auf das Symbol Hinzufügen (+), um eine neue Szene hinzuzufügen.
Klicken Sie in der neu erstellten Szene auf „Hinzufügen“ add.
für Bedingungen.
Fügen Sie eine Bedingung hinzu, die prüft, ob der mit der Unterhaltung verknüpfte Nutzer ein
bestätigter Nutzer sein. Wenn die Prüfung fehlschlägt, kann deine Aktion keine Kontoverknüpfung vornehmen
während des Gesprächs verlaufen. Er sollte Zugriff auf
für die keine Kontoverknüpfung erforderlich ist.
Geben Sie im Feld Enter new expression unter Bedingung die folgende Logik ein:
user.verificationStatus != "VERIFIED"
Wählen Sie unter Übergang eine Szene aus, für die keine Kontoverknüpfung erforderlich ist, oder
eine Szene, die der Einstiegspunkt für die Funktion
nur für Gäste ist.
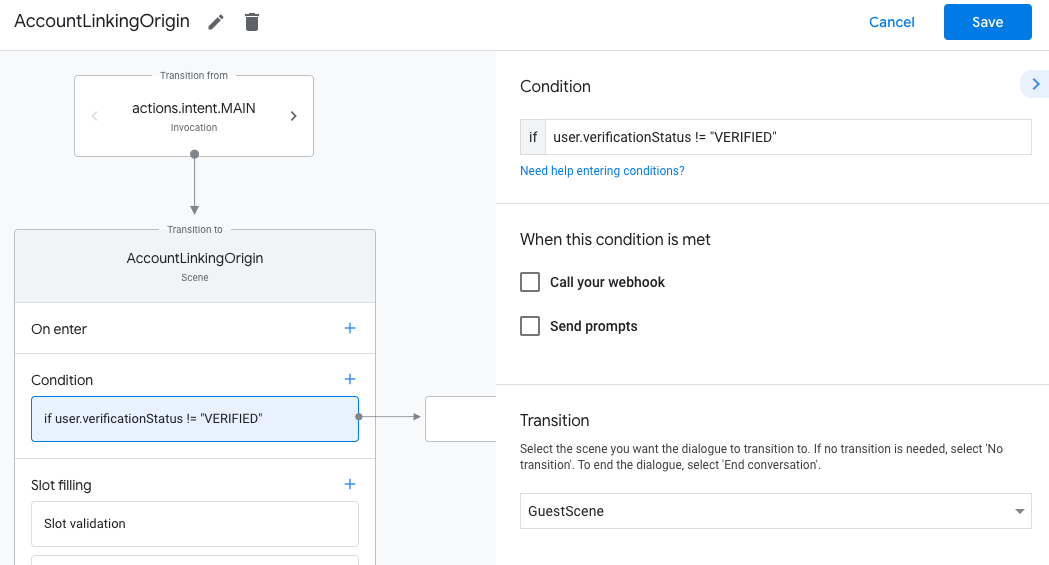
Klicken Sie für Bedingungen auf das Symbol zum Hinzufügen add.
Fügen Sie eine Bedingung hinzu, die einen Kontoverknüpfungsvorgang auslöst, wenn der Nutzer
eine verknüpfte Identität.
Geben Sie im Feld Enter new expression unter Bedingung die folgende Logik ein:
user.verificationStatus == "VERIFIED"
Wählen Sie unter Umstellung die Systemszene Kontoverknüpfung aus.
Klicken Sie auf Speichern.
Nach dem Speichern wird ein neues System zur Kontoverknüpfung namens „<SceneName>_AccountLinking“ angezeigt
wird Ihrem Projekt hinzugefügt.
Kontoverknüpfung anpassen
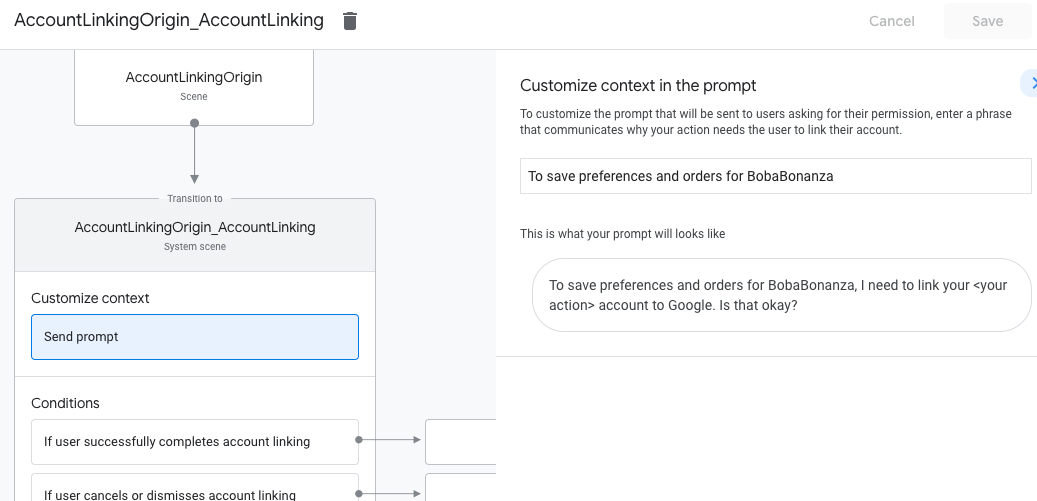
Wählen Sie unter Szenen die Systemszene für die Kontoverknüpfung aus.
Klicken Sie auf Prompt senden und fügen Sie einen kurzen Satz hinzu, um den Nutzer zu beschreiben
warum die Aktion Zugriff auf ihre Identität benötigt (z. B. „Um deine Einstellungen zu speichern“).
Klicken Sie auf Speichern.
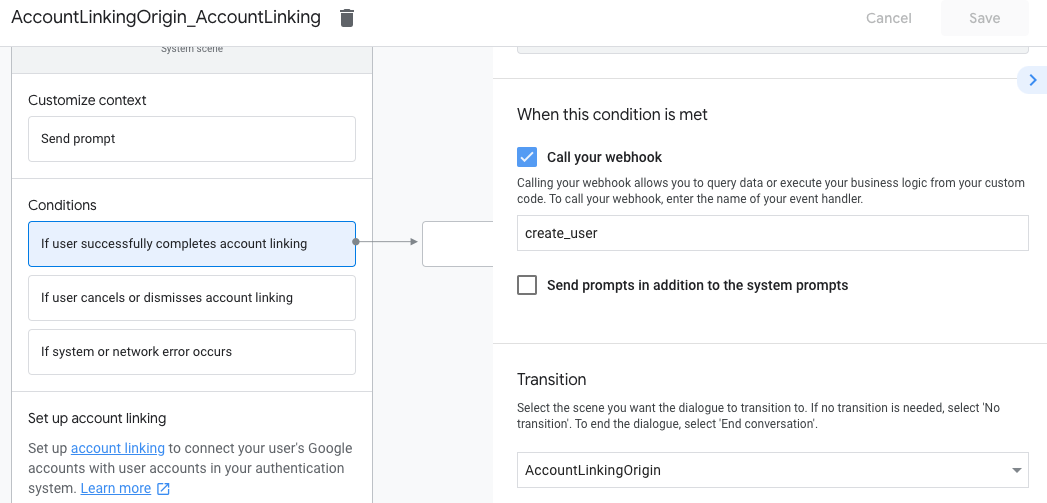
Klicken Sie unter Bedingungen auf Wenn der Nutzer die Kontoverknüpfung erfolgreich abschließt.
Konfigurieren Sie, wie der Vorgang fortgesetzt werden soll, wenn der Nutzer der Verknüpfung seines Kontos zustimmt.
Rufen Sie beispielsweise den Webhook auf, um die erforderliche benutzerdefinierte Geschäftslogik zu verarbeiten.
und zur ursprünglichen Szene übergehen.
Klicken Sie auf Speichern.
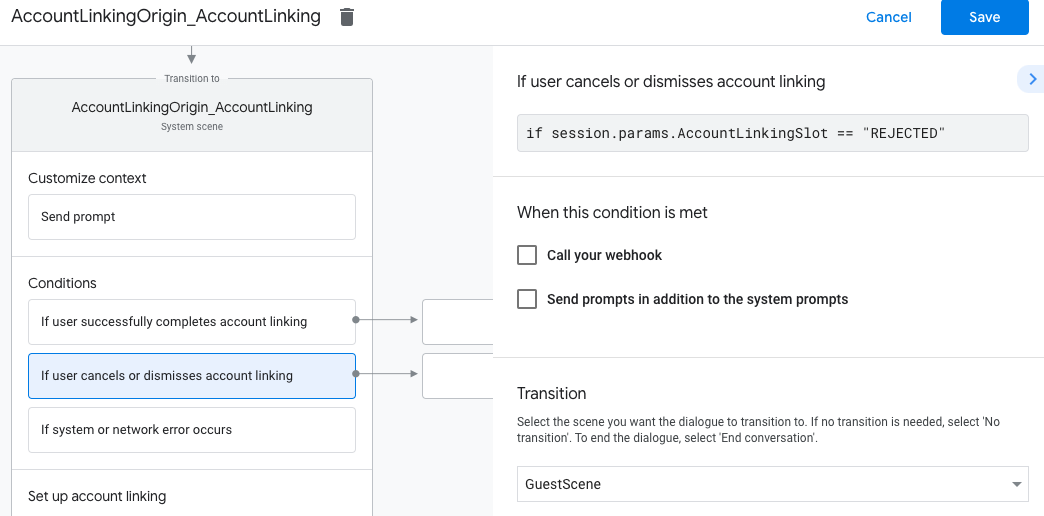
Klicken Sie unter Bedingungen auf Wenn der Nutzer die Kontoverknüpfung aufbricht oder ablehnt.
Konfigurieren Sie, wie der Ablauf fortgesetzt werden soll, wenn der Nutzer der Verknüpfung nicht zustimmt
Konto. Zum Beispiel eine Bestätigungsnachricht senden und zu Szenen weiterleiten
die Funktionen bieten, für die keine Kontoverknüpfung erforderlich ist.
Klicken Sie auf Speichern.
Klicken Sie unter Bedingungen auf Wenn ein System- oder Netzwerkfehler auftritt.
Konfiguriere, wie der Vorgang fortgesetzt werden soll, wenn die Kontoverknüpfung nicht funktioniert
aufgrund von System- oder Netzwerkfehlern abgeschlossen sein.
Zum Beispiel eine Bestätigungsnachricht senden und zu Szenen weiterleiten
die Funktionen bieten, für die keine Kontoverknüpfung erforderlich ist.
Klicken Sie auf Speichern.
Auf Profilinformationen im Backend zugreifen
Nachdem der Nutzer Ihre Aktion für den Zugriff auf sein Google-Profil autorisiert hat, erhalten Sie
ein Google-ID-Token, das die Google-Profilinformationen des Nutzers in jedem nachfolgenden
zu Ihrer Aktion.
Um auf die Profilinformationen des Nutzers zuzugreifen, müssen Sie zuerst das Token validieren und decodieren
Dazu gehen Sie so vor:
Verwende eine JWT-Decodierungsbibliothek für deine Sprache, um den
und verwenden Sie die öffentlichen Schlüssel von Google (verfügbar in JWK).
oder PEM-Format), um die Signatur des Tokens zu überprüfen.
Prüfen Sie, ob der Aussteller des Tokens (Feld iss im decodierten Token) https://accounts.google.com lautet.
und dass die Zielgruppe (Feld aud im decodierten Token) der Wert von
Von Google für deine Aktionen ausgestellte Client-ID, die deinem Projekt zugewiesen ist
in der Actions Console.
Das folgende Beispiel zeigt ein decodiertes Token:
{"sub":1234567890,// The unique ID of the user's Google Account"iss":"https://accounts.google.com",// The token's issuer"aud":"123-abc.apps.googleusercontent.com",// Client ID assigned to your Actions project"iat":233366400,// Unix timestamp of the token's creation time"exp":233370000,// Unix timestamp of the token's expiration time"name":"Jan Jansen","given_name":"Jan","family_name":"Jansen","email":"jan@gmail.com",// If present, the user's email address"locale":"en_US"}
Um Datenzugriffsanfragen zu bearbeiten, müssen Sie nur prüfen, ob der Nutzer mit der Google-ID Anspruch erhoben hat
Token ist bereits in Ihrer Datenbank vorhanden. Das folgende Code-Snippet zeigt
Beispiel für die Prüfung, ob Bestellungen für einen Nutzer bereits in einer Firestore-Datenbank vorhanden sind:
...app.handle('Place_Order',asyncconv=>{constorder=conv.session.params.order;constuserDoc=dbs.user.doc(conv.user.params.uid);constorderHistory=userDoc.collection("orderHistory");if(orderHistory){//Orderhistoryexists,sotheuseralreadyplacedanorder.//Updatecounterforordertype.awaitorderHistory.doc(order).update({count:admin.firestore.FieldValue.increment(1)});}else{//FirstordertheyplaceawaitorderHistory.doc(order).set({option:order,count:1});options.forEach(opt=>{if(opt!=order){orderHistory.doc(opt).set({option:opt,count:0});}});}returnconv.add(`Your ${order} has been placed. `+'Thanks for using Boba Bonanza, see you soon!');});
[[["Leicht verständlich","easyToUnderstand","thumb-up"],["Mein Problem wurde gelöst","solvedMyProblem","thumb-up"],["Sonstiges","otherUp","thumb-up"]],[["Benötigte Informationen nicht gefunden","missingTheInformationINeed","thumb-down"],["Zu umständlich/zu viele Schritte","tooComplicatedTooManySteps","thumb-down"],["Nicht mehr aktuell","outOfDate","thumb-down"],["Problem mit der Übersetzung","translationIssue","thumb-down"],["Problem mit Beispielen/Code","samplesCodeIssue","thumb-down"],["Sonstiges","otherDown","thumb-down"]],["Zuletzt aktualisiert: 2025-07-25 (UTC)."],[[["\u003cp\u003eGoogle Sign-In for Assistant simplifies account linking and creation for both users and developers, enabling access to user profiles for personalized experiences.\u003c/p\u003e\n"],["\u003cp\u003eDevelopers can leverage Google Sign-In to link or create user accounts across platforms, facilitating seamless user journeys and communication.\u003c/p\u003e\n"],["\u003cp\u003eImplementing Google Sign-In involves configuring the project in Actions Console, designing the authentication flow in Actions Builder, and handling data access requests securely in your backend.\u003c/p\u003e\n"],["\u003cp\u003eUser profile information, such as name, email, and profile picture, can be accessed after user authorization and token validation, allowing for customized interactions within the Action.\u003c/p\u003e\n"],["\u003cp\u003eActions using account linking for financial information are subject to additional policies and review, requiring compliance with financial services policies before submission.\u003c/p\u003e\n"]]],[],null,["# Account linking with Google Sign-In\n\nGoogle Sign-In for the Assistant provides the simplest and easiest user experience\nto users and developers both for account linking and account creation. Your Action\ncan request access to your user's Google profile during a conversation,\nincluding the user's name, email address, and profile picture.\n\nThe profile information can be used to create a personalized user experience\nin your Action. If you have apps on other platforms and they use Google Sign-In,\nyou can also find and link to an existing user's account, create a new account,\nand establish a direct channel of communication to the user.\n\nTo perform account linking with Google Sign-In, you ask the user to give consent\nto access their Google profile. You then use the information in their profile, for\nexample their email address, to identify the user in your system.\n\nImplement Google Sign-In account linking\n----------------------------------------\n\nFollow the steps in the following sections to add Google Sign-In account linking to your\nAction.\n| **Note:** If you're implementing account linking to handle financial information, note that additional policies may apply to your Action. It can take us up to six weeks to review an Action with account linking for financial information, so factor that time in when planning your release schedule. To ease the review process, make sure you comply with the [financial services policies](/assistant/console/policies/general-policies#financial_services) before submitting your Action for review.\n\n### Configure the project\n\nTo configure your project to use Google Sign-In account linking, follow these steps:\n\n1. Open the Actions Console and select a project.\n2. Click the **Develop** tab and choose **Account linking**.\n3. Enable the switch next to **Account linking**.\n4. In the **Account creation** section, select **Yes**.\n5. In **Linking type** , select **Google Sign In**.\n\n6. Open **Client Information** and take note of the value of **Client ID issued by Google to your Actions**.\n\n7. Click **Save**.\n\n### Design the voice user interface for the authentication flow\n\n| **Warning:** Don't give users a required account linking prompt at the start of the conversation with your Action. Instead, give unauthenticated users a guest flow to show how your Action works, and then only ask for account linking if it's necessary to proceed. If users are leaving the Action consistently because of account linking issues, Google will not actively promote the Action, which may decrease the Action's user traffic.\n|\n|\n| **Note:** You must use [Actions Builder](/assistant/conversational/build#actions_builder) to build an Action that implements account linking.\n\n#### Check if the user is verified and start the account linking flow\n\n1. Open your Actions Builder project in the [Actions Console](https://console.actions.google.com).\n2. Create a new scene to start account linking in your Action:\n 1. Click **Scenes**.\n 2. Click the **add** (+) icon to add a new scene.\n3. In the newly created scene, click the add *add* icon for **Conditions**.\n4. Add a condition that checks if the user associated with the conversation is a a verified user. If the check fails, your Action can't perform account linking during the conversation, and should fall back to providing access to functionality that doesn't require account linking.\n 1. In the `Enter new expression` field under **Condition** , enter the following logic: `user.verificationStatus != \"VERIFIED\"`\n 2. Under **Transition**, select a scene that doesn't require account linking or a scene that is the entry point to guest-only functionality.\n\n1. Click the add *add* icon for **Conditions**.\n2. Add a condition to trigger an account linking flow if the user doesn't have an associated identity.\n 1. In the `Enter new expression` field under **Condition** , enter the following logic:: `user.verificationStatus == \"VERIFIED\"`\n 2. Under **Transition** , select the **Account Linking** system scene.\n 3. Click **Save**.\n\nAfter saving, a new account linking system scene called `\u003cSceneName\u003e_AccountLinking`\nis added to your project.\n\n#### Customize the account linking scene\n\n1. Under **Scenes**, select the account linking system scene.\n2. Click **Send prompt** and add a short sentence to describe to the user why the Action needs to access their identity (for example \"To save your preferences\").\n3. Click **Save**.\n\n1. Under **Conditions** , click **If user successfully completes account linking**.\n2. Configure how the flow should proceed if the user agrees to link their account. For example, call the webhook to process any custom business logic required and transition back to the originating scene.\n3. Click **Save**.\n\n1. Under **Conditions** , click **If user cancels or dismisses account linking**.\n2. Configure how the flow should proceed if the user doesn't agree to link their account. For example, send an acknowledging message and redirect to scenes that provide functionality that doesn't require account linking.\n3. Click **Save**.\n\n1. Under **Conditions** , click **If system or network error occurs**.\n2. Configure how the flow should proceed if the account linking flow can't be completed because of system or network errors. For example, send an acknowledging message and redirect to scenes that provide functionality that doesn't require account linking.\n3. Click **Save**.\n\n### Access profile information in your backend\n\nAfter the user authorizes your action to access their Google profile, you will receive\na Google ID token that contains the user's Google profile information in every subsequent\nrequest to your action.\n\nTo access the user's profile information, you need to first validate and decode the token\nby doing the following:\n\n1. Use a [JWT-decoding library](https://jwt.io/) for your language to decode the token, and use Google's public keys (available in [JWK](https://www.googleapis.com/oauth2/v3/certs) or [PEM](https://www.googleapis.com/oauth2/v1/certs) format) to verify the token's signature.\n2. Verify that the token's issuer (`iss` field in the decoded token) is `https://accounts.google.com` and that the audience (`aud` field in the decoded token) is the value of **Client ID issued by Google to your Actions**, which is assigned to your project in the Actions console.\n\nThe following is an example of a decoded token: \n\n```carbon\n{\n \"sub\": 1234567890, // The unique ID of the user's Google Account\n \"iss\": \"https://accounts.google.com\", // The token's issuer\n \"aud\": \"123-abc.apps.googleusercontent.com\", // Client ID assigned to your Actions project\n \"iat\": 233366400, // Unix timestamp of the token's creation time\n \"exp\": 233370000, // Unix timestamp of the token's expiration time\n \"name\": \"Jan Jansen\",\n \"given_name\": \"Jan\",\n \"family_name\": \"Jansen\",\n \"email\": \"jan@gmail.com\", // If present, the user's email address\n \"locale\": \"en_US\"\n}\n```\n\nIf you use the [Actions on Google Fulfillment library for Node.js](https://github.com/actions-on-google/assistant-conversation-nodejs),\nit takes care of validating and decoding the token for you, and gives you access to\nthe profile content, as shown in the following code snippets. \n\n```gdscript\n...\nconst app = conversation({\n // REPLACE THE PLACEHOLDER WITH THE CLIENT_ID OF YOUR ACTIONS PROJECT\n clientId: CLIENT_ID,\n});\n...\n// Invoked on successful completion of account linking flow, check if we need to\n// create a Firebase user.\napp.handle('linkAccount', async conv =\u003e {\n let payload = conv.headers.authorization;\n if (payload) {\n // Get UID for Firebase auth user using the email of the user\n const email = payload.email;\n if (!conv.user.params.uid && email) {\n try {\n conv.user.params.uid = (await auth.getUserByEmail(email)).uid;\n } catch (e) {\n if (e.code !== 'auth/user-not-found') {\n throw e;\n }\n // If the user is not found, create a new Firebase auth user\n // using the email obtained from Google Assistant\n conv.user.params.uid = (await auth.createUser({email})).uid;\n }\n }\n }\n});\n```\n\n### Handle data access requests\n\nTo handle data access request, just verify that the user asserted by the Google ID\ntoken is already present in your database. The following snippet of code shows\nan example of how to check if orders for a user already exist in a Firestore database: \n\n```perl\n...\napp.handle('Place_Order', async conv =\u003e {\n const order = conv.session.params.order;\n const userDoc = dbs.user.doc(conv.user.params.uid);\n const orderHistory = userDoc.collection(\"orderHistory\");\n if (orderHistory) {\n // Order history exists, so the user already placed an order.\n // Update counter for order type.\n await orderHistory.doc(order).update({ count: admin.firestore.FieldValue.increment(1)});\n } else {\n // First order they place\n await orderHistory.doc(order).set({ option: order, count: 1});\n options.forEach(opt =\u003e {\n if (opt != order) {\n orderHistory.doc(opt).set({ option: opt, count: 0});\n }\n });\n }\n return conv.add(`Your ${order} has been placed. ` +\n 'Thanks for using Boba Bonanza, see you soon!');\n});\n```\n\n\u003cbr /\u003e"]]