Koleksiyonlar ile düzeninizi koruyun
İçeriği tercihlerinize göre kaydedin ve kategorilere ayırın.
Asistan için Google ile Oturum Açma, en basit ve en kolay kullanıcı deneyimini sağlar
kullanıcılara ve geliştiricilere, hem hesap bağlama hem de hesap oluşturma için kullanılabilmektedir. İşleminiz
Bir görüşme sırasında kullanıcınızın Google profiline erişim isteyebilir
(kullanıcının adı, e-posta adresi ve profil resmi dahil)
Profil bilgileri, kişiselleştirilmiş kullanıcı deneyimi oluşturmak için kullanılabilir.
bulunur. Başka platformlarda uygulamalarınız varsa ve bu platformlar Google ile Oturum Açma'yı kullanıyorsa
mevcut bir kullanıcının hesabını bulup bağlayabilir, yeni bir hesap oluşturabilir,
ve kullanıcıyla doğrudan bir iletişim kanalı kurmaktır.
Google ile Oturum Açma özelliğini kullanarak hesap bağlama işlemi gerçekleştirmek için kullanıcıdan izin vermesini istersiniz
Google profiline erişmek istiyor. Daha sonra bu bilgileri kullanarak
Örneğin, e-posta adresi kullanabilirsiniz.
Google ile Oturum Açma hesap bağlama özelliğini uygulayın
Google ile Oturum Açma hesabı bağlantısını hesabınıza eklemek için aşağıdaki bölümlerde yer alan adımları uygulayın:
İşlem.
Projeyi yapılandırma
Projenizi, Google ile Oturum Açma hesabı bağlamayı kullanacak şekilde yapılandırmak için şu adımları izleyin:
İşleminizde hesap bağlamaya başlamak için yeni bir sahne oluşturun:
Sahneler'i tıklayın.
Yeni bir sahne eklemek için add (+) simgesini tıklayın.
Yeni oluşturulan sahnede ekle simgesini add tıklayın.
Koşullar'ın simgesi.
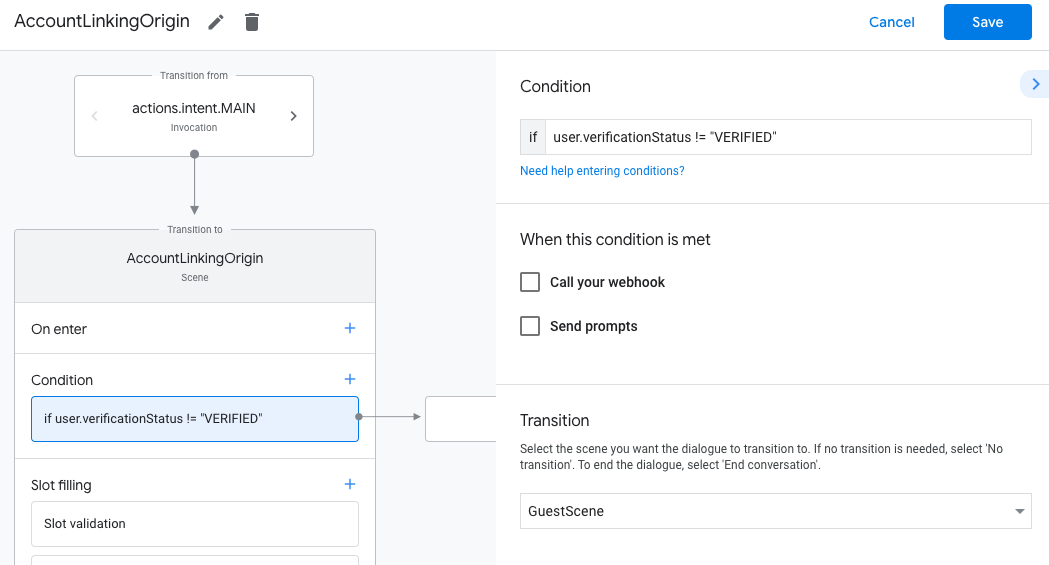
Görüşmeyle ilişkilendirilmiş kullanıcının bir kullanıcı olup olmadığını kontrol eden bir koşul ekleyin.
doğrulanmış bir kullanıcı olabilir. Kontrol başarısız olursa İşleminiz hesap bağlama gerçekleştiremez
konuşabilmelidir ve önemli bilgilere erişim
veya hesap bağlama gerektirmeyen işlevlerden yararlanın.
Koşul altındaki Enter new expression alanına aşağıdaki mantığı girin:
user.verificationStatus != "VERIFIED"
Geçiş bölümünde hesap bağlama veya
yalnızca konuklara yönelik işlevin giriş noktası olan bir sahne oluşturun.
Koşullar için add ekle simgesini tıklayın.
Kullanıcı aşağıdaki işlemleri gerçekleştirmemişse hesap bağlama akışını tetiklemek için bir koşul ekleyin:
ilişkilendirilmiş bir kimliktir.
Koşul altındaki Enter new expression alanına aşağıdaki mantığı girin:
user.verificationStatus == "VERIFIED"
Transition bölümünde Hesap Bağlama sistem sahnesini seçin.
Kaydet'i tıklayın.
Kaydettikten sonra <SceneName>_AccountLinking adlı yeni hesap bağlama sistem sahnesi var
projenize eklenir.
Hesap bağlama sahnesini özelleştirin
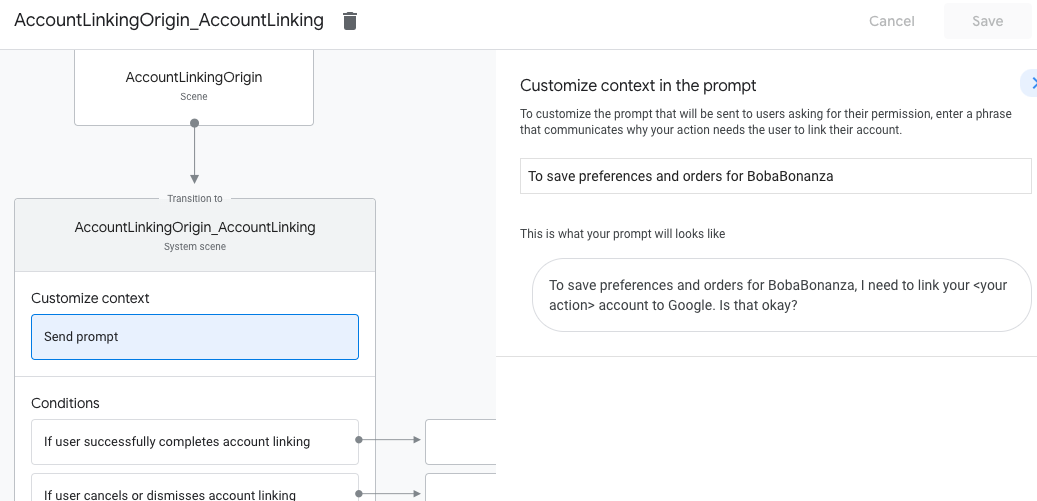
Sahneler bölümünde, hesap bağlama sistem sahnesini seçin.
İstem gönder'i tıklayın ve kullanıcıya açıklamak için kısa bir cümle ekleyin
İşlemin neden kimliğine erişmesi gerektiği (örneğin, "Tercihlerinizi kaydetmek için").
Kaydet'i tıklayın.
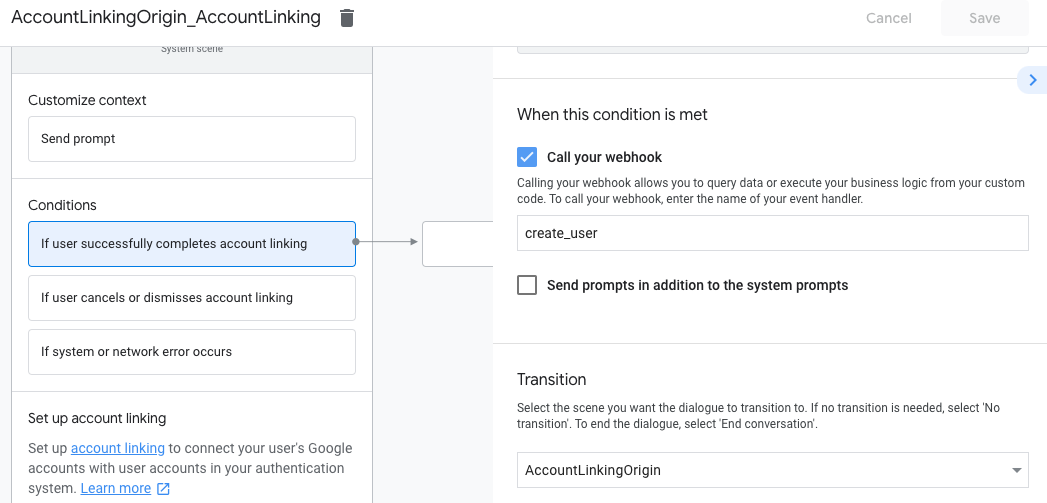
Koşullar bölümünde, Kullanıcı, hesap bağlama işlemini başarıyla tamamlarsa'yı tıklayın.
Kullanıcı, hesabını bağlamayı kabul ederse akışın nasıl devam etmesi gerektiğini yapılandırın.
Örneğin, gerekli herhangi bir özel iş mantığını işlemek için webhook'u çağırın.
ve başlangıçtaki sahneye geri
dönüştürülebilir.
Kaydet'i tıklayın.
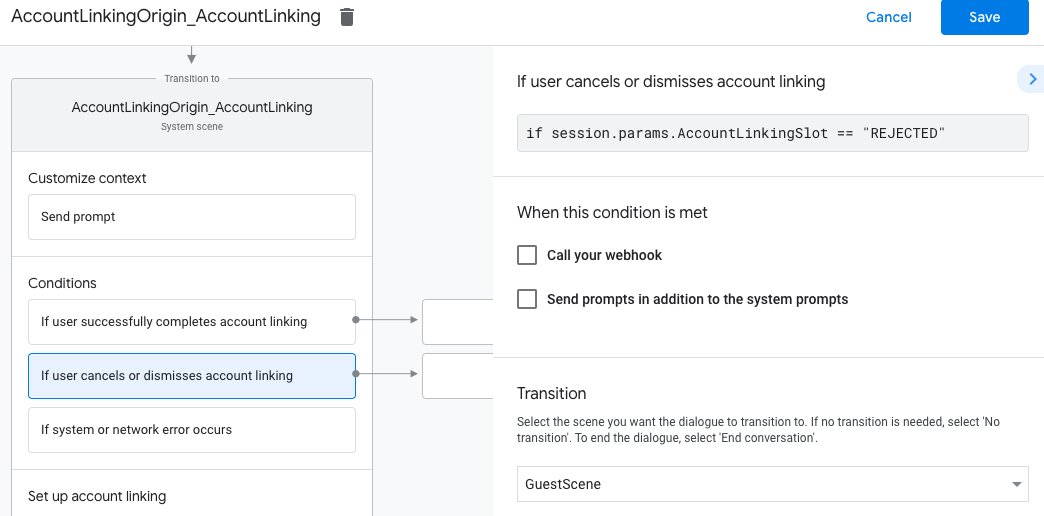
Koşullar bölümünde, Kullanıcı hesap bağlama işlemini iptal eder veya kapatırsa'yı tıklayın.
Kullanıcı hesabını bağlamayı kabul etmezse akışın nasıl devam edeceğini
hesap. Örneğin, bir onay mesajı gönderin ve sahnelere yönlendirin.
Bu reklamlar, hesap bağlama gerektirmeyen işlevler sunar.
Kaydet'i tıklayın.
Koşullar bölümünde, Sistem veya ağ hatası oluşursa'yı tıklayın.
Hesap bağlama akışı yapılamıyorsa akışın nasıl devam edeceğini yapılandırın
tamamlandı.
Örneğin, bir onay mesajı gönderin ve sahnelere yönlendirin.
Bu reklamlar, hesap bağlama gerektirmeyen işlevler sunar.
Kaydet'i tıklayın.
Arka ucunuzdaki profil bilgilerine erişin
Kullanıcı, Google profiline erişmek için işleminizi yetkilendirdikten sonra,
sonraki her adımda kullanıcının Google profil bilgilerini içeren bir Google kimliği jetonu
talebinize ekleyebilirsiniz.
Kullanıcının profil bilgilerine erişmek için önce jetonu doğrulamanız ve kodunu çözmeniz gerekir
şunu yapabilirsiniz:
Kodu çözmek için dilinize ait bir JWT kod çözme kitaplığı kullanın
jeton ve Google'ın genel anahtarlarını kullanın (JWK'da
PEM biçimini) kullanarak jetonun imzasını doğrulayın.
Jetonu verenin (kodu çözülen jetondaki iss alanı) https://accounts.google.com olduğunu doğrulayın
ve kitlenin (kodu çözülmüş jetondaki aud alanı) değeri
Google tarafından Eylemlerinize verilen ve projenize atanan istemci kimliği
seçeneğini belirleyin.
Aşağıda kodu çözülmüş bir jeton örneği verilmiştir:
{"sub":1234567890,// The unique ID of the user's Google Account"iss":"https://accounts.google.com",// The token's issuer"aud":"123-abc.apps.googleusercontent.com",// Client ID assigned to your Actions project"iat":233366400,// Unix timestamp of the token's creation time"exp":233370000,// Unix timestamp of the token's expiration time"name":"Jan Jansen","given_name":"Jan","family_name":"Jansen","email":"jan@gmail.com",// If present, the user's email address"locale":"en_US"}
Node.js için Actions on Google Fulfillment Library'yi kullanıyorsanız
sizin için jetonun doğrulanması ve kodunun çözülmesiyle ilgilenir ve
aşağıdaki kod snippet'lerinde gösterildiği gibi profil içeriği.
Veri erişimi isteğini işlemek için kullanıcının Google kimliği ile onaylandığını doğrulamanız yeterlidir
jeton veritabanınızda zaten mevcut. Aşağıdaki kod snippet'i,
Bir kullanıcıya ait siparişlerin zaten bir Firestore veritabanında olup olmadığını kontrol etme örneği:
...app.handle('Place_Order',asyncconv=>{constorder=conv.session.params.order;constuserDoc=dbs.user.doc(conv.user.params.uid);constorderHistory=userDoc.collection("orderHistory");if(orderHistory){//Orderhistoryexists,sotheuseralreadyplacedanorder.//Updatecounterforordertype.awaitorderHistory.doc(order).update({count:admin.firestore.FieldValue.increment(1)});}else{//FirstordertheyplaceawaitorderHistory.doc(order).set({option:order,count:1});options.forEach(opt=>{if(opt!=order){orderHistory.doc(opt).set({option:opt,count:0});}});}returnconv.add(`Your ${order} has been placed. `+'Thanks for using Boba Bonanza, see you soon!');});
[[["Anlaması kolay","easyToUnderstand","thumb-up"],["Sorunumu çözdü","solvedMyProblem","thumb-up"],["Diğer","otherUp","thumb-up"]],[["İhtiyacım olan bilgiler yok","missingTheInformationINeed","thumb-down"],["Çok karmaşık / çok fazla adım var","tooComplicatedTooManySteps","thumb-down"],["Güncel değil","outOfDate","thumb-down"],["Çeviri sorunu","translationIssue","thumb-down"],["Örnek veya kod sorunu","samplesCodeIssue","thumb-down"],["Diğer","otherDown","thumb-down"]],["Son güncelleme tarihi: 2025-07-25 UTC."],[[["\u003cp\u003eGoogle Sign-In for Assistant simplifies account linking and creation for both users and developers, enabling access to user profiles for personalized experiences.\u003c/p\u003e\n"],["\u003cp\u003eDevelopers can leverage Google Sign-In to link or create user accounts across platforms, facilitating seamless user journeys and communication.\u003c/p\u003e\n"],["\u003cp\u003eImplementing Google Sign-In involves configuring the project in Actions Console, designing the authentication flow in Actions Builder, and handling data access requests securely in your backend.\u003c/p\u003e\n"],["\u003cp\u003eUser profile information, such as name, email, and profile picture, can be accessed after user authorization and token validation, allowing for customized interactions within the Action.\u003c/p\u003e\n"],["\u003cp\u003eActions using account linking for financial information are subject to additional policies and review, requiring compliance with financial services policies before submission.\u003c/p\u003e\n"]]],[],null,["# Account linking with Google Sign-In\n\nGoogle Sign-In for the Assistant provides the simplest and easiest user experience\nto users and developers both for account linking and account creation. Your Action\ncan request access to your user's Google profile during a conversation,\nincluding the user's name, email address, and profile picture.\n\nThe profile information can be used to create a personalized user experience\nin your Action. If you have apps on other platforms and they use Google Sign-In,\nyou can also find and link to an existing user's account, create a new account,\nand establish a direct channel of communication to the user.\n\nTo perform account linking with Google Sign-In, you ask the user to give consent\nto access their Google profile. You then use the information in their profile, for\nexample their email address, to identify the user in your system.\n\nImplement Google Sign-In account linking\n----------------------------------------\n\nFollow the steps in the following sections to add Google Sign-In account linking to your\nAction.\n| **Note:** If you're implementing account linking to handle financial information, note that additional policies may apply to your Action. It can take us up to six weeks to review an Action with account linking for financial information, so factor that time in when planning your release schedule. To ease the review process, make sure you comply with the [financial services policies](/assistant/console/policies/general-policies#financial_services) before submitting your Action for review.\n\n### Configure the project\n\nTo configure your project to use Google Sign-In account linking, follow these steps:\n\n1. Open the Actions Console and select a project.\n2. Click the **Develop** tab and choose **Account linking**.\n3. Enable the switch next to **Account linking**.\n4. In the **Account creation** section, select **Yes**.\n5. In **Linking type** , select **Google Sign In**.\n\n6. Open **Client Information** and take note of the value of **Client ID issued by Google to your Actions**.\n\n7. Click **Save**.\n\n### Design the voice user interface for the authentication flow\n\n| **Warning:** Don't give users a required account linking prompt at the start of the conversation with your Action. Instead, give unauthenticated users a guest flow to show how your Action works, and then only ask for account linking if it's necessary to proceed. If users are leaving the Action consistently because of account linking issues, Google will not actively promote the Action, which may decrease the Action's user traffic.\n|\n|\n| **Note:** You must use [Actions Builder](/assistant/conversational/build#actions_builder) to build an Action that implements account linking.\n\n#### Check if the user is verified and start the account linking flow\n\n1. Open your Actions Builder project in the [Actions Console](https://console.actions.google.com).\n2. Create a new scene to start account linking in your Action:\n 1. Click **Scenes**.\n 2. Click the **add** (+) icon to add a new scene.\n3. In the newly created scene, click the add *add* icon for **Conditions**.\n4. Add a condition that checks if the user associated with the conversation is a a verified user. If the check fails, your Action can't perform account linking during the conversation, and should fall back to providing access to functionality that doesn't require account linking.\n 1. In the `Enter new expression` field under **Condition** , enter the following logic: `user.verificationStatus != \"VERIFIED\"`\n 2. Under **Transition**, select a scene that doesn't require account linking or a scene that is the entry point to guest-only functionality.\n\n1. Click the add *add* icon for **Conditions**.\n2. Add a condition to trigger an account linking flow if the user doesn't have an associated identity.\n 1. In the `Enter new expression` field under **Condition** , enter the following logic:: `user.verificationStatus == \"VERIFIED\"`\n 2. Under **Transition** , select the **Account Linking** system scene.\n 3. Click **Save**.\n\nAfter saving, a new account linking system scene called `\u003cSceneName\u003e_AccountLinking`\nis added to your project.\n\n#### Customize the account linking scene\n\n1. Under **Scenes**, select the account linking system scene.\n2. Click **Send prompt** and add a short sentence to describe to the user why the Action needs to access their identity (for example \"To save your preferences\").\n3. Click **Save**.\n\n1. Under **Conditions** , click **If user successfully completes account linking**.\n2. Configure how the flow should proceed if the user agrees to link their account. For example, call the webhook to process any custom business logic required and transition back to the originating scene.\n3. Click **Save**.\n\n1. Under **Conditions** , click **If user cancels or dismisses account linking**.\n2. Configure how the flow should proceed if the user doesn't agree to link their account. For example, send an acknowledging message and redirect to scenes that provide functionality that doesn't require account linking.\n3. Click **Save**.\n\n1. Under **Conditions** , click **If system or network error occurs**.\n2. Configure how the flow should proceed if the account linking flow can't be completed because of system or network errors. For example, send an acknowledging message and redirect to scenes that provide functionality that doesn't require account linking.\n3. Click **Save**.\n\n### Access profile information in your backend\n\nAfter the user authorizes your action to access their Google profile, you will receive\na Google ID token that contains the user's Google profile information in every subsequent\nrequest to your action.\n\nTo access the user's profile information, you need to first validate and decode the token\nby doing the following:\n\n1. Use a [JWT-decoding library](https://jwt.io/) for your language to decode the token, and use Google's public keys (available in [JWK](https://www.googleapis.com/oauth2/v3/certs) or [PEM](https://www.googleapis.com/oauth2/v1/certs) format) to verify the token's signature.\n2. Verify that the token's issuer (`iss` field in the decoded token) is `https://accounts.google.com` and that the audience (`aud` field in the decoded token) is the value of **Client ID issued by Google to your Actions**, which is assigned to your project in the Actions console.\n\nThe following is an example of a decoded token: \n\n```carbon\n{\n \"sub\": 1234567890, // The unique ID of the user's Google Account\n \"iss\": \"https://accounts.google.com\", // The token's issuer\n \"aud\": \"123-abc.apps.googleusercontent.com\", // Client ID assigned to your Actions project\n \"iat\": 233366400, // Unix timestamp of the token's creation time\n \"exp\": 233370000, // Unix timestamp of the token's expiration time\n \"name\": \"Jan Jansen\",\n \"given_name\": \"Jan\",\n \"family_name\": \"Jansen\",\n \"email\": \"jan@gmail.com\", // If present, the user's email address\n \"locale\": \"en_US\"\n}\n```\n\nIf you use the [Actions on Google Fulfillment library for Node.js](https://github.com/actions-on-google/assistant-conversation-nodejs),\nit takes care of validating and decoding the token for you, and gives you access to\nthe profile content, as shown in the following code snippets. \n\n```gdscript\n...\nconst app = conversation({\n // REPLACE THE PLACEHOLDER WITH THE CLIENT_ID OF YOUR ACTIONS PROJECT\n clientId: CLIENT_ID,\n});\n...\n// Invoked on successful completion of account linking flow, check if we need to\n// create a Firebase user.\napp.handle('linkAccount', async conv =\u003e {\n let payload = conv.headers.authorization;\n if (payload) {\n // Get UID for Firebase auth user using the email of the user\n const email = payload.email;\n if (!conv.user.params.uid && email) {\n try {\n conv.user.params.uid = (await auth.getUserByEmail(email)).uid;\n } catch (e) {\n if (e.code !== 'auth/user-not-found') {\n throw e;\n }\n // If the user is not found, create a new Firebase auth user\n // using the email obtained from Google Assistant\n conv.user.params.uid = (await auth.createUser({email})).uid;\n }\n }\n }\n});\n```\n\n### Handle data access requests\n\nTo handle data access request, just verify that the user asserted by the Google ID\ntoken is already present in your database. The following snippet of code shows\nan example of how to check if orders for a user already exist in a Firestore database: \n\n```perl\n...\napp.handle('Place_Order', async conv =\u003e {\n const order = conv.session.params.order;\n const userDoc = dbs.user.doc(conv.user.params.uid);\n const orderHistory = userDoc.collection(\"orderHistory\");\n if (orderHistory) {\n // Order history exists, so the user already placed an order.\n // Update counter for order type.\n await orderHistory.doc(order).update({ count: admin.firestore.FieldValue.increment(1)});\n } else {\n // First order they place\n await orderHistory.doc(order).set({ option: order, count: 1});\n options.forEach(opt =\u003e {\n if (opt != order) {\n orderHistory.doc(opt).set({ option: opt, count: 0});\n }\n });\n }\n return conv.add(`Your ${order} has been placed. ` +\n 'Thanks for using Boba Bonanza, see you soon!');\n});\n```\n\n\u003cbr /\u003e"]]