Mantieni tutto organizzato con le raccolte
Salva e classifica i contenuti in base alle tue preferenze.
Accedi con Google per l'assistente offre l'esperienza utente più semplice e intuitiva
a utenti e sviluppatori sia per il collegamento
che per la creazione dell'account. La tua azione
può richiedere l'accesso al profilo Google dell'utente durante una conversazione,
inclusi il nome, l'indirizzo email e l'immagine del profilo dell'utente.
Le informazioni del profilo possono essere utilizzate per creare un'esperienza utente personalizzata
nell'Azione. Se hai app su altre piattaforme che utilizzano Accedi con Google,
Puoi anche trovare un account utente esistente e collegarlo,
creare un nuovo account
e stabilire un canale di comunicazione diretto con l'utente.
Per eseguire il collegamento dell'account con Accedi con Google, chiedi all'utente di dare il consenso
per accedere al proprio profilo Google. Puoi quindi utilizzare le informazioni del loro profilo per
ad esempio il loro indirizzo email, per identificare l'utente nel sistema.
Implementare il collegamento all'account Accedi con Google
Segui i passaggi nelle sezioni seguenti per aggiungere un account Accedi con Google al tuo
Azione.
Configura il progetto
Per configurare il progetto in modo da utilizzare il collegamento dell'account Accedi con Google, segui questi passaggi:
Apri la console di Actions e seleziona un progetto.
Fai clic sulla scheda Sviluppo e scegli Collegamento dell'account.
Attiva l'opzione Collegamento dell'account.
Nella sezione Creazione dell'account, seleziona Sì.
In Tipo di collegamento, seleziona Accedi con Google.
Apri Informazioni sul cliente e prendi nota del valore dell'ID cliente emesso da Google per le tue azioni.
Fai clic su Salva.
Progetta l'interfaccia utente vocale per il flusso di autenticazione
di Gemini Advanced.
Controllare se l'utente è verificato e avviare il flusso di collegamento dell'account
Crea una nuova scena per avviare il collegamento dell'account nell'azione:
Fai clic su Scene.
Fai clic sull'icona aggiungi (+) per aggiungere una nuova scena.
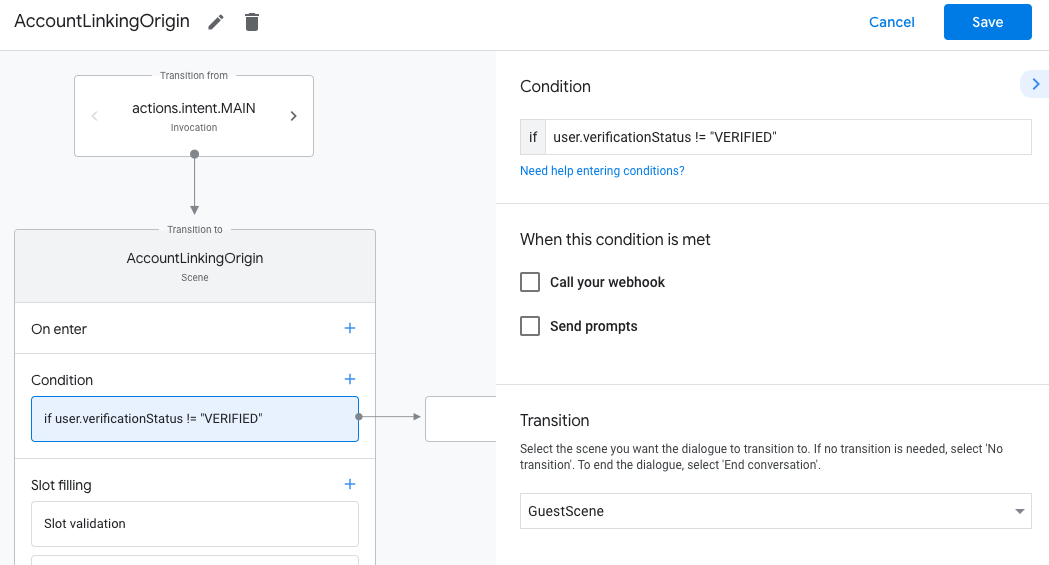
Nella scena appena creata, fai clic sull'icona Aggiungi add
relativa a Condizioni.
Aggiungi una condizione che verifichi se l'utente associato alla conversazione è un
un utente verificato. Se il controllo non va a buon fine, l'Azione non può eseguire il collegamento dell'account
durante la conversazione e dovrebbero ricorrere
a fornire l'accesso
che non richiede il collegamento dell'account.
Nel campo Enter new expression in Condizione, inserisci la seguente logica:
user.verificationStatus != "VERIFIED"
In Transizione, seleziona una scena che non richieda il collegamento dell'account o
una scena che funge da punto di accesso alla funzionalità riservata agli ospiti.
Fai clic sull'icona Aggiungi add per Condizioni.
Aggiungi una condizione per attivare un flusso di collegamento dell'account se l'utente non ha
un'identità associata.
Nel campo Enter new expression in Condizione, inserisci la seguente logica:
user.verificationStatus == "VERIFIED"
In Transizione, seleziona la scena di sistema Collegamento dell'account.
Fai clic su Salva.
Dopo il salvataggio, una nuova scena di sistema per il collegamento dell'account chiamata <SceneName>_AccountLinking
al progetto.
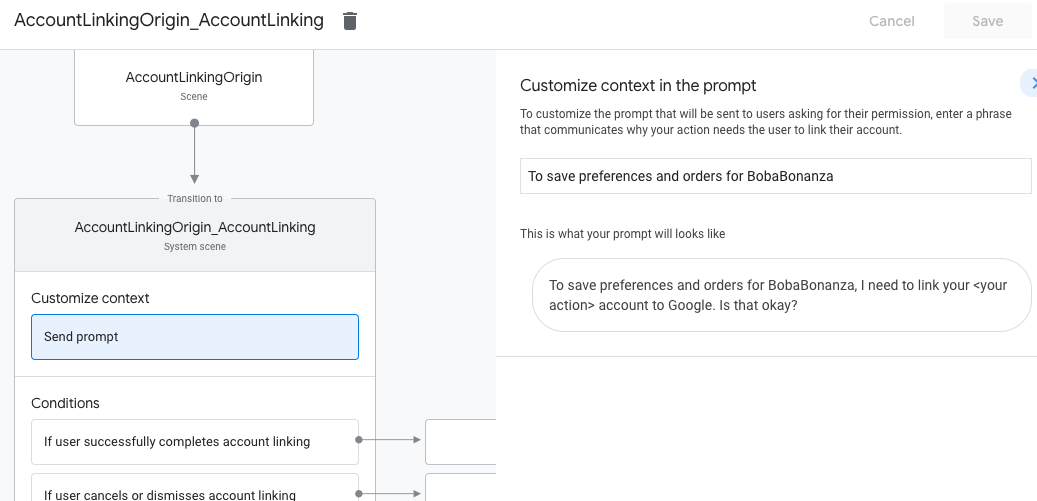
Personalizza la scena del collegamento dell'account
In Scene, seleziona la scena del sistema di collegamento dell'account.
Fai clic su Invia prompt e aggiungi una breve frase per descrivere all'utente.
perché l'Azione deve accedere alla propria identità (ad esempio "Per salvare le preferenze").
Fai clic su Salva.
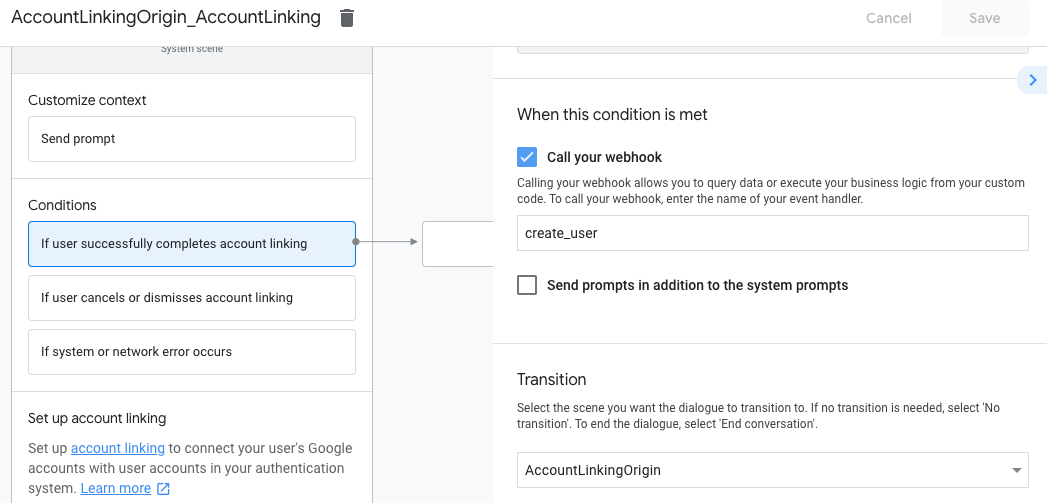
In Condizioni, fai clic su Se l'utente completa correttamente il collegamento dell'account.
Configura come deve procedere il flusso se l'utente accetta di collegare il proprio account.
Ad esempio, chiama il webhook per elaborare l'eventuale logica di business personalizzata richiesta
per poi tornare alla scena di origine.
Fai clic su Salva.
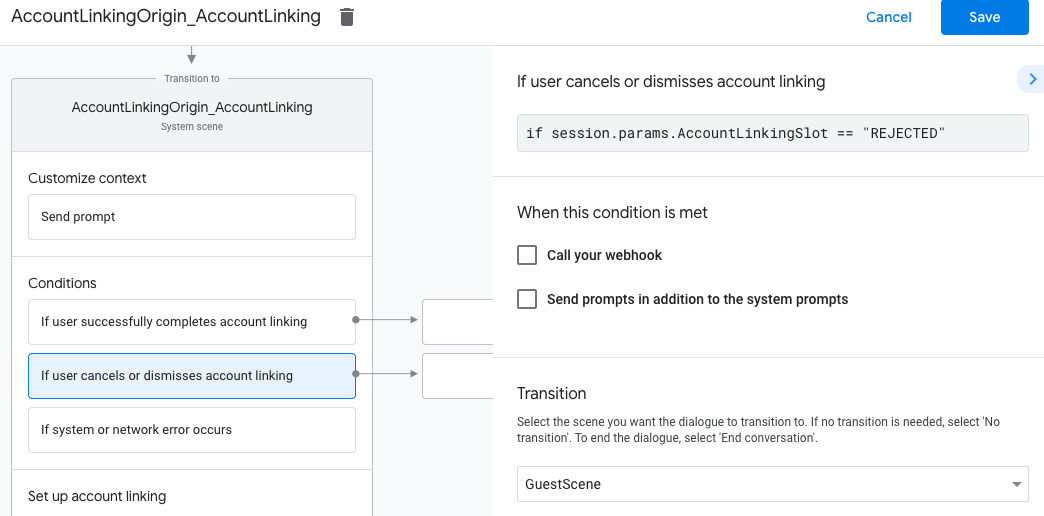
In Condizioni, fai clic su Se l'utente annulla o ignora il collegamento dell'account.
Configura come deve procedere il flusso se l'utente non accetta di collegare il proprio
. Ad esempio, invia un messaggio di conferma e reindirizza alle scene
che offrono funzionalità che non richiedono il collegamento dell'account.
Fai clic su Salva.
In Condizioni, fai clic su Se si verifica un errore di sistema o di rete.
Configura l'andamento del flusso se non è possibile eseguire il flusso di collegamento dell'account
completato a causa di errori di sistema o di rete.
Ad esempio, invia un messaggio di conferma e reindirizza alle scene
che offrono funzionalità che non richiedono il collegamento dell'account.
Fai clic su Salva.
Accedi alle informazioni del profilo nel tuo backend
Dopo che l'utente avrà autorizzato la tua azione ad accedere al suo profilo Google, riceverai
un token ID Google che contenga le informazioni del profilo Google dell'utente in ogni
richiesta all'azione.
Per accedere alle informazioni del profilo dell'utente, devi prima convalidare e decodificare il token
nel seguente modo:
Usa una libreria di decodifica JWT per la tua lingua per decodificare il
e utilizzare le chiavi pubbliche di Google (disponibili in JWK
o PEM) per verificare la firma del token.
Verifica che l'emittente del token (campo iss nel token decodificato) sia https://accounts.google.com
e che il segmento di pubblico (campo aud nel token decodificato) sia il valore di
ID client emesso da Google per le tue azioni, che è assegnato al tuo progetto
nella console Actions.
Di seguito è riportato un esempio di token decodificato:
{"sub":1234567890,// The unique ID of the user's Google Account"iss":"https://accounts.google.com",// The token's issuer"aud":"123-abc.apps.googleusercontent.com",// Client ID assigned to your Actions project"iat":233366400,// Unix timestamp of the token's creation time"exp":233370000,// Unix timestamp of the token's expiration time"name":"Jan Jansen","given_name":"Jan","family_name":"Jansen","email":"jan@gmail.com",// If present, the user's email address"locale":"en_US"}
Se utilizzi la libreria Actions on Google Fulfillment per Node.js,
si occupa di convalidare e decodificare il token e di accedere a
i contenuti del profilo, come mostrato negli snippet di codice che seguono.
Per gestire la richiesta di accesso ai dati, verifica che l'utente abbia dichiarato l'ID Google
è già presente nel database. Il seguente snippet di codice mostra
Ecco un esempio di come verificare se esistono già ordini per un utente in un database Firestore:
...app.handle('Place_Order',asyncconv=>{constorder=conv.session.params.order;constuserDoc=dbs.user.doc(conv.user.params.uid);constorderHistory=userDoc.collection("orderHistory");if(orderHistory){//Orderhistoryexists,sotheuseralreadyplacedanorder.//Updatecounterforordertype.awaitorderHistory.doc(order).update({count:admin.firestore.FieldValue.increment(1)});}else{//FirstordertheyplaceawaitorderHistory.doc(order).set({option:order,count:1});options.forEach(opt=>{if(opt!=order){orderHistory.doc(opt).set({option:opt,count:0});}});}returnconv.add(`Your ${order} has been placed. `+'Thanks for using Boba Bonanza, see you soon!');});
[[["Facile da capire","easyToUnderstand","thumb-up"],["Il problema è stato risolto","solvedMyProblem","thumb-up"],["Altra","otherUp","thumb-up"]],[["Mancano le informazioni di cui ho bisogno","missingTheInformationINeed","thumb-down"],["Troppo complicato/troppi passaggi","tooComplicatedTooManySteps","thumb-down"],["Obsoleti","outOfDate","thumb-down"],["Problema di traduzione","translationIssue","thumb-down"],["Problema relativo a esempi/codice","samplesCodeIssue","thumb-down"],["Altra","otherDown","thumb-down"]],["Ultimo aggiornamento 2025-07-25 UTC."],[[["\u003cp\u003eGoogle Sign-In for Assistant simplifies account linking and creation for both users and developers, enabling access to user profiles for personalized experiences.\u003c/p\u003e\n"],["\u003cp\u003eDevelopers can leverage Google Sign-In to link or create user accounts across platforms, facilitating seamless user journeys and communication.\u003c/p\u003e\n"],["\u003cp\u003eImplementing Google Sign-In involves configuring the project in Actions Console, designing the authentication flow in Actions Builder, and handling data access requests securely in your backend.\u003c/p\u003e\n"],["\u003cp\u003eUser profile information, such as name, email, and profile picture, can be accessed after user authorization and token validation, allowing for customized interactions within the Action.\u003c/p\u003e\n"],["\u003cp\u003eActions using account linking for financial information are subject to additional policies and review, requiring compliance with financial services policies before submission.\u003c/p\u003e\n"]]],[],null,["# Account linking with Google Sign-In\n\nGoogle Sign-In for the Assistant provides the simplest and easiest user experience\nto users and developers both for account linking and account creation. Your Action\ncan request access to your user's Google profile during a conversation,\nincluding the user's name, email address, and profile picture.\n\nThe profile information can be used to create a personalized user experience\nin your Action. If you have apps on other platforms and they use Google Sign-In,\nyou can also find and link to an existing user's account, create a new account,\nand establish a direct channel of communication to the user.\n\nTo perform account linking with Google Sign-In, you ask the user to give consent\nto access their Google profile. You then use the information in their profile, for\nexample their email address, to identify the user in your system.\n\nImplement Google Sign-In account linking\n----------------------------------------\n\nFollow the steps in the following sections to add Google Sign-In account linking to your\nAction.\n| **Note:** If you're implementing account linking to handle financial information, note that additional policies may apply to your Action. It can take us up to six weeks to review an Action with account linking for financial information, so factor that time in when planning your release schedule. To ease the review process, make sure you comply with the [financial services policies](/assistant/console/policies/general-policies#financial_services) before submitting your Action for review.\n\n### Configure the project\n\nTo configure your project to use Google Sign-In account linking, follow these steps:\n\n1. Open the Actions Console and select a project.\n2. Click the **Develop** tab and choose **Account linking**.\n3. Enable the switch next to **Account linking**.\n4. In the **Account creation** section, select **Yes**.\n5. In **Linking type** , select **Google Sign In**.\n\n6. Open **Client Information** and take note of the value of **Client ID issued by Google to your Actions**.\n\n7. Click **Save**.\n\n### Design the voice user interface for the authentication flow\n\n| **Warning:** Don't give users a required account linking prompt at the start of the conversation with your Action. Instead, give unauthenticated users a guest flow to show how your Action works, and then only ask for account linking if it's necessary to proceed. If users are leaving the Action consistently because of account linking issues, Google will not actively promote the Action, which may decrease the Action's user traffic.\n|\n|\n| **Note:** You must use [Actions Builder](/assistant/conversational/build#actions_builder) to build an Action that implements account linking.\n\n#### Check if the user is verified and start the account linking flow\n\n1. Open your Actions Builder project in the [Actions Console](https://console.actions.google.com).\n2. Create a new scene to start account linking in your Action:\n 1. Click **Scenes**.\n 2. Click the **add** (+) icon to add a new scene.\n3. In the newly created scene, click the add *add* icon for **Conditions**.\n4. Add a condition that checks if the user associated with the conversation is a a verified user. If the check fails, your Action can't perform account linking during the conversation, and should fall back to providing access to functionality that doesn't require account linking.\n 1. In the `Enter new expression` field under **Condition** , enter the following logic: `user.verificationStatus != \"VERIFIED\"`\n 2. Under **Transition**, select a scene that doesn't require account linking or a scene that is the entry point to guest-only functionality.\n\n1. Click the add *add* icon for **Conditions**.\n2. Add a condition to trigger an account linking flow if the user doesn't have an associated identity.\n 1. In the `Enter new expression` field under **Condition** , enter the following logic:: `user.verificationStatus == \"VERIFIED\"`\n 2. Under **Transition** , select the **Account Linking** system scene.\n 3. Click **Save**.\n\nAfter saving, a new account linking system scene called `\u003cSceneName\u003e_AccountLinking`\nis added to your project.\n\n#### Customize the account linking scene\n\n1. Under **Scenes**, select the account linking system scene.\n2. Click **Send prompt** and add a short sentence to describe to the user why the Action needs to access their identity (for example \"To save your preferences\").\n3. Click **Save**.\n\n1. Under **Conditions** , click **If user successfully completes account linking**.\n2. Configure how the flow should proceed if the user agrees to link their account. For example, call the webhook to process any custom business logic required and transition back to the originating scene.\n3. Click **Save**.\n\n1. Under **Conditions** , click **If user cancels or dismisses account linking**.\n2. Configure how the flow should proceed if the user doesn't agree to link their account. For example, send an acknowledging message and redirect to scenes that provide functionality that doesn't require account linking.\n3. Click **Save**.\n\n1. Under **Conditions** , click **If system or network error occurs**.\n2. Configure how the flow should proceed if the account linking flow can't be completed because of system or network errors. For example, send an acknowledging message and redirect to scenes that provide functionality that doesn't require account linking.\n3. Click **Save**.\n\n### Access profile information in your backend\n\nAfter the user authorizes your action to access their Google profile, you will receive\na Google ID token that contains the user's Google profile information in every subsequent\nrequest to your action.\n\nTo access the user's profile information, you need to first validate and decode the token\nby doing the following:\n\n1. Use a [JWT-decoding library](https://jwt.io/) for your language to decode the token, and use Google's public keys (available in [JWK](https://www.googleapis.com/oauth2/v3/certs) or [PEM](https://www.googleapis.com/oauth2/v1/certs) format) to verify the token's signature.\n2. Verify that the token's issuer (`iss` field in the decoded token) is `https://accounts.google.com` and that the audience (`aud` field in the decoded token) is the value of **Client ID issued by Google to your Actions**, which is assigned to your project in the Actions console.\n\nThe following is an example of a decoded token: \n\n```carbon\n{\n \"sub\": 1234567890, // The unique ID of the user's Google Account\n \"iss\": \"https://accounts.google.com\", // The token's issuer\n \"aud\": \"123-abc.apps.googleusercontent.com\", // Client ID assigned to your Actions project\n \"iat\": 233366400, // Unix timestamp of the token's creation time\n \"exp\": 233370000, // Unix timestamp of the token's expiration time\n \"name\": \"Jan Jansen\",\n \"given_name\": \"Jan\",\n \"family_name\": \"Jansen\",\n \"email\": \"jan@gmail.com\", // If present, the user's email address\n \"locale\": \"en_US\"\n}\n```\n\nIf you use the [Actions on Google Fulfillment library for Node.js](https://github.com/actions-on-google/assistant-conversation-nodejs),\nit takes care of validating and decoding the token for you, and gives you access to\nthe profile content, as shown in the following code snippets. \n\n```gdscript\n...\nconst app = conversation({\n // REPLACE THE PLACEHOLDER WITH THE CLIENT_ID OF YOUR ACTIONS PROJECT\n clientId: CLIENT_ID,\n});\n...\n// Invoked on successful completion of account linking flow, check if we need to\n// create a Firebase user.\napp.handle('linkAccount', async conv =\u003e {\n let payload = conv.headers.authorization;\n if (payload) {\n // Get UID for Firebase auth user using the email of the user\n const email = payload.email;\n if (!conv.user.params.uid && email) {\n try {\n conv.user.params.uid = (await auth.getUserByEmail(email)).uid;\n } catch (e) {\n if (e.code !== 'auth/user-not-found') {\n throw e;\n }\n // If the user is not found, create a new Firebase auth user\n // using the email obtained from Google Assistant\n conv.user.params.uid = (await auth.createUser({email})).uid;\n }\n }\n }\n});\n```\n\n### Handle data access requests\n\nTo handle data access request, just verify that the user asserted by the Google ID\ntoken is already present in your database. The following snippet of code shows\nan example of how to check if orders for a user already exist in a Firestore database: \n\n```perl\n...\napp.handle('Place_Order', async conv =\u003e {\n const order = conv.session.params.order;\n const userDoc = dbs.user.doc(conv.user.params.uid);\n const orderHistory = userDoc.collection(\"orderHistory\");\n if (orderHistory) {\n // Order history exists, so the user already placed an order.\n // Update counter for order type.\n await orderHistory.doc(order).update({ count: admin.firestore.FieldValue.increment(1)});\n } else {\n // First order they place\n await orderHistory.doc(order).set({ option: order, count: 1});\n options.forEach(opt =\u003e {\n if (opt != order) {\n orderHistory.doc(opt).set({ option: opt, count: 0});\n }\n });\n }\n return conv.add(`Your ${order} has been placed. ` +\n 'Thanks for using Boba Bonanza, see you soon!');\n});\n```\n\n\u003cbr /\u003e"]]