Tetap teratur dengan koleksi
Simpan dan kategorikan konten berdasarkan preferensi Anda.
Login dengan Google untuk Asisten memberikan pengalaman pengguna yang paling sederhana dan mudah
bagi pengguna dan developer, baik untuk penautan akun maupun pembuatan akun. Tindakan Anda
dapat meminta akses ke profil Google pengguna selama percakapan,
termasuk nama, alamat email, dan foto profil pengguna.
Informasi profil dapat digunakan untuk membuat pengalaman pengguna yang dipersonalisasi
dalam Action Anda. Jika Anda memiliki aplikasi di platform lain dan menggunakan Login dengan Google,
Anda juga dapat menemukan dan menautkan ke
akun pengguna yang ada, membuat akun baru,
dan membuat saluran komunikasi
langsung dengan pengguna.
Untuk melakukan penautan akun dengan Login dengan Google, Anda meminta pengguna untuk memberikan izin
untuk mengakses profil Google mereka. Kemudian Anda menggunakan informasi
di profil mereka, untuk
misalnya alamat email mereka, untuk mengidentifikasi
pengguna di sistem Anda.
Menerapkan penautan akun Login dengan Google
Ikuti langkah-langkah di bagian berikut untuk menambahkan penautan akun Login dengan Google ke
{i>Action<i}.
Mengonfigurasi project
Untuk mengonfigurasi project Anda agar dapat menggunakan penautan akun Login dengan Google, ikuti langkah-langkah berikut:
Buka Actions Console dan pilih project.
Klik tab Develop dan pilih Account linking.
Aktifkan tombol di samping Penautan akun.
Di bagian Pembuatan akun, pilih Ya.
Di Linking type, pilih Login dengan Google.
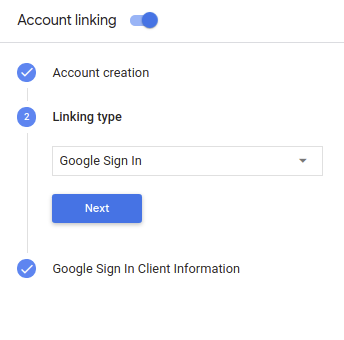
Buka Informasi Klien, lalu catat nilai ID Klien yang diterbitkan oleh Google untuk Action Anda.
Klik Simpan.
Mendesain antarmuka pengguna suara untuk alur otentikasi
Periksa apakah pengguna telah diverifikasi dan mulai alur penautan akun
Buat scene baru untuk memulai penautan akun di Action Anda:
Klik Adegan.
Klik ikon add (+) untuk menambahkan adegan baru.
Pada scene yang baru dibuat, klik tambahkan add
ikon untuk Kondisi.
Tambahkan kondisi yang memeriksa apakah pengguna yang terkait dengan percakapan adalah
pengguna terverifikasi. Jika pemeriksaan gagal, Action Anda tidak dapat melakukan penautan akun
selama percakapan, dan harus kembali
memberikan akses ke
fungsionalitas yang tidak memerlukan penautan akun.
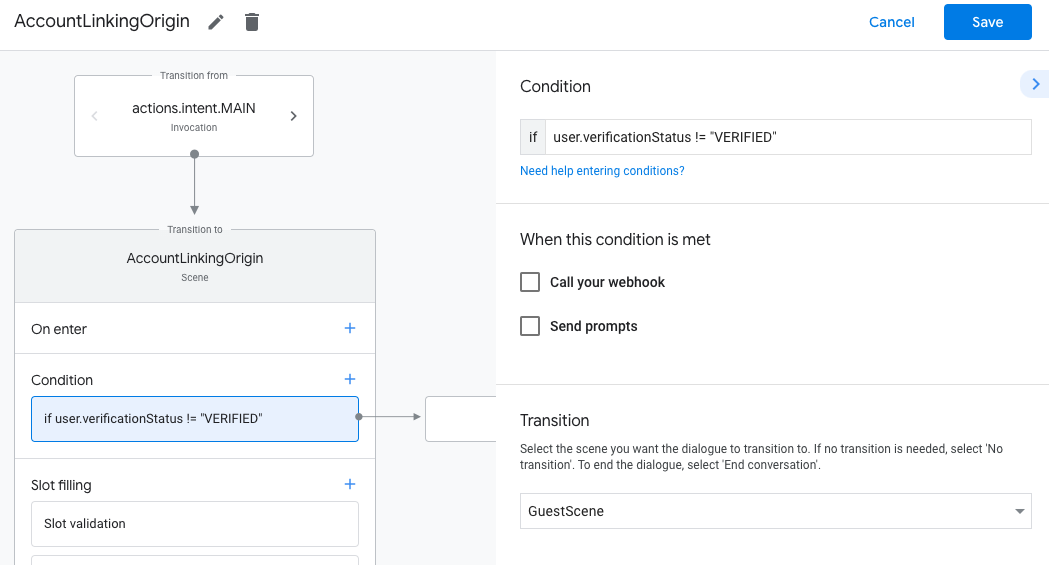
Di kolom Enter new expression di bagian Condition, masukkan logika berikut:
user.verificationStatus != "VERIFIED"
Di bagian Transisi, pilih adegan yang tidak memerlukan penautan akun atau
adegan yang merupakan titik masuk
ke fungsionalitas khusus tamu.
Klik ikon tambahkan add untuk Kondisi.
Tambahkan kondisi untuk memicu alur penautan akun jika pengguna tidak memiliki
identitas terkait.
Di kolom Enter new expression di bagian Condition, masukkan logika berikut:
user.verificationStatus == "VERIFIED"
Di bagian Transition, pilih scene sistem Penautan Akun.
Klik Simpan.
Setelah disimpan, scene sistem penautan akun baru bernama <SceneName>_AccountLinking
ditambahkan ke project Anda.
Menyesuaikan adegan penautan akun
Di bagian Scenes, pilih scene sistem penautan akun.
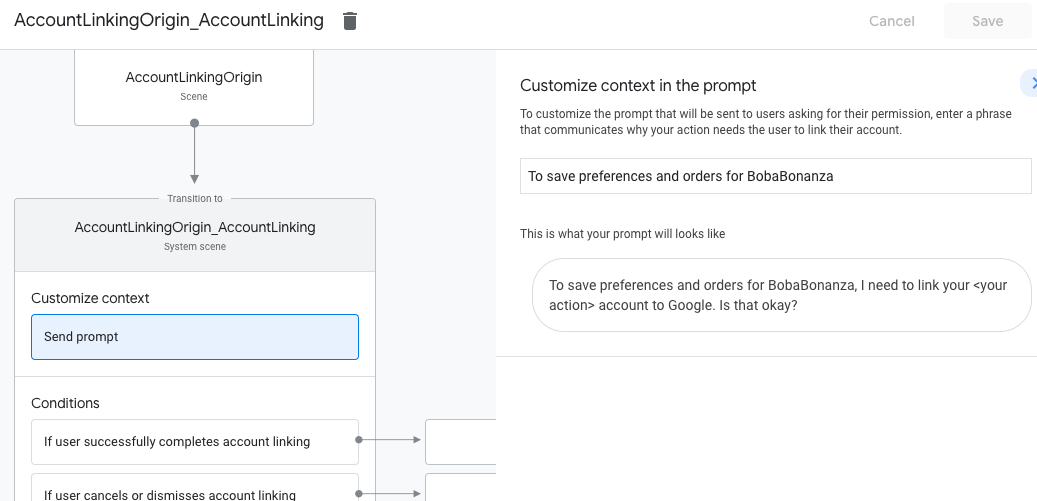
Klik Kirim perintah, lalu tambahkan kalimat singkat untuk menjelaskan kepada pengguna
alasan Action perlu mengakses identitasnya (misalnya, "Untuk menyimpan preferensi Anda").
Klik Simpan.
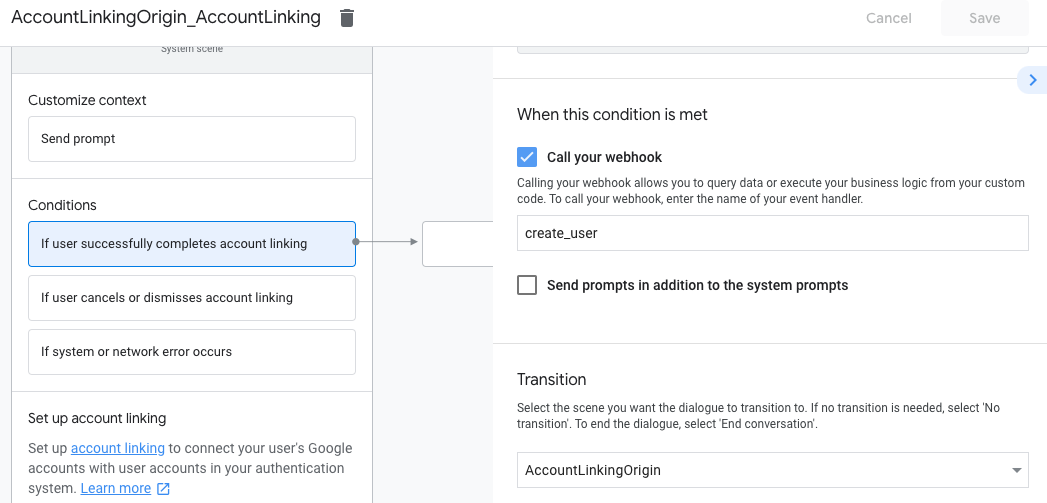
Di bagian Kondisi, klik Jika pengguna berhasil menyelesaikan penautan akun.
Konfigurasi cara melanjutkan alur jika pengguna setuju untuk menautkan akun mereka.
Misalnya, panggil webhook untuk memproses logika bisnis kustom yang diperlukan
dan bertransisi kembali ke scene awal.
Klik Simpan.
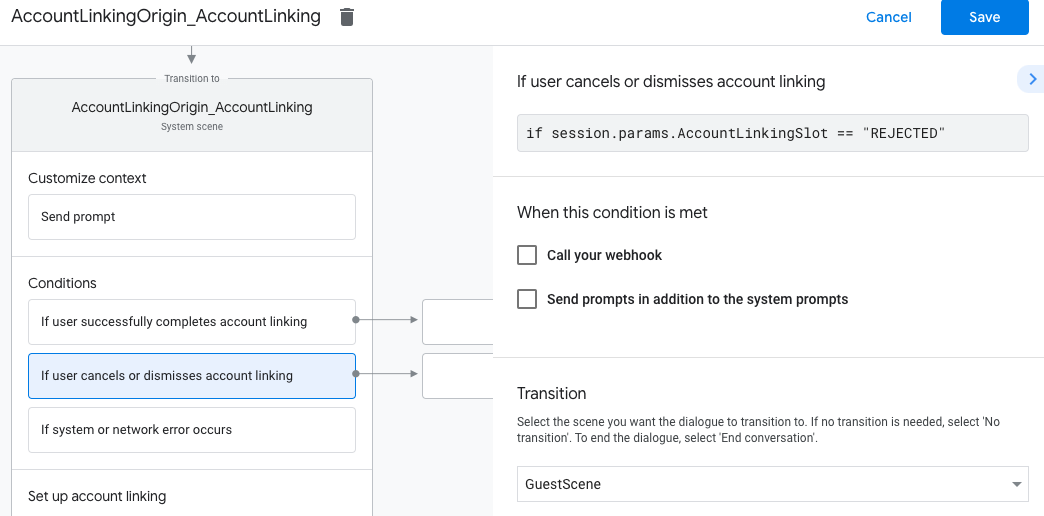
Di bagian Kondisi, klik Jika pengguna membatalkan atau menolak penautan akun.
Konfigurasikan bagaimana alur akan berjalan jika pengguna tidak setuju untuk menautkan
menggunakan akun layanan. Misalnya, kirim pesan konfirmasi dan alihkan ke adegan
yang menyediakan fungsi yang tidak memerlukan penautan akun.
Klik Simpan.
Di bagian Kondisi, klik Jika terjadi error sistem atau jaringan.
Konfigurasi cara alur selanjutnya jika alur penautan akun tidak dapat
diselesaikan karena
kesalahan sistem atau jaringan.
Misalnya, kirim pesan konfirmasi dan alihkan ke adegan
yang menyediakan fungsi yang tidak memerlukan penautan akun.
Klik Simpan.
Mengakses informasi profil di backend Anda
Setelah pengguna mengizinkan tindakan Anda mengakses profil Google miliknya, Anda akan menerima
token ID Google yang berisi informasi profil Google pengguna di setiap
terhadap tindakan Anda.
Untuk mengakses informasi profil pengguna, Anda harus memvalidasi dan mendekode token terlebih dahulu
dengan melakukan hal berikut:
Gunakan library decoding JWT untuk bahasa Anda guna mendekode
token, dan menggunakan kunci publik Google (tersedia di JWK
atau format PEM) untuk memverifikasi tanda tangan token.
Verifikasi bahwa penerbit token (kolom iss dalam token yang didekode) adalah https://accounts.google.com
dan bahwa audiens (kolom aud dalam token yang didekode) adalah nilai
Client ID dikeluarkan oleh Google untuk Action Anda, yang ditetapkan ke project Anda
di Konsol Actions.
Berikut adalah contoh token yang didekode:
{"sub":1234567890,// The unique ID of the user's Google Account"iss":"https://accounts.google.com",// The token's issuer"aud":"123-abc.apps.googleusercontent.com",// Client ID assigned to your Actions project"iat":233366400,// Unix timestamp of the token's creation time"exp":233370000,// Unix timestamp of the token's expiration time"name":"Jan Jansen","given_name":"Jan","family_name":"Jansen","email":"jan@gmail.com",// If present, the user's email address"locale":"en_US"}
Jika Anda menggunakan library Actions on Google Fulfillment untuk Node.js,
menangani validasi dan dekode token tersebut, serta memberi Anda akses ke
konten profil, seperti yang ditampilkan dalam cuplikan kode berikut.
Untuk menangani permintaan akses data, cukup verifikasi bahwa pengguna ditegaskan oleh ID Google
token ini sudah ada dalam database Anda. Cuplikan kode berikut menunjukkan
contoh cara memeriksa apakah pesanan untuk pengguna sudah ada di database Firestore:
...app.handle('Place_Order',asyncconv=>{constorder=conv.session.params.order;constuserDoc=dbs.user.doc(conv.user.params.uid);constorderHistory=userDoc.collection("orderHistory");if(orderHistory){//Orderhistoryexists,sotheuseralreadyplacedanorder.//Updatecounterforordertype.awaitorderHistory.doc(order).update({count:admin.firestore.FieldValue.increment(1)});}else{//FirstordertheyplaceawaitorderHistory.doc(order).set({option:order,count:1});options.forEach(opt=>{if(opt!=order){orderHistory.doc(opt).set({option:opt,count:0});}});}returnconv.add(`Your ${order} has been placed. `+'Thanks for using Boba Bonanza, see you soon!');});
[[["Mudah dipahami","easyToUnderstand","thumb-up"],["Memecahkan masalah saya","solvedMyProblem","thumb-up"],["Lainnya","otherUp","thumb-up"]],[["Informasi yang saya butuhkan tidak ada","missingTheInformationINeed","thumb-down"],["Terlalu rumit/langkahnya terlalu banyak","tooComplicatedTooManySteps","thumb-down"],["Sudah usang","outOfDate","thumb-down"],["Masalah terjemahan","translationIssue","thumb-down"],["Masalah kode / contoh","samplesCodeIssue","thumb-down"],["Lainnya","otherDown","thumb-down"]],["Terakhir diperbarui pada 2025-07-25 UTC."],[[["\u003cp\u003eGoogle Sign-In for Assistant simplifies account linking and creation for both users and developers, enabling access to user profiles for personalized experiences.\u003c/p\u003e\n"],["\u003cp\u003eDevelopers can leverage Google Sign-In to link or create user accounts across platforms, facilitating seamless user journeys and communication.\u003c/p\u003e\n"],["\u003cp\u003eImplementing Google Sign-In involves configuring the project in Actions Console, designing the authentication flow in Actions Builder, and handling data access requests securely in your backend.\u003c/p\u003e\n"],["\u003cp\u003eUser profile information, such as name, email, and profile picture, can be accessed after user authorization and token validation, allowing for customized interactions within the Action.\u003c/p\u003e\n"],["\u003cp\u003eActions using account linking for financial information are subject to additional policies and review, requiring compliance with financial services policies before submission.\u003c/p\u003e\n"]]],[],null,["# Account linking with Google Sign-In\n\nGoogle Sign-In for the Assistant provides the simplest and easiest user experience\nto users and developers both for account linking and account creation. Your Action\ncan request access to your user's Google profile during a conversation,\nincluding the user's name, email address, and profile picture.\n\nThe profile information can be used to create a personalized user experience\nin your Action. If you have apps on other platforms and they use Google Sign-In,\nyou can also find and link to an existing user's account, create a new account,\nand establish a direct channel of communication to the user.\n\nTo perform account linking with Google Sign-In, you ask the user to give consent\nto access their Google profile. You then use the information in their profile, for\nexample their email address, to identify the user in your system.\n\nImplement Google Sign-In account linking\n----------------------------------------\n\nFollow the steps in the following sections to add Google Sign-In account linking to your\nAction.\n| **Note:** If you're implementing account linking to handle financial information, note that additional policies may apply to your Action. It can take us up to six weeks to review an Action with account linking for financial information, so factor that time in when planning your release schedule. To ease the review process, make sure you comply with the [financial services policies](/assistant/console/policies/general-policies#financial_services) before submitting your Action for review.\n\n### Configure the project\n\nTo configure your project to use Google Sign-In account linking, follow these steps:\n\n1. Open the Actions Console and select a project.\n2. Click the **Develop** tab and choose **Account linking**.\n3. Enable the switch next to **Account linking**.\n4. In the **Account creation** section, select **Yes**.\n5. In **Linking type** , select **Google Sign In**.\n\n6. Open **Client Information** and take note of the value of **Client ID issued by Google to your Actions**.\n\n7. Click **Save**.\n\n### Design the voice user interface for the authentication flow\n\n| **Warning:** Don't give users a required account linking prompt at the start of the conversation with your Action. Instead, give unauthenticated users a guest flow to show how your Action works, and then only ask for account linking if it's necessary to proceed. If users are leaving the Action consistently because of account linking issues, Google will not actively promote the Action, which may decrease the Action's user traffic.\n|\n|\n| **Note:** You must use [Actions Builder](/assistant/conversational/build#actions_builder) to build an Action that implements account linking.\n\n#### Check if the user is verified and start the account linking flow\n\n1. Open your Actions Builder project in the [Actions Console](https://console.actions.google.com).\n2. Create a new scene to start account linking in your Action:\n 1. Click **Scenes**.\n 2. Click the **add** (+) icon to add a new scene.\n3. In the newly created scene, click the add *add* icon for **Conditions**.\n4. Add a condition that checks if the user associated with the conversation is a a verified user. If the check fails, your Action can't perform account linking during the conversation, and should fall back to providing access to functionality that doesn't require account linking.\n 1. In the `Enter new expression` field under **Condition** , enter the following logic: `user.verificationStatus != \"VERIFIED\"`\n 2. Under **Transition**, select a scene that doesn't require account linking or a scene that is the entry point to guest-only functionality.\n\n1. Click the add *add* icon for **Conditions**.\n2. Add a condition to trigger an account linking flow if the user doesn't have an associated identity.\n 1. In the `Enter new expression` field under **Condition** , enter the following logic:: `user.verificationStatus == \"VERIFIED\"`\n 2. Under **Transition** , select the **Account Linking** system scene.\n 3. Click **Save**.\n\nAfter saving, a new account linking system scene called `\u003cSceneName\u003e_AccountLinking`\nis added to your project.\n\n#### Customize the account linking scene\n\n1. Under **Scenes**, select the account linking system scene.\n2. Click **Send prompt** and add a short sentence to describe to the user why the Action needs to access their identity (for example \"To save your preferences\").\n3. Click **Save**.\n\n1. Under **Conditions** , click **If user successfully completes account linking**.\n2. Configure how the flow should proceed if the user agrees to link their account. For example, call the webhook to process any custom business logic required and transition back to the originating scene.\n3. Click **Save**.\n\n1. Under **Conditions** , click **If user cancels or dismisses account linking**.\n2. Configure how the flow should proceed if the user doesn't agree to link their account. For example, send an acknowledging message and redirect to scenes that provide functionality that doesn't require account linking.\n3. Click **Save**.\n\n1. Under **Conditions** , click **If system or network error occurs**.\n2. Configure how the flow should proceed if the account linking flow can't be completed because of system or network errors. For example, send an acknowledging message and redirect to scenes that provide functionality that doesn't require account linking.\n3. Click **Save**.\n\n### Access profile information in your backend\n\nAfter the user authorizes your action to access their Google profile, you will receive\na Google ID token that contains the user's Google profile information in every subsequent\nrequest to your action.\n\nTo access the user's profile information, you need to first validate and decode the token\nby doing the following:\n\n1. Use a [JWT-decoding library](https://jwt.io/) for your language to decode the token, and use Google's public keys (available in [JWK](https://www.googleapis.com/oauth2/v3/certs) or [PEM](https://www.googleapis.com/oauth2/v1/certs) format) to verify the token's signature.\n2. Verify that the token's issuer (`iss` field in the decoded token) is `https://accounts.google.com` and that the audience (`aud` field in the decoded token) is the value of **Client ID issued by Google to your Actions**, which is assigned to your project in the Actions console.\n\nThe following is an example of a decoded token: \n\n```carbon\n{\n \"sub\": 1234567890, // The unique ID of the user's Google Account\n \"iss\": \"https://accounts.google.com\", // The token's issuer\n \"aud\": \"123-abc.apps.googleusercontent.com\", // Client ID assigned to your Actions project\n \"iat\": 233366400, // Unix timestamp of the token's creation time\n \"exp\": 233370000, // Unix timestamp of the token's expiration time\n \"name\": \"Jan Jansen\",\n \"given_name\": \"Jan\",\n \"family_name\": \"Jansen\",\n \"email\": \"jan@gmail.com\", // If present, the user's email address\n \"locale\": \"en_US\"\n}\n```\n\nIf you use the [Actions on Google Fulfillment library for Node.js](https://github.com/actions-on-google/assistant-conversation-nodejs),\nit takes care of validating and decoding the token for you, and gives you access to\nthe profile content, as shown in the following code snippets. \n\n```gdscript\n...\nconst app = conversation({\n // REPLACE THE PLACEHOLDER WITH THE CLIENT_ID OF YOUR ACTIONS PROJECT\n clientId: CLIENT_ID,\n});\n...\n// Invoked on successful completion of account linking flow, check if we need to\n// create a Firebase user.\napp.handle('linkAccount', async conv =\u003e {\n let payload = conv.headers.authorization;\n if (payload) {\n // Get UID for Firebase auth user using the email of the user\n const email = payload.email;\n if (!conv.user.params.uid && email) {\n try {\n conv.user.params.uid = (await auth.getUserByEmail(email)).uid;\n } catch (e) {\n if (e.code !== 'auth/user-not-found') {\n throw e;\n }\n // If the user is not found, create a new Firebase auth user\n // using the email obtained from Google Assistant\n conv.user.params.uid = (await auth.createUser({email})).uid;\n }\n }\n }\n});\n```\n\n### Handle data access requests\n\nTo handle data access request, just verify that the user asserted by the Google ID\ntoken is already present in your database. The following snippet of code shows\nan example of how to check if orders for a user already exist in a Firestore database: \n\n```perl\n...\napp.handle('Place_Order', async conv =\u003e {\n const order = conv.session.params.order;\n const userDoc = dbs.user.doc(conv.user.params.uid);\n const orderHistory = userDoc.collection(\"orderHistory\");\n if (orderHistory) {\n // Order history exists, so the user already placed an order.\n // Update counter for order type.\n await orderHistory.doc(order).update({ count: admin.firestore.FieldValue.increment(1)});\n } else {\n // First order they place\n await orderHistory.doc(order).set({ option: order, count: 1});\n options.forEach(opt =\u003e {\n if (opt != order) {\n orderHistory.doc(opt).set({ option: opt, count: 0});\n }\n });\n }\n return conv.add(`Your ${order} has been placed. ` +\n 'Thanks for using Boba Bonanza, see you soon!');\n});\n```\n\n\u003cbr /\u003e"]]