Organiza tus páginas con colecciones
Guarda y categoriza el contenido según tus preferencias.
El Acceso con Google para el Asistente proporciona la experiencia del usuario más sencilla y sin inconvenientes
a los usuarios y desarrolladores respecto de la vinculación y creación de cuentas. Tu acción
puede solicitar acceso al perfil de Google de tu usuario durante una conversación
incluidos el nombre, la dirección de correo electrónico y la foto de perfil del usuario.
La información del perfil se puede usar para crear una experiencia del usuario personalizada
en tu Action. Si tienes apps en otras plataformas y usan Acceso con Google,
Puedes buscar la cuenta de un usuario existente y vincularla, crear una cuenta nueva
y establecer un canal directo de comunicación con el usuario.
Para vincular la cuenta con el Acceso con Google, le pides al usuario que dé su consentimiento
para acceder a su perfil de Google. Luego, usarás la información de su perfil para
ejemplo, su dirección de correo electrónico, para identificar al usuario en su sistema.
Implementa la vinculación de cuentas de Acceso con Google
Sigue los pasos de las siguientes secciones para agregar la vinculación de la cuenta de Acceso con Google a tu
Acción.
Configura el proyecto
Si deseas configurar tu proyecto para usar la vinculación de cuentas de Acceso con Google, sigue estos pasos:
Abre la Consola de Actions y selecciona un proyecto.
Haz clic en la pestaña Desarrollar y elige Vinculación de cuentas.
Habilita el interruptor junto a Vinculación de cuentas.
En la sección Creación de la cuenta, selecciona Sí.
En Tipo de vinculación, selecciona Acceso con Google.
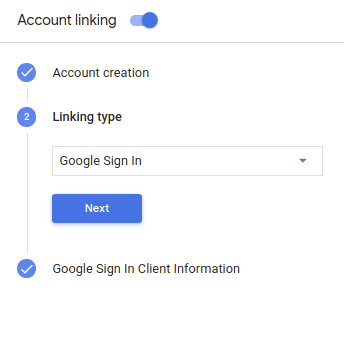
Abre Información del cliente y toma nota del valor del ID de cliente que emite Google para tus Acciones.
Haz clic en Guardar.
Diseña la interfaz de usuario de voz para el flujo de autenticación
Comprueba si el usuario está verificado y, luego, inicia el flujo de vinculación de cuentas
Crea una nueva escena para comenzar la vinculación de cuentas en tu acción:
Haz clic en Escenas.
Haz clic en el ícono de agregar (+) para agregar una escena nueva.
En la escena recién creada, haz clic en el botón Agregar add
de Condiciones.
Agregar una condición que verifique si el usuario asociado con la conversación es un
un usuario verificado. Si falla la verificación, tu acción no podrá vincular la cuenta
durante la conversación, y debería recurrir a brindar acceso a
que no requiere la vinculación de cuentas.
En el campo Enter new expression, en Condición, ingresa la siguiente lógica:
user.verificationStatus != "VERIFIED"
En Transición, selecciona una escena que no requiera la vinculación de cuentas.
una escena que es el punto de entrada a la funcionalidad solo para invitados.
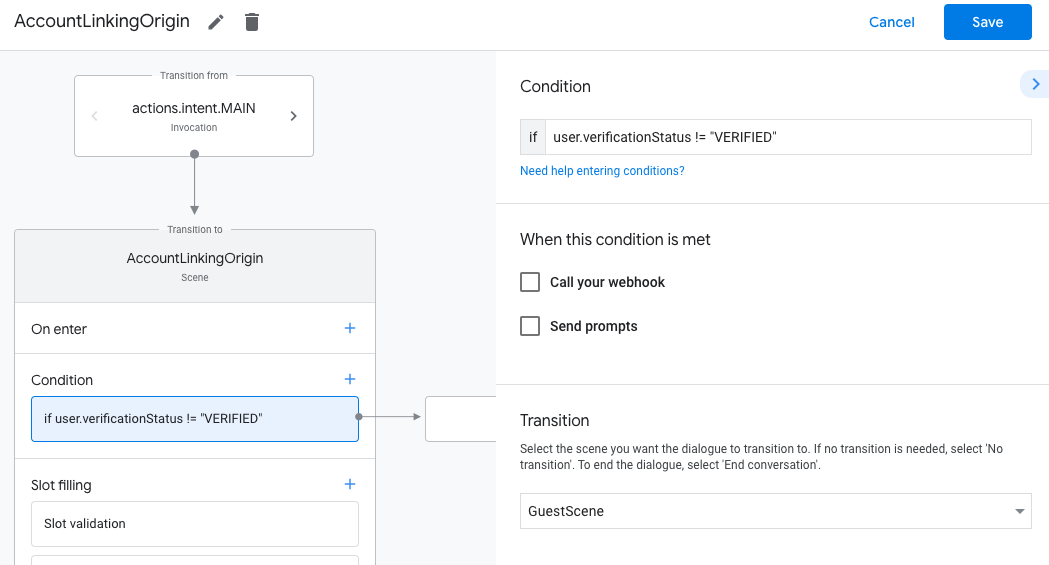
Haz clic en el ícono para agregar add de Conditions.
Agregar una condición para activar un flujo de vinculación de cuentas si el usuario no tiene
una identidad asociada.
En el campo Enter new expression, en Condición, ingresa la siguiente lógica:
user.verificationStatus == "VERIFIED"
En Transition, selecciona la escena del sistema Account Linking.
Haz clic en Guardar.
Después de guardar, se creará una nueva escena del sistema de vinculación de cuentas llamada <SceneName>_AccountLinking.
se agrega a tu proyecto.
Cómo personalizar el ambiente de vinculación de cuentas
En Scenes, selecciona la escena del sistema de vinculación de cuentas.
Haz clic en Enviar mensaje y agrega una oración corta para describir al usuario.
por qué la Acción necesita acceder a su identidad (por ejemplo, "Para guardar tus preferencias").
Haz clic en Guardar.
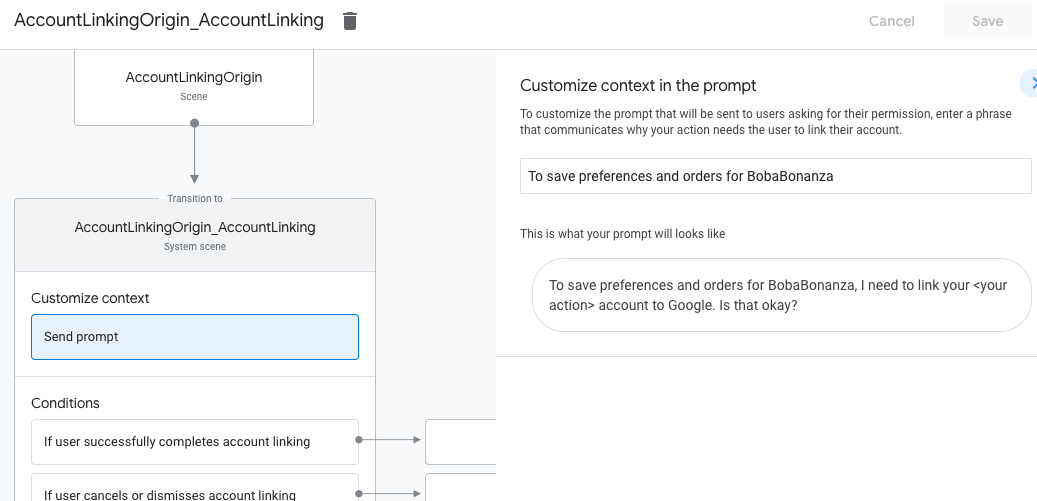
En Condiciones, haz clic en Si el usuario completa la vinculación de la cuenta.
Configura cómo debe proceder el flujo si el usuario acepta vincular su cuenta.
Por ejemplo, llama al webhook para procesar cualquier lógica empresarial personalizada que se requiera.
y volver a la escena de origen.
Haz clic en Guardar.
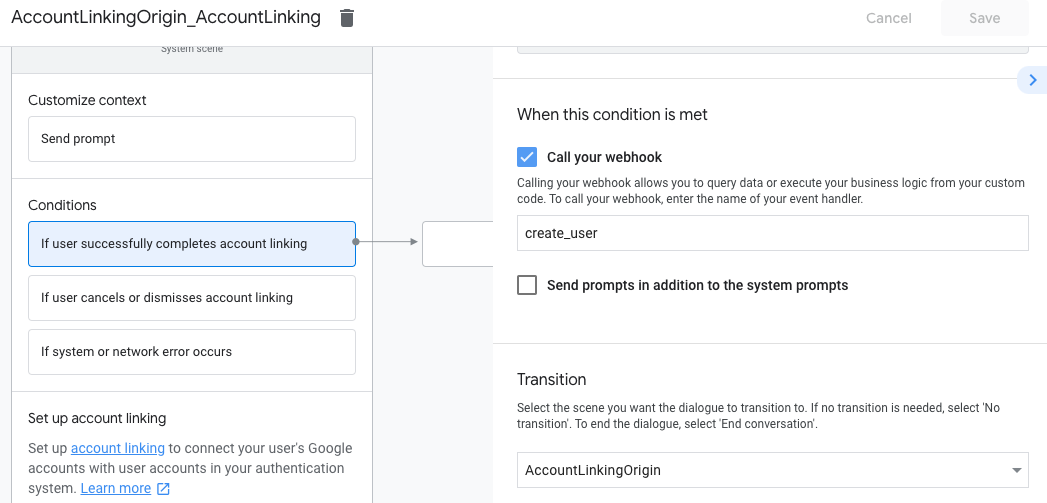
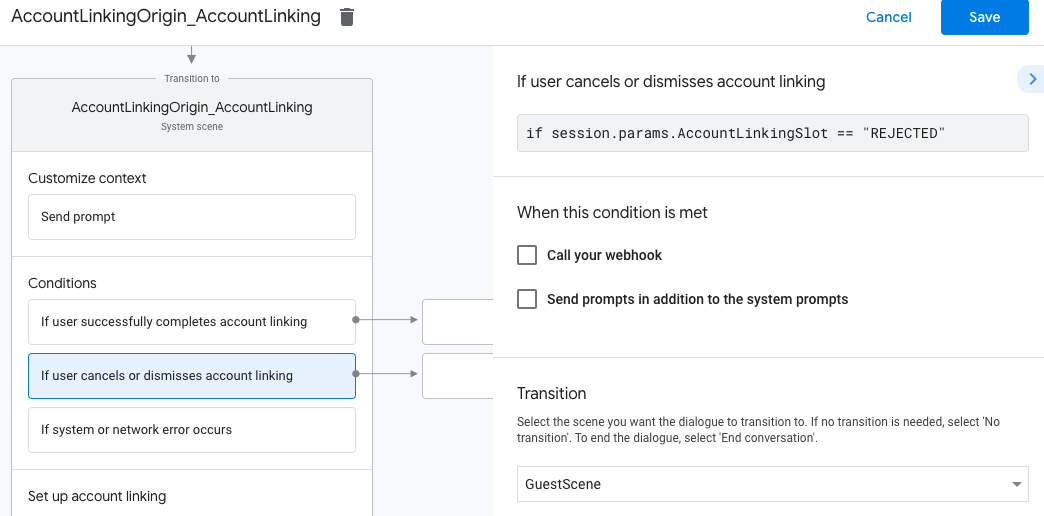
En Condiciones, haz clic en Si el usuario cancela o descarta la vinculación de cuentas.
Configurar cómo debe proceder el flujo si el usuario no acepta vincular su
de servicio predeterminada. Por ejemplo, envía un mensaje de confirmación y redirecciona a escenas
que proporcionan funciones que no requieren la vinculación de cuentas.
Haz clic en Guardar.
En Condiciones, haz clic en Si se produce un error en el sistema o la red.
Configurar el procedimiento del flujo si no se puede realizar la vinculación de cuentas
completado debido a errores del sistema o de red.
Por ejemplo, envía un mensaje de confirmación y redirecciona a escenas
que proporcionan funciones que no requieren la vinculación de cuentas.
Haz clic en Guardar.
Cómo acceder a la información del perfil en tu backend
Una vez que el usuario autorice tu acción para acceder a su perfil de Google, recibirás
un token de ID de Google que contenga la información de perfil de Google del usuario en cada
una solicitud a la acción.
Para acceder a la información del perfil del usuario, primero debes validar y decodificar el token
haciendo lo siguiente:
Usa una biblioteca de decodificación JWT para que tu lenguaje decodifique el
token y usa las claves públicas de Google (disponibles en JWK
o PEM) para verificar la firma del token.
Verifica que la entidad emisora del token (campo iss del token decodificado) sea https://accounts.google.com
y que el público (campo aud del token decodificado) es el valor de
ID de cliente que emite Google a tus Acciones, que se asigna a tu proyecto
en la Consola de Actions.
El siguiente es un ejemplo de un token decodificado:
{"sub":1234567890,// The unique ID of the user's Google Account"iss":"https://accounts.google.com",// The token's issuer"aud":"123-abc.apps.googleusercontent.com",// Client ID assigned to your Actions project"iat":233366400,// Unix timestamp of the token's creation time"exp":233370000,// Unix timestamp of the token's expiration time"name":"Jan Jansen","given_name":"Jan","family_name":"Jansen","email":"jan@gmail.com",// If present, the user's email address"locale":"en_US"}
Si usas la biblioteca de entregas de Actions on Google para Node.js, haz lo siguiente:
se encarga de validar y decodificar el token, y te da acceso a
el contenido del perfil, como se muestra en los siguientes fragmentos de código.
Para controlar la solicitud de acceso a los datos, solo verifica que el usuario afirmado por el ID de Google
token ya está presente en tu base de datos. El siguiente fragmento de código muestra
Este es un ejemplo de cómo verificar si los pedidos de un usuario ya existen en una base de datos de Firestore:
...app.handle('Place_Order',asyncconv=>{constorder=conv.session.params.order;constuserDoc=dbs.user.doc(conv.user.params.uid);constorderHistory=userDoc.collection("orderHistory");if(orderHistory){//Orderhistoryexists,sotheuseralreadyplacedanorder.//Updatecounterforordertype.awaitorderHistory.doc(order).update({count:admin.firestore.FieldValue.increment(1)});}else{//FirstordertheyplaceawaitorderHistory.doc(order).set({option:order,count:1});options.forEach(opt=>{if(opt!=order){orderHistory.doc(opt).set({option:opt,count:0});}});}returnconv.add(`Your ${order} has been placed. `+'Thanks for using Boba Bonanza, see you soon!');});
[[["Fácil de comprender","easyToUnderstand","thumb-up"],["Resolvió mi problema","solvedMyProblem","thumb-up"],["Otro","otherUp","thumb-up"]],[["Falta la información que necesito","missingTheInformationINeed","thumb-down"],["Muy complicado o demasiados pasos","tooComplicatedTooManySteps","thumb-down"],["Desactualizado","outOfDate","thumb-down"],["Problema de traducción","translationIssue","thumb-down"],["Problema con las muestras o los códigos","samplesCodeIssue","thumb-down"],["Otro","otherDown","thumb-down"]],["Última actualización: 2025-07-25 (UTC)"],[[["\u003cp\u003eGoogle Sign-In for Assistant simplifies account linking and creation for both users and developers, enabling access to user profiles for personalized experiences.\u003c/p\u003e\n"],["\u003cp\u003eDevelopers can leverage Google Sign-In to link or create user accounts across platforms, facilitating seamless user journeys and communication.\u003c/p\u003e\n"],["\u003cp\u003eImplementing Google Sign-In involves configuring the project in Actions Console, designing the authentication flow in Actions Builder, and handling data access requests securely in your backend.\u003c/p\u003e\n"],["\u003cp\u003eUser profile information, such as name, email, and profile picture, can be accessed after user authorization and token validation, allowing for customized interactions within the Action.\u003c/p\u003e\n"],["\u003cp\u003eActions using account linking for financial information are subject to additional policies and review, requiring compliance with financial services policies before submission.\u003c/p\u003e\n"]]],[],null,["# Account linking with Google Sign-In\n\nGoogle Sign-In for the Assistant provides the simplest and easiest user experience\nto users and developers both for account linking and account creation. Your Action\ncan request access to your user's Google profile during a conversation,\nincluding the user's name, email address, and profile picture.\n\nThe profile information can be used to create a personalized user experience\nin your Action. If you have apps on other platforms and they use Google Sign-In,\nyou can also find and link to an existing user's account, create a new account,\nand establish a direct channel of communication to the user.\n\nTo perform account linking with Google Sign-In, you ask the user to give consent\nto access their Google profile. You then use the information in their profile, for\nexample their email address, to identify the user in your system.\n\nImplement Google Sign-In account linking\n----------------------------------------\n\nFollow the steps in the following sections to add Google Sign-In account linking to your\nAction.\n| **Note:** If you're implementing account linking to handle financial information, note that additional policies may apply to your Action. It can take us up to six weeks to review an Action with account linking for financial information, so factor that time in when planning your release schedule. To ease the review process, make sure you comply with the [financial services policies](/assistant/console/policies/general-policies#financial_services) before submitting your Action for review.\n\n### Configure the project\n\nTo configure your project to use Google Sign-In account linking, follow these steps:\n\n1. Open the Actions Console and select a project.\n2. Click the **Develop** tab and choose **Account linking**.\n3. Enable the switch next to **Account linking**.\n4. In the **Account creation** section, select **Yes**.\n5. In **Linking type** , select **Google Sign In**.\n\n6. Open **Client Information** and take note of the value of **Client ID issued by Google to your Actions**.\n\n7. Click **Save**.\n\n### Design the voice user interface for the authentication flow\n\n| **Warning:** Don't give users a required account linking prompt at the start of the conversation with your Action. Instead, give unauthenticated users a guest flow to show how your Action works, and then only ask for account linking if it's necessary to proceed. If users are leaving the Action consistently because of account linking issues, Google will not actively promote the Action, which may decrease the Action's user traffic.\n|\n|\n| **Note:** You must use [Actions Builder](/assistant/conversational/build#actions_builder) to build an Action that implements account linking.\n\n#### Check if the user is verified and start the account linking flow\n\n1. Open your Actions Builder project in the [Actions Console](https://console.actions.google.com).\n2. Create a new scene to start account linking in your Action:\n 1. Click **Scenes**.\n 2. Click the **add** (+) icon to add a new scene.\n3. In the newly created scene, click the add *add* icon for **Conditions**.\n4. Add a condition that checks if the user associated with the conversation is a a verified user. If the check fails, your Action can't perform account linking during the conversation, and should fall back to providing access to functionality that doesn't require account linking.\n 1. In the `Enter new expression` field under **Condition** , enter the following logic: `user.verificationStatus != \"VERIFIED\"`\n 2. Under **Transition**, select a scene that doesn't require account linking or a scene that is the entry point to guest-only functionality.\n\n1. Click the add *add* icon for **Conditions**.\n2. Add a condition to trigger an account linking flow if the user doesn't have an associated identity.\n 1. In the `Enter new expression` field under **Condition** , enter the following logic:: `user.verificationStatus == \"VERIFIED\"`\n 2. Under **Transition** , select the **Account Linking** system scene.\n 3. Click **Save**.\n\nAfter saving, a new account linking system scene called `\u003cSceneName\u003e_AccountLinking`\nis added to your project.\n\n#### Customize the account linking scene\n\n1. Under **Scenes**, select the account linking system scene.\n2. Click **Send prompt** and add a short sentence to describe to the user why the Action needs to access their identity (for example \"To save your preferences\").\n3. Click **Save**.\n\n1. Under **Conditions** , click **If user successfully completes account linking**.\n2. Configure how the flow should proceed if the user agrees to link their account. For example, call the webhook to process any custom business logic required and transition back to the originating scene.\n3. Click **Save**.\n\n1. Under **Conditions** , click **If user cancels or dismisses account linking**.\n2. Configure how the flow should proceed if the user doesn't agree to link their account. For example, send an acknowledging message and redirect to scenes that provide functionality that doesn't require account linking.\n3. Click **Save**.\n\n1. Under **Conditions** , click **If system or network error occurs**.\n2. Configure how the flow should proceed if the account linking flow can't be completed because of system or network errors. For example, send an acknowledging message and redirect to scenes that provide functionality that doesn't require account linking.\n3. Click **Save**.\n\n### Access profile information in your backend\n\nAfter the user authorizes your action to access their Google profile, you will receive\na Google ID token that contains the user's Google profile information in every subsequent\nrequest to your action.\n\nTo access the user's profile information, you need to first validate and decode the token\nby doing the following:\n\n1. Use a [JWT-decoding library](https://jwt.io/) for your language to decode the token, and use Google's public keys (available in [JWK](https://www.googleapis.com/oauth2/v3/certs) or [PEM](https://www.googleapis.com/oauth2/v1/certs) format) to verify the token's signature.\n2. Verify that the token's issuer (`iss` field in the decoded token) is `https://accounts.google.com` and that the audience (`aud` field in the decoded token) is the value of **Client ID issued by Google to your Actions**, which is assigned to your project in the Actions console.\n\nThe following is an example of a decoded token: \n\n```carbon\n{\n \"sub\": 1234567890, // The unique ID of the user's Google Account\n \"iss\": \"https://accounts.google.com\", // The token's issuer\n \"aud\": \"123-abc.apps.googleusercontent.com\", // Client ID assigned to your Actions project\n \"iat\": 233366400, // Unix timestamp of the token's creation time\n \"exp\": 233370000, // Unix timestamp of the token's expiration time\n \"name\": \"Jan Jansen\",\n \"given_name\": \"Jan\",\n \"family_name\": \"Jansen\",\n \"email\": \"jan@gmail.com\", // If present, the user's email address\n \"locale\": \"en_US\"\n}\n```\n\nIf you use the [Actions on Google Fulfillment library for Node.js](https://github.com/actions-on-google/assistant-conversation-nodejs),\nit takes care of validating and decoding the token for you, and gives you access to\nthe profile content, as shown in the following code snippets. \n\n```gdscript\n...\nconst app = conversation({\n // REPLACE THE PLACEHOLDER WITH THE CLIENT_ID OF YOUR ACTIONS PROJECT\n clientId: CLIENT_ID,\n});\n...\n// Invoked on successful completion of account linking flow, check if we need to\n// create a Firebase user.\napp.handle('linkAccount', async conv =\u003e {\n let payload = conv.headers.authorization;\n if (payload) {\n // Get UID for Firebase auth user using the email of the user\n const email = payload.email;\n if (!conv.user.params.uid && email) {\n try {\n conv.user.params.uid = (await auth.getUserByEmail(email)).uid;\n } catch (e) {\n if (e.code !== 'auth/user-not-found') {\n throw e;\n }\n // If the user is not found, create a new Firebase auth user\n // using the email obtained from Google Assistant\n conv.user.params.uid = (await auth.createUser({email})).uid;\n }\n }\n }\n});\n```\n\n### Handle data access requests\n\nTo handle data access request, just verify that the user asserted by the Google ID\ntoken is already present in your database. The following snippet of code shows\nan example of how to check if orders for a user already exist in a Firestore database: \n\n```perl\n...\napp.handle('Place_Order', async conv =\u003e {\n const order = conv.session.params.order;\n const userDoc = dbs.user.doc(conv.user.params.uid);\n const orderHistory = userDoc.collection(\"orderHistory\");\n if (orderHistory) {\n // Order history exists, so the user already placed an order.\n // Update counter for order type.\n await orderHistory.doc(order).update({ count: admin.firestore.FieldValue.increment(1)});\n } else {\n // First order they place\n await orderHistory.doc(order).set({ option: order, count: 1});\n options.forEach(opt =\u003e {\n if (opt != order) {\n orderHistory.doc(opt).set({ option: opt, count: 0});\n }\n });\n }\n return conv.add(`Your ${order} has been placed. ` +\n 'Thanks for using Boba Bonanza, see you soon!');\n});\n```\n\n\u003cbr /\u003e"]]