Zadbaj o dobrą organizację dzięki kolekcji
Zapisuj i kategoryzuj treści zgodnie ze swoimi preferencjami.
Logowanie przez Google w Asystencie to najprostsza i najłatwiejsza metoda dla użytkownika
zarówno użytkownikom, jak i deweloperom. Twoja akcja
podczas rozmowy mogą poprosić o dostęp do Twojego profilu Google użytkownika,
w tym imię i nazwisko, adres e-mail i zdjęcie profilowe użytkownika.
Informacje profilowe mogą być używane do personalizowania usług
w akcji. Jeśli masz aplikacje na innych platformach i używają one Logowania przez Google,
Możesz też znaleźć i połączyć istniejące konto użytkownika, utworzyć nowe
i ustanowienie kanału
bezpośredniej komunikacji z użytkownikiem.
Aby połączyć konta z użyciem Logowania przez Google, musisz poprosić użytkownika o zgodę
aby uzyskać dostęp do swojego profilu Google. Następnie używasz tych informacji do celów
np. jego adres e-mail, aby zidentyfikować użytkownika w swoim systemie.
Wdrażanie łączenia konta Logowania przez Google
Wykonaj czynności opisane w sekcjach poniżej, aby dodać połączenie z kontem Logowania przez Google do
Akcja.
Konfigurowanie projektu
Aby skonfigurować projekt do korzystania z funkcji łączenia kont za pomocą Logowania przez Google, wykonaj te czynności:
Otwórz konsolę Actions i wybierz projekt.
Kliknij kartę Programowanie i wybierz Łączenie kont.
Włącz przełącznik obok opcji Łączenie kont.
W sekcji Tworzenie konta wybierz Tak.
W sekcji Typ połączenia wybierz Logowanie przez Google.
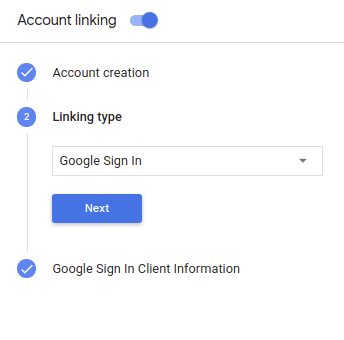
Otwórz Informacje o kliencie i zanotuj wartość identyfikatora klienta nadanego przez Google dla Twoich działań.
Kliknij Zapisz.
Zaprojektuj interfejs głosowy na potrzeby procesu uwierzytelniania
.
Sprawdź, czy użytkownik został zweryfikowany, i rozpocznij proces łączenia kont
Utwórz nową scenę, aby rozpocząć łączenie kont w akcji:
Kliknij Sceny.
Aby dodać nową scenę, kliknij ikonę dodaj (+).
W nowo utworzonej scenie kliknij przycisk dodawania add.
obok warunków.
Dodaj warunek, który sprawdza, czy użytkownik powiązany z rozmową jest
zweryfikowanego użytkownika. Jeśli weryfikacja się nie powiedzie, akcja nie może połączyć kont
podczas rozmowy i powinien wrócić do przyznania dostępu
funkcję, która nie wymaga połączenia kont.
W polu Enter new expression w sekcji Warunek wpisz tę logikę:
user.verificationStatus != "VERIFIED"
W sekcji Przejście wybierz scenę, która nie wymaga łączenia kont, lub
scenę, która stanowi punkt dostępu do funkcji dostępnych tylko dla gości.
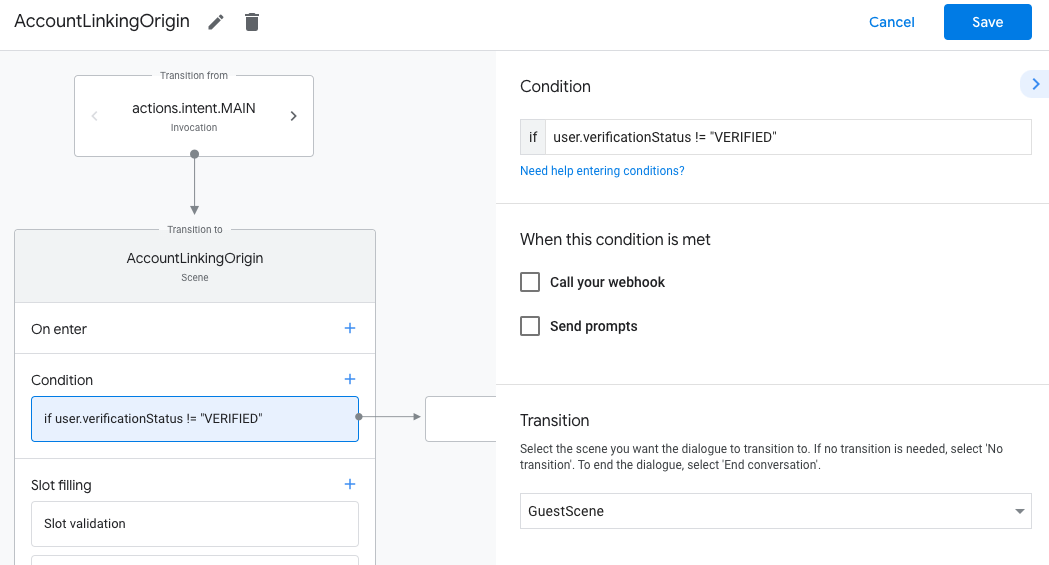
Kliknij ikonę dodawania add przy warunkach.
Dodaj warunek, aby uruchomić proces łączenia kont, jeśli użytkownik nie
z powiązaną tożsamością.
W polu Enter new expression w sekcji Warunek wpisz tę logikę:
user.verificationStatus == "VERIFIED"
W sekcji Przenoszenie wybierz scenę systemową Łączenie kont.
Kliknij Zapisz.
Po zapisaniu nowa scena systemowa o nazwie <SceneName>_AccountLinking do łączenia kont
zostanie dodana do projektu.
Dostosowywanie punktu łączenia kont
W sekcji Sceny wybierz scenę systemową łączącą konto.
Kliknij Wyślij prompt i dodaj krótkie zdanie, które opisze użytkownikowi.
dlaczego akcja musi uzyskać dostęp do swojej tożsamości (np. „Aby zapisać preferencje”).
Kliknij Zapisz.
W sekcji Warunki kliknij Jeśli użytkownik ukończy łączenie kont.
Określ, co ma być kontynuowane, jeśli użytkownik zgodzi się na połączenie swojego konta.
Na przykład wywołaj webhooka, aby przetworzyć wymaganą logikę biznesową
i powrót do sceny początkowej.
Kliknij Zapisz.
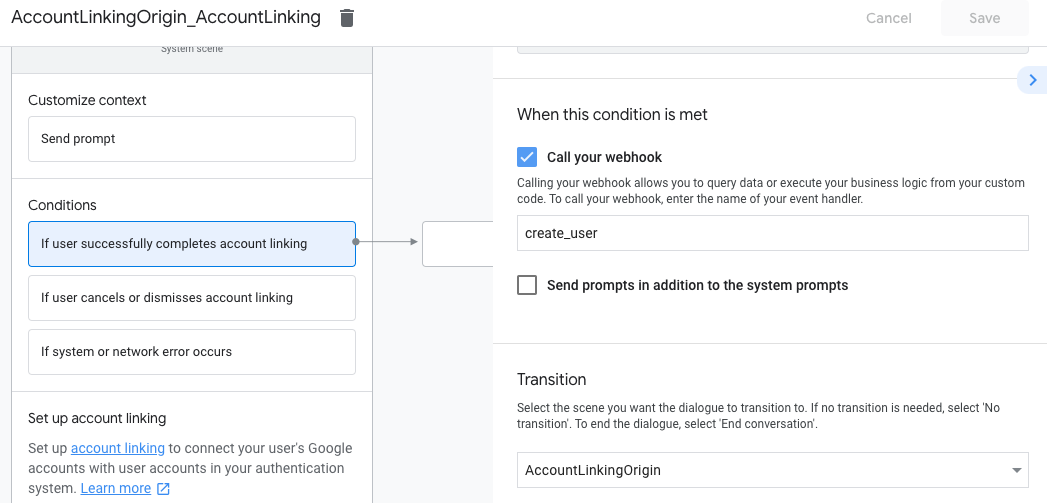
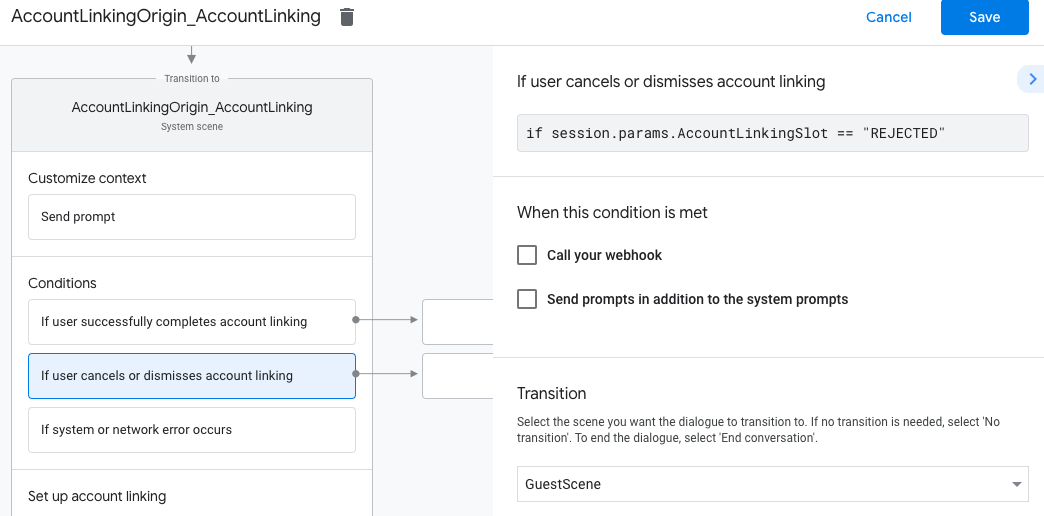
W sekcji Warunki kliknij Jeśli użytkownik anuluje lub odrzuci połączenie kont.
Określ, co ma być kontynuowane, jeśli użytkownik nie zgodzi się na połączenie swojego konta
koncie. Na przykład wyślij wiadomość z potwierdzeniem i przekieruj do scen
które oferują funkcje, które nie wymagają połączenia kont.
Kliknij Zapisz.
W sekcji Warunki kliknij W przypadku błędu systemu lub sieci.
Określ, jak ma być kontynuowany proces, gdy nie można połączyć kont
zostało ukończone z powodu błędów systemu lub sieci.
Na przykład wyślij wiadomość z potwierdzeniem i przekieruj do scen
które oferują funkcje, które nie wymagają połączenia kont.
Kliknij Zapisz.
Uzyskiwanie dostępu do informacji o profilu w backendzie
Gdy użytkownik zezwoli użytkownikowi na dostęp do jego profilu Google, otrzymasz
token tożsamości Google, który zawiera informacje z profilu Google użytkownika w każdym kolejnym
do Twojego działania.
Aby uzyskać dostęp do informacji o profilu użytkownika, musisz najpierw zweryfikować i zdekodować token
wykonując te czynności:
Użyj biblioteki dekodowania JWT w swoim języku, aby zdekodować
i użyj kluczy publicznych Google (dostępnych w JWK).
lub PEM), aby zweryfikować podpis tokena.
Sprawdź, czy wydawca tokena (pole iss w zdekodowanym tokenie) to https://accounts.google.com
a lista odbiorców (pole aud w zdekodowanym tokenie) to wartość
Identyfikator klienta nadany przez Google dla Działań, który jest przypisany do Twojego projektu
w Konsoli Actions.
Oto przykład zdekodowanego tokena:
{"sub":1234567890,// The unique ID of the user's Google Account"iss":"https://accounts.google.com",// The token's issuer"aud":"123-abc.apps.googleusercontent.com",// Client ID assigned to your Actions project"iat":233366400,// Unix timestamp of the token's creation time"exp":233370000,// Unix timestamp of the token's expiration time"name":"Jan Jansen","given_name":"Jan","family_name":"Jansen","email":"jan@gmail.com",// If present, the user's email address"locale":"en_US"}
Aby obsłużyć żądanie dostępu do danych, sprawdź, czy użytkownik potwierdził to za pomocą identyfikatora Google
token znajduje się już w bazie danych. Następujący fragment kodu pokazuje:
Oto przykład, jak sprawdzić, czy zamówienia danego użytkownika istnieją już w bazie danych Firestore:
...app.handle('Place_Order',asyncconv=>{constorder=conv.session.params.order;constuserDoc=dbs.user.doc(conv.user.params.uid);constorderHistory=userDoc.collection("orderHistory");if(orderHistory){//Orderhistoryexists,sotheuseralreadyplacedanorder.//Updatecounterforordertype.awaitorderHistory.doc(order).update({count:admin.firestore.FieldValue.increment(1)});}else{//FirstordertheyplaceawaitorderHistory.doc(order).set({option:order,count:1});options.forEach(opt=>{if(opt!=order){orderHistory.doc(opt).set({option:opt,count:0});}});}returnconv.add(`Your ${order} has been placed. `+'Thanks for using Boba Bonanza, see you soon!');});
[[["Łatwo zrozumieć","easyToUnderstand","thumb-up"],["Rozwiązało to mój problem","solvedMyProblem","thumb-up"],["Inne","otherUp","thumb-up"]],[["Brak potrzebnych mi informacji","missingTheInformationINeed","thumb-down"],["Zbyt skomplikowane / zbyt wiele czynności do wykonania","tooComplicatedTooManySteps","thumb-down"],["Nieaktualne treści","outOfDate","thumb-down"],["Problem z tłumaczeniem","translationIssue","thumb-down"],["Problem z przykładami/kodem","samplesCodeIssue","thumb-down"],["Inne","otherDown","thumb-down"]],["Ostatnia aktualizacja: 2025-07-25 UTC."],[[["\u003cp\u003eGoogle Sign-In for Assistant simplifies account linking and creation for both users and developers, enabling access to user profiles for personalized experiences.\u003c/p\u003e\n"],["\u003cp\u003eDevelopers can leverage Google Sign-In to link or create user accounts across platforms, facilitating seamless user journeys and communication.\u003c/p\u003e\n"],["\u003cp\u003eImplementing Google Sign-In involves configuring the project in Actions Console, designing the authentication flow in Actions Builder, and handling data access requests securely in your backend.\u003c/p\u003e\n"],["\u003cp\u003eUser profile information, such as name, email, and profile picture, can be accessed after user authorization and token validation, allowing for customized interactions within the Action.\u003c/p\u003e\n"],["\u003cp\u003eActions using account linking for financial information are subject to additional policies and review, requiring compliance with financial services policies before submission.\u003c/p\u003e\n"]]],[],null,["# Account linking with Google Sign-In\n\nGoogle Sign-In for the Assistant provides the simplest and easiest user experience\nto users and developers both for account linking and account creation. Your Action\ncan request access to your user's Google profile during a conversation,\nincluding the user's name, email address, and profile picture.\n\nThe profile information can be used to create a personalized user experience\nin your Action. If you have apps on other platforms and they use Google Sign-In,\nyou can also find and link to an existing user's account, create a new account,\nand establish a direct channel of communication to the user.\n\nTo perform account linking with Google Sign-In, you ask the user to give consent\nto access their Google profile. You then use the information in their profile, for\nexample their email address, to identify the user in your system.\n\nImplement Google Sign-In account linking\n----------------------------------------\n\nFollow the steps in the following sections to add Google Sign-In account linking to your\nAction.\n| **Note:** If you're implementing account linking to handle financial information, note that additional policies may apply to your Action. It can take us up to six weeks to review an Action with account linking for financial information, so factor that time in when planning your release schedule. To ease the review process, make sure you comply with the [financial services policies](/assistant/console/policies/general-policies#financial_services) before submitting your Action for review.\n\n### Configure the project\n\nTo configure your project to use Google Sign-In account linking, follow these steps:\n\n1. Open the Actions Console and select a project.\n2. Click the **Develop** tab and choose **Account linking**.\n3. Enable the switch next to **Account linking**.\n4. In the **Account creation** section, select **Yes**.\n5. In **Linking type** , select **Google Sign In**.\n\n6. Open **Client Information** and take note of the value of **Client ID issued by Google to your Actions**.\n\n7. Click **Save**.\n\n### Design the voice user interface for the authentication flow\n\n| **Warning:** Don't give users a required account linking prompt at the start of the conversation with your Action. Instead, give unauthenticated users a guest flow to show how your Action works, and then only ask for account linking if it's necessary to proceed. If users are leaving the Action consistently because of account linking issues, Google will not actively promote the Action, which may decrease the Action's user traffic.\n|\n|\n| **Note:** You must use [Actions Builder](/assistant/conversational/build#actions_builder) to build an Action that implements account linking.\n\n#### Check if the user is verified and start the account linking flow\n\n1. Open your Actions Builder project in the [Actions Console](https://console.actions.google.com).\n2. Create a new scene to start account linking in your Action:\n 1. Click **Scenes**.\n 2. Click the **add** (+) icon to add a new scene.\n3. In the newly created scene, click the add *add* icon for **Conditions**.\n4. Add a condition that checks if the user associated with the conversation is a a verified user. If the check fails, your Action can't perform account linking during the conversation, and should fall back to providing access to functionality that doesn't require account linking.\n 1. In the `Enter new expression` field under **Condition** , enter the following logic: `user.verificationStatus != \"VERIFIED\"`\n 2. Under **Transition**, select a scene that doesn't require account linking or a scene that is the entry point to guest-only functionality.\n\n1. Click the add *add* icon for **Conditions**.\n2. Add a condition to trigger an account linking flow if the user doesn't have an associated identity.\n 1. In the `Enter new expression` field under **Condition** , enter the following logic:: `user.verificationStatus == \"VERIFIED\"`\n 2. Under **Transition** , select the **Account Linking** system scene.\n 3. Click **Save**.\n\nAfter saving, a new account linking system scene called `\u003cSceneName\u003e_AccountLinking`\nis added to your project.\n\n#### Customize the account linking scene\n\n1. Under **Scenes**, select the account linking system scene.\n2. Click **Send prompt** and add a short sentence to describe to the user why the Action needs to access their identity (for example \"To save your preferences\").\n3. Click **Save**.\n\n1. Under **Conditions** , click **If user successfully completes account linking**.\n2. Configure how the flow should proceed if the user agrees to link their account. For example, call the webhook to process any custom business logic required and transition back to the originating scene.\n3. Click **Save**.\n\n1. Under **Conditions** , click **If user cancels or dismisses account linking**.\n2. Configure how the flow should proceed if the user doesn't agree to link their account. For example, send an acknowledging message and redirect to scenes that provide functionality that doesn't require account linking.\n3. Click **Save**.\n\n1. Under **Conditions** , click **If system or network error occurs**.\n2. Configure how the flow should proceed if the account linking flow can't be completed because of system or network errors. For example, send an acknowledging message and redirect to scenes that provide functionality that doesn't require account linking.\n3. Click **Save**.\n\n### Access profile information in your backend\n\nAfter the user authorizes your action to access their Google profile, you will receive\na Google ID token that contains the user's Google profile information in every subsequent\nrequest to your action.\n\nTo access the user's profile information, you need to first validate and decode the token\nby doing the following:\n\n1. Use a [JWT-decoding library](https://jwt.io/) for your language to decode the token, and use Google's public keys (available in [JWK](https://www.googleapis.com/oauth2/v3/certs) or [PEM](https://www.googleapis.com/oauth2/v1/certs) format) to verify the token's signature.\n2. Verify that the token's issuer (`iss` field in the decoded token) is `https://accounts.google.com` and that the audience (`aud` field in the decoded token) is the value of **Client ID issued by Google to your Actions**, which is assigned to your project in the Actions console.\n\nThe following is an example of a decoded token: \n\n```carbon\n{\n \"sub\": 1234567890, // The unique ID of the user's Google Account\n \"iss\": \"https://accounts.google.com\", // The token's issuer\n \"aud\": \"123-abc.apps.googleusercontent.com\", // Client ID assigned to your Actions project\n \"iat\": 233366400, // Unix timestamp of the token's creation time\n \"exp\": 233370000, // Unix timestamp of the token's expiration time\n \"name\": \"Jan Jansen\",\n \"given_name\": \"Jan\",\n \"family_name\": \"Jansen\",\n \"email\": \"jan@gmail.com\", // If present, the user's email address\n \"locale\": \"en_US\"\n}\n```\n\nIf you use the [Actions on Google Fulfillment library for Node.js](https://github.com/actions-on-google/assistant-conversation-nodejs),\nit takes care of validating and decoding the token for you, and gives you access to\nthe profile content, as shown in the following code snippets. \n\n```gdscript\n...\nconst app = conversation({\n // REPLACE THE PLACEHOLDER WITH THE CLIENT_ID OF YOUR ACTIONS PROJECT\n clientId: CLIENT_ID,\n});\n...\n// Invoked on successful completion of account linking flow, check if we need to\n// create a Firebase user.\napp.handle('linkAccount', async conv =\u003e {\n let payload = conv.headers.authorization;\n if (payload) {\n // Get UID for Firebase auth user using the email of the user\n const email = payload.email;\n if (!conv.user.params.uid && email) {\n try {\n conv.user.params.uid = (await auth.getUserByEmail(email)).uid;\n } catch (e) {\n if (e.code !== 'auth/user-not-found') {\n throw e;\n }\n // If the user is not found, create a new Firebase auth user\n // using the email obtained from Google Assistant\n conv.user.params.uid = (await auth.createUser({email})).uid;\n }\n }\n }\n});\n```\n\n### Handle data access requests\n\nTo handle data access request, just verify that the user asserted by the Google ID\ntoken is already present in your database. The following snippet of code shows\nan example of how to check if orders for a user already exist in a Firestore database: \n\n```perl\n...\napp.handle('Place_Order', async conv =\u003e {\n const order = conv.session.params.order;\n const userDoc = dbs.user.doc(conv.user.params.uid);\n const orderHistory = userDoc.collection(\"orderHistory\");\n if (orderHistory) {\n // Order history exists, so the user already placed an order.\n // Update counter for order type.\n await orderHistory.doc(order).update({ count: admin.firestore.FieldValue.increment(1)});\n } else {\n // First order they place\n await orderHistory.doc(order).set({ option: order, count: 1});\n options.forEach(opt =\u003e {\n if (opt != order) {\n orderHistory.doc(opt).set({ option: opt, count: 0});\n }\n });\n }\n return conv.add(`Your ${order} has been placed. ` +\n 'Thanks for using Boba Bonanza, see you soon!');\n});\n```\n\n\u003cbr /\u003e"]]