
O tipo de vinculação "simplificada" do Login do Google baseada em OAuth adiciona o Login do Google à vinculação de contas baseada em OAuth. Isso oferece uma vinculação por voz perfeita para usuários do Google e também permite a vinculação de contas para usuários que se inscreveram no seu serviço com uma identidade que não é do Google.
Esse tipo de vinculação começa com o Login do Google, que permite verificar se as informações do perfil do usuário no Google existem no seu sistema. Se as informações do usuário não forem encontradas no seu sistema, um fluxo OAuth padrão será iniciado. O usuário também pode criar uma conta com as informações do perfil do Google.
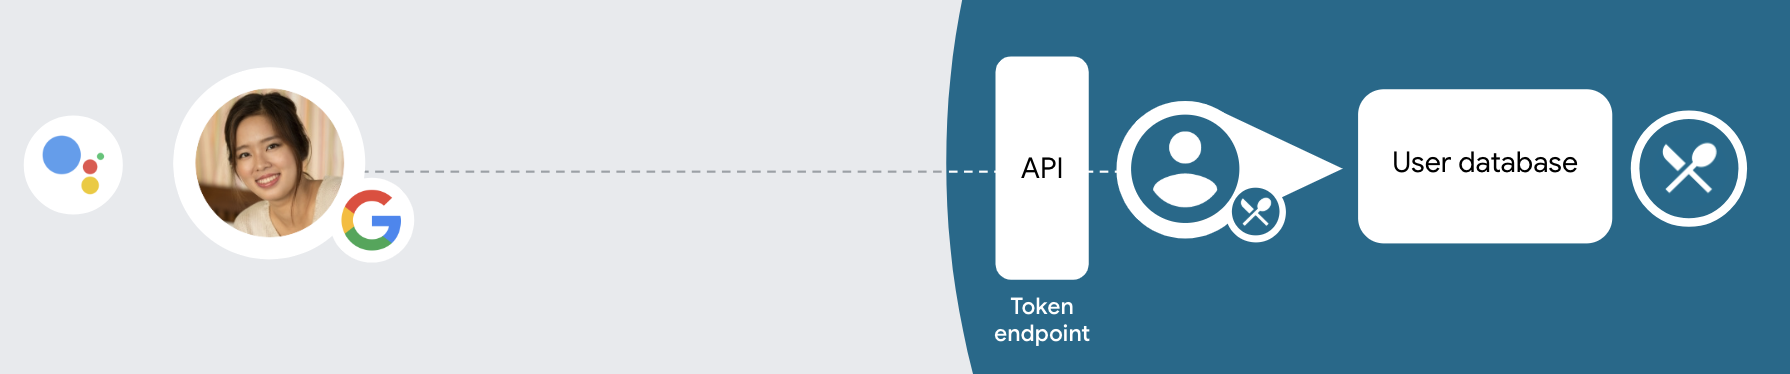
Para fazer a vinculação de contas com o tipo simplificado, siga estas etapas gerais:
- Primeiro, peça ao usuário para dar consentimento de acesso ao perfil do Google dele.
- Use as informações no perfil para identificar o usuário.
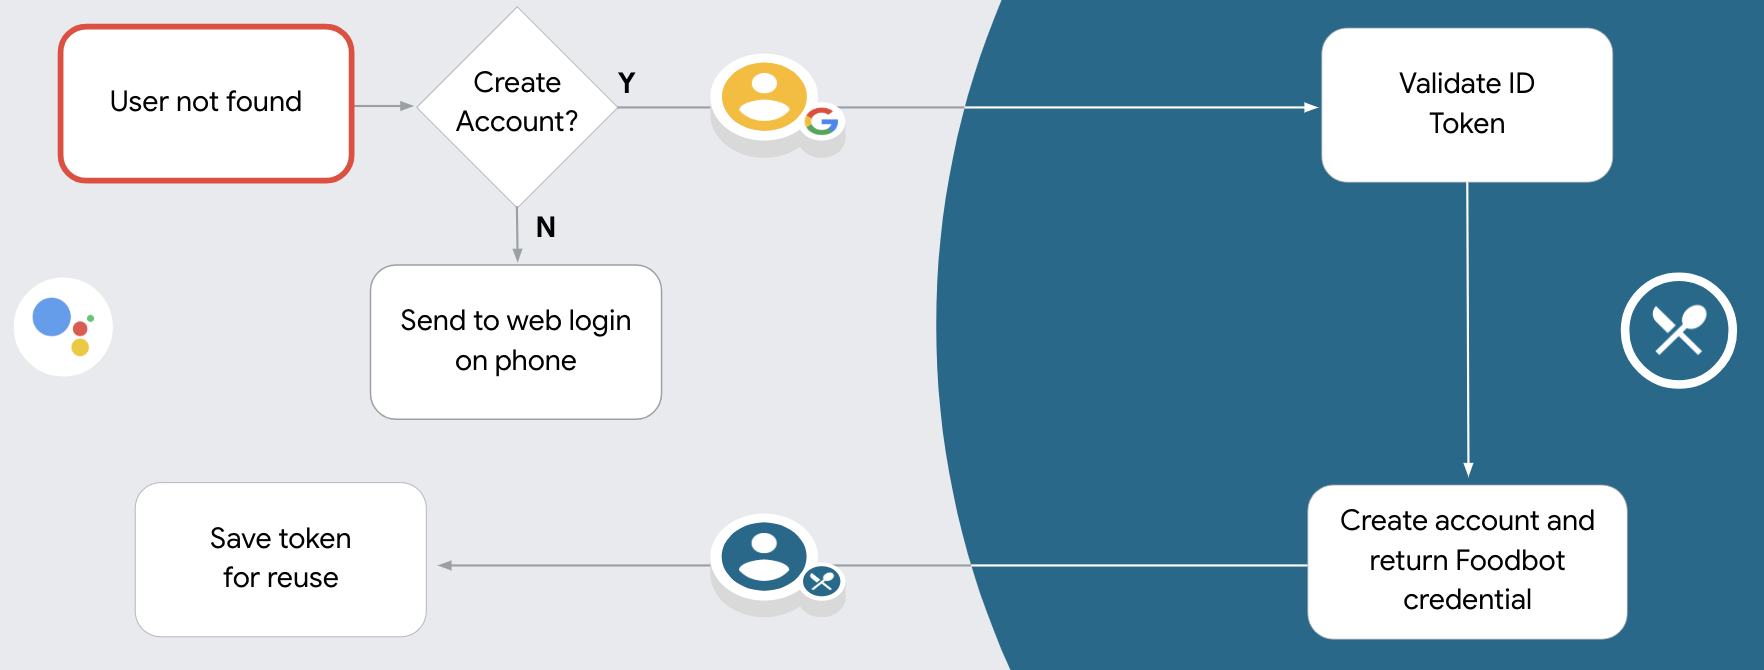
- Se não for possível encontrar uma correspondência para o usuário do Google no seu sistema de autenticação, o fluxo vai continuar dependendo de como você configurou o projeto do Actions no console do Actions para permitir a criação de contas de usuário por voz ou apenas no seu site.
- Se você permitir a criação de contas por voz, valide o token de ID recebido do Google. Em seguida, você pode criar um usuário com base nas informações do perfil contidas no token de ID.
- Se você não permitir a criação de contas por voz, o usuário será transferido para um navegador em que poderá carregar sua página de autorização e concluir o fluxo de criação de usuário.
Criar contas de suporte por voz
Se você permitir a criação de contas de usuário por voz, o Google Assistente vai perguntar se o usuário quer fazer o seguinte:
- Crie uma conta no seu sistema usando as informações da Conta do Google dela ou
- Faça login no sistema de autenticação com outra conta, se ela tiver uma conta que não seja do Google.
Recomendamos permitir a criação de contas por voz se você quiser minimizar o atrito do fluxo de criação de contas. O usuário só precisa sair do fluxo de voz se quiser fazer login usando uma conta que não seja do Google.
Não permitir a criação de contas por voz
Se você não permitir a criação de contas de usuário por voz, o Google Assistente vai abrir o URL do site que você forneceu para autenticação do usuário. Se a interação estiver acontecendo em um dispositivo sem tela, o Google Assistente vai direcionar o usuário para um smartphone para continuar o fluxo de vinculação de contas.
Recomendamos desativar a criação se:
Você não quer permitir que usuários com contas que não são do Google criem uma nova conta de usuário e quer que eles vinculem as contas de usuário atuais ao seu sistema de autenticação. Por exemplo, se você oferece um programa de fidelidade, talvez queira garantir que o usuário não perca os pontos acumulados na conta atual.
Você precisa ter controle total do fluxo de criação de contas. Por exemplo, é possível impedir a criação se você precisar mostrar os Termos de Serviço ao usuário durante a criação da conta.
Implementar a vinculação "simplificada" do login do Google baseada em OAuth
As contas são vinculadas com fluxos OAuth 2.0 padrão do setor. O Actions on Google é compatível com os fluxos implícito e de código de autorização.
No fluxo de código implícito, o Google abre o endpoint de autorização no navegador do usuário. Após o login, você retorna um token de acesso de longa duração para o Google. Esse token de acesso agora está incluído em todas as solicitações enviadas do Assistente para sua ação.
No fluxo do código de autorização, você precisa de dois endpoints:
- O endpoint de autorização, responsável por apresentar a IU de login aos usuários que ainda não fizeram login e registrar o consentimento para o acesso solicitado na forma de um código de autorização de curta duração.
- O endpoint de troca de token, que é responsável por dois tipos de trocas:
- troca um código de autorização por um token de atualização de longa duração e um token de acesso de curta duração. Essa troca acontece quando o usuário passa pelo fluxo de vinculação da conta.
- Troca um token de atualização de longa duração por um token de acesso de curta duração. Essa troca acontece quando o Google precisa de um novo token de acesso porque ele expirou.
Embora o fluxo do código implícito seja mais simples de implementar, o Google recomenda que os tokens de acesso emitidos usando o fluxo implícito nunca expirem, porque o uso do token com o fluxo implícito força o usuário a vincular a conta novamente. Se você precisar da validade do token por motivos de segurança, considere o uso do fluxo do código de autenticação.
Configurar o projeto
Para configurar seu projeto para usar a vinculação simplificada, siga estas etapas:
- Abra o console do Actions e selecione o projeto que você quer usar.
- Clique na guia Desenvolver e escolha Vinculação de contas.
- Ative a chave ao lado de Vinculação de contas.
- Na seção Criação de conta, selecione Sim.
Em Tipo de vinculação, selecione OAuth e Login do Google e Implícito.
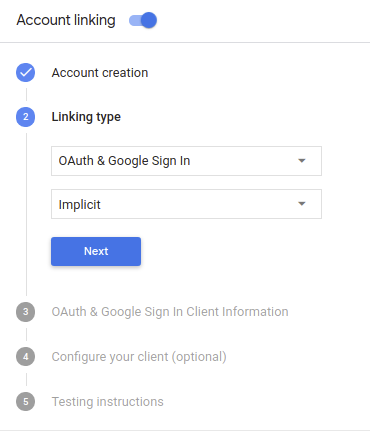
Em Informações do cliente, faça o seguinte:
- Atribua um valor a ID do cliente emitido pelo Actions on Google para identificar solicitações do Google.
- Insira os URLs dos endpoints de autorização e troca de token.
Clique em Salvar.
Implementar seu servidor OAuth
Para oferecer suporte ao fluxo implícito do OAuth 2.0, seu serviço faz uma autorização de destino disponível por HTTPS. Esse endpoint é responsável por autenticar e obter consentimento dos usuários para acesso aos dados. O endpoint de autorização apresenta uma interface de login aos usuários que ainda não estão conectados e registra consentir com o acesso solicitado.
Quando seu Action precisa chamar uma das APIs autorizadas do serviço, o Google usa endpoint para obter permissão de seus usuários para chamar essas APIs em seus nome de usuário.
Uma sessão de fluxo implícito do OAuth 2.0 típica iniciada pelo Google tem o seguinte fluxo:
- O Google abre seu endpoint de autorização no navegador do usuário. A o usuário faz login caso ainda não tenha feito isso e concede ao Google permissão para acessar os dados dele com a API, caso ainda não tenham concedido permissão.
- Seu serviço cria um token de acesso e o retorna para o Google redirecionando o navegador do usuário de volta para o Google com o token de acesso; anexada à solicitação.
- O Google chama as APIs do seu serviço e anexa o token de acesso com cada solicitação. O serviço verifica se o token de acesso concede ao Google autorização para acessar a API e, em seguida, conclui a chamada de API.
Processar solicitações de autorização
Quando sua ação precisar vincular a conta usando um fluxo implícito do OAuth 2.0, O Google envia o usuário para seu endpoint de autorização com uma solicitação que inclui os seguintes parâmetros:
| Parâmetros de endpoint de autorização | |
|---|---|
client_id |
O ID do cliente que você atribuiu ao Google. |
redirect_uri |
O URL para o qual você envia a resposta para essa solicitação. |
state |
Um valor de contabilidade que é retornado ao Google inalterado na URI de redirecionamento. |
response_type |
O tipo de valor a ser retornado na resposta. Para a implementação implícita do OAuth 2.0
fluxo, o tipo de resposta será sempre token. |
Por exemplo, se o endpoint de autorização estiver disponível em https://myservice.example.com/auth,
uma solicitação será semelhante a esta:
GET https://myservice.example.com/auth?client_id=GOOGLE_CLIENT_ID&redirect_uri=REDIRECT_URI&state=STATE_STRING&response_type=token
Para que o endpoint de autorização processe solicitações de login, siga estas etapas:
Verifique os valores
client_ideredirect_uripara impedir a concessão de acesso a apps clientes não intencionais ou configurados incorretamente:- Confirme se o
client_idcorresponde ao ID do cliente que você atribuídas ao Google. - Confirme se o URL especificado pelo
redirect_uritem o seguinte formato:https://oauth-redirect.googleusercontent.com/r/YOUR_PROJECT_ID
- Confirme se o
Verifique se o usuário está conectado ao seu serviço. Se o usuário não tiver feito login conclua o fluxo de login ou inscrição do serviço.
Gere um token de acesso que o Google usará para acessar sua API. A token de acesso pode ser qualquer valor de string, mas deve representar exclusivamente o usuário e o cliente a que o token se destina e não pode ser adivinhado.
Envia uma resposta HTTP que redireciona o navegador do usuário para o URL especificado pelo parâmetro
redirect_uri. Inclua todos os elementos parâmetros a seguir no fragmento de URL:access_token: o token de acesso que você acabou de gerar.token_type: a stringbearer.state: o valor do estado não modificado do original. solicitação Veja a seguir um exemplo de URL resultante:https://oauth-redirect.googleusercontent.com/r/YOUR_PROJECT_ID#access_token=ACCESS_TOKEN&token_type=bearer&state=STATE_STRING
O gerenciador de redirecionamento OAuth 2.0 do Google recebe o token de acesso e confirma
que o valor state não mudou. Depois que o Google tiver
token de acesso do seu serviço, o Google o anexa às chamadas subsequentes
à sua ação como parte do AppRequest.
Processar a vinculação automática
Depois que o usuário autorizar o acesso ao perfil do Google, o Google envia uma solicitação que contém uma declaração assinada sobre a identidade do usuário do Google. A declaração contém informações que incluem o ID, o nome, o ID da Conta do Google do usuário e endereço de e-mail. O endpoint de troca de token configurado para o projeto gerencia a solicitação.
Se a Conta do Google correspondente já estiver no seu sistema de autenticação,
seu endpoint de troca de token retorna um token para o usuário. Se a Conta do Google
corresponder a um usuário existente, seu endpoint de troca de token retornará um erro user_not_found.
A solicitação tem o seguinte formato:
POST /token HTTP/1.1
Host: oauth2.example.com
Content-Type: application/x-www-form-urlencoded

grant_type=urn:ietf:params:oauth:grant-type:jwt-bearer&intent=get&assertion=JWT&consent_code=CONSENT_CODE&scope=SCOPES
Seu endpoint de troca de token precisa ser capaz de lidar com os seguintes parâmetros:
| Parâmetros de endpoint de token | |
|---|---|
grant_type |
O tipo de token que está sendo trocado. Para essas solicitações,
tem o valor urn:ietf:params:oauth:grant-type:jwt-bearer. |
intent |
Para essas solicitações, o valor desse parâmetro é "get". |
assertion |
Um JSON Web Token (JWT) que fornece uma declaração assinada do identidade do usuário. O JWT contém informações que incluem o endereço de e-mail ID, nome e endereço de e-mail da conta. |
consent_code |
Opcional: quando presente, um código de uso único que indica que o o usuário autorizou sua ação a acessar os escopos especificados. |
scope |
Opcional: todos os escopos que você configurou para solicitar aos usuários. |
Quando o endpoint de troca de token recebe o pedido de vinculação, ele deve fazer o seguinte:
Valide e decodifique a declaração do JWT
É possível validar e decodificar a declaração JWT usando uma biblioteca de decodificação JWT para sua linguagem. Use as chaves públicas do Google, disponíveis no JWK (link em inglês) ou PEM) para verificar assinatura.
Quando decodificada, a declaração JWT se parece com o seguinte exemplo:
{
  "sub": 1234567890,        // The unique ID of the user's Google Account
  "iss": "https://accounts.google.com",        // The assertion's issuer
  "aud": "123-abc.apps.googleusercontent.com", // Your server's client ID
  "iat": 233366400,         // Unix timestamp of the assertion's creation time
  "exp": 233370000,         // Unix timestamp of the assertion's expiration time
  "name": "Jan Jansen",
  "given_name": "Jan",
  "family_name": "Jansen",
  "email": "jan@gmail.com", // If present, the user's email address
  "locale": "en_US"
}
Além de verificar a assinatura do token, verifique se o emissor da declaração
(campo iss) é https://accounts.google.com e que o público-alvo (campo aud)
é o ID do cliente atribuído à sua ação.
Verificar se a Conta do Google já está no sistema de autenticação
Verifique se uma das condições a seguir é verdadeira:
- O ID da Conta do Google, encontrado no campo
subda declaração, está no seu banco de dados de usuários. - O endereço de e-mail na declaração corresponde a um usuário no seu banco de dados de usuários.
Se alguma das condições for verdadeira, o usuário já se inscreveu e você pode emitir um token de acesso.
Se nem o ID da Conta do Google nem o endereço de e-mail especificado na declaração
corresponde a um usuário no seu banco de dados, ele ainda não se inscreveu. Nesse caso, seu
endpoint de troca de token deve responder com um erro HTTP 401, que especifica error=user_not_found,
como no exemplo a seguir:
HTTP/1.1 401 Unauthorized
Content-Type: application/json;charset=UTF-8

{
  "error":"user_not_found",
}
user_not_found, o Google
chama o endpoint de troca de token com o valor do parâmetro intent;
Defina como create e envie um token de ID com as informações do perfil do usuário.
com a solicitação.
Processar a criação de contas pelo Login do Google
Quando um usuário precisa criar uma conta no seu serviço, o Google
solicitação ao seu endpoint de troca de token que especifica
intent=create, como no exemplo abaixo:
POST /token HTTP/1.1
Host: oauth2.example.com
Content-Type: application/x-www-form-urlencoded

response_type=token&grant_type=urn:ietf:params:oauth:grant-type:jwt-bearer&scope=SCOPES&intent=create&consent_code=CONSENT_CODE&assertion=JWT[&NEW_ACCOUNT_INFO]
O parâmetro assertion contém um JSON Web Token (JWT) que fornece
uma declaração assinada da identidade do usuário do Google. O JWT contém informações
incluindo o ID, o nome e o endereço de e-mail da Conta do Google do usuário, que você pode usar
para criar uma nova conta no serviço.
Para responder a solicitações de criação de conta, seu endpoint de troca de token precisa: o seguinte:
Valide e decodifique a declaração do JWT
É possível validar e decodificar a declaração JWT usando uma biblioteca de decodificação JWT para sua linguagem. Use as chaves públicas do Google, disponíveis no JWK (link em inglês) ou PEM) para verificar assinatura.
Quando decodificada, a declaração JWT se parece com o seguinte exemplo:
{
  "sub": 1234567890,        // The unique ID of the user's Google Account
  "iss": "https://accounts.google.com",        // The assertion's issuer
  "aud": "123-abc.apps.googleusercontent.com", // Your server's client ID
  "iat": 233366400,         // Unix timestamp of the assertion's creation time
  "exp": 233370000,         // Unix timestamp of the assertion's expiration time
  "name": "Jan Jansen",
  "given_name": "Jan",
  "family_name": "Jansen",
  "email": "jan@gmail.com", // If present, the user's email address
  "locale": "en_US"
}
Além de verificar a assinatura do token, verifique se o emissor da declaração
(campo iss) é https://accounts.google.com e que o público-alvo (campo aud)
é o ID do cliente atribuído à sua ação.
Valide as informações do usuário e crie uma nova conta
Verifique se uma das condições a seguir é verdadeira:
- O ID da Conta do Google, encontrado no campo
subda declaração, está no seu banco de dados de usuários. - O endereço de e-mail na declaração corresponde a um usuário no seu banco de dados de usuários.
Se uma das condições for verdadeira, solicite que o usuário vincule a conta atual dele com
sua Conta do Google respondendo à solicitação com um erro HTTP 401, especificando
error=linking_error e o endereço de e-mail do usuário como login_hint, como no
exemplo a seguir:
HTTP/1.1 401 Unauthorized
Content-Type: application/json;charset=UTF-8

{
  "error":"linking_error",
  "login_hint":"foo@bar.com"
}
Se nenhuma das condições for verdadeira, crie uma nova conta de usuário usando as informações. fornecidos no JWT. Em geral, novas contas não têm uma senha definida. É recomendamos que você adicione o Login do Google a outras plataformas para permitir que os usuários façam login pelo Google em todas as plataformas do seu aplicativo. Também é possível enviar ao usuário um link por e-mail que inicie seu fluxo de recuperação de senha para permitir que ele defina uma senha para fazer login em outras plataformas.
Quando a criação for concluída, emita um token de acesso e retorna os valores em um objeto JSON o corpo da sua resposta HTTPS, como no exemplo a seguir:
{
  "token_type": "Bearer",
  "access_token": "ACCESS_TOKEN",

  "expires_in": SECONDS_TO_EXPIRATION
}
Projetar a interface de usuário de voz para o fluxo de autenticação
Verificar se o usuário está verificado e iniciar o fluxo de vinculação da conta
- Abra seu projeto do Actions Builder no Console do Actions.
- Crie uma nova cena para iniciar a vinculação de contas na sua ação:
- Clique em Cenas.
- Clique no ícone de adição (+) para adicionar uma nova cena.
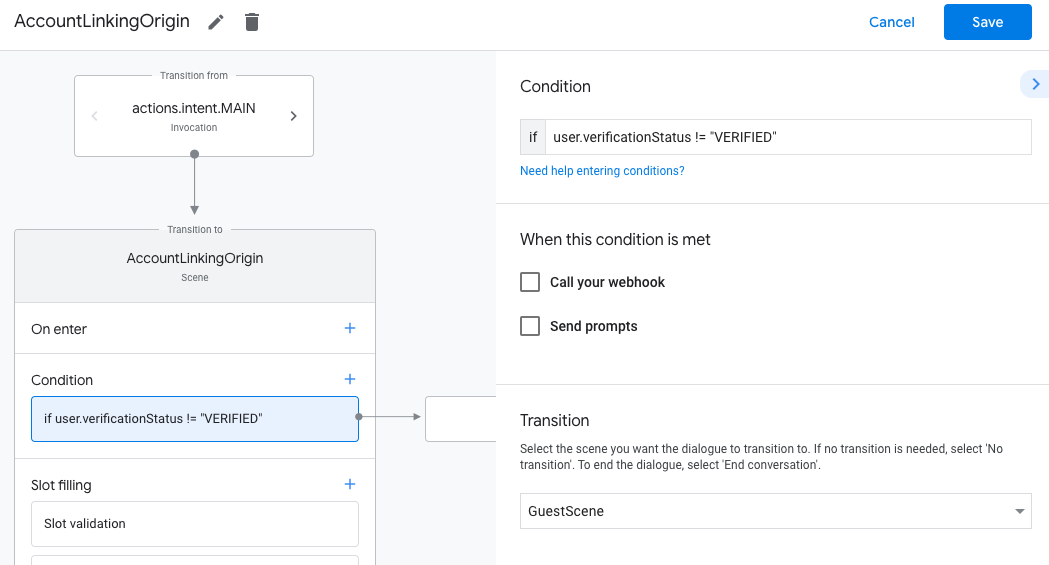
- Na cena recém-criada, clique no ícone de adição add para Condições.
- Adicione uma condição que verifique se o usuário associado à conversa é um usuário verificado. Se a verificação falhar, a Ação não poderá vincular contas
durante a conversa e precisará oferecer acesso a
funcionalidades que não exigem vinculação de contas.
- No campo
Enter new expressionem Condição, insira a seguinte lógica:user.verificationStatus != "VERIFIED" - Em Transição, selecione uma cena que não exija vinculação de conta ou uma cena que seja o ponto de entrada para a funcionalidade somente para convidados.
- No campo
- Clique no ícone de adição add em Condições.
- Adicione uma condição para acionar um fluxo de vinculação de contas se o usuário não tiver
uma identidade associada.
- No campo
Enter new expressionem Condição, insira a seguinte lógica:user.verificationStatus == "VERIFIED" - Em Transição, selecione a cena do sistema Vinculação de conta.
- Clique em Salvar.
- No campo
![]()
Depois de salvar, uma nova cena do sistema de vinculação de contas chamada <SceneName>_AccountLinking
será adicionada ao seu projeto.
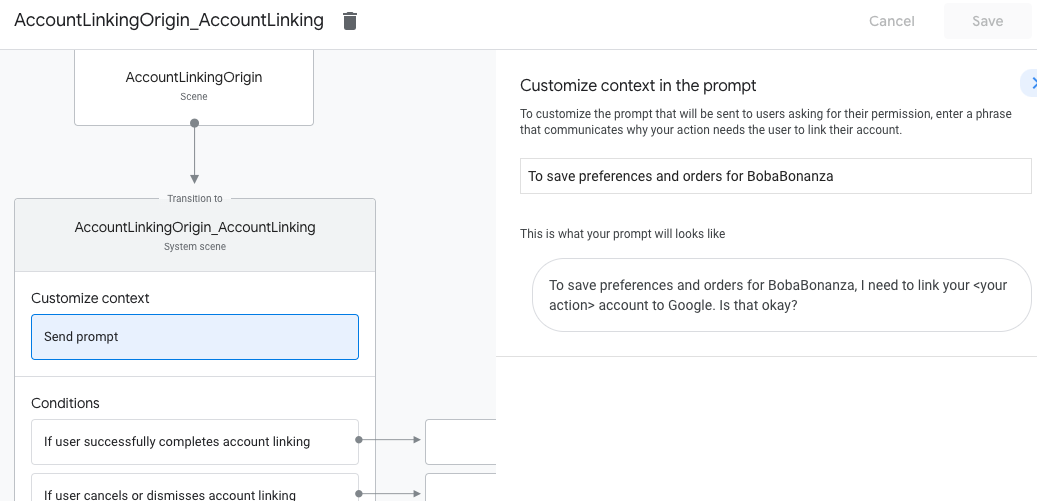
Personalizar a cena de vinculação de conta
- Em Cenas, selecione a cena do sistema de vinculação de contas.
- Clique em Enviar solicitação e adicione uma frase curta para descrever ao usuário por que a ação precisa acessar a identidade dele (por exemplo, "Para salvar suas preferências").
- Clique em Salvar.
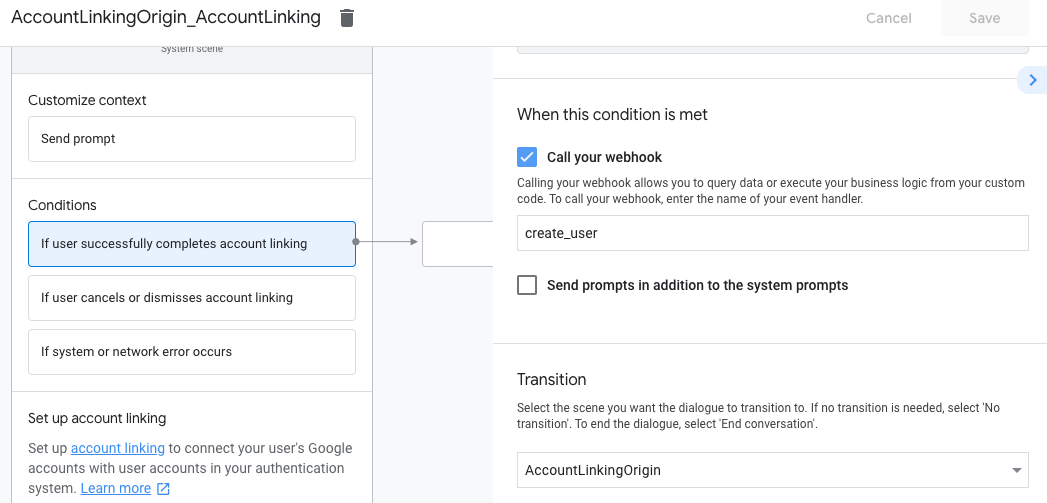
- Em Condições, clique em Se o usuário concluir a vinculação de contas.
- Configure como o fluxo vai prosseguir se o usuário concordar em vincular a conta. Por exemplo, chame o webhook para processar qualquer lógica de negócios personalizada necessária e volte para a cena de origem.
- Clique em Salvar.
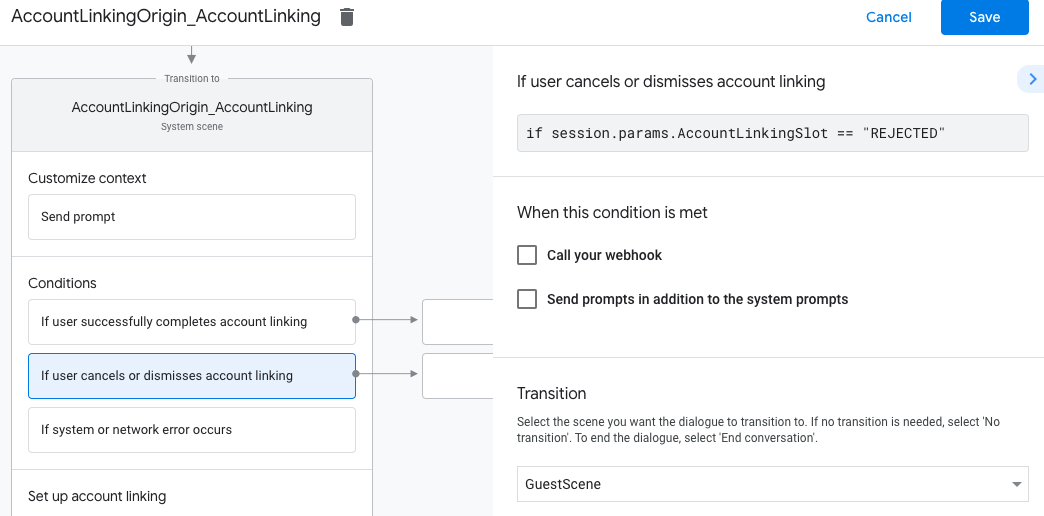
- Em Condições, clique em Se o usuário cancelar ou dispensar a vinculação de contas.
- Configure como o fluxo deve prosseguir se o usuário não concordar em vincular a conta. Por exemplo, envie uma mensagem de confirmação e redirecione para cenas que oferecem funcionalidades que não exigem vinculação de contas.
- Clique em Salvar.
- Em Condições, clique em Se ocorrer um erro de sistema ou de rede.
- Configure como o fluxo deve prosseguir se a vinculação de conta não puder ser concluída devido a erros de sistema ou de rede. Por exemplo, envie uma mensagem de confirmação e redirecione para cenas que oferecem funcionalidades que não exigem vinculação de contas.
- Clique em Salvar.
Processar solicitações de acesso a dados
Se a solicitação do Google Assistente contiver um token de acesso, primeiro verifique se o token é válido e não expirou. Depois, recupere do banco de dados da conta de usuário a conta associada ao token.