
Le type d'association Google Sign-In "simplifié" basé sur OAuth ajoute Google Sign-In à l'association de compte basée sur OAuth. Cela permet aux utilisateurs Google d'associer facilement leur compte par commande vocale, tout en permettant l'association de compte pour les utilisateurs qui se sont inscrits à votre service avec une identité non Google.
Ce type d'association commence par Se connecter avec Google, ce qui vous permet de vérifier si les informations du profil Google de l'utilisateur existent dans votre système. Si les informations de l'utilisateur ne sont pas trouvées dans votre système, un flux OAuth standard commence. L'utilisateur peut également choisir de créer un compte avec les informations de son profil Google.
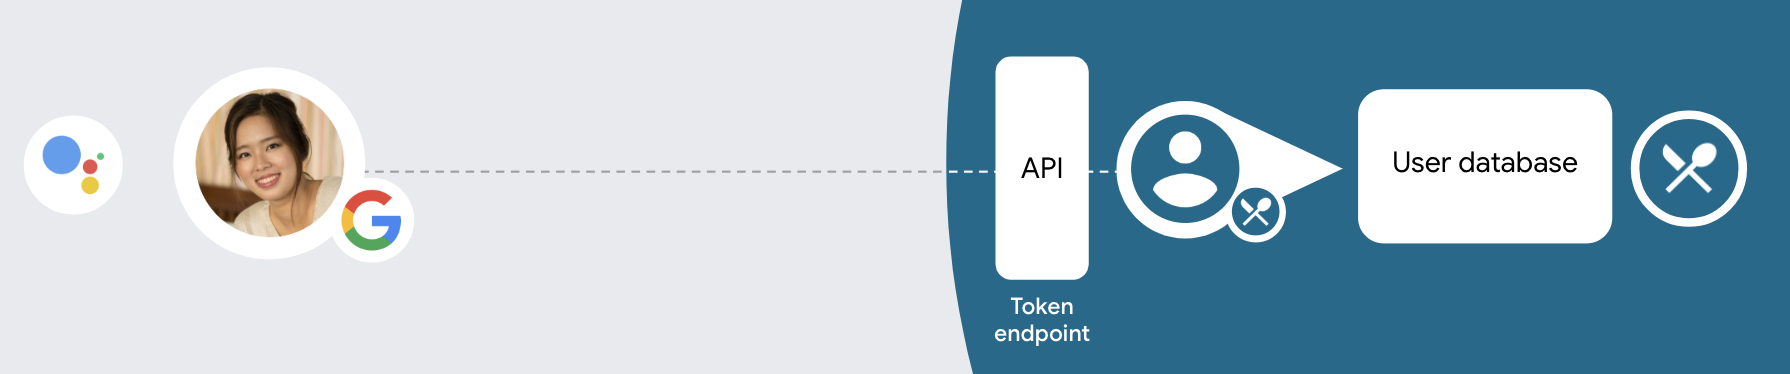
Pour associer un compte avec le type d'association simplifiée, suivez ces étapes générales :
- Demandez d'abord à l'utilisateur d'autoriser l'accès à son profil Google.
- Utilisez les informations de son profil pour identifier l'utilisateur.
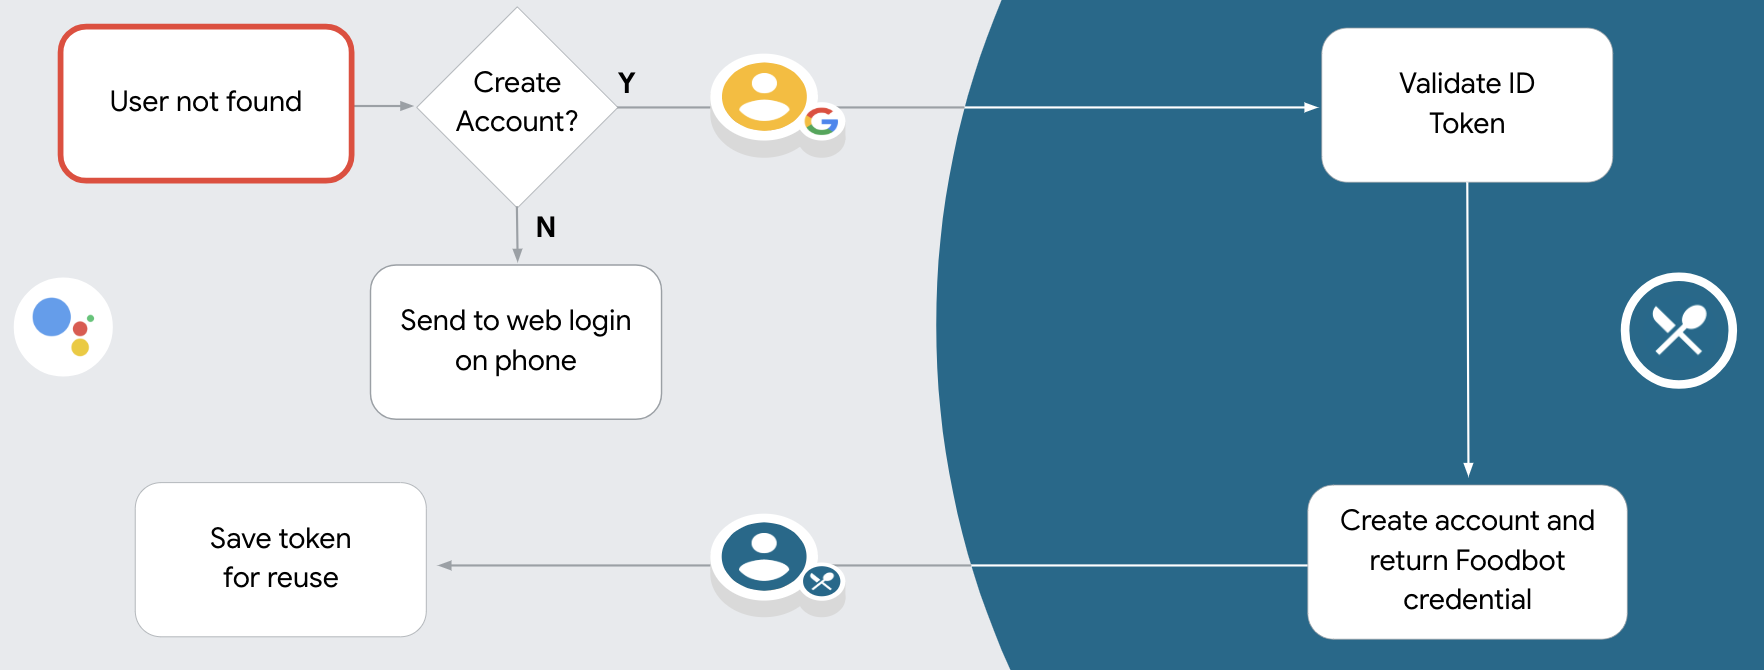
- Si vous ne trouvez pas d'utilisateur Google correspondant dans votre système d'authentification, le flux se poursuit selon que vous avez configuré votre projet Actions dans la console Actions pour autoriser la création de comptes utilisateur par commande vocale ou uniquement sur votre site Web.
- Si vous autorisez la création de comptes par commande vocale, validez le jeton d'identité reçu de Google. Vous pouvez ensuite créer un utilisateur en fonction des informations de profil contenues dans le jeton d'identité.
- Si vous n'autorisez pas la création de compte par commande vocale, l'utilisateur est redirigé vers un navigateur où il peut charger votre page d'autorisation et suivre le flux de création d'utilisateur.
Créer un compte d'assistance par commande vocale
Si vous autorisez la création de comptes utilisateur par commande vocale, l'Assistant demande à l'utilisateur s'il souhaite effectuer les actions suivantes :
- créer un compte sur votre système à l'aide des informations de son compte Google ;
- Connectez-vous à votre système d'authentification avec un autre compte si vous en avez déjà un qui n'est pas un compte Google.
Nous vous recommandons d'autoriser la création de comptes par commande vocale si vous souhaitez minimiser les frictions du processus de création de compte. L'utilisateur n'a besoin de quitter le flux vocal que s'il souhaite se connecter à l'aide d'un compte existant autre que Google.
Interdire la création de comptes par commande vocale
Si vous avez interdit la création de comptes utilisateur par commande vocale, l'Assistant ouvre l'URL du site Web que vous avez fournie pour l'authentification des utilisateurs. Si l'interaction a lieu sur un appareil sans écran, l'Assistant redirige l'utilisateur vers un téléphone pour qu'il poursuive le parcours d'association de compte.
Il est recommandé de ne pas autoriser la création dans les cas suivants :
Vous ne souhaitez pas autoriser les utilisateurs disposant de comptes non Google à créer un compte utilisateur, mais plutôt à l'associer à leurs comptes utilisateur existants dans votre système d'authentification. Par exemple, si vous proposez un programme de fidélité, vous pouvez vous assurer que l'utilisateur ne perd pas les points accumulés sur son compte existant.
Vous devez avoir le contrôle total du flux de création de compte. Par exemple, vous pouvez interdire la création si vous devez présenter vos conditions d'utilisation à l'utilisateur lors de la création du compte.
Implémenter l'association "simplifiée" de compte Google Sign-in basée sur OAuth
Les comptes sont associés à l'aide de flux OAuth 2.0 standards dans le secteur. Actions on Google est compatible avec les flux implicites et avec code d'autorisation.
Dans le flux de code implicite, Google ouvre votre point de terminaison d'autorisation dans le navigateur de l'utilisateur. Une fois connecté, vous renvoyez un jeton d'accès de longue durée à Google. Ce jeton d'accès est désormais inclus dans chaque requête envoyée à l'action par l'Assistant.
Dans le flux de code d'autorisation, vous avez besoin de deux points de terminaison:
- Le point de terminaison authorization, qui consiste à présenter l'interface de connexion aux utilisateurs qui ne sont pas déjà connectés et à enregistrer le consentement demandé pour l'accès demandé sous la forme d'un code d'autorisation temporaire.
- Le point de terminaison d'échange de jetons, responsable de deux types d'échanges :
- Échange un code d'autorisation contre un jeton d'actualisation de longue durée et un jeton d'accès de courte durée. Cet échange se produit lorsque l'utilisateur suit la procédure d'association de comptes.
- Échange un jeton d'actualisation de longue durée contre un jeton d'accès de courte durée. Cet échange se produit lorsque Google a besoin d'un nouveau jeton d'accès, car celui-ci a expiré.
Bien que le flux de code implicite soit plus facile à mettre en œuvre, Google recommande que les jetons d'accès émis à l'aide du flux implicite n'expirent jamais, car l'expiration du jeton avec le flux implicite oblige l'utilisateur à associer de nouveau son compte. Si vous avez besoin d'un jeton expiré pour des raisons de sécurité, envisagez plutôt d'utiliser le flux de code d'autorisation.
Configurer le projet
Pour configurer votre projet afin qu'il utilise l'association simplifiée, procédez comme suit :
- Ouvrez la console Actions et sélectionnez le projet que vous souhaitez utiliser.
- Cliquez sur l'onglet Develop (Développer), puis sélectionnez Account linking (Association de comptes).
- Activez le bouton à côté de Association de compte.
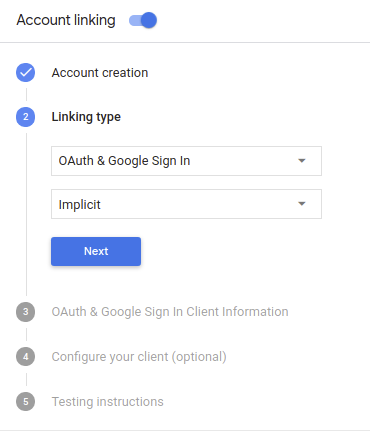
- Dans la section Création de compte, sélectionnez Oui.
Dans Type d'association, sélectionnez OAuth et Se connecter avec Google, puis Implicite.
Dans Client Information (Informations sur le client), procédez comme suit :
- Attribuez une valeur à ID client émis par vos Actions sur Google pour identifier les requêtes provenant de Google.
- Insérez les URL de vos points de terminaison d'autorisation et d'échange de jetons.
Cliquez sur Enregistrer.
Implémenter votre serveur OAuth
Pour prendre en charge le flux implicite OAuth 2.0, votre service accorde une autorisation un point de terminaison unique disponible via HTTPS. Ce point de terminaison est responsable de l’authentification et l'obtention du consentement des utilisateurs pour l'accès aux données. Le point de terminaison d'autorisation présente une interface utilisateur de connexion aux utilisateurs qui ne sont pas déjà connectés et enregistre autoriser l'accès demandé.
Lorsque votre action doit appeler l'une des API autorisées de votre service, Google utilise ce point de terminaison pour obtenir l'autorisation de vos utilisateurs d'appeler ces API au nom de l'utilisateur.
Une session de flux implicite OAuth 2.0 typique lancée par Google possède le flux suivant:
- Google ouvre votre point de terminaison d'autorisation dans le navigateur de l'utilisateur. La l'utilisateur se connecte s'il n'est pas déjà connecté et autorise Google à y accéder leurs données avec votre API s'ils ne l'ont pas déjà accordé.
- Votre service crée un jeton d'accès et le renvoie à Google en redirigeant le navigateur de l'utilisateur vers Google à l'aide du jeton d'accès joint à la demande.
- Google appelle les API de votre service et associe le jeton d'accès chaque requête. Votre service vérifie que le jeton d'accès accorde à Google l'autorisation d'accès à l'API, puis termine l'appel d'API.
Gérer les requêtes d'autorisation
Lorsque votre action doit associer des comptes via un flux implicite OAuth 2.0, Google renvoie l'utilisateur vers votre point de terminaison d'autorisation avec une requête qui inclut les paramètres suivants:
| Paramètres du point de terminaison de l'autorisation | |
|---|---|
client_id |
ID client que vous avez attribué à Google. |
redirect_uri |
URL à laquelle vous envoyez la réponse à cette requête. |
state |
Une valeur de tenue de registre renvoyée à Google telle quelle dans le l'URI de redirection. |
response_type |
Type de valeur à renvoyer dans la réponse. Pour l'authentification OAuth 2.0
le type de réponse est toujours token. |
Par exemple, si votre point de terminaison d'autorisation est disponible à l'adresse https://myservice.example.com/auth,
une requête peut se présenter comme suit:
GET https://myservice.example.com/auth?client_id=GOOGLE_CLIENT_ID&redirect_uri=REDIRECT_URI&state=STATE_STRING&response_type=token
Pour que votre point de terminaison d'autorisation traite les requêtes de connexion, procédez comme suit:
Vérifiez les valeurs
client_idetredirect_uripour pour empêcher l'octroi d'accès à des applications clientes non intentionnelles ou mal configurées:- Vérifiez que
client_idcorrespond à l'ID client que vous attribué à Google. - Vérifiez que l'URL spécifiée par
redirect_uria la forme suivante:https://oauth-redirect.googleusercontent.com/r/YOUR_PROJECT_ID
- Vérifiez que
Vérifiez si l'utilisateur est connecté à votre service. Si l'utilisateur n'est pas signé suivez la procédure de connexion ou d'inscription de votre service.
Générez un jeton d'accès que Google utilisera pour accéder à votre API. La Le jeton d'accès peut correspondre à n'importe quelle valeur de chaîne, mais il doit représenter de manière unique le user et le client pour lequel le jeton est destiné et ne doit pas être devinable.
Envoyer une réponse HTTP qui redirige le navigateur de l'utilisateur vers l'URL spécifiée par le paramètre
redirect_uri. Incluez tous les les paramètres suivants dans le fragment d'URL:access_token: jeton d'accès que vous venez de générertoken_type: chaînebearerstate: valeur de l'état non modifié de l'original demander Voici un exemple de l'URL obtenue:https://oauth-redirect.googleusercontent.com/r/YOUR_PROJECT_ID#access_token=ACCESS_TOKEN&token_type=bearer&state=STATE_STRING
Le gestionnaire de redirection OAuth 2.0 de Google recevra le jeton d'accès et confirmera
que la valeur state n'a pas changé. Une fois que Google a obtenu
pour votre service, Google l'associe aux appels suivants
à votre action dans le cadre de AppRequest.
Gérer l'association automatique
Une fois que l'utilisateur a autorisé votre action à accéder à son profil Google, Google envoie une requête contenant une assertion signée de l'identité de l'utilisateur Google. L'assertion contient des informations comme l'ID, le nom, et votre adresse e-mail. Le point de terminaison d'échange de jetons configuré pour votre projet gère cette demande.
Si le compte Google correspondant est déjà présent dans votre système d'authentification,
le point de terminaison de votre échange de jetons renvoie un jeton pour l'utilisateur. Si le compte Google
correspond à un utilisateur existant, le point de terminaison de votre échange de jetons renvoie une erreur user_not_found.
La demande se présente sous la forme suivante:
POST /token HTTP/1.1
Host: oauth2.example.com
Content-Type: application/x-www-form-urlencoded

grant_type=urn:ietf:params:oauth:grant-type:jwt-bearer&intent=get&assertion=JWT&consent_code=CONSENT_CODE&scope=SCOPES
Le point de terminaison de votre échange de jetons doit pouvoir gérer les paramètres suivants:
| Paramètres du point de terminaison du jeton | |
|---|---|
grant_type |
Type de jeton échangé. Pour ces requêtes,
a pour valeur urn:ietf:params:oauth:grant-type:jwt-bearer. |
intent |
Pour ces requêtes, la valeur de ce paramètre est "get". |
assertion |
Jeton Web JSON (JWT, JSON Web Token) qui fournit une assertion signée du jeton Google l'identité de l'utilisateur. Le jeton JWT contient des informations incluant les identifiants Google ID du compte, nom et adresse e-mail. |
consent_code |
Facultatif: code à usage unique indiquant que le paramètre L'utilisateur a autorisé votre action à accéder aux champs d'application spécifiés. |
scope |
Facultatif: tous les champs d'application que vous avez configurés par Google pour qu'ils soient demandés aux utilisateurs. |
Lorsque le point de terminaison de votre échange de jetons reçoit la demande d'association, il doit effectuer la suivantes:
Valider et décoder l'assertion JWT
Vous pouvez valider et décoder l'assertion JWT à l'aide d'une bibliothèque de décodage JWT pour votre langage. Utilisez les clés publiques de Google (disponibles dans JWK ou PEM) pour vérifier signature.
Une fois décodée, l'assertion JWT ressemble à l'exemple suivant:
{
  "sub": 1234567890,        // The unique ID of the user's Google Account
  "iss": "https://accounts.google.com",        // The assertion's issuer
  "aud": "123-abc.apps.googleusercontent.com", // Your server's client ID
  "iat": 233366400,         // Unix timestamp of the assertion's creation time
  "exp": 233370000,         // Unix timestamp of the assertion's expiration time
  "name": "Jan Jansen",
  "given_name": "Jan",
  "family_name": "Jansen",
  "email": "jan@gmail.com", // If present, the user's email address
  "locale": "en_US"
}
En plus de vérifier la signature du jeton, vérifiez que l'émetteur de l'assertion
(champ iss) est https://accounts.google.com et que l'audience (champ aud)
est l'ID client attribué à votre action.
Vérifier si le compte Google est déjà présent dans votre système d'authentification
Vérifiez si l'une des conditions suivantes est remplie:
- L'ID de compte Google, qui se trouve dans le champ
subde l'assertion, se trouve dans votre base de données d'utilisateurs. - L'adresse e-mail indiquée dans l'assertion correspond à un utilisateur de votre base de données utilisateur.
Si l'une ou l'autre des conditions est remplie, l'utilisateur s'est déjà inscrit et vous pouvez émettre un un jeton d'accès.
Si ni l'ID du compte Google, ni l'adresse e-mail spécifiée dans la déclaration
correspond à un utilisateur de votre base de données, cela signifie que l'utilisateur ne s'est pas encore inscrit. Dans ce cas,
Le point de terminaison de l'échange de jetons doit renvoyer une erreur HTTP 401, spécifiant error=user_not_found,
comme dans l'exemple suivant:
HTTP/1.1 401 Unauthorized
Content-Type: application/json;charset=UTF-8

{
  "error":"user_not_found",
}
user_not_found,
appelle le point de terminaison de votre échange de jetons avec la valeur du paramètre intent
est défini sur create et envoie un jeton d'ID contenant les informations du profil de l'utilisateur.
avec la demande.
Gérer la création de compte via Google Sign-In
Lorsqu'un utilisateur doit créer un compte sur votre service, Google effectue une
à votre point de terminaison d'échange de jetons, qui spécifie
intent=create, comme dans l'exemple suivant:
POST /token HTTP/1.1
Host: oauth2.example.com
Content-Type: application/x-www-form-urlencoded

response_type=token&grant_type=urn:ietf:params:oauth:grant-type:jwt-bearer&scope=SCOPES&intent=create&consent_code=CONSENT_CODE&assertion=JWT[&NEW_ACCOUNT_INFO]
Le paramètre assertion contient un jeton Web JSON (JWT) qui fournit
une assertion signée de l'identité de l'utilisateur Google. Le jeton JWT contient des informations
qui inclut l'ID, le nom et l'adresse e-mail du compte Google de l'utilisateur, que vous pouvez utiliser
pour créer un nouveau compte sur votre service.
Pour répondre aux demandes de création de compte, le point de terminaison de votre échange de jetons doit les éléments suivants:
Valider et décoder l'assertion JWT
Vous pouvez valider et décoder l'assertion JWT à l'aide d'une bibliothèque de décodage JWT pour votre langage. Utilisez les clés publiques de Google (disponibles dans JWK ou PEM) pour vérifier signature.
Une fois décodée, l'assertion JWT ressemble à l'exemple suivant:
{
  "sub": 1234567890,        // The unique ID of the user's Google Account
  "iss": "https://accounts.google.com",        // The assertion's issuer
  "aud": "123-abc.apps.googleusercontent.com", // Your server's client ID
  "iat": 233366400,         // Unix timestamp of the assertion's creation time
  "exp": 233370000,         // Unix timestamp of the assertion's expiration time
  "name": "Jan Jansen",
  "given_name": "Jan",
  "family_name": "Jansen",
  "email": "jan@gmail.com", // If present, the user's email address
  "locale": "en_US"
}
En plus de vérifier la signature du jeton, vérifiez que l'émetteur de l'assertion
(champ iss) est https://accounts.google.com et que l'audience (champ aud)
est l'ID client attribué à votre action.
Valider les informations sur l'utilisateur et créer un compte
Vérifiez si l'une des conditions suivantes est remplie:
- L'ID de compte Google, qui se trouve dans le champ
subde l'assertion, se trouve dans votre base de données d'utilisateurs. - L'adresse e-mail indiquée dans l'assertion correspond à un utilisateur de votre base de données utilisateur.
Si l'une des conditions est vraie, invitez l'utilisateur à associer son compte existant à
son compte Google en répondant à la requête avec une erreur HTTP 401, en spécifiant
error=linking_error et l'adresse e-mail de l'utilisateur en tant que login_hint, comme dans
l'exemple suivant:
HTTP/1.1 401 Unauthorized
Content-Type: application/json;charset=UTF-8

{
  "error":"linking_error",
  "login_hint":"foo@bar.com"
}
Si aucune condition n'est remplie, créez un nouveau compte d'utilisateur à l'aide des informations fournies dans le JWT. En règle générale, aucun mot de passe n'est défini pour les nouveaux comptes. Il est recommandé d'ajouter Google Sign-In aux autres plates-formes pour permettre aux utilisateurs de se connecter via Google sur toutes les surfaces de votre application. Vous pouvez également envoyer par e-mail à l'utilisateur un lien qui lance le processus de récupération de mot de passe pour lui permettre de définir un mot de passe pour se connecter sur d'autres plateformes.
Une fois la création terminée, émettez un jeton d'accès et qui renvoient les valeurs dans un objet JSON le corps de votre réponse HTTPS, comme dans l'exemple suivant:
{
  "token_type": "Bearer",
  "access_token": "ACCESS_TOKEN",

  "expires_in": SECONDS_TO_EXPIRATION
}
Concevoir l'interface utilisateur vocale pour le flux d'authentification
Vérifiez si l'utilisateur est validé et lancez le processus d'association de compte.
- Ouvrez votre projet Actions Builder dans la console Actions.
- Créez une scène pour lancer l'association de compte dans votre action :
- Cliquez sur Scènes.
- Cliquez sur l'icône Ajouter (+) pour ajouter une scène.
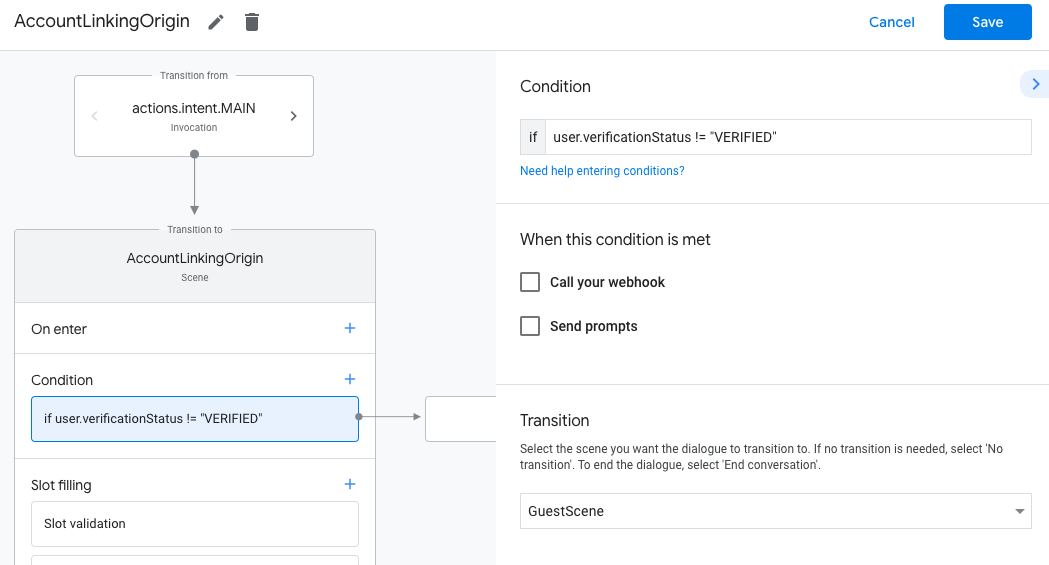
- Dans la scène que vous venez de créer, cliquez sur l'icône Ajouter add pour Conditions.
- Ajoutez une condition qui vérifie si l'utilisateur associé à la conversation est un utilisateur validé. Si la vérification échoue, votre action ne peut pas associer de compte pendant la conversation et doit revenir à l'accès aux fonctionnalités qui ne nécessitent pas d'association de compte.
- Dans le champ
Enter new expressionsous Condition, saisissez la logique suivante :user.verificationStatus != "VERIFIED" - Sous Transition, sélectionnez une scène qui ne nécessite pas d'association de compte ou une scène qui constitue le point d'entrée de la fonctionnalité réservée aux invités.
- Dans le champ
- Cliquez sur l'icône Ajouter add pour Conditions.
- Ajoutez une condition pour déclencher un parcours d'association de compte si l'utilisateur n'a pas d'identité associée.
- Dans le champ
Enter new expressionsous Condition, saisissez la logique suivante :user.verificationStatus == "VERIFIED" - Sous Transition, sélectionnez la scène système Association de compte.
- Cliquez sur Enregistrer.
- Dans le champ
![]()
Une fois l'enregistrement effectué, une scène de système d'association de compte appelée <SceneName>_AccountLinking est ajoutée à votre projet.
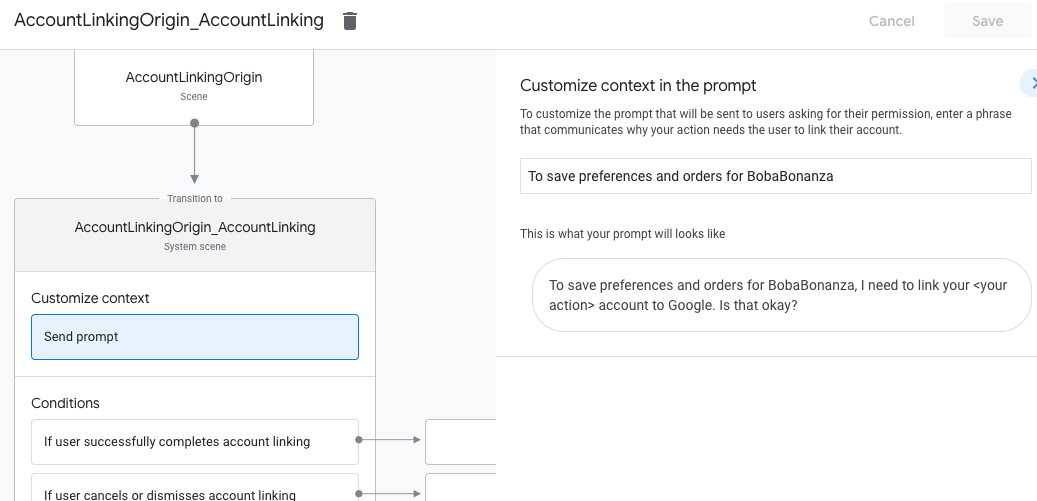
Personnaliser la scène d'association de comptes
- Sous Scènes, sélectionnez la scène du système d'association de comptes.
- Cliquez sur Envoyer le prompt et ajoutez une brève phrase pour expliquer à l'utilisateur pourquoi l'action doit accéder à son identité (par exemple, "Pour enregistrer vos préférences").
- Cliquez sur Enregistrer.
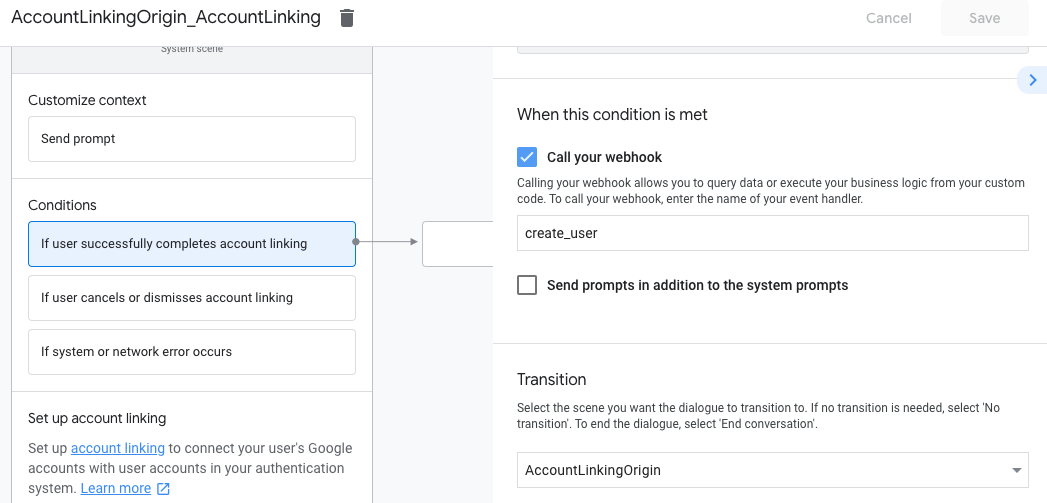
- Sous Conditions, cliquez sur Si l'utilisateur associe son compte.
- Configurez la façon dont le flux doit se dérouler si l'utilisateur accepte d'associer son compte. Par exemple, appelez le webhook pour traiter toute logique métier personnalisée requise et revenez à la scène d'origine.
- Cliquez sur Enregistrer.
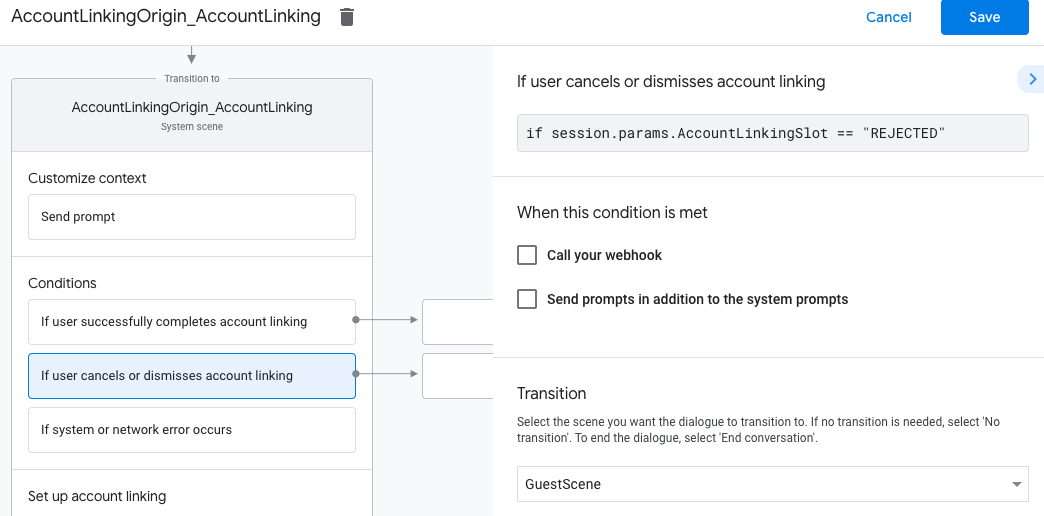
- Sous Conditions, cliquez sur Si l'utilisateur annule ou ignore l'association de compte.
- Configurez la façon dont le flux doit se dérouler si l'utilisateur n'accepte pas d'associer son compte. Par exemple, envoyez un message de confirmation et redirigez l'utilisateur vers des scènes qui fournissent des fonctionnalités ne nécessitant pas l'association de comptes.
- Cliquez sur Enregistrer.
- Sous Conditions, cliquez sur En cas d'erreur système ou réseau.
- Configurez la façon dont le flux doit se dérouler si le flux d'association de compte ne peut pas être terminé en raison d'erreurs système ou réseau. Par exemple, envoyez un message de confirmation et redirigez l'utilisateur vers des scènes qui fournissent des fonctionnalités ne nécessitant pas l'association de comptes.
- Cliquez sur Enregistrer.
Gérer les demandes d'accès aux données
Si la requête de l'Assistant contient un jeton d'accès, vérifiez d'abord que le jeton d'accès est valide et n'a pas expiré, puis récupérez le compte utilisateur associé au jeton à partir de votre base de données de comptes utilisateur.