
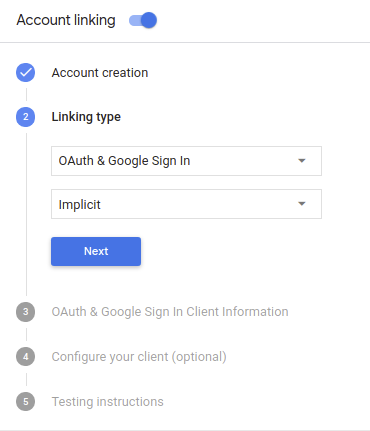
ประเภทการลิงก์ "คล่องตัว" ของ Google Sign-In ที่ใช้ OAuth จะเพิ่ม Google Sign-In นอกเหนือจากการลิงก์บัญชีที่ใช้ OAuth ซึ่งจะช่วยให้ผู้ใช้ Google ลิงก์ด้วยเสียงได้อย่างราบรื่น และยังช่วยให้ผู้ใช้ที่ลงทะเบียนบริการของคุณด้วยข้อมูลประจำตัวที่ไม่ใช่ของ Google สามารถลิงก์บัญชีได้ด้วย
การลิงก์ประเภทนี้เริ่มต้นด้วยการลงชื่อเข้าใช้ด้วย Google ซึ่งช่วยให้คุณตรวจสอบได้ว่ามีข้อมูลโปรไฟล์ Google ของผู้ใช้ในระบบหรือไม่ หากไม่พบข้อมูลของผู้ใช้ในระบบของคุณ ระบบจะเริ่มขั้นตอน OAuth มาตรฐาน นอกจากนี้ ผู้ใช้ยังเลือกสร้างบัญชีใหม่โดยใช้ข้อมูลโปรไฟล์ Google ได้ด้วย
หากต้องการลิงก์บัญชีด้วยการลิงก์ประเภทที่ปรับปรุงแล้ว ให้ทำตามขั้นตอนทั่วไปต่อไปนี้
- ก่อนอื่น ให้ขอความยินยอมจากผู้ใช้เพื่อเข้าถึงโปรไฟล์ Google ของผู้ใช้
- ใช้ข้อมูลในโปรไฟล์เพื่อระบุตัวผู้ใช้
- หากไม่พบผู้ใช้ Google ที่ตรงกันในระบบการตรวจสอบสิทธิ์
ขั้นตอนจะดำเนินต่อโดยขึ้นอยู่กับว่าคุณได้กำหนดค่าโปรเจ็กต์ Actions
ใน Actions Console เพื่ออนุญาตให้สร้างบัญชีผู้ใช้ผ่านเสียงหรือเฉพาะใน
เว็บไซต์ของคุณหรือไม่
- หากอนุญาตให้สร้างบัญชีผ่านเสียง ให้ตรวจสอบโทเค็น รหัสที่ได้รับจาก Google จากนั้นคุณจะสร้างผู้ใช้ตาม ข้อมูลโปรไฟล์ที่มีอยู่ในโทเค็นรหัสได้
- หากคุณไม่อนุญาตให้สร้างบัญชีผ่านเสียง ระบบจะโอนผู้ใช้ไปยัง เบราว์เซอร์ที่ผู้ใช้สามารถโหลดหน้าการให้สิทธิ์และทําตามขั้นตอนการสร้าง ผู้ใช้ให้เสร็จสมบูรณ์
รองรับการสร้างบัญชีผ่านเสียง
หากคุณอนุญาตให้สร้างบัญชีผู้ใช้ผ่านเสียง Assistant จะถามผู้ใช้ว่าต้องการทำสิ่งต่อไปนี้หรือไม่
- สร้างบัญชีใหม่ในระบบโดยใช้ข้อมูลบัญชี Google ของผู้ใช้ หรือ
- ลงชื่อเข้าใช้ระบบการตรวจสอบสิทธิ์ด้วยบัญชีอื่นหากมีบัญชีที่ไม่ใช่ของ Google อยู่แล้ว
เราขอแนะนำให้เปิดใช้การสร้างบัญชีผ่านเสียงหากคุณต้องการลด ความซับซ้อนของขั้นตอนการสร้างบัญชี ผู้ใช้จะต้องออกจากขั้นตอนการสนทนาด้วยเสียง ก็ต่อเมื่อต้องการลงชื่อเข้าใช้โดยใช้บัญชีที่ไม่ใช่ของ Google ที่มีอยู่
ไม่อนุญาตให้สร้างบัญชีผ่านเสียง
หากคุณไม่อนุญาตให้สร้างบัญชีผู้ใช้ผ่านเสียง Assistant จะเปิด URL ไปยัง เว็บไซต์ที่คุณระบุไว้สำหรับการตรวจสอบสิทธิ์ผู้ใช้ หากการโต้ตอบเกิดขึ้นในอุปกรณ์ที่ไม่มีหน้าจอ Assistant จะนำผู้ใช้ไปยังโทรศัพท์เพื่อดำเนินการขั้นตอนการลิงก์บัญชีต่อ
เราขอแนะนำให้ไม่อนุญาตการสร้างในกรณีต่อไปนี้
คุณไม่ต้องการอนุญาตให้ผู้ใช้ที่มีบัญชีที่ไม่ใช่ของ Google สร้างบัญชีผู้ใช้ใหม่ และต้องการให้ผู้ใช้ลิงก์กับบัญชีผู้ใช้ที่มีอยู่ในระบบการตรวจสอบสิทธิ์ของคุณแทน ตัวอย่างเช่น หากคุณมีโปรแกรมสะสมคะแนน คุณอาจต้องตรวจสอบว่าผู้ใช้จะไม่สูญเสียคะแนนที่สะสมไว้ในบัญชีที่มีอยู่
คุณต้องควบคุมขั้นตอนการสร้างบัญชีได้อย่างเต็มที่ เช่น คุณอาจ ไม่อนุญาตให้สร้างหากต้องการแสดงข้อกำหนดในการให้บริการแก่ผู้ใช้ในระหว่าง การสร้างบัญชี
ใช้การลิงก์ "สตรีมไลน์" ของ Google Sign-In ที่ใช้ OAuth
บัญชีจะลิงก์กับขั้นตอน OAuth 2.0 ซึ่งเป็นมาตรฐานอุตสาหกรรม Actions on Google รองรับขั้นตอนโดยนัยและขั้นตอนรหัสการให้สิทธิ์
เพื่อให้การตรวจสอบเป็นไปอย่างราบรื่นในขั้นตอนการเขียนโค้ดแบบโดยนัย Google จะเปิดปลายทางการให้สิทธิ์ในเบราว์เซอร์ของผู้ใช้ เมื่อลงชื่อเข้าใช้สําเร็จ คุณจะส่งคืนโทเค็นเพื่อการเข้าถึงที่ใช้ได้นานแก่ Google ตอนนี้โทเค็นเพื่อการเข้าถึงนี้รวมอยู่ในคําขอทุกรายการที่ส่งจาก Assistant ไปยังการดําเนินการของคุณแล้ว
ในกระบวนการรหัสการให้สิทธิ์ คุณต้องมีปลายทาง 2 จุด ได้แก่
- ปลายทางการให้สิทธิ์ ซึ่งมีหน้าที่นําเสนอ UI การลงชื่อเข้าใช้แก่ผู้ใช้ที่ไม่ได้ลงชื่อเข้าใช้ และยินยอมให้มีการเข้าถึงการเข้าถึงที่ขอในรูปของรหัสการให้สิทธิ์ระยะสั้น
- ปลายทางของการแลกเปลี่ยนโทเค็นที่มีหน้าที่รับผิดชอบการแลกเปลี่ยน 2 ประเภท ได้แก่
- แลกเปลี่ยนรหัสการให้สิทธิ์สําหรับโทเค็นการรีเฟรชที่ใช้ได้นานและโทเค็นเพื่อการเข้าถึงที่ใช้ได้นาน การแลกเปลี่ยนนี้จะเกิดขึ้นเมื่อผู้ใช้เข้าสู่ กระบวนการเชื่อมโยงบัญชี
- แลกเปลี่ยนโทเค็นการรีเฟรชที่ใช้ได้นานกับโทเค็นเพื่อการเข้าถึงที่ใช้ได้ในระยะสั้น Exchange นี้จะเกิดขึ้นเมื่อ Google ต้องการโทเค็นเพื่อการเข้าถึงใหม่เนื่องจากโทเค็นหมดอายุ
แม้ว่าขั้นตอนการใช้รหัสโดยนัยจะง่ายกว่า Google ขอแนะนําว่าโทเค็นเพื่อการเข้าถึงที่ออกโดยใช้โฟลว์โดยนัยไม่มีวันหมดอายุ เนื่องจากการใช้การหมดอายุของโทเค็นด้วยขั้นตอนโดยนัยบังคับให้ผู้ใช้ลิงก์บัญชีอีกครั้ง หากคุณต้องการใช้การหมดอายุของโทเค็นด้วยเหตุผลด้านความปลอดภัย คุณควรพิจารณาการใช้ขั้นตอนการตรวจสอบสิทธิ์แทน
กำหนดค่าโปรเจ็กต์
หากต้องการกำหนดค่าโปรเจ็กต์ให้ใช้การลิงก์ที่ปรับปรุงแล้ว ให้ทำตามขั้นตอนต่อไปนี้
- เปิดคอนโซล Actions แล้วเลือกโปรเจ็กต์ที่ต้องการใช้
- คลิกแท็บพัฒนา แล้วเลือกการลิงก์บัญชี
- เปิดสวิตช์ข้างการลิงก์บัญชี
- ในส่วนการสร้างบัญชี ให้เลือกใช่
ในประเภทการลิงก์ ให้เลือก OAuth และการลงชื่อเข้าใช้ด้วยบัญชี Google และโดยนัย
ในข้อมูลลูกค้า ให้ทำดังนี้
- กำหนดค่าให้กับรหัสไคลเอ็นต์ที่ Actions ของคุณออกให้กับ Google เพื่อระบุ คำขอที่มาจาก Google
- แทรก URL สำหรับปลายทางการให้สิทธิ์และการแลกเปลี่ยนโทเค็น
คลิกบันทึก
ติดตั้งใช้งานเซิร์ฟเวอร์ OAuth
บริการของคุณจะให้สิทธิ์เพื่อรองรับขั้นตอนโดยนัยของ OAuth 2.0 ปลายทางที่พร้อมใช้งานผ่าน HTTPS ปลายทางนี้มีหน้าที่ในการตรวจสอบสิทธิ์และ ได้รับความยินยอมจากผู้ใช้ในการเข้าถึงข้อมูล ปลายทางการให้สิทธิ์ แสดง UI การลงชื่อเข้าใช้แก่ผู้ใช้ที่ยังไม่ได้ลงชื่อเข้าใช้และบันทึกไว้ ความยินยอมต่อการเข้าถึงที่ขอ
เมื่อการดำเนินการของคุณจำเป็นต้องเรียกใช้ API ที่ได้รับอนุญาตของบริการ Google จะใช้ ปลายทางนี้เพื่อขอสิทธิ์จากผู้ใช้เพื่อเรียกใช้ API เหล่านี้ใน แทน
เซสชันโฟลว์แบบโดยนัยของ OAuth 2.0 ทั่วไปที่ Google เป็นผู้เริ่มต้นจะมี ขั้นตอนดังต่อไปนี้
- Google จะเปิดปลายทางการให้สิทธิ์ในเบราว์เซอร์ของผู้ใช้ ผู้ใช้ ลงชื่อเข้าใช้หากยังไม่ได้ลงชื่อเข้าใช้ และให้สิทธิ์แก่ Google ในการเข้าถึง ข้อมูลของตนเองกับ API ของคุณ หากผู้ใช้ยังไม่ได้ให้สิทธิ์
- บริการของคุณจะสร้างโทเค็นเพื่อการเข้าถึงและส่งไปยัง Google โดยการเปลี่ยนเส้นทางเบราว์เซอร์ของผู้ใช้กลับไปยัง Google ด้วยโทเค็นเพื่อการเข้าถึง ที่แนบมากับคำขอ
- Google จะเรียกใช้ API ของบริการ และแนบโทเค็นเพื่อการเข้าถึงกับ คำขอแต่ละรายการ บริการของคุณยืนยันว่าโทเค็นเพื่อการเข้าถึงให้สิทธิ์ Google การอนุญาตให้เข้าถึง API จากนั้นจึงเรียก API
จัดการคำขอการให้สิทธิ์
เมื่อการดำเนินการของคุณต้องลิงก์บัญชีผ่านขั้นตอนโดยนัยของ OAuth 2.0 Google จะส่งผู้ใช้ไปยังปลายทางการให้สิทธิ์พร้อมคำขอที่มี พารามิเตอร์ต่อไปนี้
| พารามิเตอร์ปลายทางการให้สิทธิ์ | |
|---|---|
client_id |
รหัสไคลเอ็นต์ที่คุณกำหนดให้กับ Google |
redirect_uri |
URL ที่คุณส่งการตอบกลับคำขอนี้ |
state |
มูลค่าการทำบัญชีที่ส่งกลับไปยัง Google ไม่เปลี่ยนแปลงใน URI การเปลี่ยนเส้นทาง |
response_type |
ประเภทของค่าที่จะแสดงในคำตอบ สำหรับ OAuth 2.0 โดยปริยาย
ประเภทการตอบกลับจะเป็น token เสมอ |
ตัวอย่างเช่น หากปลายทางการให้สิทธิ์อยู่ที่ https://myservice.example.com/auth
คำขออาจมีลักษณะดังนี้
GET https://myservice.example.com/auth?client_id=GOOGLE_CLIENT_ID&redirect_uri=REDIRECT_URI&state=STATE_STRING&response_type=token
สำหรับปลายทางการให้สิทธิ์ในการจัดการคำขอลงชื่อเข้าใช้ ให้ทำตามขั้นตอนต่อไปนี้
ยืนยันค่า
client_idและredirect_uriเพื่อ ป้องกันการให้สิทธิ์เข้าถึงแอปไคลเอ็นต์ที่ไม่ได้ตั้งใจหรือกำหนดค่าไม่ถูกต้อง- ยืนยันว่า
client_idตรงกับรหัสไคลเอ็นต์ที่คุณ ที่มอบหมายให้กับ Google - ยืนยันว่า URL ที่ระบุโดย
redirect_uriจะมีรูปแบบต่อไปนี้https://oauth-redirect.googleusercontent.com/r/YOUR_PROJECT_ID
- ยืนยันว่า
ตรวจสอบว่าผู้ใช้ลงชื่อเข้าใช้บริการของคุณหรือไม่ หากผู้ใช้ไม่ได้เซ็น ดำเนินการตามขั้นตอนการลงชื่อเข้าใช้หรือลงชื่อสมัครใช้บริการของคุณ
สร้างโทเค็นเพื่อการเข้าถึงที่ Google จะใช้เพื่อเข้าถึง API ของคุณ โทเค็นเพื่อการเข้าถึงสามารถเป็นค่าสตริงใดก็ได้ แต่จะต้องแสดงถึง ผู้ใช้และไคลเอ็นต์ที่ใช้โทเค็นและต้องคาดเดาไม่ได้
ส่งการตอบกลับ HTTP ที่เปลี่ยนเส้นทางเบราว์เซอร์ของผู้ใช้ไปยัง URL ที่ระบุโดยพารามิเตอร์
redirect_uriรวม พารามิเตอร์ต่อไปนี้ในส่วนย่อยของ URLaccess_token: โทเค็นเพื่อการเข้าถึงที่คุณเพิ่งสร้างtoken_type: สตริงbearerstate: ค่าสถานะที่ไม่มีการแก้ไขจากค่าเดิม คำขอ ตัวอย่างของ URL ที่ได้มีดังนี้https://oauth-redirect.googleusercontent.com/r/YOUR_PROJECT_ID#access_token=ACCESS_TOKEN&token_type=bearer&state=STATE_STRING
เครื่องจัดการการเปลี่ยนเส้นทาง OAuth 2.0 ของ Google จะได้รับโทเค็นเพื่อการเข้าถึงและยืนยัน
ค่า state ยังไม่มีการเปลี่ยนแปลง หลังจากที่ Google ได้รับ
โทเค็นเพื่อการเข้าถึงสำหรับบริการของคุณ Google จะแนบโทเค็นไปกับการเรียกครั้งต่อๆ ไป
ไปยังการดำเนินการของคุณได้โดยเป็นส่วนหนึ่งของ AppRequest
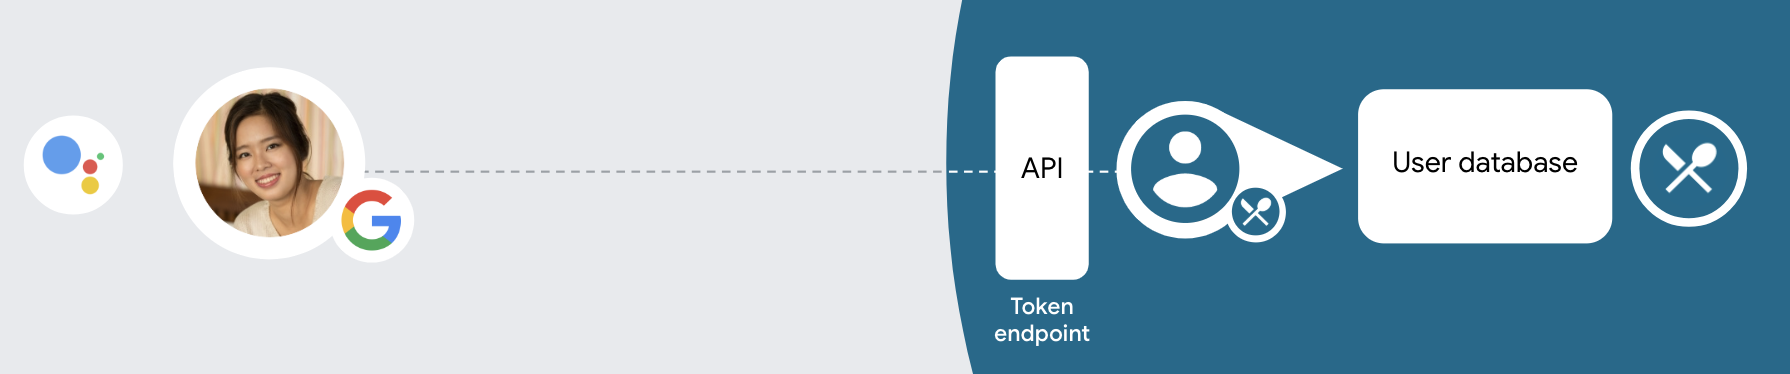
จัดการการลิงก์อัตโนมัติ
หลังจากที่ผู้ใช้ให้ความยินยอมแก่การดำเนินการของคุณเพื่อเข้าถึงโปรไฟล์ Google แล้ว Google ส่งคำขอที่มีการยืนยันข้อมูลประจำตัวของผู้ใช้ Google ที่ลงชื่อ การยืนยันประกอบด้วยข้อมูลที่มีรหัสบัญชี Google, ชื่อ, และอีเมล ปลายทางการแลกเปลี่ยนโทเค็นที่กำหนดค่าไว้สำหรับแฮนเดิลโปรเจ็กต์ คำขอนั้น
หากมีบัญชี Google ที่เกี่ยวข้องอยู่ในระบบการตรวจสอบสิทธิ์แล้ว
ปลายทางการแลกเปลี่ยนโทเค็นจะแสดงโทเค็นสำหรับผู้ใช้ หากบัญชี Google ไม่
ตรงกับผู้ใช้ที่มีอยู่ ปลายทางการแลกเปลี่ยนโทเค็นแสดงข้อผิดพลาด user_not_found
คำขอมีแบบฟอร์มต่อไปนี้
POST /token HTTP/1.1
Host: oauth2.example.com
Content-Type: application/x-www-form-urlencoded

grant_type=urn:ietf:params:oauth:grant-type:jwt-bearer&intent=get&assertion=JWT&consent_code=CONSENT_CODE&scope=SCOPES
ปลายทางการแลกเปลี่ยนโทเค็นต้องจัดการพารามิเตอร์ต่อไปนี้ได้
| พารามิเตอร์ปลายทางของโทเค็น | |
|---|---|
grant_type |
ประเภทของโทเค็นที่แลกเปลี่ยน สำหรับคำขอเหล่านี้ พารามิเตอร์นี้
มีค่า urn:ietf:params:oauth:grant-type:jwt-bearer |
intent |
สำหรับคำขอเหล่านี้ ค่าของพารามิเตอร์นี้คือ "get" |
assertion |
JSON Web Token (JWT) ที่แสดงการยืนยันของ Google ข้อมูลประจำตัวของผู้ใช้ JWT มีข้อมูลที่มีประวัติของผู้ใช้ รหัสบัญชี ชื่อ และอีเมล |
consent_code |
ไม่บังคับ: หากมี รหัสแบบใช้ครั้งเดียวซึ่งระบุว่าพารามิเตอร์ ผู้ใช้ได้ให้ความยินยอมให้การดำเนินการของคุณเข้าถึงขอบเขตที่ระบุ |
scope |
ไม่บังคับ: ขอบเขตที่คุณกำหนดค่าให้ Google ส่งคำขอจากผู้ใช้ |
เมื่อปลายทางการแลกเปลี่ยนโทเค็นได้รับคำขอลิงก์ ระบบควรทำ ดังต่อไปนี้:
ตรวจสอบและถอดรหัสการยืนยัน JWT
คุณตรวจสอบและถอดรหัสการยืนยัน JWT ได้โดยใช้ไลบรารีการถอดรหัส JWT สำหรับภาษาของคุณ ใช้คีย์สาธารณะของ Google (มีให้ใช้งานใน JWK หรือ PEM) เพื่อยืนยันโทเค็น ลายเซ็น
เมื่อถอดรหัสแล้ว การยืนยัน JWT จะมีลักษณะดังตัวอย่างต่อไปนี้
{
  "sub": 1234567890,        // The unique ID of the user's Google Account
  "iss": "https://accounts.google.com",        // The assertion's issuer
  "aud": "123-abc.apps.googleusercontent.com", // Your server's client ID
  "iat": 233366400,         // Unix timestamp of the assertion's creation time
  "exp": 233370000,         // Unix timestamp of the assertion's expiration time
  "name": "Jan Jansen",
  "given_name": "Jan",
  "family_name": "Jansen",
  "email": "jan@gmail.com", // If present, the user's email address
  "locale": "en_US"
}
นอกจากการยืนยันลายเซ็นของโทเค็นแล้ว ให้ตรวจสอบว่าผู้ออกการยืนยัน
(ช่อง iss) คือ https://accounts.google.com และกลุ่มเป้าหมาย (ช่อง aud)
เป็นรหัสไคลเอ็นต์ที่กำหนดให้กับการดำเนินการของคุณ
ตรวจสอบว่ามีบัญชี Google อยู่ในระบบการตรวจสอบสิทธิ์ของคุณแล้วหรือยัง
ตรวจสอบว่าเงื่อนไขใดเงื่อนไขหนึ่งต่อไปนี้เป็นจริง
- รหัสบัญชี Google ที่พบในช่อง
subของการยืนยันนั้นอยู่ในฐานข้อมูลผู้ใช้ของคุณ - อีเมลในการยืนยันตรงกับผู้ใช้ในฐานข้อมูลผู้ใช้
หากเงื่อนไขใดเงื่อนไขหนึ่งเป็นจริง แสดงว่าผู้ใช้ได้ลงชื่อสมัครใช้แล้ว และคุณสามารถออก โทเค็นเพื่อการเข้าถึง
หากทั้งรหัสบัญชี Google และอีเมลที่ระบุในการยืนยัน
ตรงกับผู้ใช้ในฐานข้อมูลของคุณ แต่ผู้ใช้ยังไม่ได้ลงชื่อสมัครใช้ ในกรณีนี้
ปลายทางการแลกเปลี่ยนโทเค็นควรตอบกลับพร้อมข้อผิดพลาด HTTP 401 ซึ่งระบุ error=user_not_found
ดังตัวอย่างต่อไปนี้
HTTP/1.1 401 Unauthorized
Content-Type: application/json;charset=UTF-8

{
  "error":"user_not_found",
}
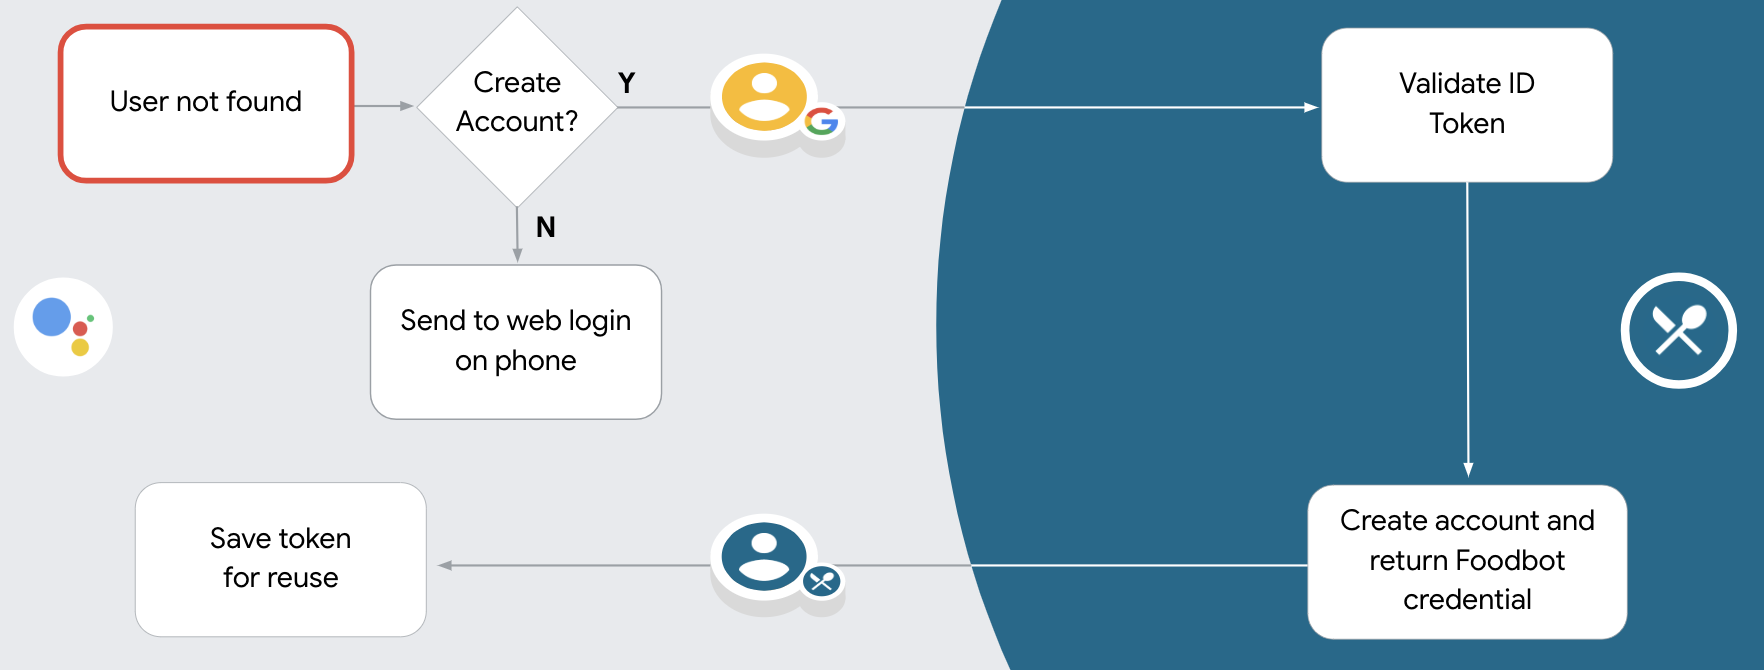
user_not_found ทาง Google
เรียกปลายทางการแลกเปลี่ยนโทเค็นด้วยค่าของพารามิเตอร์ intent
ตั้งค่าเป็น สร้าง และส่งโทเค็นรหัสที่มีข้อมูลโปรไฟล์ของผู้ใช้
พร้อมกับคำขอ
จัดการการสร้างบัญชีผ่าน Google Sign-In
เมื่อผู้ใช้ต้องการสร้างบัญชีในบริการของคุณ Google จะสร้าง
คำขอไปยังปลายทางการแลกเปลี่ยนโทเค็นที่ระบุ
intent=create ตามตัวอย่างต่อไปนี้
POST /token HTTP/1.1
Host: oauth2.example.com
Content-Type: application/x-www-form-urlencoded

response_type=token&grant_type=urn:ietf:params:oauth:grant-type:jwt-bearer&scope=SCOPES&intent=create&consent_code=CONSENT_CODE&assertion=JWT[&NEW_ACCOUNT_INFO]
พารามิเตอร์ assertion มี JSON Web Token (JWT) ที่
การยืนยันข้อมูลประจำตัวของผู้ใช้ Google JWT มีข้อมูล
ที่มีรหัสบัญชี ชื่อ และอีเมลของผู้ใช้ Google ซึ่งคุณสามารถใช้
เพื่อสร้างบัญชีใหม่ในบริการของคุณ
หากต้องการตอบกลับคำขอสร้างบัญชี ปลายทางการแลกเปลี่ยนโทเค็นจะต้องทำ ดังต่อไปนี้
ตรวจสอบและถอดรหัสการยืนยัน JWT
คุณตรวจสอบและถอดรหัสการยืนยัน JWT ได้โดยใช้ไลบรารีการถอดรหัส JWT สำหรับภาษาของคุณ ใช้คีย์สาธารณะของ Google (มีให้ใช้งานใน JWK หรือ PEM) เพื่อยืนยันโทเค็น ลายเซ็น
เมื่อถอดรหัสแล้ว การยืนยัน JWT จะมีลักษณะดังตัวอย่างต่อไปนี้
{
  "sub": 1234567890,        // The unique ID of the user's Google Account
  "iss": "https://accounts.google.com",        // The assertion's issuer
  "aud": "123-abc.apps.googleusercontent.com", // Your server's client ID
  "iat": 233366400,         // Unix timestamp of the assertion's creation time
  "exp": 233370000,         // Unix timestamp of the assertion's expiration time
  "name": "Jan Jansen",
  "given_name": "Jan",
  "family_name": "Jansen",
  "email": "jan@gmail.com", // If present, the user's email address
  "locale": "en_US"
}
นอกจากการยืนยันลายเซ็นของโทเค็นแล้ว ให้ตรวจสอบว่าผู้ออกการยืนยัน
(ช่อง iss) คือ https://accounts.google.com และกลุ่มเป้าหมาย (ช่อง aud)
เป็นรหัสไคลเอ็นต์ที่กำหนดให้กับการดำเนินการของคุณ
ตรวจสอบข้อมูลผู้ใช้และสร้างบัญชีใหม่
ตรวจสอบว่าเงื่อนไขใดเงื่อนไขหนึ่งต่อไปนี้เป็นจริง
- รหัสบัญชี Google ที่พบในช่อง
subของการยืนยันนั้นอยู่ในฐานข้อมูลผู้ใช้ของคุณ - อีเมลในการยืนยันตรงกับผู้ใช้ในฐานข้อมูลผู้ใช้
หากเงื่อนไขใดเงื่อนไขหนึ่งเป็นจริง แจ้งให้ผู้ใช้ลิงก์บัญชีที่มีอยู่กับ
บัญชี Google ของตนโดยการตอบกลับคำขอด้วยข้อผิดพลาด HTTP 401 โดยระบุว่า
error=linking_error และอีเมลของผู้ใช้เป็น login_hint ตามที่แสดงใน
ตัวอย่างต่อไปนี้
HTTP/1.1 401 Unauthorized
Content-Type: application/json;charset=UTF-8

{
  "error":"linking_error",
  "login_hint":"foo@bar.com"
}
หากไม่มีเงื่อนไขใดเป็นจริง ให้สร้างบัญชีผู้ใช้ใหม่โดยใช้ข้อมูล ที่ให้ไว้ใน JWT โดยทั่วไป บัญชีใหม่จะไม่ตั้งรหัสผ่าน ใช่เลย ขอแนะนำให้คุณเพิ่ม Google Sign-In ลงในแพลตฟอร์มอื่นๆ เพื่อให้ผู้ใช้ ผ่าน Google ในแพลตฟอร์มต่างๆ ของแอปพลิเคชัน อีกวิธีหนึ่งคือ ส่งอีเมลลิงก์ที่เริ่มต้นกระบวนการกู้คืนรหัสผ่านให้กับผู้ใช้ เพื่อให้ผู้ใช้สามารถตั้งค่า รหัสผ่านสำหรับการลงชื่อเข้าใช้ในแพลตฟอร์มอื่น
เมื่อสร้างเสร็จแล้ว ให้ออกโทเค็นเพื่อการเข้าถึง จากนั้นแสดงผลค่าในออบเจ็กต์ JSON ใน ส่วนเนื้อหาของการตอบกลับ HTTPS ดังตัวอย่างต่อไปนี้
{
  "token_type": "Bearer",
  "access_token": "ACCESS_TOKEN",

  "expires_in": SECONDS_TO_EXPIRATION
}
ออกแบบอินเทอร์เฟซผู้ใช้ด้วยเสียงสำหรับขั้นตอนการตรวจสอบสิทธิ์
ตรวจสอบว่าผู้ใช้ได้รับการยืนยันแล้วหรือไม่ และเริ่มขั้นตอนการลิงก์บัญชี
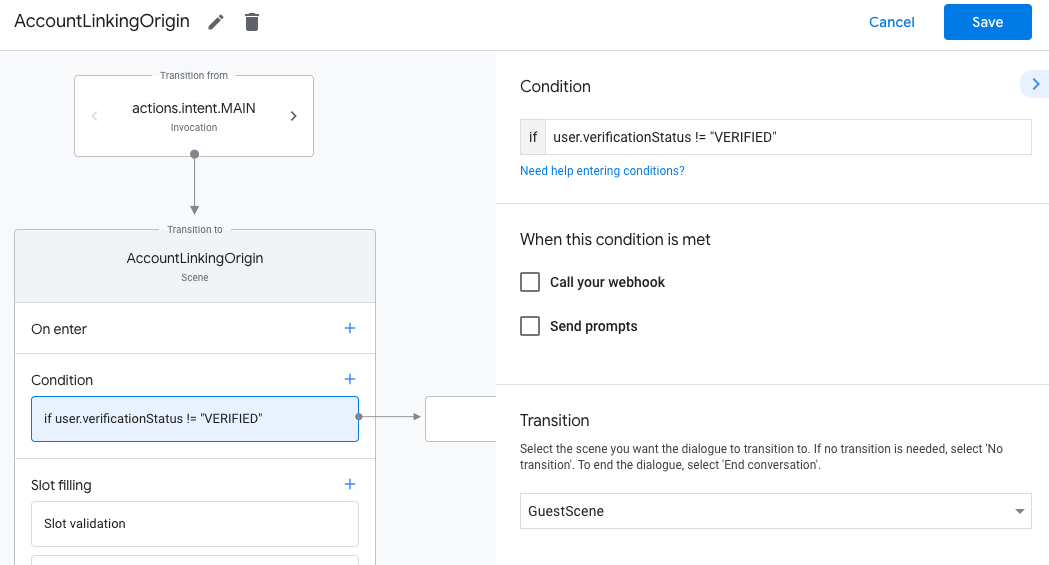
- เปิดโปรเจ็กต์ Actions Builder ใน Actions Console
- สร้างฉากใหม่เพื่อเริ่มการลิงก์บัญชีใน Action โดยทำดังนี้
- คลิกฉาก
- คลิกไอคอนเพิ่ม (+) เพื่อเพิ่มฉากใหม่
- ในฉากที่สร้างขึ้นใหม่ ให้คลิกไอคอนเพิ่ม add สำหรับเงื่อนไข
- เพิ่มเงื่อนไขที่ตรวจสอบว่าผู้ใช้ที่เชื่อมโยงกับการสนทนาเป็นผู้ใช้ที่ยืนยันแล้วหรือไม่ หากการตรวจสอบล้มเหลว การดำเนินการของคุณจะลิงก์บัญชีไม่ได้
ระหว่างการสนทนา และควรกลับไปให้สิทธิ์เข้าถึง
ฟังก์ชันที่ไม่ต้องมีการลิงก์บัญชี
- ในช่อง
Enter new expressionในส่วนเงื่อนไข ให้ป้อนตรรกะต่อไปนี้user.verificationStatus != "VERIFIED" - ในส่วนการเปลี่ยนฉาก ให้เลือกฉากที่ไม่ต้องลิงก์บัญชีหรือฉากที่เป็นจุดเริ่มต้นของฟังก์ชันการทำงานสำหรับแขกรับเชิญเท่านั้น
- ในช่อง
- คลิกไอคอนเพิ่ม add สำหรับเงื่อนไข
- เพิ่มเงื่อนไขเพื่อทริกเกอร์โฟลว์การลิงก์บัญชีหากผู้ใช้ไม่มี
ข้อมูลประจำตัวที่เชื่อมโยง
- ในช่อง
Enter new expressionในส่วนเงื่อนไข ให้ป้อนตรรกะต่อไปนี้user.verificationStatus == "VERIFIED" - ในส่วนการเปลี่ยนฉาก ให้เลือกฉากระบบการลิงก์บัญชี
- คลิกบันทึก
- ในช่อง
![]()
หลังจากบันทึกแล้ว ระบบจะเพิ่มฉากระบบการลิงก์บัญชีใหม่ที่ชื่อ <SceneName>_AccountLinking
ลงในโปรเจ็กต์
ปรับแต่งฉากการลิงก์บัญชี
- ในส่วนฉาก ให้เลือกฉากระบบการลิงก์บัญชี
- คลิกส่งพรอมต์ แล้วเพิ่มประโยคสั้นๆ เพื่ออธิบายให้ผู้ใช้ทราบ ว่าทำไมแอ็กชันจึงต้องเข้าถึงข้อมูลประจำตัวของผู้ใช้ (เช่น "เพื่อบันทึกค่ากำหนดของคุณ")
- คลิกบันทึก
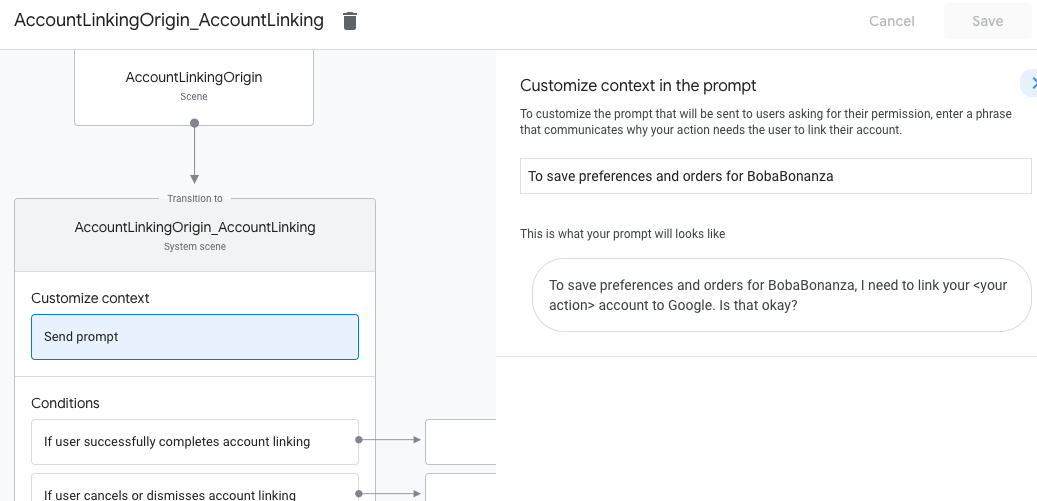
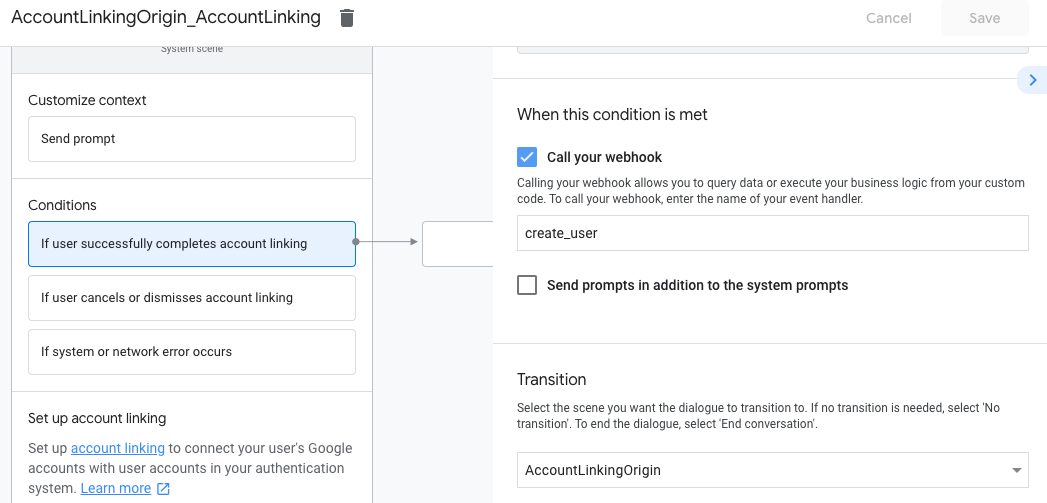
- ในส่วนเงื่อนไข ให้คลิกหากผู้ใช้ลิงก์บัญชีสำเร็จ
- กำหนดค่าว่าขั้นตอนควรดำเนินการอย่างไรหากผู้ใช้ตกลงที่จะลิงก์บัญชี เช่น เรียกใช้เว็บฮุกเพื่อประมวลผลตรรกะทางธุรกิจที่กำหนดเองที่จำเป็น และเปลี่ยนกลับไปที่ฉากต้นทาง
- คลิกบันทึก
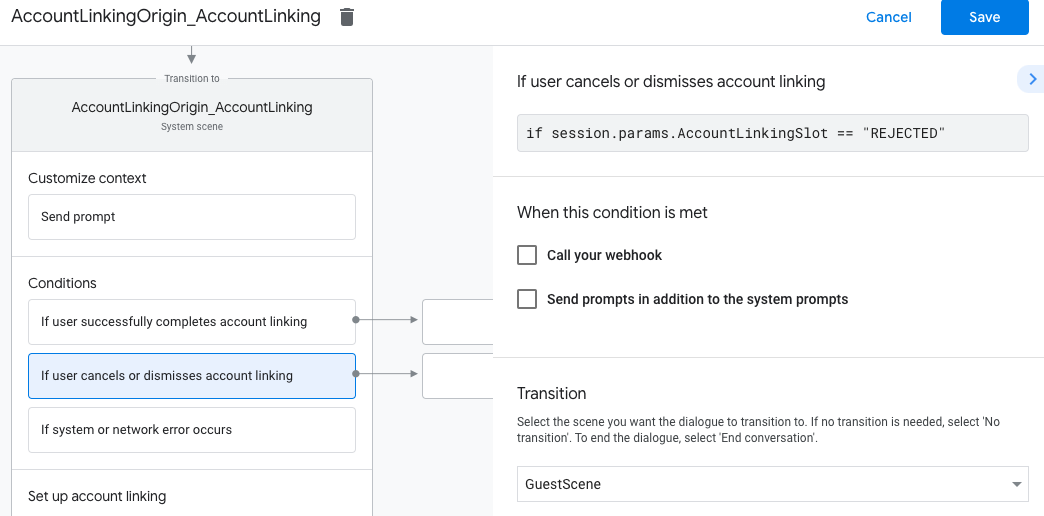
- ในส่วนเงื่อนไข ให้คลิกหากผู้ใช้ยกเลิกหรือปิดการลิงก์บัญชี
- กำหนดค่าว่าขั้นตอนการทำงานควรเป็นอย่างไรหากผู้ใช้ไม่ยอมรับการลิงก์บัญชี เช่น ส่งข้อความรับทราบและเปลี่ยนเส้นทางไปยังฉาก ที่ให้ฟังก์ชันการทำงานที่ไม่ต้องลิงก์บัญชี
- คลิกบันทึก
- ในส่วนเงื่อนไข ให้คลิกหากเกิดข้อผิดพลาดของระบบหรือเครือข่าย
- กำหนดค่าวิธีที่โฟลว์ควรดำเนินการหากโฟลว์การลิงก์บัญชีดำเนินการไม่สำเร็จเนื่องจากข้อผิดพลาดของระบบหรือเครือข่าย เช่น ส่งข้อความรับทราบและเปลี่ยนเส้นทางไปยังฉาก ที่ให้ฟังก์ชันการทำงานที่ไม่ต้องลิงก์บัญชี
- คลิกบันทึก
จัดการคำขอเข้าถึงข้อมูล
หากคำขอของ Assistant มีโทเค็นเพื่อการเข้าถึง ให้ตรวจสอบก่อนว่าโทเค็นเพื่อการเข้าถึงนั้นถูกต้องและไม่หมดอายุ จากนั้นดึงข้อมูลจาก ฐานข้อมูลบัญชีผู้ใช้ของคุณซึ่งเป็นบัญชีผู้ใช้ที่เชื่อมโยงกับโทเค็น