
Typ połączenia „Uproszczone” logowanie przez Google oparte na OAuth dodaje logowanie przez Google do połączenia konta opartego na OAuth. Umożliwia to bezproblemowe łączenie kont za pomocą głosu dla użytkowników Google, a także łączenie kont użytkowników, którzy zarejestrowali się w Twojej usłudze za pomocą tożsamości innej niż Google.
Ten typ połączenia zaczyna się od logowania przez Google, które umożliwia sprawdzenie, czy informacje z profilu Google użytkownika znajdują się w Twoim systemie. Jeśli informacji o użytkowniku nie ma w Twoim systemie, rozpoczyna się standardowy proces OAuth. Użytkownik może też utworzyć nowe konto, korzystając z informacji z profilu Google.
Aby połączyć konta za pomocą uproszczonego połączenia, wykonaj te ogólne czynności:
- Najpierw poproś użytkownika o zgodę na dostęp do jego profilu Google.
- Użyj informacji z profilu, aby zidentyfikować użytkownika.
- Jeśli w systemie uwierzytelniania nie znajdziesz odpowiednika użytkownika Google, proces będzie przebiegać w zależności od tego, czy projekt działania został skonfigurowany w konsoli Actions tak, aby zezwalać na tworzenie kont użytkowników za pomocą głosu, czy tylko na stronie internetowej.
- Jeśli zezwalasz na tworzenie konta za pomocą głosu, zweryfikuj token identyfikatora otrzymany od Google. Następnie możesz utworzyć użytkownika na podstawie informacji o profilu zawartych w tokenie identyfikatora.
- Jeśli nie zezwalasz na tworzenie konta za pomocą głosu, użytkownik zostanie przekierowany do przeglądarki, w której może otworzyć stronę autoryzacji i dokończyć proces tworzenia konta.
Obsługa tworzenia konta za pomocą głosu
Jeśli zezwalasz na tworzenie kont użytkowników za pomocą głosu, Asystent pyta użytkownika, czy chce:
- utworzyć nowe konto w swoim systemie, używając informacji z konta Google użytkownika,
- Zaloguj się w systemie uwierzytelniania za pomocą innego konta, jeśli użytkownik ma już konto inne niż Google.
Jeśli chcesz zminimalizować trudności związane z procesem tworzenia konta, zalecamy włączenie tworzenia konta za pomocą głosu. Użytkownik musi opuścić przepływ głosowy tylko wtedy, gdy chce zalogować się za pomocą istniejącego konta innego niż Google.
Blokowanie tworzenia konta za pomocą głosu
Jeśli nie zezwolisz na tworzenie kont użytkowników za pomocą głosu, Asystent otworzy adres URL witryny, którą podasz na potrzeby uwierzytelniania użytkowników. Jeśli interakcja odbywa się na urządzeniu bez ekranu, Asystent kieruje użytkownika na telefon, aby kontynuować proces łączenia kont.
Zalecamy zablokowanie tworzenia, jeśli:
Nie chcesz zezwalać użytkownikom z kontami innymi niż Google na tworzenie nowych kont użytkowników, ale chcesz, aby zamiast tego łączyli się z istniejącymi kontami użytkowników w Twoim systemie uwierzytelniania. Jeśli na przykład oferujesz program lojalnościowy, możesz chcieć mieć pewność, że użytkownik nie straci punktów zgromadzonych na dotychczasowym koncie.
Musisz mieć pełną kontrolę nad procesem tworzenia konta. Możesz na przykład zablokować tworzenie konta, jeśli podczas tego procesu musisz wyświetlić użytkownikowi warunki usługi.
Wdrożenie uproszczonego łączenia kont za pomocą logowania przez Google opartego na OAuth
Konta są łączone za pomocą standardowych przepływów OAuth 2.0. Actions on Google obsługuje procesy niejawne i z kodem autoryzacji.
W pośrednim przepływie kodu Google otwiera punkt końcowy autoryzacji w przeglądarce użytkownika. Po udanym logowaniu zwracasz token dostępu o długim czasie do Google. Ten token dostępu jest teraz dołączany do każdego żądania wysyłanego przez Asystenta do działania.
W ramach procesu kodu autoryzacji potrzebujesz 2 punktów końcowych:
- Punkt końcowy autoryzacji, który odpowiada za wyświetlanie interfejsu logowania użytkownikom, którzy nie są jeszcze zalogowani, i rejestrowanie zgody w żądanym terminie w postaci kodu o ograniczonym czasie ważności.
- Punkt końcowy giełdy tokenów odpowiedzialny za 2 typy giełd:
- Wymienia kod autoryzacji tokena długoterminowego i tokena dostępu o ograniczonym czasie ważności. Ta wymiana ma miejsce, gdy użytkownik przechodzi przez proces łączenia kont.
- Wymienia długotrwały token odświeżania na token dostępu o ograniczonym czasie ważności. Ta giełda ma miejsce, gdy Google potrzebuje nowego tokena dostępu, ponieważ wygasł.
Implementacja niejawnego przepływu kodu jest prostsza, ale Google zaleca, aby tokeny dostępu wydane z wykorzystaniem niejawnego przepływu nigdy nie wygasały, ponieważ korzystanie z tożsamości w wyniku takiego działania wymusza na użytkowniku ponowne połączenie konta. Jeśli ze względów bezpieczeństwa zależy Ci na wygaśnięciu tokena, rozważ użycie kodu uwierzytelniania.
Konfigurowanie projektu
Aby skonfigurować projekt pod kątem uproszczonego łączenia, wykonaj te czynności:
- Otwórz konsolę Actions i wybierz projekt, którego chcesz użyć.
- Kliknij kartę Tworzenie i wybierz Łączenie kont.
- Włącz przełącznik obok opcji Łączenie kont.
- W sekcji Tworzenie konta wybierz Tak.
W sekcji Typ połączenia wybierz OAuth i logowanie przez Google oraz Pośredni.
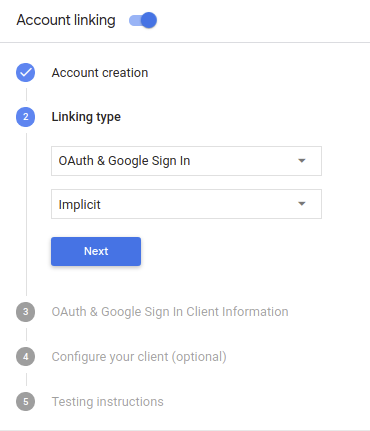
W sekcji Informacje o kliencie wykonaj te czynności:
- Przypisz wartość do pola Identyfikator klienta wydany przez Twoje działania w Google, aby identyfikować żądania pochodzące z Google.
- Wstaw adresy URL punktów końcowych autoryzacji i wymiany tokenów.
Kliknij Zapisz.
Wdrażanie serwera OAuth
Aby obsługiwać niejawny przepływ OAuth 2.0, Twoja usługa wymaga autoryzacji punktu końcowego dostępnego przez HTTPS. Ten punkt końcowy odpowiada za uwierzytelnianie i uzyskiwania od użytkowników zgody na dostęp do danych. Punkt końcowy autoryzacji wyświetla interfejs logowania użytkownikom, którzy nie są jeszcze zalogowani, wyrazić zgodę na żądany dostęp.
Gdy akcja musi wywołać jeden z autoryzowanych interfejsów API usługi, Google używa ten punkt końcowy, aby uzyskać od użytkowników uprawnienia do wywoływania tych interfejsów API w imieniu Google.
Typowa sesja niejawnego przepływu zainicjowana przez Google w języku OAuth 2.0 ma następujący przepływ:
- Google otworzy punkt końcowy autoryzacji w przeglądarce użytkownika. loguje się, jeśli jeszcze nie jest zalogowany, i zezwala Google na dostęp swoich danych za pomocą interfejsu API, jeśli nie udzielili jeszcze zgody.
- Usługa tworzy token dostępu i zwraca go do Google przez przekierowanie przeglądarki użytkownika z powrotem do Google wraz z tokenem dostępu. do żądania.
- Google wywołuje interfejsy API Twojej usługi i łączy token dostępu z każdego żądania. Usługa sprawdza, czy token dostępu przyznaje Google aby uzyskać dostęp do interfejsu API, a następnie wykonać jego wywołanie.
Obsługa żądań autoryzacji
Jeśli akcja musi połączyć konta przez niejawny przepływ OAuth 2.0, Google wysyła użytkownika do punktu końcowego autoryzacji z żądaniem zawierającym ciąg następujące parametry:
| Parametry punktu końcowego autoryzacji | |
|---|---|
client_id |
Identyfikator klienta przypisany przez Ciebie do Google. |
redirect_uri |
Adres URL, na który została wysłana odpowiedź na to żądanie. |
state |
wartości księgowej, która jest przesyłana do Google bez zmian w identyfikator URI przekierowania. |
response_type |
Typ wartości do zwrócenia w odpowiedzi. W przypadku protokołu OAuth 2.0 implicit
przepływu, typ odpowiedzi to zawsze token. |
Jeśli na przykład punkt końcowy autoryzacji jest dostępny pod adresem https://myservice.example.com/auth,
żądanie może wyglądać tak:
GET https://myservice.example.com/auth?client_id=GOOGLE_CLIENT_ID&redirect_uri=REDIRECT_URI&state=STATE_STRING&response_type=token
Aby punkt końcowy autoryzacji mógł obsługiwać żądania logowania, wykonaj te czynności:
Sprawdź wartości
client_idiredirect_uriw zapobiegaj przyznawaniu dostępu do niezamierzonych lub błędnie skonfigurowanych aplikacji klienckich:- Sprawdź, czy identyfikator
client_idjest zgodny z Twoim identyfikatorem klienta przypisane do Google. - Sprawdź, czy URL podany w pliku
redirect_urima taką postać:https://oauth-redirect.googleusercontent.com/r/YOUR_PROJECT_ID
- Sprawdź, czy identyfikator
Sprawdź, czy użytkownik jest zalogowany w Twojej usłudze. Jeśli użytkownik nie jest zalogowany dokończ proces logowania lub rejestracji w usłudze.
Wygeneruj token dostępu, którego Google będzie używać, aby uzyskiwać dostęp do Twojego interfejsu API. token dostępu może być dowolną wartością ciągu, ale musi jednoznacznie reprezentować i klienta, dla którego jest przeznaczony token, i nie może być odgadywany.
Wyślij odpowiedź HTTP przekierowującą przeglądarkę użytkownika na ten adres URL wskazywaną przez parametr
redirect_uri. Uwzględnij wszystkie następujące parametry we fragmencie adresu URL:access_token: wygenerowany właśnie przez Ciebie token dostępu.token_type: ciąg znakówbearerstate: niezmodyfikowana wartość stanu pierwotnego, prośba Oto przykład powstałego adresu URL:https://oauth-redirect.googleusercontent.com/r/YOUR_PROJECT_ID#access_token=ACCESS_TOKEN&token_type=bearer&state=STATE_STRING
Moduł obsługi przekierowań OAuth 2.0 od Google otrzyma token dostępu i potwierdzi
że wartość state się nie zmieniła. Po uzyskaniu przez Google
dla Twojej usługi, Google będzie dołączać ten token do kolejnych wywołań
do akcji w ramach żądania AppRequest.
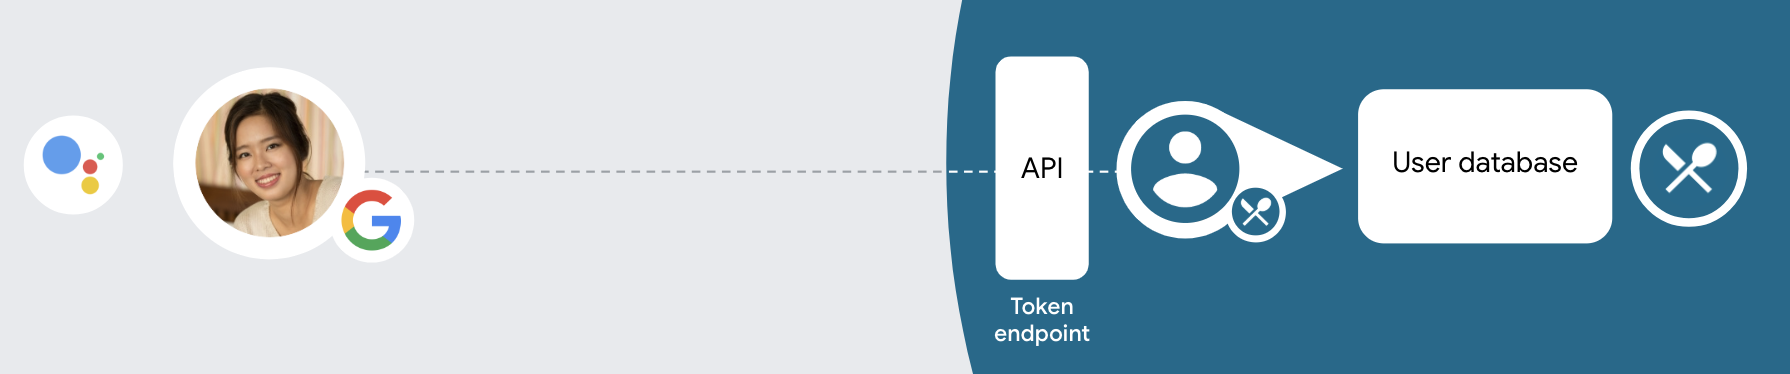
Obsługa automatycznego łączenia
Gdy użytkownik wyrazi zgodę na dostęp do profilu Google, Google wysyła żądanie zawierające podpisane potwierdzenie tożsamości użytkownika Google. Potwierdzenie zawiera informacje, które obejmują identyfikator konta Google użytkownika, jego nazwę i adres e-mail. Punkt końcowy wymiany tokenów skonfigurowany na potrzeby projektu obsługuje tę prośbę.
Jeśli w systemie uwierzytelniania już istnieje odpowiednie konto Google,
punkt końcowy wymiany tokenów zwraca token użytkownika. Jeśli konto Google nie
pasujące do istniejącego użytkownika, punkt końcowy wymiany tokenów zwraca błąd user_not_found.
Prośba ma taki format:
POST /token HTTP/1.1
Host: oauth2.example.com
Content-Type: application/x-www-form-urlencoded

grant_type=urn:ietf:params:oauth:grant-type:jwt-bearer&intent=get&assertion=JWT&consent_code=CONSENT_CODE&scope=SCOPES
Punkt końcowy wymiany tokenów musi obsługiwać te parametry:
| Parametry punktu końcowego tokena | |
|---|---|
grant_type |
Typ wymienianego tokena. W przypadku tych żądań
ma wartość urn:ietf:params:oauth:grant-type:jwt-bearer. |
intent |
W przypadku tych żądań wartość tego parametru to „get”. |
assertion |
Token internetowy JSON (JWT), który stanowi podpisane potwierdzenie uwierzytelniania Google tożsamości użytkownika. Token JWT zawiera informacje o Google użytkownika Identyfikator konta, imię i nazwisko oraz adres e-mail. |
consent_code |
Opcjonalnie: jeśli jest dostępny, jednorazowy kod, który wskazuje, że użytkownik wyraził zgodę na dostęp Twojej akcji do określonych zakresów. |
scope |
Opcjonalne: wszystkie zakresy skonfigurowane przez Google, aby żądać od użytkowników. |
Gdy punkt końcowy wymiany tokenów otrzyma żądanie połączenia, powinien wykonać :
Weryfikowanie i dekodowanie potwierdzenia JWT
Potwierdzenie JWT możesz zweryfikować i zdekodować za pomocą biblioteki dekodowania JWT dla swojego języka. Użyj kluczy publicznych Google (dostępnych w językach JWK lub PEM), aby zweryfikować token podpis.
Po zdekodowaniu potwierdzenie JWT wygląda jak w tym przykładzie:
{
  "sub": 1234567890,        // The unique ID of the user's Google Account
  "iss": "https://accounts.google.com",        // The assertion's issuer
  "aud": "123-abc.apps.googleusercontent.com", // Your server's client ID
  "iat": 233366400,         // Unix timestamp of the assertion's creation time
  "exp": 233370000,         // Unix timestamp of the assertion's expiration time
  "name": "Jan Jansen",
  "given_name": "Jan",
  "family_name": "Jansen",
  "email": "jan@gmail.com", // If present, the user's email address
  "locale": "en_US"
}
Oprócz weryfikacji podpisu tokena sprawdź, czy wydawca potwierdzenia
(pole iss) to https://accounts.google.com, a lista odbiorców (pole aud)
to identyfikator klienta przypisany do Twojej akcji.
Sprawdź, czy konto Google znajduje się już w systemie uwierzytelniania
Sprawdź, czy spełniony jest jeden z tych warunków:
- Identyfikator konta Google znajdujący się w polu
subpotwierdzenia znajduje się w bazie danych użytkowników. - Adres e-mail podany w potwierdzeniu pasuje do użytkownika w bazie danych użytkowników.
Jeśli którykolwiek z tych warunków jest spełniony, użytkownik już się zarejestrował, więc możesz wysłać token dostępu.
Jeśli ani identyfikator konta Google, ani adres e-mail podany w potwierdzeniu
pasuje do użytkownika w bazie danych, nie zarejestrował się jeszcze. W takim przypadku atrybut
Punkt końcowy wymiany tokenów powinien odpowiedzieć z błędem HTTP 401, który określa error=user_not_found,
Jak w tym przykładzie:
HTTP/1.1 401 Unauthorized
Content-Type: application/json;charset=UTF-8

{
  "error":"user_not_found",
}
user_not_found, Google
wywołuje punkt końcowy wymiany tokenów wartością parametru intent
ustaw na create (utwórz) i wysyłaj token tożsamości zawierający informacje o profilu użytkownika;
z prośbą o pozwolenie.
Utwórz konto za pomocą Logowania przez Google
Gdy użytkownik musi utworzyć konto w Twojej usłudze, Google
żądanie do punktu końcowego wymiany tokenów, który określa
intent=create jak w tym przykładzie:
POST /token HTTP/1.1
Host: oauth2.example.com
Content-Type: application/x-www-form-urlencoded

response_type=token&grant_type=urn:ietf:params:oauth:grant-type:jwt-bearer&scope=SCOPES&intent=create&consent_code=CONSENT_CODE&assertion=JWT[&NEW_ACCOUNT_INFO]
Parametr assertion zawiera token sieciowy JSON (JWT), który udostępnia
podpisane potwierdzenie tożsamości użytkownika Google. Token JWT zawiera informacje
obejmujący identyfikator konta Google użytkownika, imię i nazwisko oraz adres e-mail,
aby utworzyć nowe konto w usłudze.
Aby odpowiadać na żądania utworzenia konta, punkt końcowy wymiany tokenów musi wykonać następujące:
Weryfikowanie i dekodowanie potwierdzenia JWT
Potwierdzenie JWT możesz zweryfikować i zdekodować za pomocą biblioteki dekodowania JWT dla swojego języka. Użyj kluczy publicznych Google (dostępnych w językach JWK lub PEM), aby zweryfikować token podpis.
Po zdekodowaniu potwierdzenie JWT wygląda jak w tym przykładzie:
{
  "sub": 1234567890,        // The unique ID of the user's Google Account
  "iss": "https://accounts.google.com",        // The assertion's issuer
  "aud": "123-abc.apps.googleusercontent.com", // Your server's client ID
  "iat": 233366400,         // Unix timestamp of the assertion's creation time
  "exp": 233370000,         // Unix timestamp of the assertion's expiration time
  "name": "Jan Jansen",
  "given_name": "Jan",
  "family_name": "Jansen",
  "email": "jan@gmail.com", // If present, the user's email address
  "locale": "en_US"
}
Oprócz weryfikacji podpisu tokena sprawdź, czy wydawca potwierdzenia
(pole iss) to https://accounts.google.com, a lista odbiorców (pole aud)
to identyfikator klienta przypisany do Twojej akcji.
Zweryfikuj informacje o użytkowniku i utwórz nowe konto
Sprawdź, czy spełniony jest jeden z tych warunków:
- Identyfikator konta Google znajdujący się w polu
subpotwierdzenia znajduje się w bazie danych użytkowników. - Adres e-mail podany w potwierdzeniu pasuje do użytkownika w bazie danych użytkowników.
Jeśli którykolwiek z tych warunków jest spełniony, poproś użytkownika o połączenie istniejącego konta
swojego konta Google, odpowiadając na żądanie z błędem HTTP 401, określając
error=linking_error, a adres e-mail użytkownika w polu login_hint, na przykład
następujący przykład:
HTTP/1.1 401 Unauthorized
Content-Type: application/json;charset=UTF-8

{
  "error":"linking_error",
  "login_hint":"foo@bar.com"
}
Jeśli żaden z tych warunków nie jest spełniony, utwórz nowe konto użytkownika przy użyciu tych informacji podane w tokenie JWT. Nowe konta zwykle nie mają ustawionego hasła. Jest zalecamy dodanie Logowania przez Google na innych platformach, aby umożliwić użytkownikom logowanie w różnych miejscach aplikacji. Ewentualnie możesz wyślij użytkownikowi e-maila z linkiem, który rozpoczyna proces odzyskiwania hasła, aby umożliwić użytkownikowi ustawienie hasła do logowania się na innych platformach.
Po zakończeniu tworzenia wydaj token dostępu i zwracają wartości w obiekcie JSON w treść odpowiedzi HTTPS, jak w tym przykładzie:
{
  "token_type": "Bearer",
  "access_token": "ACCESS_TOKEN",

  "expires_in": SECONDS_TO_EXPIRATION
}
Zaprojektuj interfejs głosowy dla procesu uwierzytelniania.
Sprawdź, czy użytkownik jest zweryfikowany, i rozpocznij proces łączenia konta.
- Otwórz projekt w Actions Builder w konsoli Actions.
- Utwórz nową scenę, aby rozpocząć łączenie kont w swojej akcji:
- Kliknij Sceny.
- Kliknij ikonę dodawania (+), aby dodać nową scenę.
- W nowo utworzonej scenie kliknij ikonę dodawania add obok Warunków.
- Dodaj warunek, który sprawdza, czy użytkownik powiązany z rozmową jest zweryfikowany. Jeśli weryfikacja się nie powiedzie, Akcja nie będzie mogła połączyć kont podczas rozmowy i powinna wrócić do udostępniania funkcji, które nie wymagają łączenia kont.
- W polu
Enter new expressionw sekcji Warunek wpisz tę logikę:user.verificationStatus != "VERIFIED" - W sekcji Przejście wybierz scenę, która nie wymaga połączenia konta, lub scenę, która jest punktem wejścia do funkcji dostępnych tylko dla gości.
- W polu
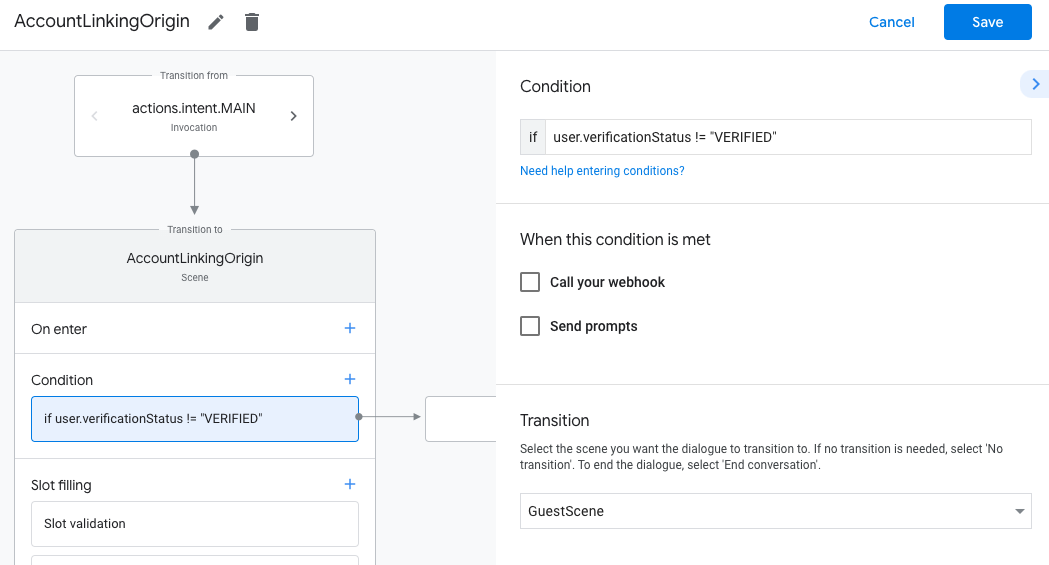
- Kliknij ikonę dodawania add obok pozycji Warunki.
- Dodaj warunek, który uruchomi proces łączenia kont, jeśli użytkownik nie ma powiązanej tożsamości.
- W polu
Enter new expressionw sekcji Warunek wpisz tę logikę:user.verificationStatus == "VERIFIED" - W sekcji Przejście wybierz scenę systemową Łączenie kont.
- Kliknij Zapisz.
- W polu
![]()
Po zapisaniu do projektu zostanie dodana nowa scena systemu łączenia kont o nazwie <SceneName>_AccountLinking.
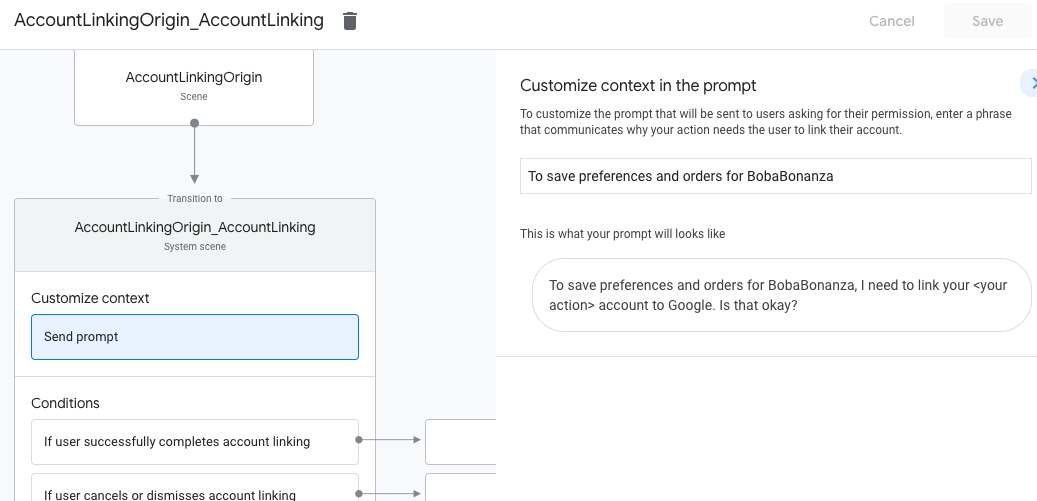
Dostosowywanie sceny łączenia kont
- W sekcji Sceny wybierz scenę systemu łączenia kont.
- Kliknij Wyślij prompt i dodaj krótkie zdanie, aby wyjaśnić użytkownikowi, dlaczego działanie potrzebuje dostępu do jego tożsamości (np. „Aby zapisać Twoje ustawienia”).
- Kliknij Zapisz.
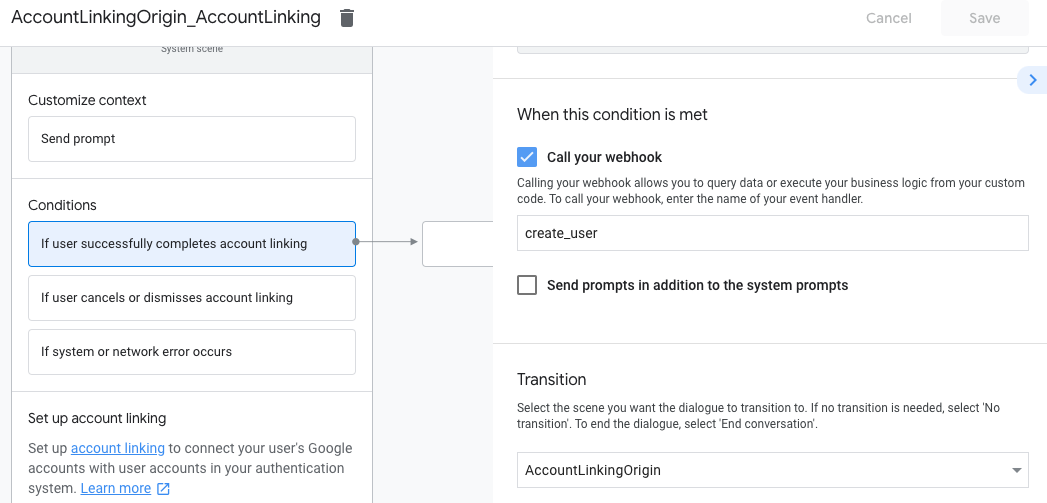
- W sekcji Warunki kliknij Jeśli użytkownik pomyślnie połączy konta.
- Skonfiguruj, jak ma przebiegać proces, jeśli użytkownik zgodzi się na połączenie konta. Możesz na przykład wywołać webhooka, aby przetworzyć dowolną niestandardową logikę biznesową i wrócić do pierwotnej sceny.
- Kliknij Zapisz.
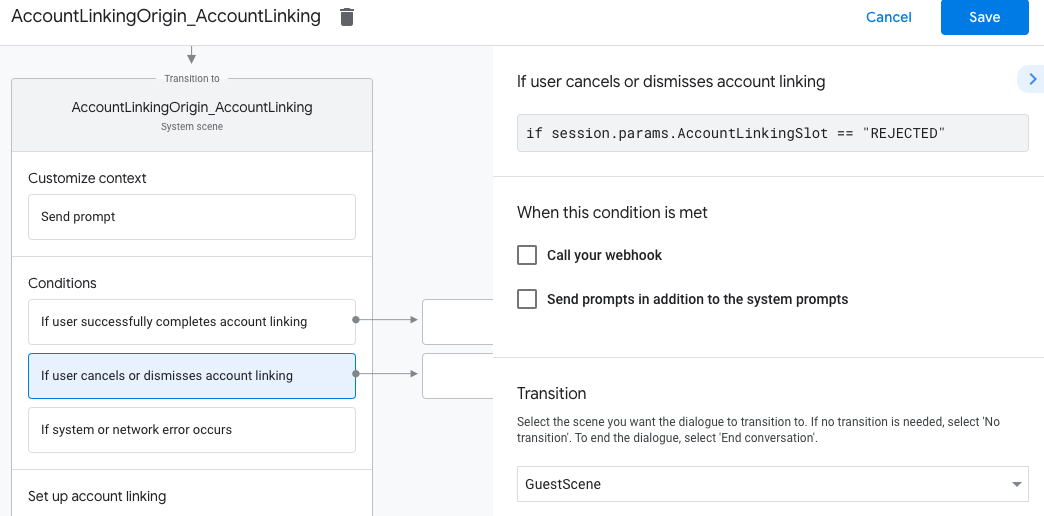
- W sekcji Warunki kliknij Jeśli użytkownik anuluje połączenie konta lub je odrzuci.
- Skonfiguruj, jak ma przebiegać proces, jeśli użytkownik nie zgodzi się na połączenie konta. Możesz na przykład wysłać wiadomość z potwierdzeniem i przekierować użytkownika do scen, które zapewniają funkcje niewymagające połączenia kont.
- Kliknij Zapisz.
- W sekcji Warunki kliknij Jeśli wystąpi błąd systemu lub sieci.
- Skonfiguruj, jak ma przebiegać proces, jeśli nie można go ukończyć z powodu błędów systemu lub sieci. Możesz na przykład wysłać wiadomość z potwierdzeniem i przekierować użytkownika do scen, które zapewniają funkcje niewymagające połączenia kont.
- Kliknij Zapisz.
Obsługa próśb o dostęp do danych
Jeśli żądanie Asystenta zawiera token dostępu, najpierw sprawdź, czy jest on ważny i nie wygasł, a potem pobierz z bazy danych kont użytkowników konto powiązane z tym tokenem.