
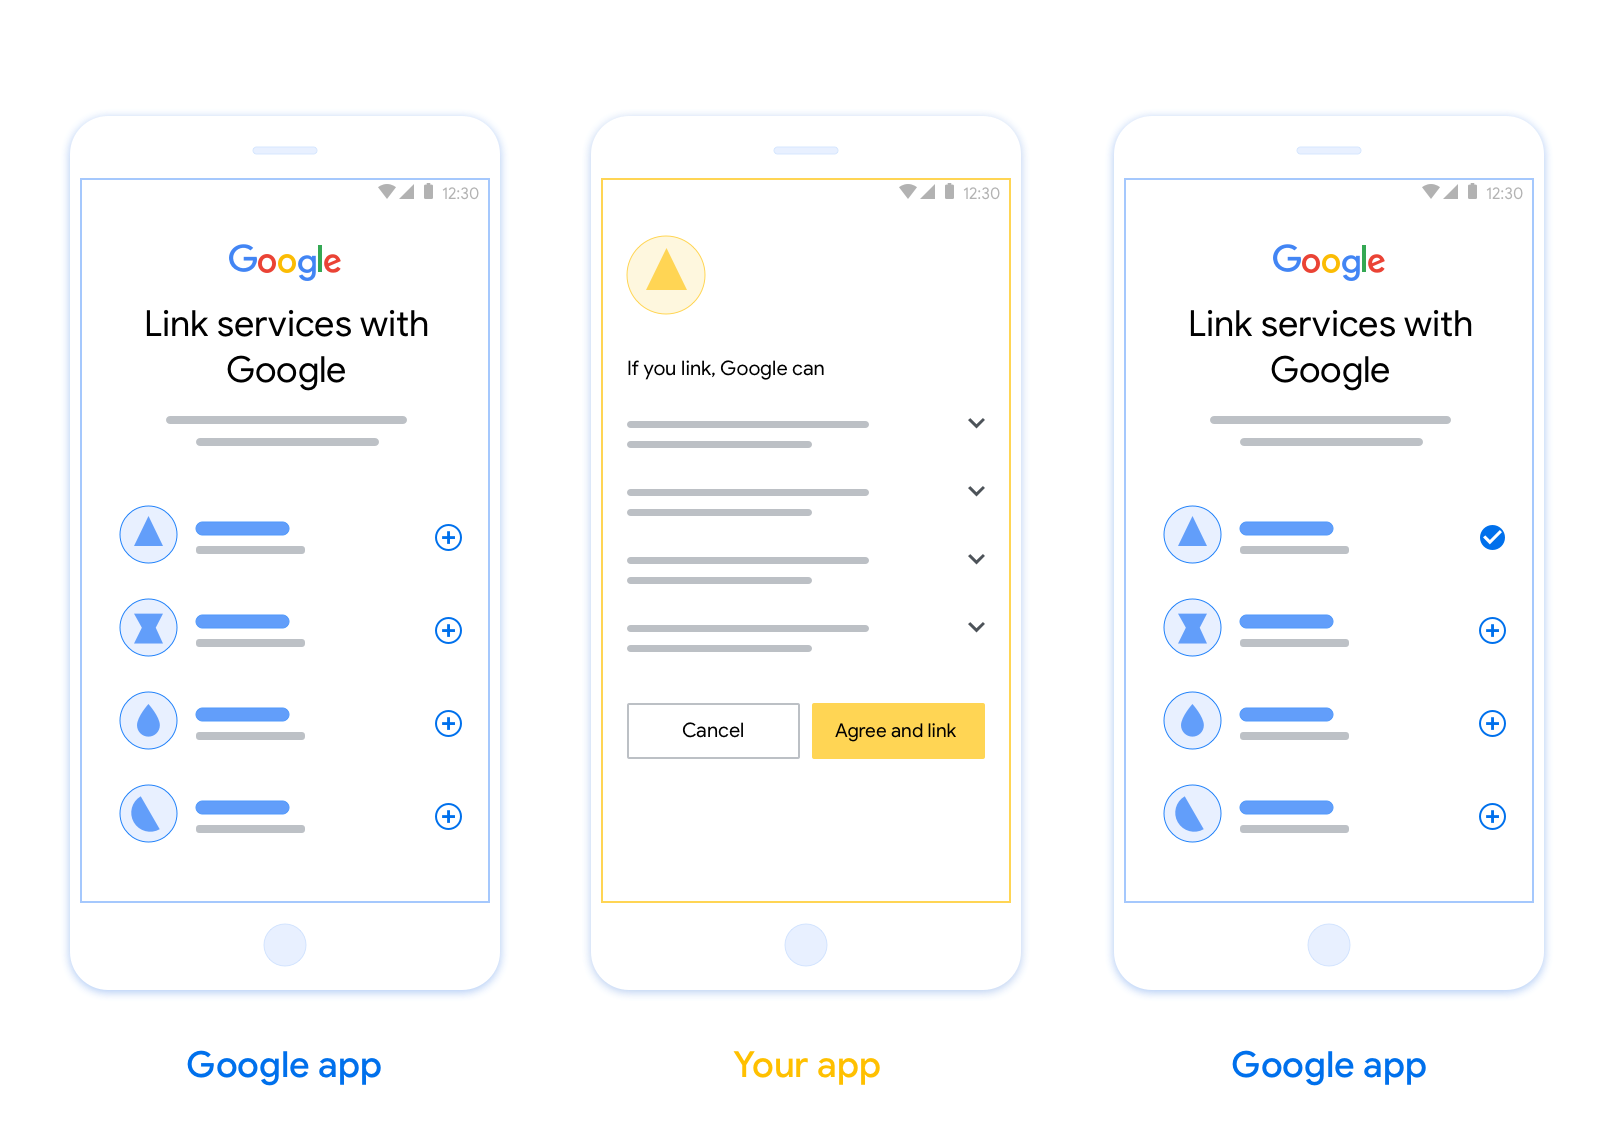
La vinculación de cuentas con App Flip basada en OAuth (App Flip) permite que los usuarios vinculen rápidamente sus cuentas en tu sistema de autenticación a sus Cuentas de Google. Si tu app está instalada en el teléfono del usuario cuando inicia el proceso de vinculación de la cuenta, se lo redirecciona sin problemas a tu app para obtener la autorización del usuario.
Este enfoque proporciona un proceso de vinculación más rápido, ya que el usuario no tiene que volver a ingresar su nombre de usuario y contraseña para autenticarse. En cambio, App Flip aprovecha las credenciales de la cuenta del usuario en tu app. Una vez que un usuario vincula su Cuenta de Google con tu app, puede aprovechar cualquier integración que hayas desarrollado.
Puedes configurar el cambio rápido de apps para apps de iOS y Android.
Requisitos
Para implementar App Flip, debes cumplir con los siguientes requisitos:
- Debes tener una app para Android o iOS.
- Debes ser propietario, administrador y encargado del mantenimiento de un servidor de OAuth 2.0 que admita el flujo de código de autorización de OAuth 2.0.
Flujo de App Flip basado en OAuth
En el siguiente diagrama de secuencia, se detalla la interacción entre el usuario, la app de Google, tu app y tu servidor de autorización para el cambio rápido de apps.
Funciones y responsabilidades
En la siguiente tabla, se definen los roles y las responsabilidades de los participantes en el flujo de App Flip.
| Actor / Componente | Rol de GAL | Responsabilidades |
|---|---|---|
| App o servidor de Google | Cliente de OAuth | Inicia el proceso de vinculación, activa un vínculo directo a tu app para dispositivos móviles, intercambia el código de autorización por tokens y los almacena de forma segura para acceder a las APIs de tu servicio. |
| Tu app | Agente de autorización | Autentica al usuario (por lo general, con las credenciales existentes de la app), obtiene el consentimiento y recupera un código de autorización de tu servidor. |
| Tu servidor de autorización | Servidor de autorización | Valida los códigos de autorización y los tokens de actualización, y emite tokens de acceso al servidor de Google. |
Si deseas obtener más información sobre el flujo de código de autorización de vinculación de OAuth, consulta Implementa tu servidor de OAuth.
Design guidelines
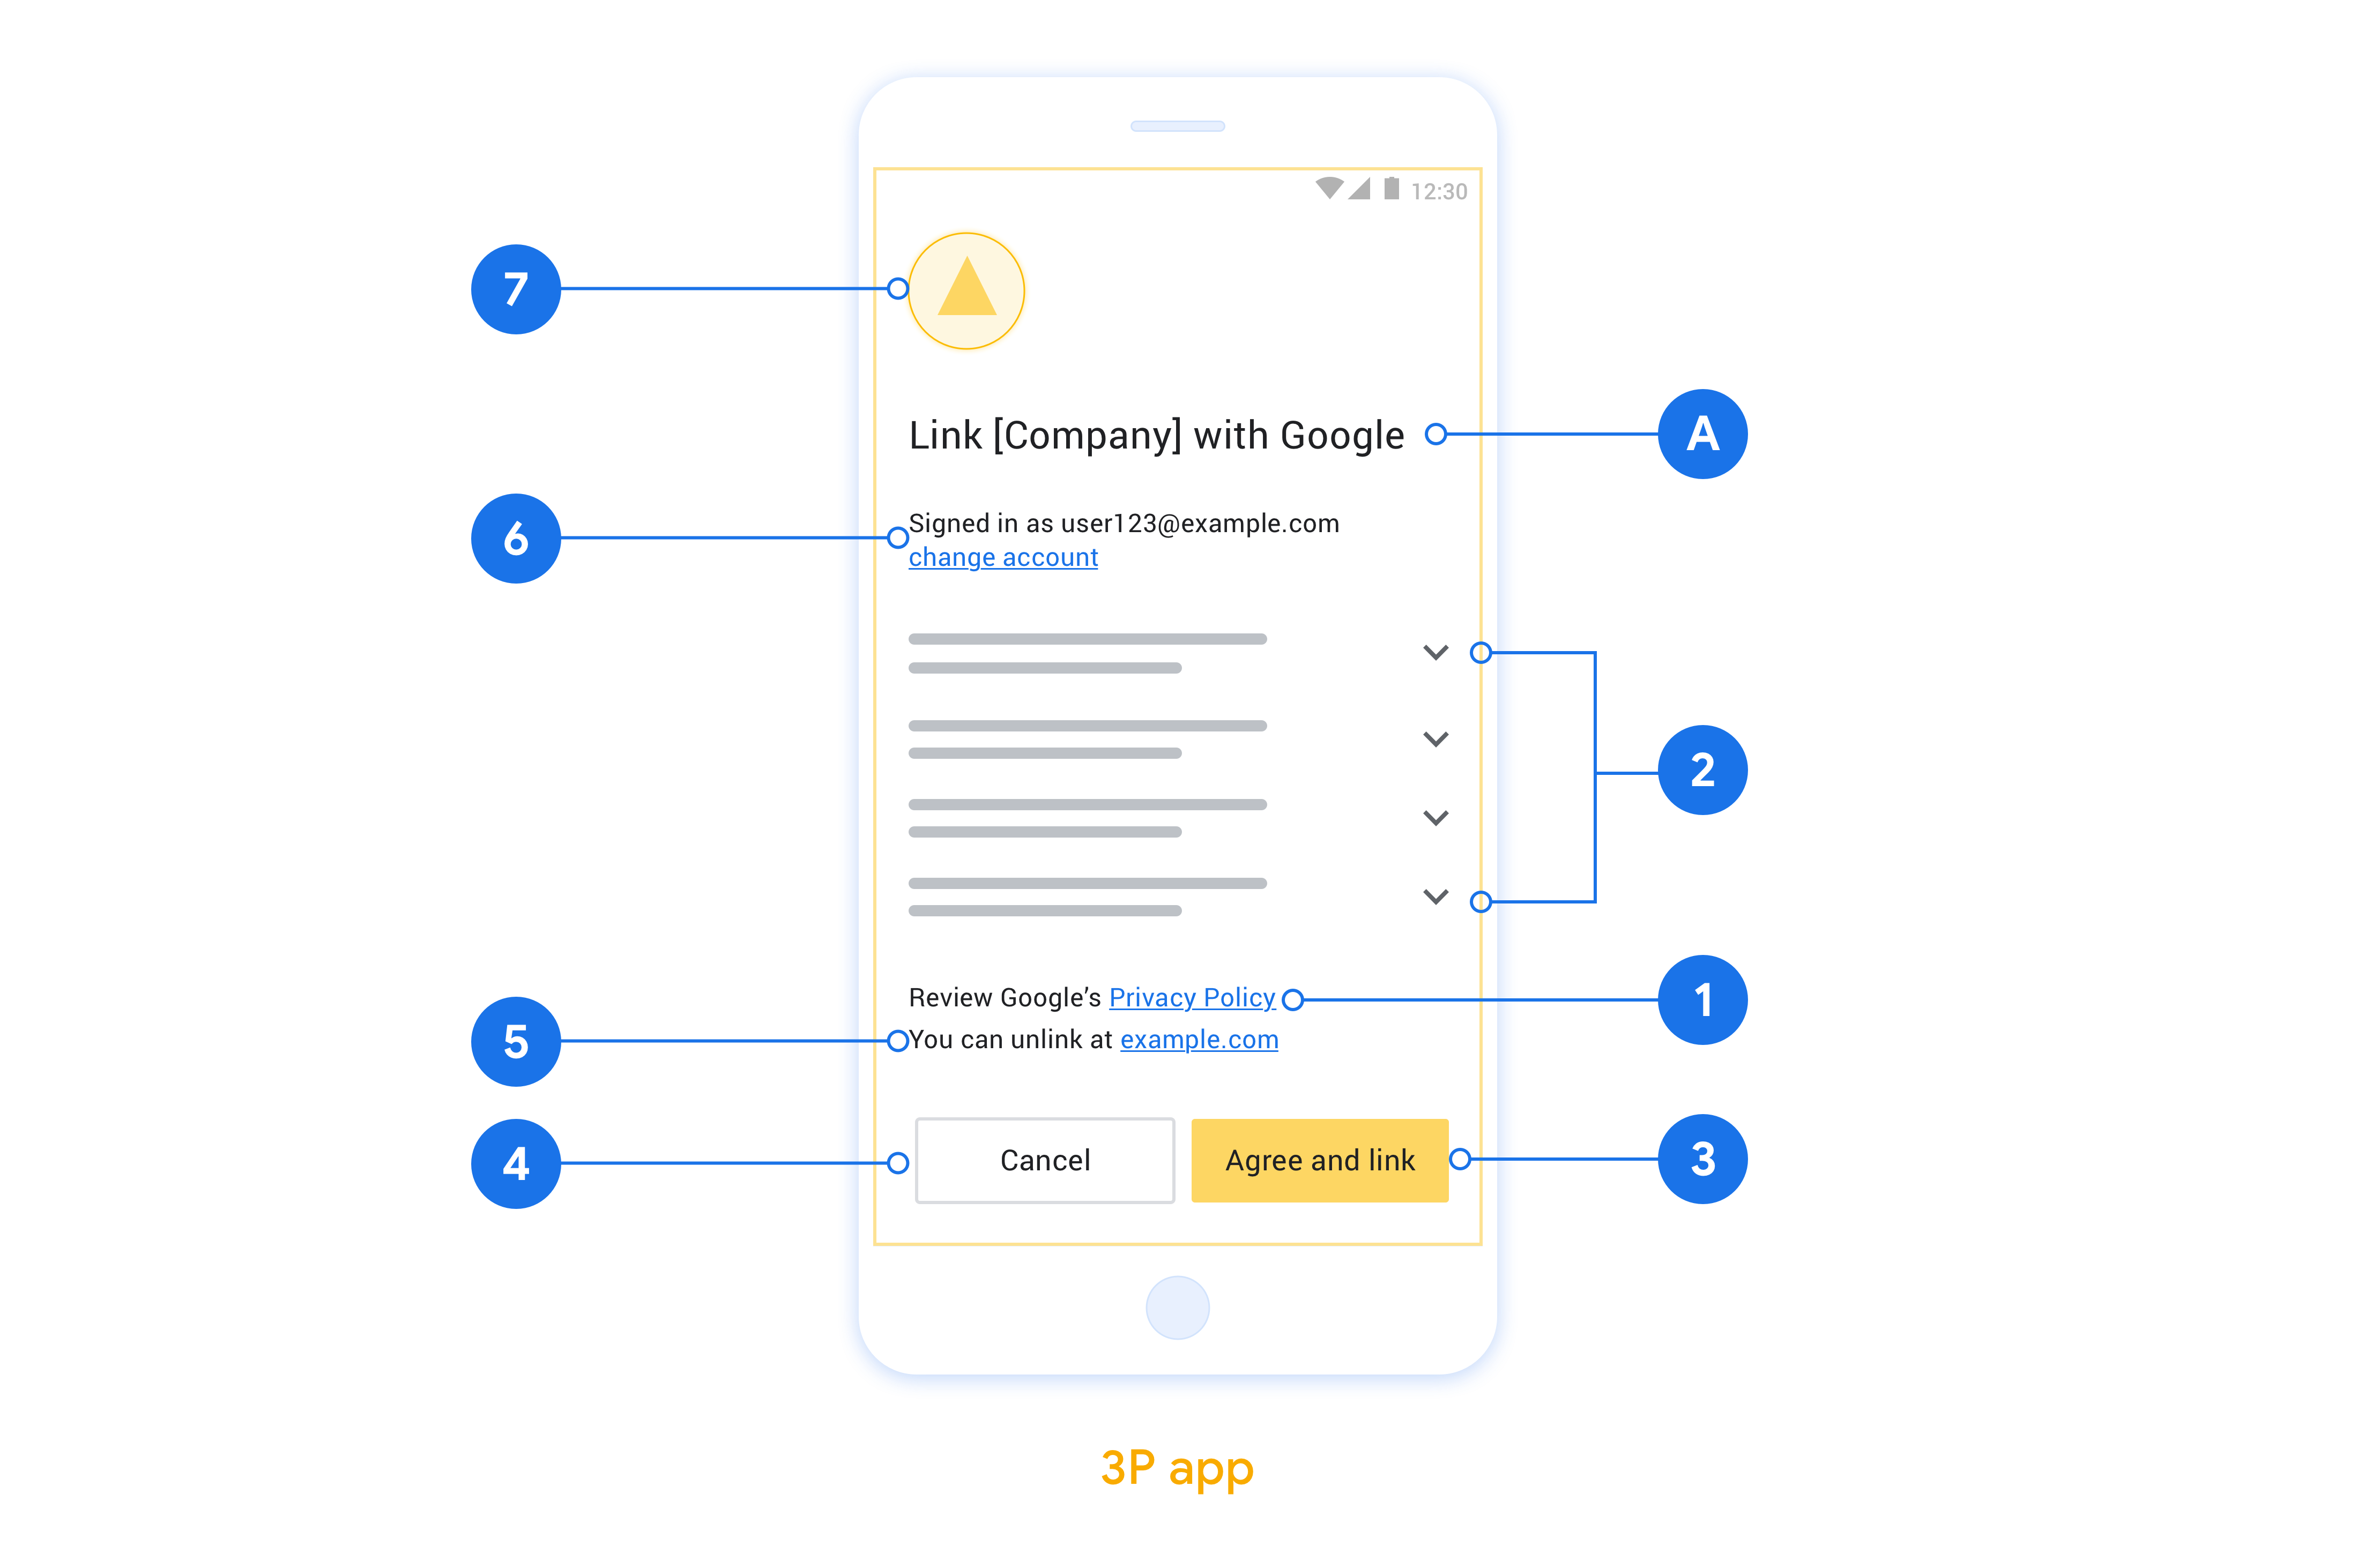
This section describes the design requirements and recommendations for the App Flip account linking consent screen. After Google calls your app, your app displays the consent screen to the user.
Requirements
- You must communicate that the user’s account is being linked to Google, not to a specific Google product, such as Google Home or Google Assistant.
Recommendations
We recommend that you do the following:
Display Google's Privacy Policy. Include a link to Google’s Privacy Policy on the consent screen.
Data to be shared. Use clear and concise language to tell the user what data of theirs Google requires and why.
Clear call-to-action. State a clear call-to-action on your consent screen, such as “Agree and link.” This is because users need to understand what data they're required to share with Google to link their accounts.
Ability to deny or cancel. Provide a way for users to go back, deny, or cancel, if they choose not to link.
Ability to unlink. Offer a mechanism for users to unlink, such as a URL to their account settings on your platform. Alternatively, you can include a link to Google Account where users can manage their linked account.
Ability to change user account. Suggest a method for users to switch their account(s). This is especially beneficial if users tend to have multiple accounts.
- If a user must close the consent screen to switch accounts, send a recoverable error to Google so the user can sign in to the desired account with OAuth linking and the implicit flow.
Include your logo. Display your company logo on the consent screen. Use your style guidelines to place your logo. If you wish to also display Google's logo, see Logos and trademarks.
Configuración de App Flip basada en OAuth
En las siguientes secciones, se describen los requisitos previos para el cambio de app basado en OAuth y cómo configurar tu proyecto de cambio de app en la Consola de Actions.
Crea una acción y configura un servidor de OAuth 2.0
Antes de configurar App Flip, debes hacer lo siguiente:
- Crea una acción. Para crear una acción, sigue las instrucciones de la sección Crea un proyecto.
- Configura un servidor OAuth 2.0. Si quieres obtener más información para configurar un servidor de OAuth, consulta Implementa la vinculación de cuentas con OAuth.
Configura App Flip en la Consola de Actions
En la siguiente sección, se describe cómo configurar App Flip en la consola de Actions.
- En el menú de navegación superior, haz clic en Develop. Luego, haz clic en Vinculación de la cuenta en el menú de navegación izquierdo.
- Activa el interruptor junto a Vinculación de cuentas.
- En Creación de cuentas, selecciona No, solo quiero permitir la creación de cuentas en mi sitio web.
- Haz clic en Siguiente.
- En Tipo de vinculación, selecciona OAuth y Código de autorización en los menús desplegables.
- Haz clic en Siguiente.
- Completa todos los campos en Información del cliente de OAuth. (Si no se admite App Flip, se usa OAuth normal como alternativa).
- Haz clic en Siguiente.
- En Usa tu app para la vinculación de cuentas (opcional), marca Habilitar para iOS.
- Completa el campo Universal Link. Para obtener más información sobre los vínculos universales, consulta Cómo permitir que las apps y los sitios web vinculen tu contenido .
- Si deseas configurar tu cliente de forma opcional, agrega permisos y haz clic en Agregar permiso en Configura tu cliente (opcional). De lo contrario, haz clic en Siguiente.
- En Instrucciones de prueba, escribe
test(o cualquier otra cadena) como marcador de posición. (Completar este campo con una cuenta de prueba solo es necesario si realmente envías tu Acción para que se publique). - Haz clic en Guardar.
Ahora puedes continuar con la siguiente sección para implementar App Flip en tu app para iOS o Android.
Implementa App Flip en tus apps nativas
Para implementar App Flip, debes modificar el código de autorización del usuario en tu app para aceptar un vínculo directo de Google.
Prueba App Flip en tu dispositivo
Ahora que creaste una acción y configuraste App Flip en la consola y en tu app, puedes probar App Flip en tu dispositivo móvil. Puedes usar la app de Asistente de Google para probar App Flip.
Para probar App Flip desde la app del Asistente, sigue estos pasos:
- Ve a la consola de Actions y selecciona tu proyecto.
- En el menú de navegación superior, haz clic en Test.
- Activa el flujo de vinculación de cuentas desde la app de Asistente:
- Abre la app del Asistente de Google.
- Haz clic en Configuración.
- En la pestaña Asistente, haz clic en Control de la casa.
- Haz clic en Agregar(+).
- Selecciona tu acción en la lista de proveedores. En la lista, tendrá el prefijo “[test]”. Cuando selecciones tu acción [de prueba] en la lista, se debería abrir tu app.
- Verifica que se haya iniciado tu app y comienza a probar el flujo de autorización.