
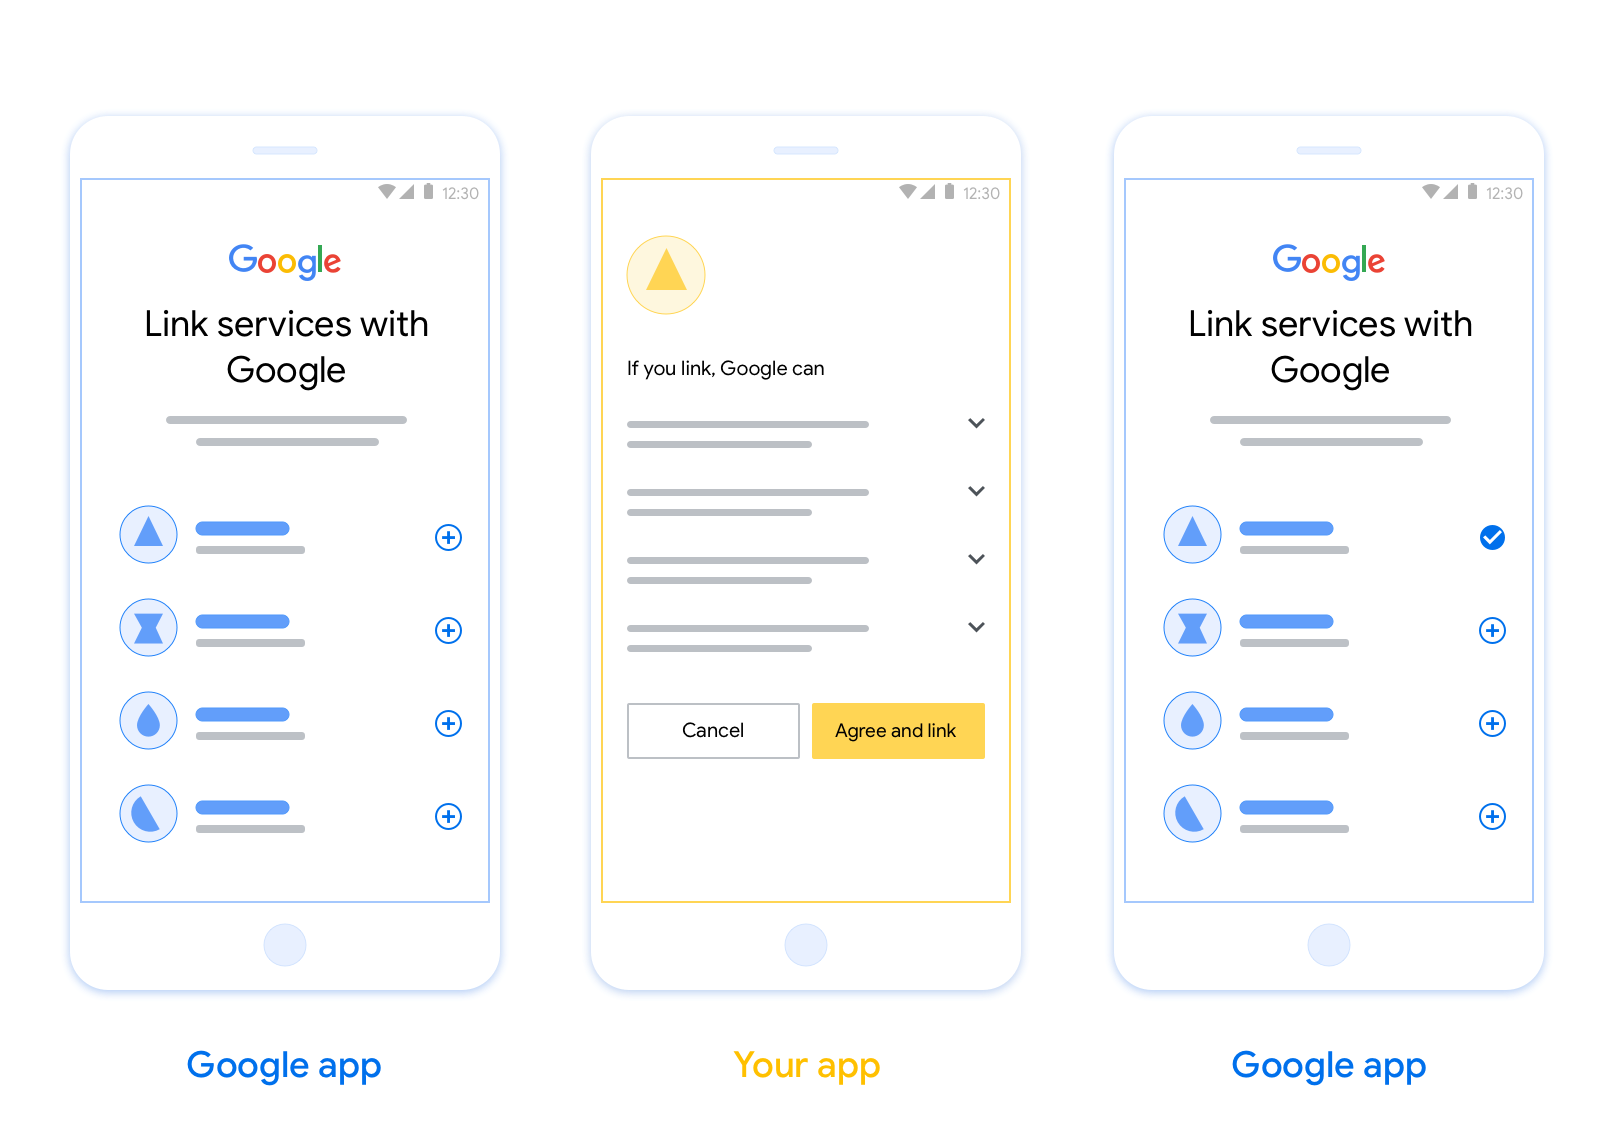
Tính năng Liên kết bằng cách chuyển đổi ứng dụng (App Flip) dựa trên OAuth cho phép người dùng nhanh chóng liên kết tài khoản của họ trong hệ thống xác thực của bạn với Tài khoản Google. Nếu ứng dụng của bạn được cài đặt trên điện thoại của người dùng khi họ bắt đầu quy trình liên kết tài khoản, thì họ sẽ được chuyển đổi liền mạch sang ứng dụng của bạn để được cấp quyền của người dùng.
Phương pháp này giúp quy trình liên kết diễn ra nhanh hơn vì người dùng không phải nhập lại tên người dùng và mật khẩu để xác thực. Thay vào đó, tính năng App Flip tận dụng thông tin xác thực từ tài khoản của người dùng trên ứng dụng của bạn. Sau khi liên kết Tài khoản Google với ứng dụng của bạn, người dùng có thể tận dụng mọi tính năng tích hợp mà bạn đã phát triển.
Bạn có thể thiết lập tính năng App Flip cho cả ứng dụng iOS và Android.
Yêu cầu
Để triển khai tính năng App Flip, bạn phải đáp ứng các yêu cầu sau:
- Bạn phải có một ứng dụng Android hoặc iOS.
- Bạn phải sở hữu, quản lý và duy trì một máy chủ OAuth 2.0 hỗ trợ quy trình sử dụng mã uỷ quyền OAuth 2.0.
Quy trình App Flip dựa trên OAuth
Sơ đồ trình tự sau đây trình bày chi tiết về sự tương tác giữa Người dùng, ứng dụng Google, Ứng dụng của bạn và Máy chủ uỷ quyền của bạn cho tính năng lật ứng dụng.
Vai trò và trách nhiệm
Bảng sau đây xác định vai trò và trách nhiệm của những người thực hiện trong quy trình App Flip.
| Người thực hiện / Thành phần | Vai trò GAL | Trách nhiệm |
|---|---|---|
| Ứng dụng / Máy chủ Google | Ứng dụng OAuth | Bắt đầu quy trình liên kết, kích hoạt một liên kết sâu đến ứng dụng di động app, trao đổi mã uỷ quyền để lấy mã thông báo và lưu trữ các mã này một cách an toàn để truy cập vào các API của dịch vụ. |
| Ứng dụng của bạn | Đại diện uỷ quyền | Xác thực người dùng (thường là bằng thông tin xác thực hiện có của ứng dụng), lấy được sự đồng ý và truy xuất mã uỷ quyền từ máy chủ của bạn. |
| Máy chủ uỷ quyền của bạn | Máy chủ uỷ quyền | Xác thực mã uỷ quyền và mã làm mới, đồng thời cấp mã truy cập cho Máy chủ Google. |
Để biết thêm thông tin về quy trình mã uỷ quyền liên kết OAuth, hãy xem phần Triển khai máy chủ OAuth.
Hướng dẫn thiết kế
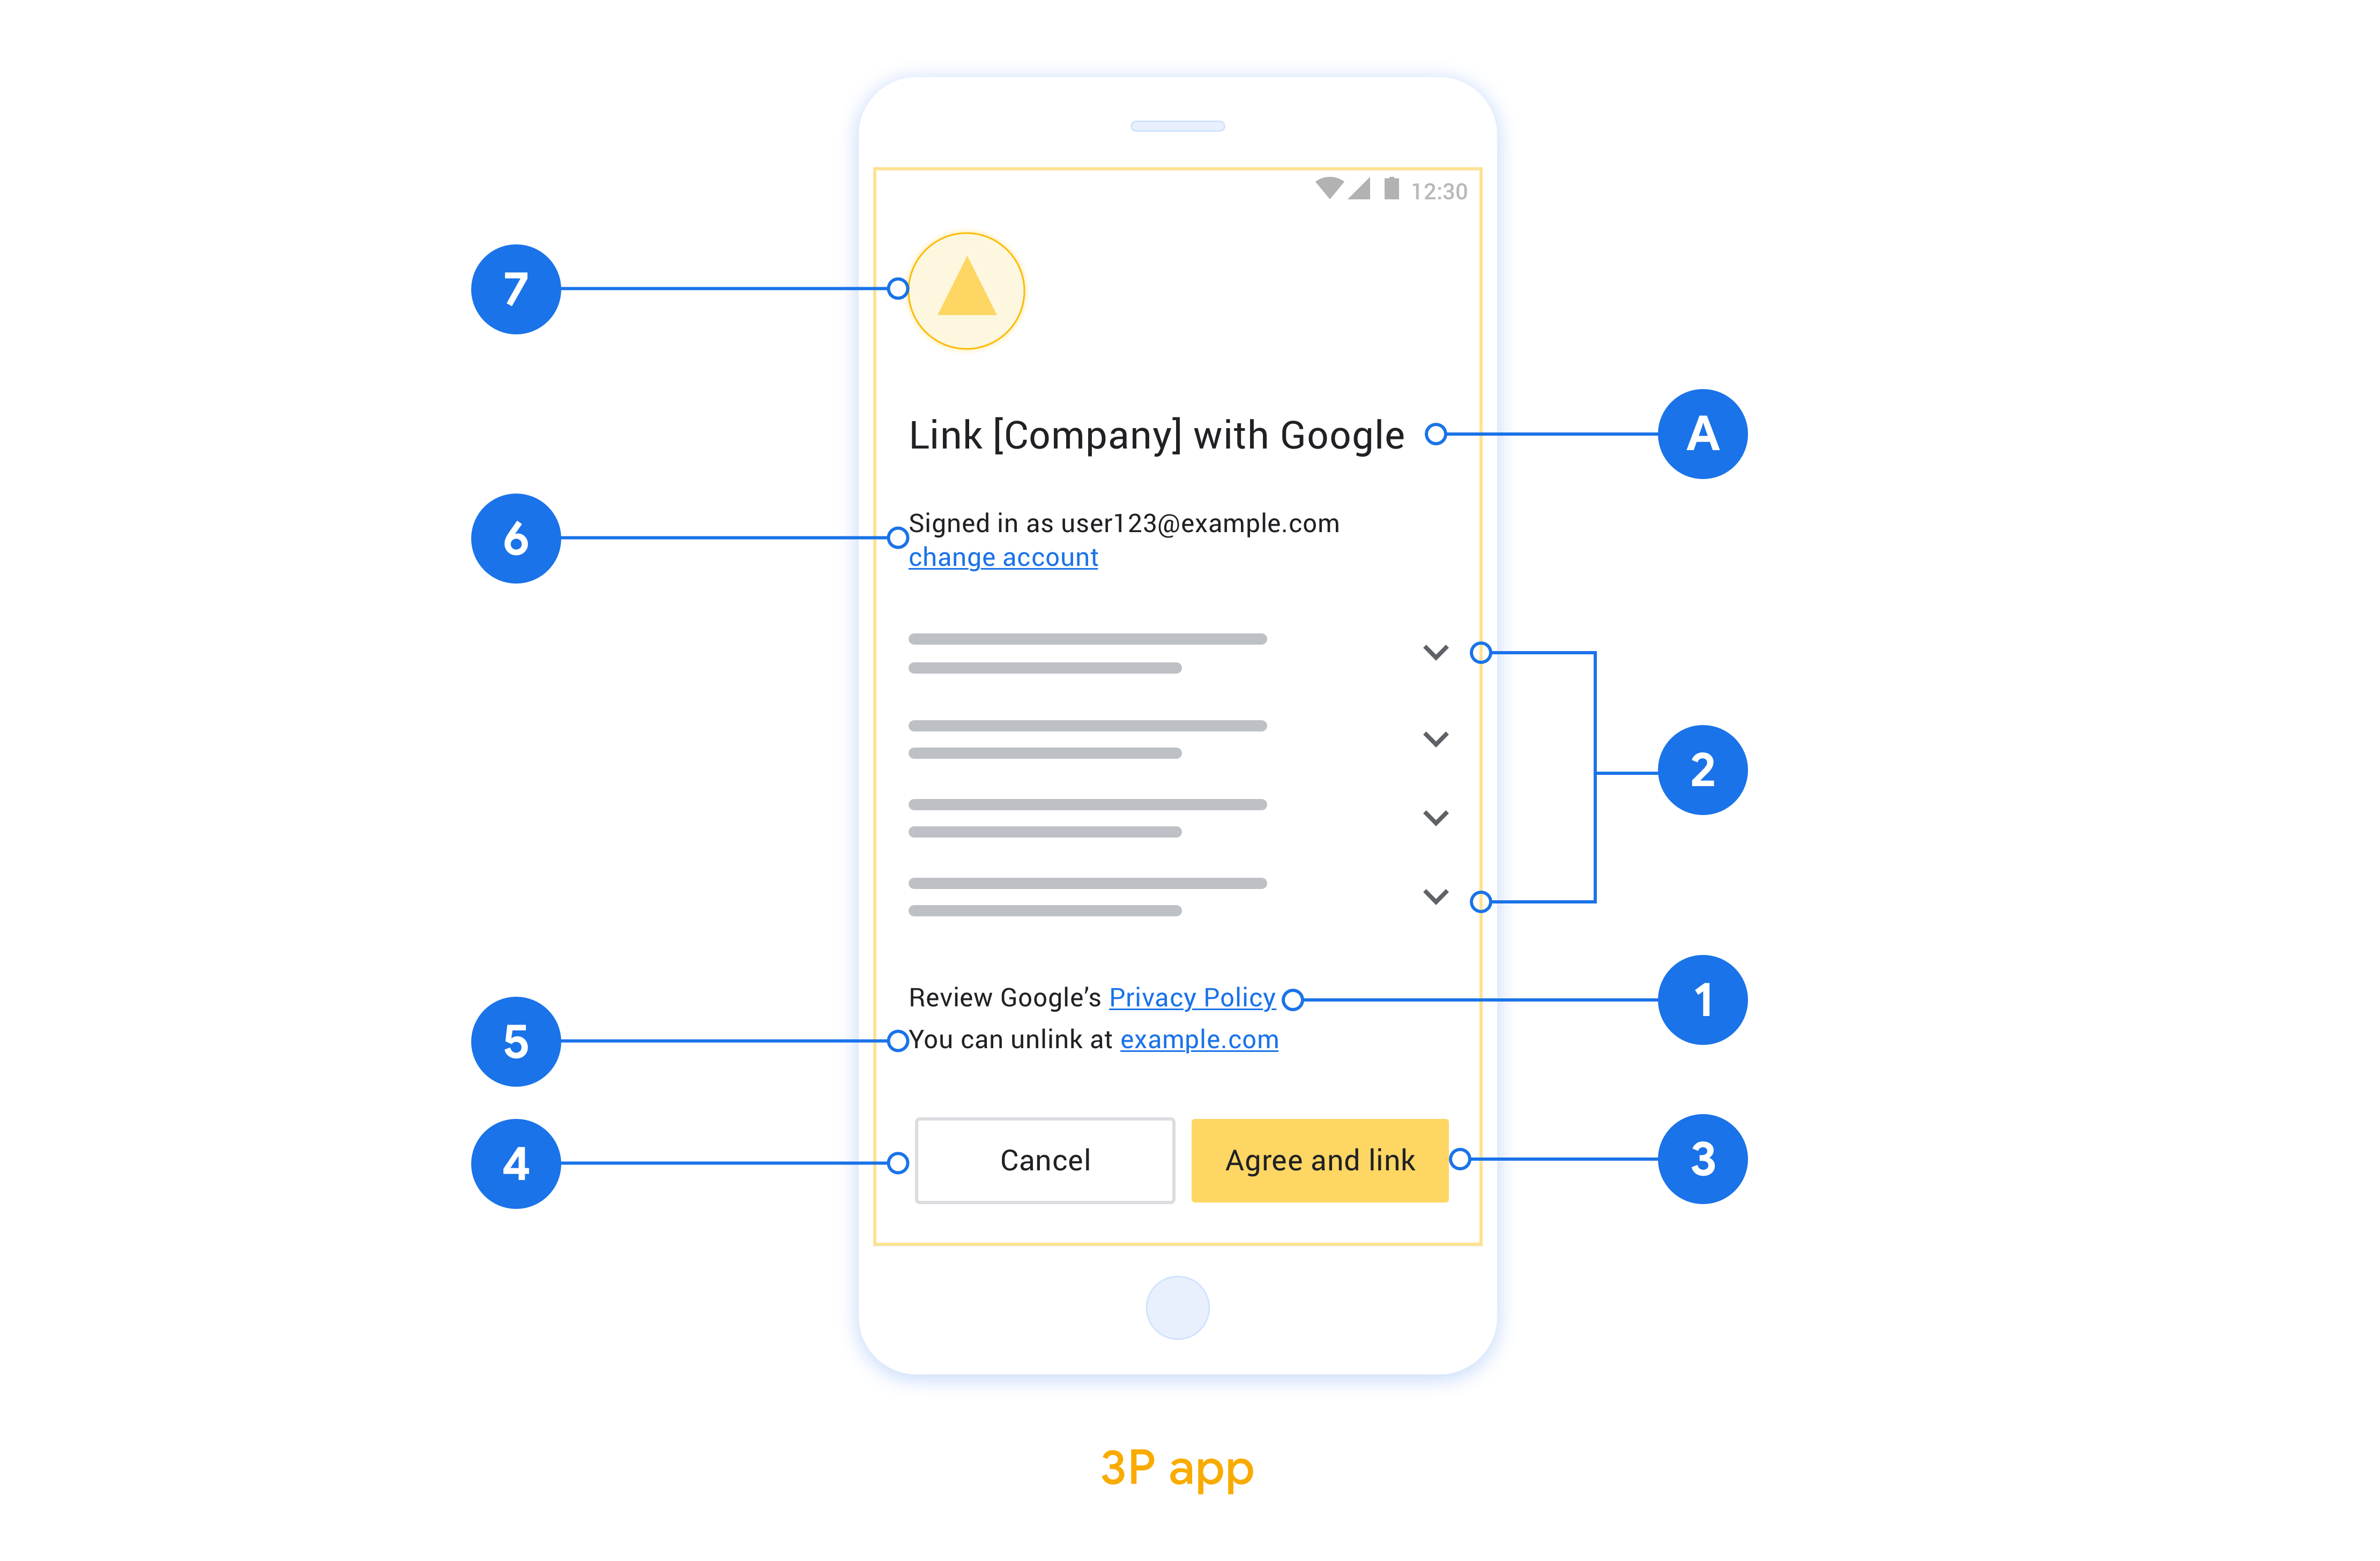
Phần này mô tả các yêu cầu và đề xuất về thiết kế cho màn hình đồng ý liên kết tài khoản AppFlip. Sau khi Google gọi ứng dụng của bạn, ứng dụng sẽ hiển thị màn hình yêu cầu sự đồng ý cho người dùng.
Yêu cầu
- Bạn phải thông báo rằng tài khoản của người dùng đang được liên kết với Google, chứ không phải với một sản phẩm cụ thể của Google, chẳng hạn như Google Home hoặc Trợ lý Google.
Đề xuất
Bạn nên thực hiện những điều sau:
Hiển thị Chính sách quyền riêng tư của Google. Cung cấp một đường liên kết đến Chính sách quyền riêng tư của Google trên màn hình xin phép.
Dữ liệu sẽ được chia sẻ. Dùng ngôn ngữ rõ ràng và súc tích để cho người dùng biết Google yêu cầu dữ liệu nào của họ và lý do tại sao.
Lời kêu gọi hành động rõ ràng. Nêu rõ lời kêu gọi hành động trên màn hình đồng ý, chẳng hạn như "Đồng ý và liên kết". Điều này là do người dùng cần hiểu rõ những dữ liệu mà họ bắt buộc phải chia sẻ với Google để liên kết tài khoản.
Có thể từ chối hoặc huỷ. Cung cấp cho người dùng cách quay lại, từ chối hoặc huỷ nếu họ chọn không liên kết.
Có thể huỷ liên kết. Cung cấp một cơ chế để người dùng huỷ liên kết, chẳng hạn như một URL đến phần cài đặt tài khoản của họ trên nền tảng của bạn. Ngoài ra, bạn có thể thêm một đường liên kết đến Tài khoản Google để người dùng có thể quản lý tài khoản được liên kết của họ.
Có thể thay đổi tài khoản người dùng. Đề xuất một phương thức để người dùng chuyển đổi(các) tài khoản của họ. Điều này đặc biệt có lợi nếu người dùng có xu hướng có nhiều tài khoản.
- Nếu người dùng phải đóng màn hình đồng ý để chuyển đổi tài khoản, hãy gửi một lỗi có thể khôi phục đến Google để người dùng có thể đăng nhập vào tài khoản mong muốn bằng tính năng liên kết OAuth và quy trình ngầm ẩn.
Thêm biểu trưng của bạn. Hiển thị biểu trưng công ty của bạn trên màn hình đồng ý. Sử dụng nguyên tắc về phong cách để đặt biểu trưng. Nếu bạn cũng muốn hiển thị biểu trưng của Google, hãy xem phần Biểu trưng và nhãn hiệu.
Thiết lập tính năng Chuyển đổi ứng dụng dựa trên OAuth
Các phần sau đây mô tả các điều kiện tiên quyết cho tính năng Chuyển đổi ứng dụng dựa trên OAuth và cách định cấu hình dự án Chuyển đổi ứng dụng trong Actions Console.
Tạo một Thao tác và thiết lập một máy chủ OAuth 2.0
Trước khi có thể định cấu hình tính năng Chuyển đổi ứng dụng, bạn cần làm như sau:
- Tạo một Thao tác. Để tạo một Thao tác, hãy làm theo hướng dẫn trong phần Tạo dự án.
- Thiết lập một máy chủ OAuth 2.0. Để biết thêm thông tin về cách thiết lập một máy chủ OAuth, hãy xem phần Triển khai tính năng liên kết tài khoản bằng OAuth.
Định cấu hình tính năng Chuyển đổi ứng dụng trong Actions Console
Phần sau đây mô tả cách định cấu hình tính năng Chuyển đổi ứng dụng trong bảng điều khiển Actions.
- Nhấp vào Phát triển trong trình đơn điều hướng trên cùng. Sau đó, hãy nhấp vào Liên kết tài khoản trong trình đơn điều hướng bên trái.
- Bật nút chuyển bên cạnh mục Liên kết tài khoản.
- Trong mục Tạo tài khoản, hãy chọn Không, tôi chỉ muốn cho phép tạo tài khoản trên trang web của mình.
- Nhấp vào Tiếp theo.
- Trong phần Loại liên kết, hãy chọn OAuth và Mã uỷ quyền trong trình đơn thả xuống.
- Nhấp vào Tiếp theo.
- Điền vào tất cả các trường trong phần Thông tin về ứng dụng OAuth. (Nếu không hỗ trợ App Flip, hệ thống sẽ dùng OAuth thông thường làm phương án dự phòng.)
- Nhấp vào Tiếp theo.
- Trong mục Sử dụng ứng dụng của bạn để liên kết tài khoản (không bắt buộc), hãy đánh dấu vào Bật cho iOS.
- Điền vào trường Đường liên kết phổ quát. Để biết thêm thông tin về liên kết phổ biến, hãy xem bài viết Cho phép ứng dụng và trang web liên kết đến nội dung của bạn .
- Nếu muốn định cấu hình ứng dụng khách, hãy thêm phạm vi rồi nhấp vào Thêm phạm vi trong mục Định cấu hình ứng dụng khách (không bắt buộc). Nếu không, hãy nhấp vào Tiếp theo.
- Trong phần Hướng dẫn kiểm thử, hãy nhập
test(hoặc bất kỳ chuỗi nào khác) làm phần giữ chỗ. (Bạn chỉ cần điền vào trường này bằng tài khoản kiểm thử nếu thực sự đang gửi Thao tác để xuất bản.) - Nhấp vào Lưu.
Bây giờ, bạn có thể chuyển sang phần tiếp theo để triển khai tính năng Chuyển đổi ứng dụng trong ứng dụng iOS hoặc Android của mình.
Triển khai tính năng Chuyển đổi ứng dụng trong các ứng dụng gốc
Để triển khai tính năng Chuyển đổi ứng dụng, bạn cần sửa đổi mã uỷ quyền người dùng trong ứng dụng để chấp nhận một đường liên kết sâu từ Google.
Kiểm thử tính năng Chuyển đổi ứng dụng trên thiết bị
Giờ đây, sau khi tạo một Thao tác và định cấu hình tính năng App Flip trên bảng điều khiển và trong ứng dụng, bạn có thể kiểm thử tính năng App Flip trên thiết bị di động. Bạn có thể dùng ứng dụng Trợ lý Google để kiểm thử tính năng Chuyển đổi ứng dụng.
Để kiểm thử tính năng Lật ứng dụng trong ứng dụng Trợ lý, hãy làm theo các bước sau:
- Truy cập vào Actions Console rồi chọn dự án của bạn.
- Nhấp vào Kiểm thử trong trình đơn điều hướng trên cùng.
- Kích hoạt quy trình liên kết tài khoản từ ứng dụng Trợ lý:
- Mở ứng dụng Trợ lý Google.
- Nhấp vào Cài đặt.
- Trên thẻ Trợ lý, hãy nhấp vào Điều khiển nhà.
- Nhấp vào Thêm(+).
- Chọn Thao tác của bạn trong danh sách nhà cung cấp. Tên này sẽ có tiền tố "[test]" trong danh sách. Khi bạn chọn Hành động [kiểm thử] trong danh sách, Hành động đó sẽ mở ứng dụng của bạn.
- Xác minh rằng ứng dụng của bạn đã được khởi chạy và bắt đầu kiểm thử quy trình uỷ quyền.