
OAuth tabanlı uygulama değiştirerek bağlantı oluşturma (App Flip), kullanıcılarınızın kimlik doğrulama sisteminizdeki hesaplarını Google Hesaplarına hızlıca bağlamasına olanak tanır. Kullanıcılar hesap bağlantısı oluşturma sürecini başlattığında uygulamanız telefonlarında yüklüyse kullanıcı yetkisi almak için sorunsuz bir şekilde uygulamanıza yönlendirilirler.
Bu yaklaşım, kullanıcının kimliğini doğrulamak için kullanıcı adını ve şifresini yeniden girmesi gerekmediğinden daha hızlı bir bağlantı oluşturma süreci sağlar. Bunun yerine, uygulama geçişi, kullanıcının uygulamanızdaki hesabının kimlik bilgilerini kullanır. Kullanıcı, Google Hesabı'nı uygulamanıza bağladıktan sonra geliştirdiğiniz tüm entegrasyonlardan yararlanabilir.
Uygulama bağlama özelliğini hem iOS hem de Android uygulamaları için ayarlayabilirsiniz.
Şartlar
Uygulama Geçişi'ni uygulamak için aşağıdaki koşulları karşılamanız gerekir:
- Android veya iOS uygulamanız olmalıdır.
- OAuth 2.0 yetkilendirme kodu akışını destekleyen bir OAuth 2.0 sunucusuna sahip olmanız, bu sunucuyu yönetmeniz ve bakımını yapmanız gerekir.
OAuth tabanlı uygulama değiştirme akışı
Aşağıdaki sıra şeması, Uygulama Geçişi için Kullanıcı, Google Uygulaması, Uygulamanız ve Yetkilendirme Sunucunuz arasındaki etkileşimi ayrıntılı olarak açıklar.
Roller ve sorumluluklar
Aşağıdaki tabloda, uygulama geçişi akışındaki aktörlerin rolleri ve sorumlulukları tanımlanmaktadır.
| İşlemi gerçekleştiren / Bileşen | GAL Rolü | Sorumluluklar |
|---|---|---|
| Google Uygulaması / Sunucusu | OAuth İstemcisi | Bağlantı oluşturma sürecini başlatır, mobil uygulamanıza derin bağlantı tetikler, yetkilendirme kodunu jetonlarla değiştirir ve hizmetinizin API'lerine erişmek için bunları güvenli bir şekilde saklar. |
| Uygulamanız | Yetkilendirme Aracısı | Kullanıcının kimliğini doğrular (genellikle mevcut uygulama kimlik bilgilerini kullanarak), izin alır ve sunucunuzdan bir yetkilendirme kodu alır. |
| Yetkilendirme Sunucunuz | Yetkilendirme Sunucusu | Yetkilendirme kodlarını ve yenileme jetonlarını doğrular ve Google sunucusuna erişim jetonları verir. |
OAuth bağlama yetkilendirme kodu akışı hakkında daha fazla bilgi için OAuth sunucunuzu uygulama başlıklı makaleyi inceleyin.
Tasarım yönergeleri
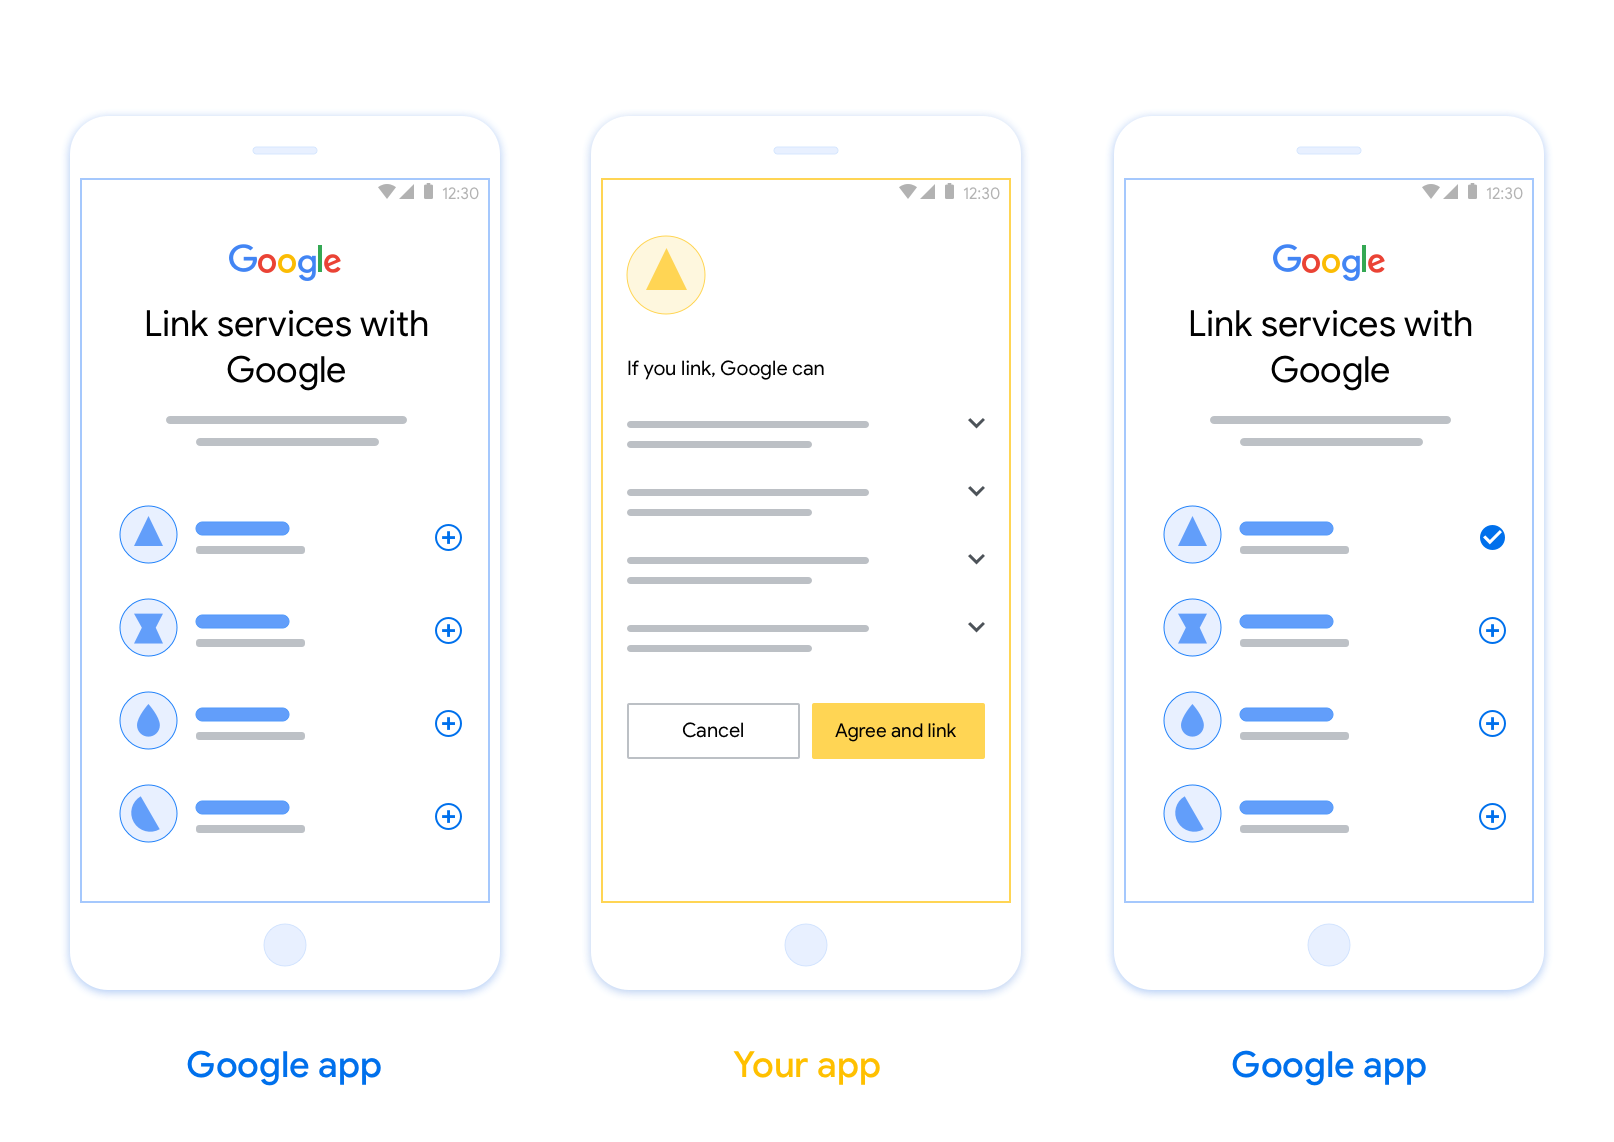
Bu bölümde, Uygulama Değiştirme hesap bağlama izin ekranıyla ilgili tasarım şartları ve önerileri açıklanmaktadır. Google, uygulamanızı çağırdıktan sonra uygulamanız kullanıcıya izin ekranını gösterir.
Şartlar
- Kullanıcının hesabının Google'a bağlandığını, Google Home veya Google Asistan gibi belirli bir Google ürününe bağlanmadığını belirtmeniz gerekir.
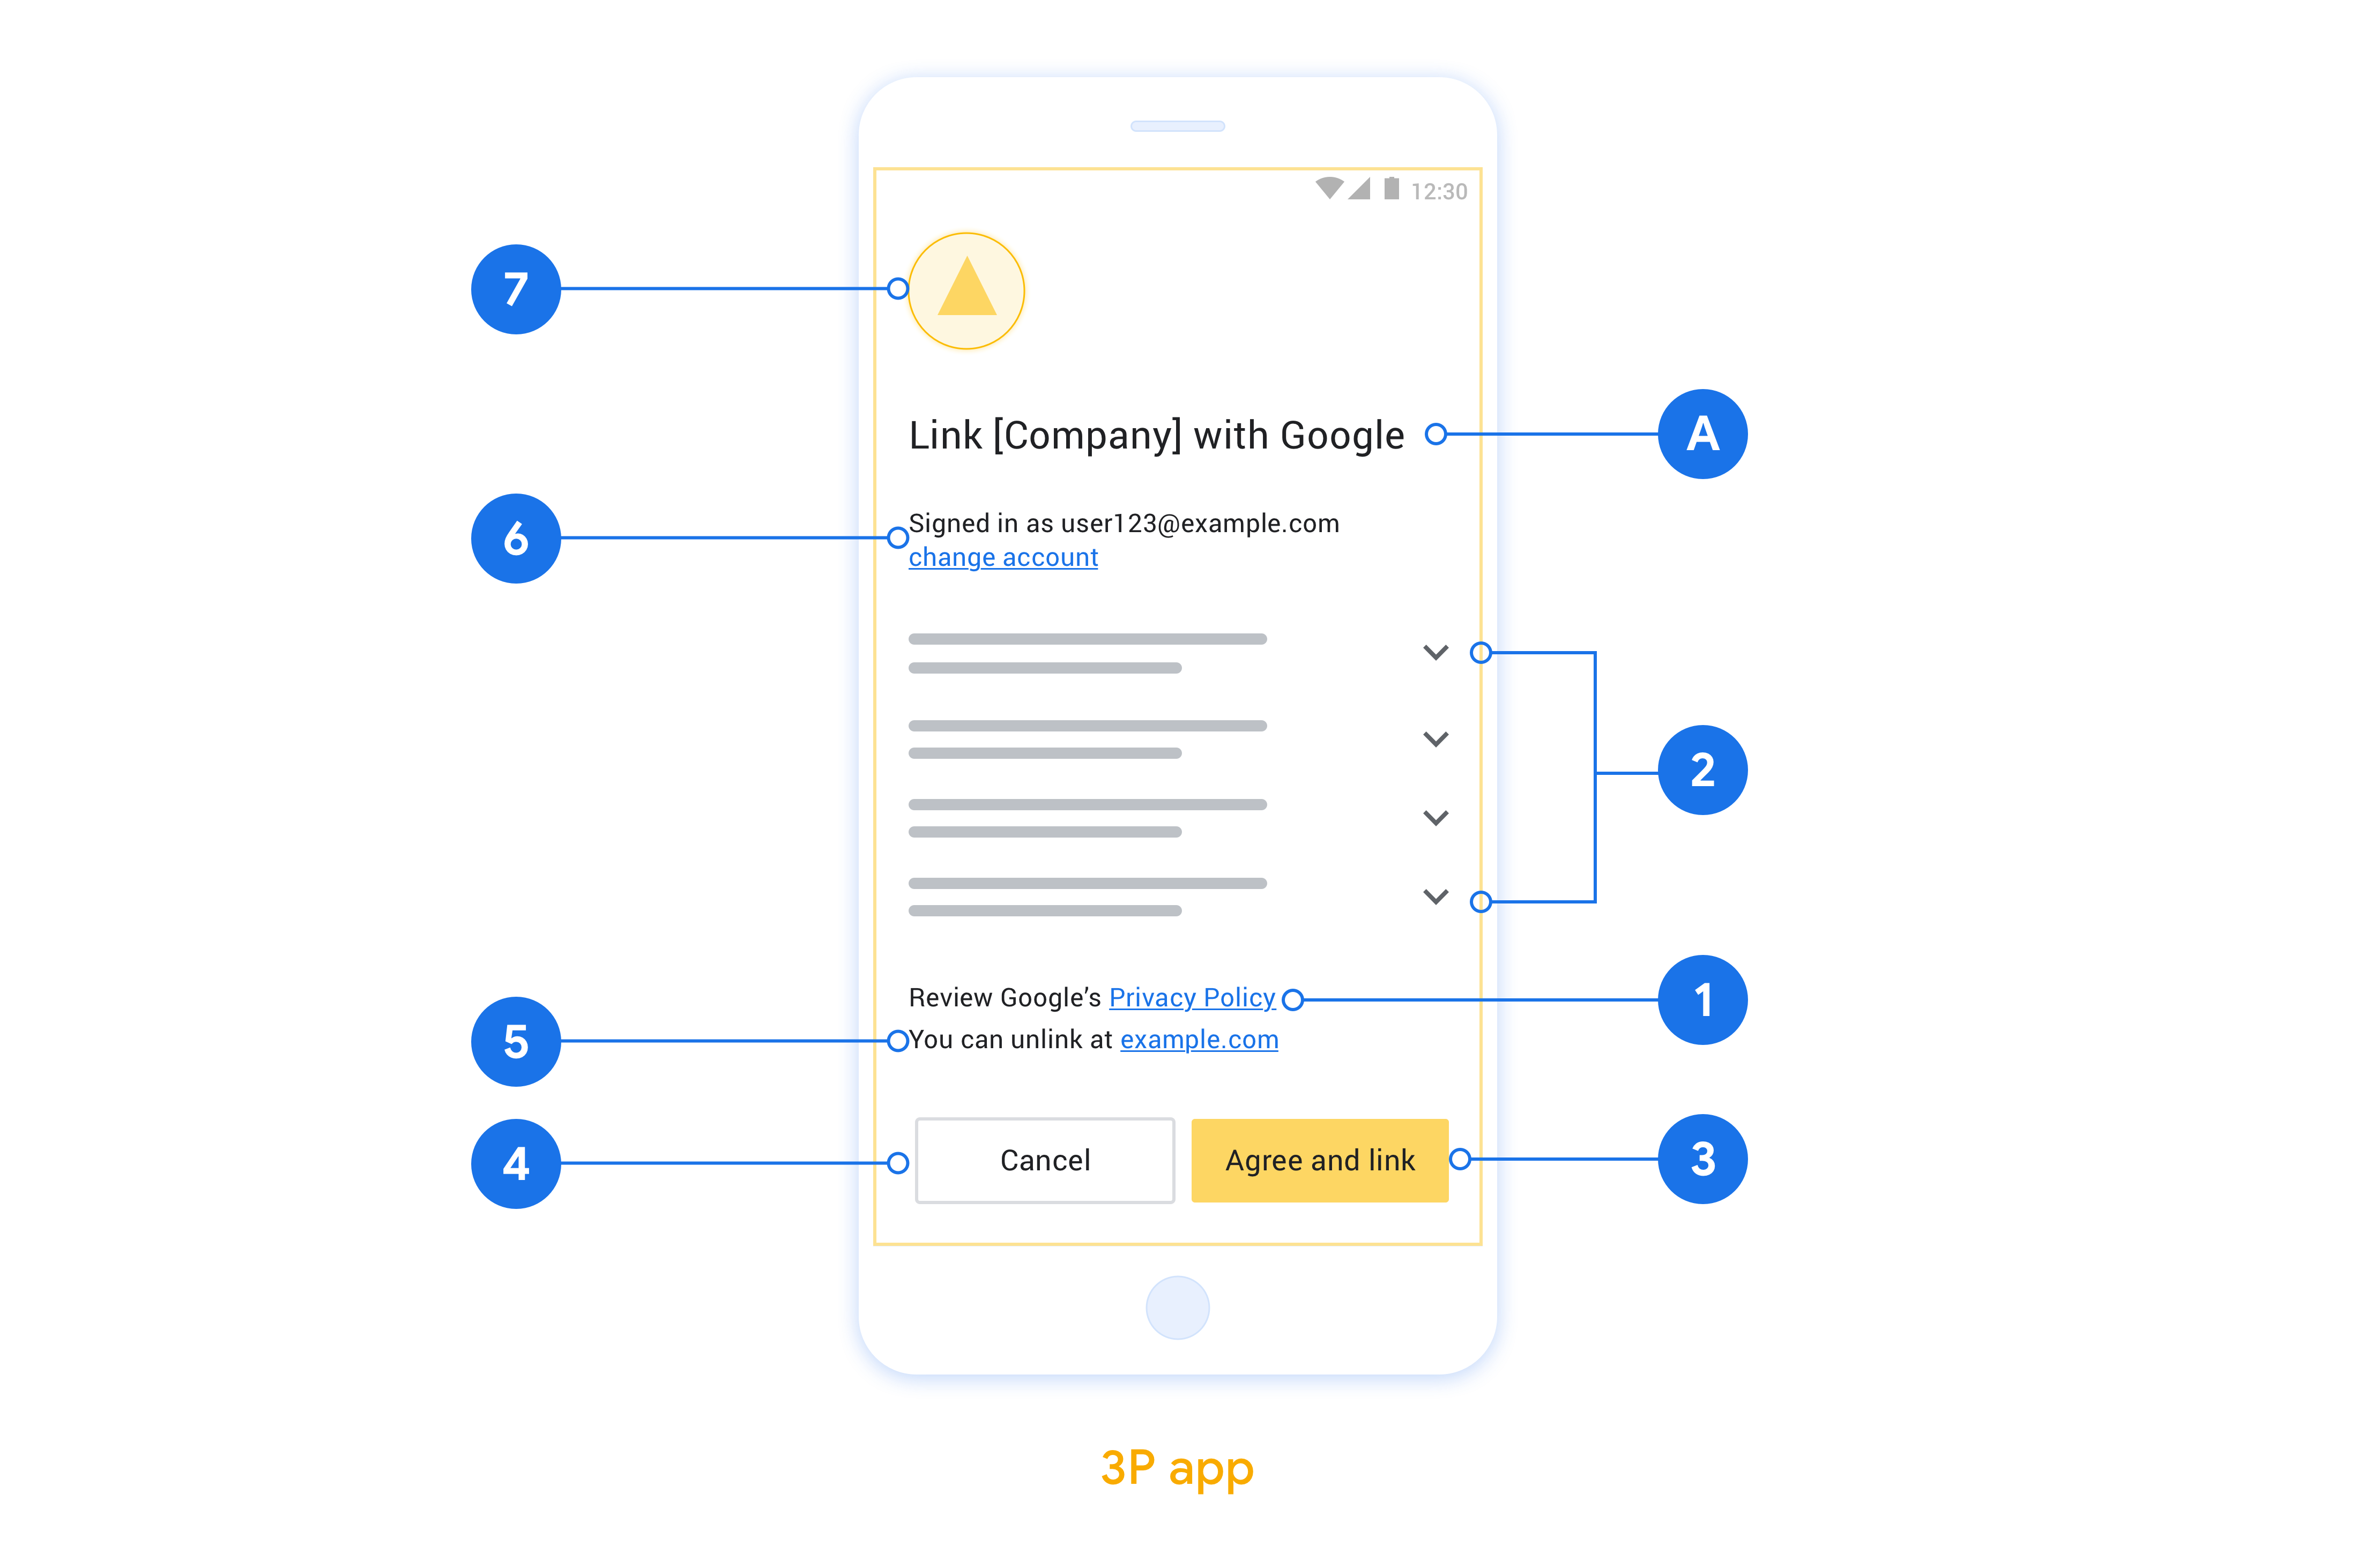
Öneriler
Aşağıdakileri yapmanızı öneririz:
Google'ın Gizlilik Politikası'nı gösterin. Kullanıcı rızası ekranına Google'ın Gizlilik Politikası'nın bağlantısını ekleyin.
Paylaşılacak veriler. Google'ın hangi kullanıcı verilerine ve neden ihtiyaç duyduğunu kullanıcıya bildirmek için net ve kısa bir dil kullanın.
Net harekete geçirici mesaj. İzin ekranınızda "Kabul et ve bağla" gibi net bir harekete geçirici mesaj belirtin. Bunun nedeni, kullanıcıların hesaplarını bağlamak için Google ile hangi verileri paylaşmaları gerektiğini anlamalarıdır.
Reddetme veya iptal etme olanağı Kullanıcılara, bağlantı oluşturmayı tercih etmemeleri durumunda geri dönme, reddetme veya iptal etme olanağı tanıyın.
Bağlantıyı kaldırma özelliği. Kullanıcılara bağlantıyı kaldırma mekanizması sunun. Örneğin, platformunuzdaki hesap ayarlarına yönlendiren bir URL. Alternatif olarak, kullanıcıların bağlı hesaplarını yönetebileceği Google Hesabı'na bir bağlantı ekleyebilirsiniz.
Kullanıcı hesabını değiştirme Kullanıcılara hesaplarını değiştirmeleri için bir yöntem önerin. Bu özellik, özellikle kullanıcıların birden fazla hesabı olduğu durumlarda faydalıdır.
- Kullanıcının hesap değiştirmek için izin ekranını kapatması gerekiyorsa Google'a kurtarılabilir bir hata gönderin. Böylece kullanıcı, OAuth bağlantısı ve örtülü akışla istediği hesapta oturum açabilir.
Logonuzu ekleyin. İzin ekranında şirket logonuzu gösterin. Logonuzu yerleştirmek için stil kurallarınızı kullanın. Google'ın logosunu da göstermek istiyorsanız Logolar ve ticari markalar bölümüne bakın.
OAuth tabanlı uygulama geçişi için ayarlama
Aşağıdaki bölümlerde, OAuth tabanlı uygulama geçişi için ön koşullar ve İşlemler Console'da uygulama geçişi projenizi nasıl yapılandıracağınız açıklanmaktadır.
Bir Action oluşturun ve OAuth 2.0 sunucusu kurun
Uygulama Geçişi'ni yapılandırabilmeniz için aşağıdakileri yapmanız gerekir:
- Eylem oluşturun. İşlem oluşturmak için Proje oluşturma bölümündeki talimatları uygulayın.
- OAuth 2.0 sunucusu kurun. OAuth sunucusu oluşturma hakkında daha fazla bilgi için OAuth hesap bağlamayı uygulama başlıklı makaleyi inceleyin.
İşlemler Konsolu'nda Uygulama Geçişi'ni yapılandırma
Aşağıdaki bölümde, İşlemler Konsolu'nda Uygulama Geçişi'ni nasıl yapılandıracağınız açıklanmaktadır.
- Üst gezinme menüsünde Geliştir'i tıklayın. Ardından, sol gezinme bölmesinde Hesap bağlama'yı tıklayın.
- Hesap bağlama'nın yanındaki anahtarı açın.
- Hesap oluşturma bölümünde Hayır, yalnızca web sitemde hesap oluşturmaya izin vermek istiyorum'u seçin.
- İleri'yi tıklayın.
- Bağlantı türü bölümünde, açılır menülerden OAuth ve Yetkilendirme kodu'nu seçin.
- İleri'yi tıklayın.
- OAuth istemci bilgileri bölümündeki tüm alanları doldurun. (Uygulama Geçişi desteklenmiyorsa yedek olarak normal OAuth kullanılır.)
- İleri'yi tıklayın.
- Hesap bağlama için uygulamanızı kullanın (isteğe bağlı) bölümünde iOS için etkinleştir'i işaretleyin.
- Geçiş bağlantısı alanını doldurun. Evrensel bağlantılar hakkında daha fazla bilgi için Uygulamaların ve Web Sitelerinin İçeriğinize Bağlanmasına İzin Verme başlıklı makaleyi inceleyin.
- İstemcinizi isteğe bağlı olarak yapılandırmak istiyorsanız kapsamlar ekleyin ve İstemcinizi yapılandırın (isteğe bağlı) bölümünde Kapsam ekle'yi tıklayın. Açık değilse Sonraki'yi tıklayın.
- Test talimatları bölümünde yer tutucu olarak
test(veya başka bir dize) yazın. (Bu alanı bir test hesabıyla doldurmanız yalnızca işleminizi yayınlanmak üzere gönderiyorsanız gereklidir.) - Kaydet'i tıklayın.
Artık iOS veya Android uygulamanızda Uygulama Geçişi'ni uygulamak için bir sonraki bölüme geçebilirsiniz.
Yerel uygulamalarınızda Uygulama Geçişi'ni uygulama
Uygulama Geçişi'ni uygulamak için uygulamanızdaki kullanıcı yetkilendirme kodunu, Google'dan gelen derin bağlantıyı kabul edecek şekilde değiştirmeniz gerekir.
Cihazınızda Uygulama Geçişi'ni test etme
Bir işlem oluşturup konsolda ve uygulamanızda Uygulama Geçişi'ni yapılandırdığınıza göre artık mobil cihazınızda Uygulama Geçişi'ni test edebilirsiniz. Uygulama Geçişi'ni test etmek için Google Asistan uygulamasını kullanabilirsiniz.
Uygulama Geçişi özelliğini Asistan uygulamasında test etmek için aşağıdaki adımları uygulayın:
- Actions Console'a gidip projenizi seçin.
- Üst gezinme menüsünde Test'i tıklayın.
- Hesap bağlama akışını Asistan uygulamasından tetikleme:
- Google Asistan uygulamasını açın.
- Ayarlar'ı tıklayın.
- Asistan sekmesinde Ev Kontrolü'nü tıklayın.
- Ekle(+) seçeneğini tıklayın.
- Sağlayıcılar listesinden işleminizi seçin. Listede "[test]" önekiyle gösterilir. Listeden [test] işleminizi seçtiğinizde uygulamanız açılır.
- Uygulamanızın başlatıldığını doğrulayın ve yetkilendirme akışınızı test etmeye başlayın.