
Il collegamento basato su OAuth (App Flip) consente agli utenti di collegare rapidamente i propri account nel tuo sistema di autenticazione ai loro Account Google. Se l'app è installata sullo smartphone dell'utente quando avvia la procedura di collegamento dell'account, viene reindirizzato senza problemi all'app per ottenere l'autorizzazione utente.
Questo approccio offre una procedura di collegamento più rapida, in quanto l'utente non deve reinserire il nome utente e la password per l'autenticazione. Al contrario, App Flip utilizza le credenziali dell'account dell'utente nella tua app. Una volta collegato il proprio Account Google alla tua app, l'utente può usufruire di tutte le integrazioni che hai sviluppato.
Puoi configurare App Flip sia per le app per iOS che per Android.
Requisiti
Per implementare App Flip, devi soddisfare i seguenti requisiti:
- Devi avere un'app per Android o iOS.
- Devi possedere, gestire e mantenere un server OAuth 2.0 che supporti il flusso del codice di autorizzazione OAuth 2.0.
Flusso di cambio app basato su OAuth
Il seguente diagramma di sequenza descrive in dettaglio l'interazione tra l'utente, l'app Google, la tua app e il tuo server di autorizzazione per App Flip.
Ruoli e responsabilità
La tabella seguente definisce i ruoli e le responsabilità degli attori nel flusso di cambio app.
| Attore / componente | Ruolo GAL | Responsabilità |
|---|---|---|
| App / server Google | Client OAuth | Avvia la procedura di collegamento, attiva un deep link alla tua app mobile, scambia il codice di autorizzazione con i token e li archivia in modo sicuro per accedere alle API del tuo servizio. |
| La tua app | Agente autorizzato | Autentica l'utente (in genere utilizzando le credenziali dell'app esistenti), ottiene il consenso e recupera un codice di autorizzazione dal tuo server. |
| Il server di autorizzazione | Server di autorizzazione | Convalida i codici di autorizzazione e i token di aggiornamento ed emette token di accesso al server Google. |
Per saperne di più sul flusso del codice di autorizzazione per il collegamento OAuth, consulta Implementare il server OAuth.
Istruzioni sul design
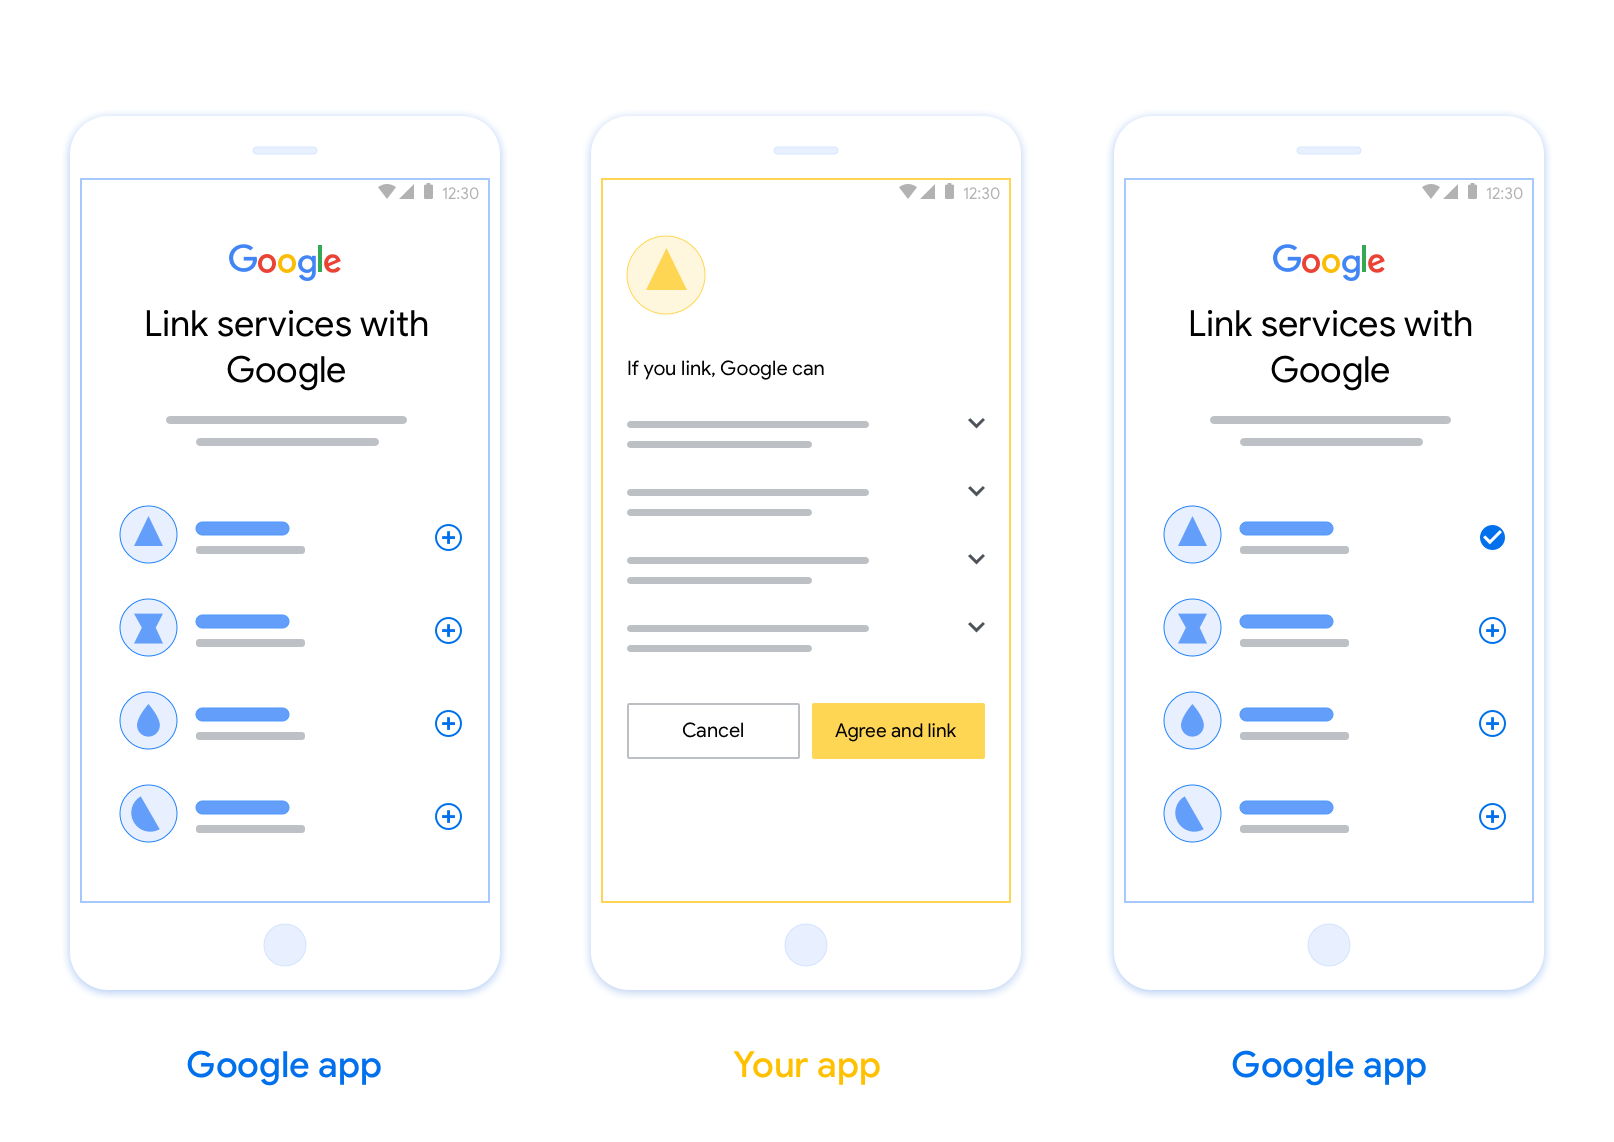
Questa sezione descrive i requisiti e i consigli di progettazione per la schermata di consenso per il collegamento dell'account App Flip. Dopo che Google chiama la tua app, quest'ultima mostra la schermata di consenso all'utente.
Requisiti
- Devi comunicare che l'account dell'utente viene collegato a Google, non a un prodotto Google specifico, come Google Home o l'Assistente Google.
Consigli
Ti consigliamo di procedere come segue:
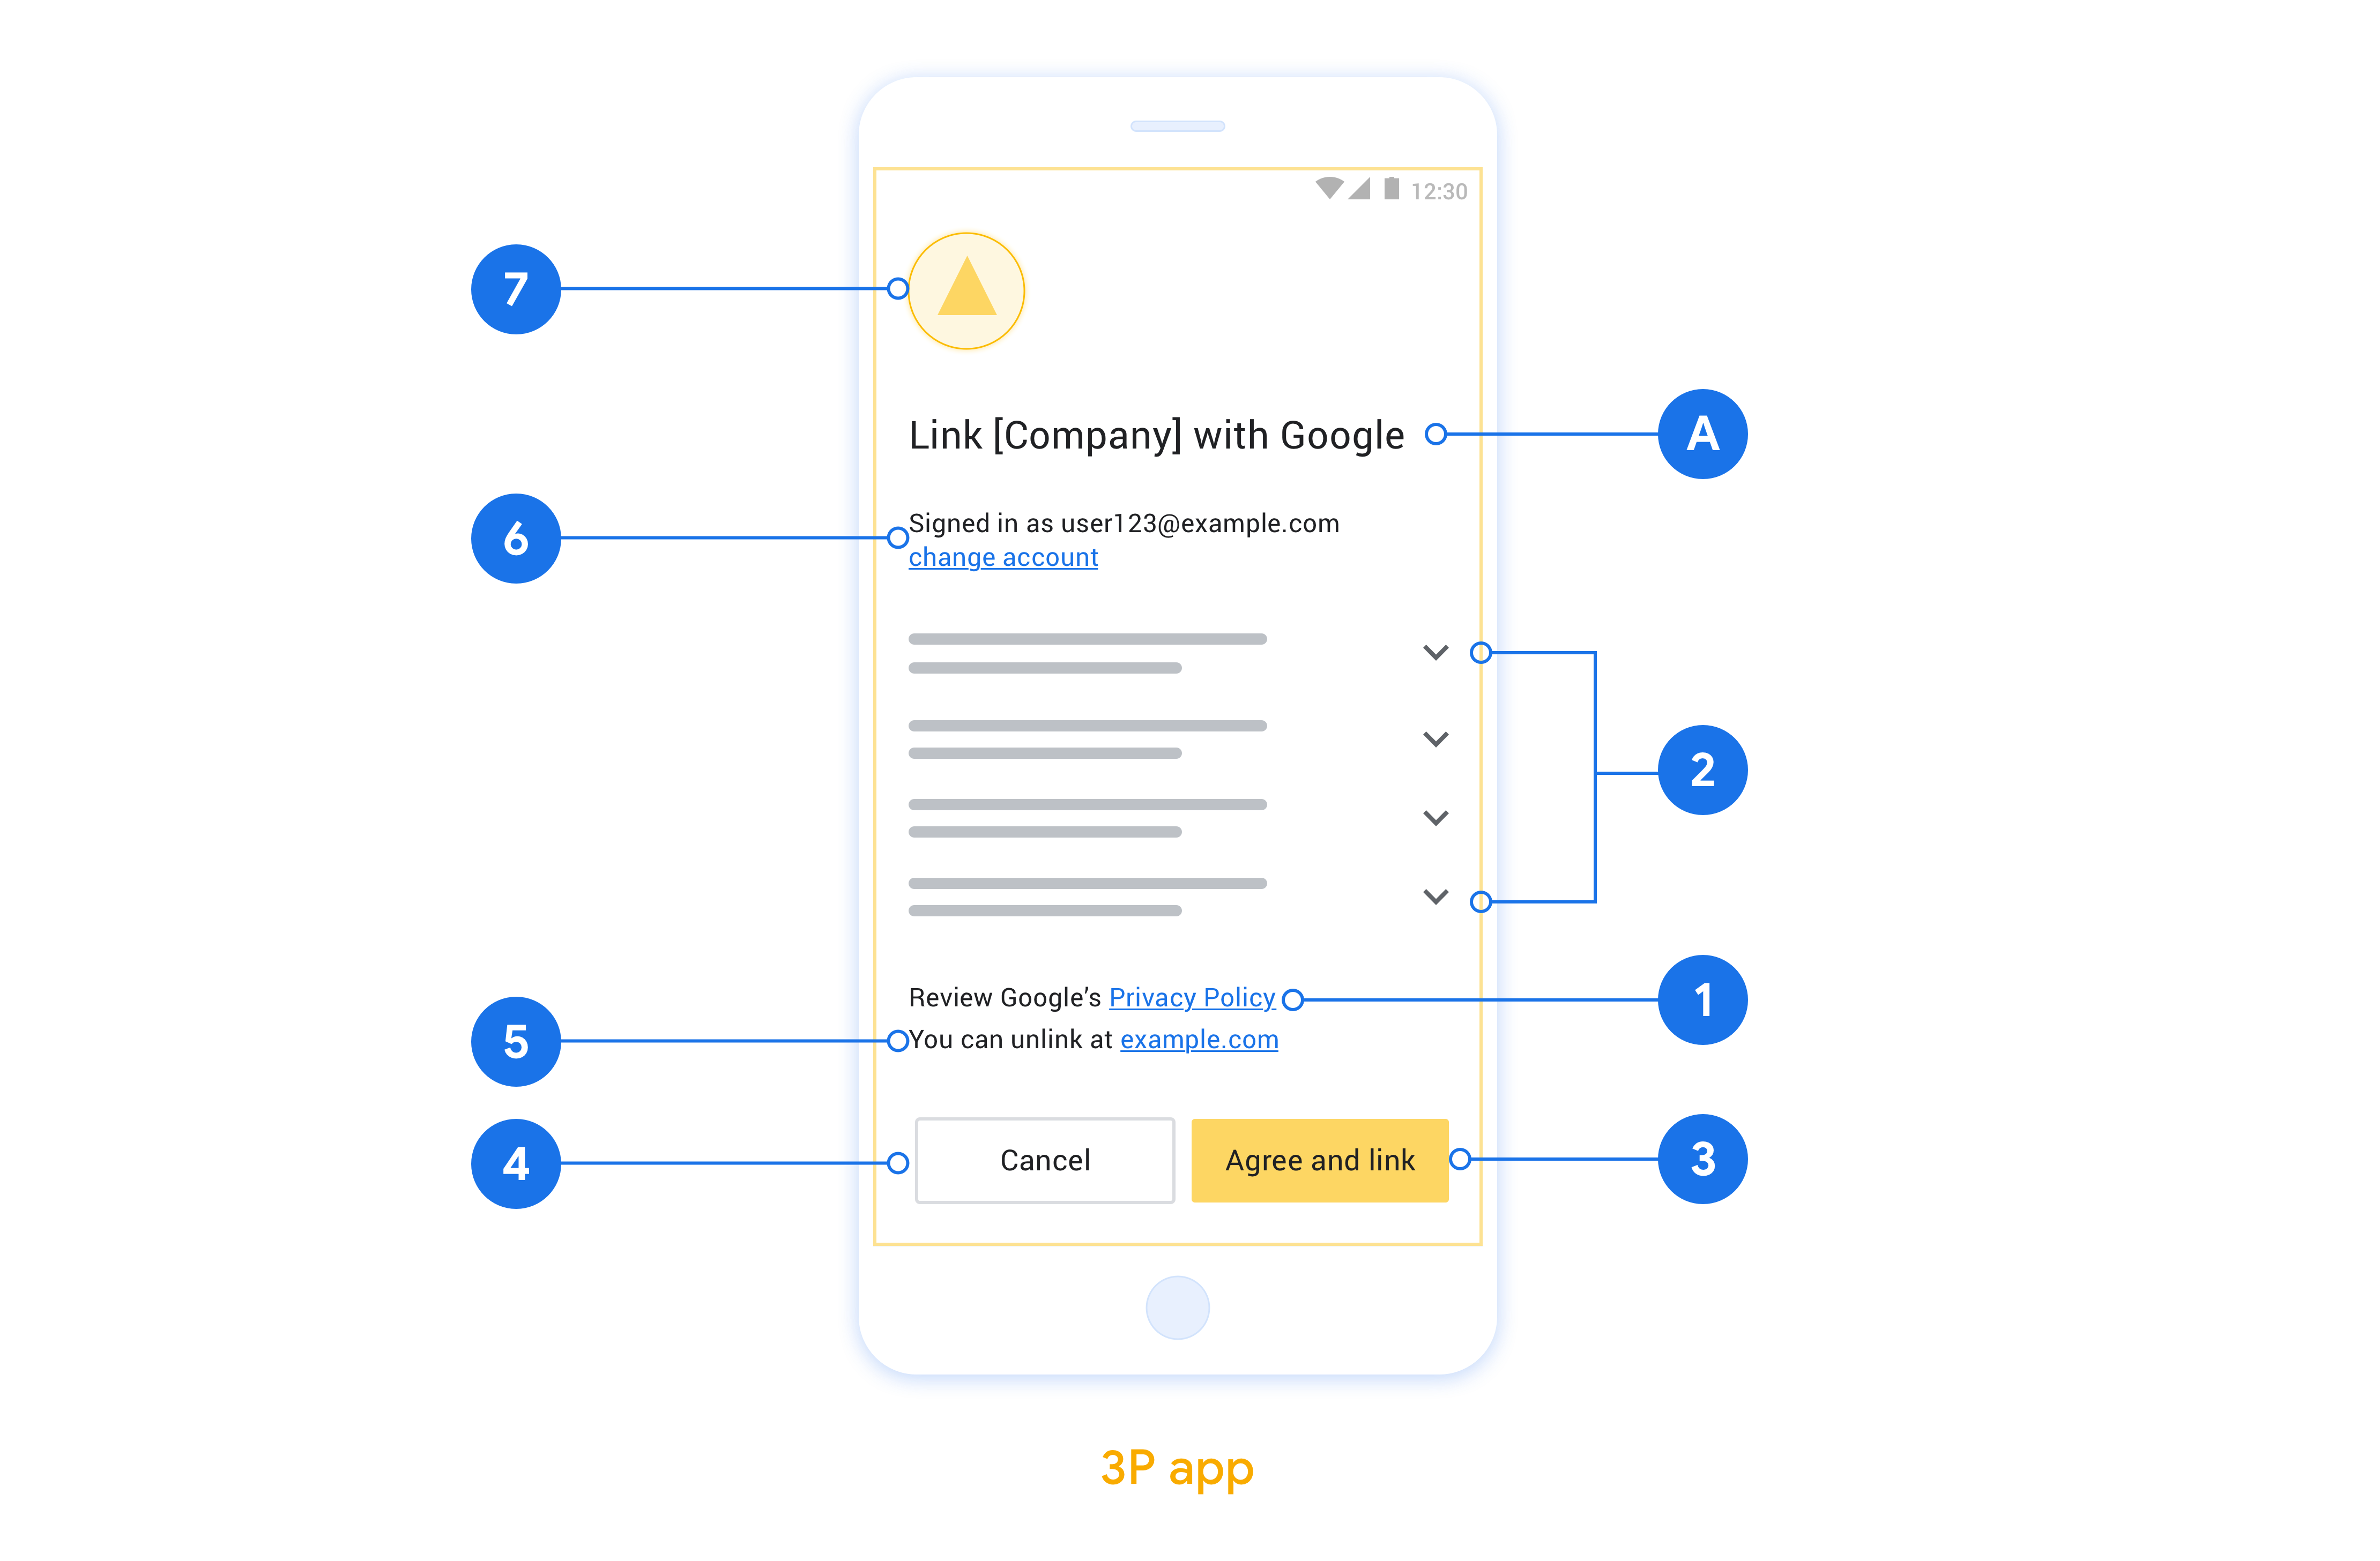
Visualizza le Norme sulla privacy di Google. Includi un link alle Norme sulla privacy di Google nella schermata per il consenso.
Dati da condividere. Utilizza un linguaggio chiaro e conciso per comunicare all'utente quali dati di sua proprietà sono richiesti da Google e perché.
Invito all'azione chiaro. Indica un invito all'azione chiaro nella schermata del consenso, ad esempio "Accetta e collega". Questo perché gli utenti devono capire quali dati sono tenuti a condividere con Google per collegare i propri account.
Possibilità di rifiutare o annullare. Offri agli utenti un modo per tornare indietro, rifiutare o annullare, se scelgono di non collegare.
Possibilità di scollegare. Offri agli utenti un meccanismo per scollegare l'account, ad esempio un URL alle impostazioni dell'account sulla tua piattaforma. In alternativa, puoi includere un link all'Account Google in cui gli utenti possono gestire il proprio account collegato.
Possibilità di cambiare account utente. Suggerisci un metodo per consentire agli utenti di cambiare i propri account. Ciò è particolarmente utile se gli utenti tendono ad avere più account.
- Se un utente deve chiudere la schermata del consenso per cambiare account, invia un errore recuperabile a Google in modo che l'utente possa accedere all'account desiderato con il collegamento OAuth e il flusso implicito.
Includi il tuo logo. Mostrare il logo della tua azienda nella schermata del consenso. Utilizza le linee guida di stile per posizionare il logo. Se vuoi mostrare anche il logo di Google, consulta Loghi e marchi.
Configurare App Flip basato su OAuth
Le sezioni seguenti descrivono i prerequisiti per App Flip basato su OAuth e come configurare il tuo progetto App Flip nella console Actions.
Crea un'azione e configura un server OAuth 2.0
Prima di poter configurare App Flip, devi:
- Crea un'azione. Per creare un'azione, segui le istruzioni riportate nella sezione Creare un progetto.
- Configura un server OAuth 2.0. Per maggiori informazioni sulla configurazione di un server OAuth, consulta la sezione Implementare il collegamento dell'account OAuth.
Configurare App Flip nella console Azioni
La sezione seguente descrive come configurare App Flip nella console Actions.
- Fai clic su Sviluppa nella barra di navigazione in alto. Poi fai clic su Collegamento degli account nel menu di navigazione a sinistra.
- Attiva l'opzione accanto a Collegamento dell'account.
- Nella sezione Creazione account, seleziona No, voglio solo consentire la creazione di account sul mio sito web.
- Fai clic su Avanti.
- In Tipo di collegamento, seleziona OAuth e Codice di autorizzazione dai menu a discesa.
- Fai clic su Avanti.
- Compila tutti i campi in Informazioni sul client OAuth. Se App Flip non è supportato, viene utilizzato OAuth normale come fallback.
- Fai clic su Avanti.
- Nella sezione Utilizza la tua app per il collegamento degli account (facoltativo), seleziona Attiva per iOS.
- Compila il campo Link universale. Per ulteriori informazioni sui link universali, consulta Consentire ad app e siti web di collegarsi ai tuoi contenuti .
- Se vuoi configurare facoltativamente il client, aggiungi gli ambiti e fai clic su Aggiungi ambito in Configura il client (facoltativo). In caso contrario, fai clic su Avanti.
- Nella sezione Istruzioni per il test, digita
test(o qualsiasi altra stringa) come segnaposto. (Il completamento di questo campo con un account di test è necessario solo se stai effettivamente inviando l'azione per la pubblicazione.) - Fai clic su Salva.
Ora puoi passare alla sezione successiva per implementare App Flip nella tua app per iOS o Android.
Implementare App Flip nelle app native
Per implementare App Flip, devi modificare il codice di autorizzazione utente nella tua app per accettare un link diretto da Google.
Testare App Flip sul tuo dispositivo
Ora che hai creato un'azione e configurato App Flip nella console e nella tua app, puoi testare App Flip sul tuo dispositivo mobile. Puoi utilizzare l'app Assistente Google per testare il cambio app.
Per testare App Flip dall'app Assistente, segui questi passaggi:
- Vai alla console Actions e seleziona il tuo progetto.
- Fai clic su Test nella barra di navigazione in alto.
- Attiva il flusso di collegamento degli account dall'app Assistente:
- Apri l'app Assistente Google.
- Fai clic su Impostazioni.
- Nella scheda Assistente, fai clic su Controllo della casa.
- Fai clic su Aggiungi(+).
- Seleziona l'azione dall'elenco dei fornitori. Nell'elenco, il nome sarà preceduto da "[test]". Quando selezioni l'azione [test] dall'elenco, dovrebbe aprirsi la tua app.
- Verifica che l'app sia stata avviata e inizia a testare il flusso di autorizzazione.