يتوافق نوع ربط حساب OAuth مع مسارَي OAuth 2.0 وفقًا للمعيار المتّبع في المجال، وهما مسار الربط الضمني ومسار رمز التفويض.
In the implicit code flow, Google opens your authorization endpoint in the user's browser. After successful sign in, you return a long-lived access token to Google. This access token is now included in every request sent from the Assistant to your Action.
In the authorization code flow, you need two endpoints:
- The authorization endpoint, which is responsible for presenting the sign-in UI to your users that aren't already signed in and recording consent to the requested access in the form of a short-lived authorization code.
- The token exchange endpoint, which is responsible for two types of exchanges:
- Exchanges an authorization code for a long-lived refresh token and a short-lived access token. This exchange happens when the user goes through the account linking flow.
- Exchanges a long-lived refresh token for a short-lived access token. This exchange happens when Google needs a new access token because the one it had expired.
Although the implicit code flow is simpler to implement, Google recommends that access tokens issued using the implicit flow never expire, because using token expiration with the implicit flow forces the user to link their account again. If you need token expiration for security reasons, you should strongly consider using the auth code flow instead.
تنفيذ عملية ربط حساب OAuth
ضبط إعدادات المشروع
لضبط مشروعك لاستخدام ميزة ربط الحسابات عبر OAuth، اتّبِع الخطوات التالية:
- افتح Actions Console واختَر المشروع الذي تريد استخدامه.
- انقر على علامة التبويب تطوير واختَر ربط الحساب.
- فعِّل مفتاح التبديل بجانب ربط الحساب.
- في قسم إنشاء الحساب، اختَر لا، أريد فقط السماح بإنشاء الحساب على موقعي الإلكتروني.
في نوع الربط، اختَر OAuth وضمنيّ.
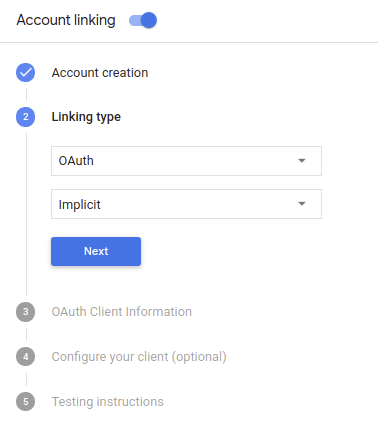
في معلومات العميل:
- عيِّن قيمة لمعرّف العميل الصادر عن "إجراءات على Google" لتحديد الطلبات الواردة من Google.
- أدرِج عناوين URL لنقاط نهاية التفويض وتبادل الرموز المميزة.
- انقر على حفظ.
تنفيذ خادم OAuth
To support the OAuth 2.0 implicit flow, your service makes an authorization endpoint available by HTTPS. This endpoint is responsible for authenticating and obtaining consent from users for data access. The authorization endpoint presents a sign-in UI to your users that aren't already signed in and records consent to the requested access.
When your Action needs to call one of your service's authorized APIs, Google uses this endpoint to get permission from your users to call these APIs on their behalf.
A typical OAuth 2.0 implicit flow session initiated by Google has the following flow:
- Google opens your authorization endpoint in the user's browser. The user signs in if not signed in already, and grants Google permission to access their data with your API if they haven't already granted permission.
- Your service creates an access token and returns it to Google by redirecting the user's browser back to Google with the access token attached to the request.
- Google calls your service's APIs, and attaches the access token with each request. Your service verifies that the access token grants Google authorization to access the API and then completes the API call.
Handle authorization requests
When your Action needs to perform account linking via an OAuth 2.0 implicit flow, Google sends the user to your authorization endpoint with a request that includes the following parameters:
| Authorization endpoint parameters | |
|---|---|
client_id |
The client ID you assigned to Google. |
redirect_uri |
The URL to which you send the response to this request. |
state |
A bookkeeping value that is passed back to Google unchanged in the redirect URI. |
response_type |
The type of value to return in the response. For the OAuth 2.0 implicit
flow, the response type is always token. |
For example, if your authorization endpoint is available at https://myservice.example.com/auth,
a request might look like:
GET https://myservice.example.com/auth?client_id=GOOGLE_CLIENT_ID&redirect_uri=REDIRECT_URI&state=STATE_STRING&response_type=token
For your authorization endpoint to handle sign-in requests, do the following steps:
Verify the
client_idandredirect_urivalues to prevent granting access to unintended or misconfigured client apps:- Confirm that the
client_idmatches the client ID you assigned to Google. - Confirm that the URL specified by the
redirect_uriparameter has the following form:https://oauth-redirect.googleusercontent.com/r/YOUR_PROJECT_ID
- Confirm that the
Check if the user is signed in to your service. If the user isn't signed in, complete your service's sign-in or sign-up flow.
Generate an access token that Google will use to access your API. The access token can be any string value, but it must uniquely represent the user and the client the token is for and must not be guessable.
Send an HTTP response that redirects the user's browser to the URL specified by the
redirect_uriparameter. Include all of the following parameters in the URL fragment:access_token: the access token you just generatedtoken_type: the stringbearerstate: the unmodified state value from the original request The following is an example of the resulting URL:https://oauth-redirect.googleusercontent.com/r/YOUR_PROJECT_ID#access_token=ACCESS_TOKEN&token_type=bearer&state=STATE_STRING
Google's OAuth 2.0 redirect handler will receive the access token and confirm
that the state value hasn't changed. After Google has obtained an
access token for your service, Google will attach the token to subsequent calls
to your Action as part of the AppRequest.
تصميم واجهة المستخدم الصوتية لمسار المصادقة
التحقّق من إثبات هوية المستخدم وبدء عملية ربط الحساب
- افتح مشروعك في Actions Builder في Actions Console.
- أنشئ مشهدًا جديدًا لبدء ربط الحساب في تطبيقك:
- انقر على المشاهد.
- انقر على رمز إضافة (+) لإضافة مشهد جديد.
- في المشهد الذي تم إنشاؤه حديثًا، انقر على رمز الإضافة add الشروط.
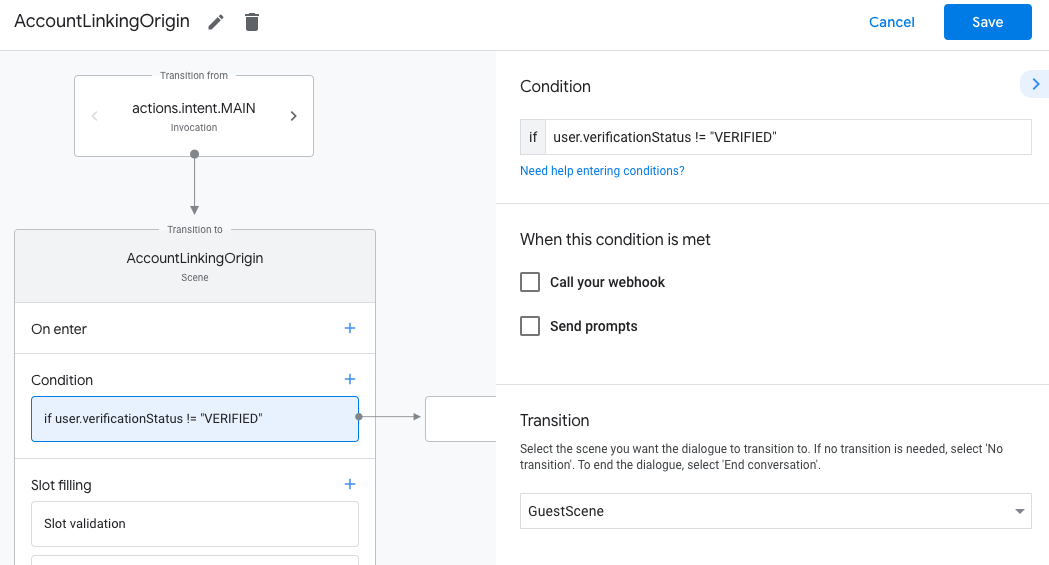
- أضِف شرطًا يتحقّق مما إذا كان المستخدم المرتبط بالمحادثة مستخدمًا تم التحقّق منه. إذا لم تنجح عملية التحقّق، لن تتمكّن مهمتك من ربط الحساب أثناء المحادثة، ويجب أن تعود إلى توفير إمكانية الوصول إلى الوظائف التي لا تتطلّب ربط الحساب.
- في الحقل
Enter new expressionضِمن الشرط، أدخِل المنطق التالي:user.verificationStatus != "VERIFIED" - ضمن الانتقال، اختَر مشهدًا لا يتطلّب ربط الحساب أو مشهدًا يشكّل نقطة دخول إلى الوظائف المتاحة للضيوف فقط.
- في الحقل
- انقر على رمز الإضافة add في الشروط.
- أضِف شرطًا لتفعيل مسار ربط الحساب إذا لم يكن لدى المستخدم هوية مرتبطة.
- في الحقل
Enter new expressionضِمن الشرط، أدخِل المنطق التالي:user.verificationStatus == "VERIFIED" - ضمن الانتقال، اختَر مشهد نظام ربط الحساب.
- انقر على حفظ.
- في الحقل
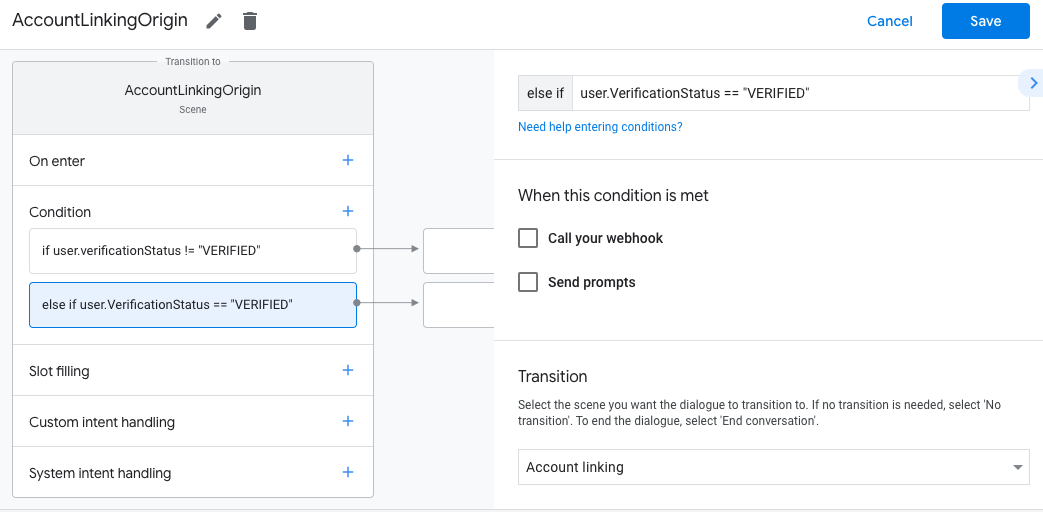
بعد الحفظ، تتم إضافة مشهد جديد لنظام ربط الحسابات باسم <SceneName>_AccountLinking
إلى مشروعك.
تخصيص مشهد ربط الحساب
- ضمن المشاهد، اختَر مشهد نظام ربط الحساب.
- انقر على إرسال الطلب وأضِف جملة قصيرة لتوضيح سبب حاجة الإجراء إلى الوصول إلى هوية المستخدم (مثلاً "لحفظ إعداداتك المفضّلة").
- انقر على حفظ.
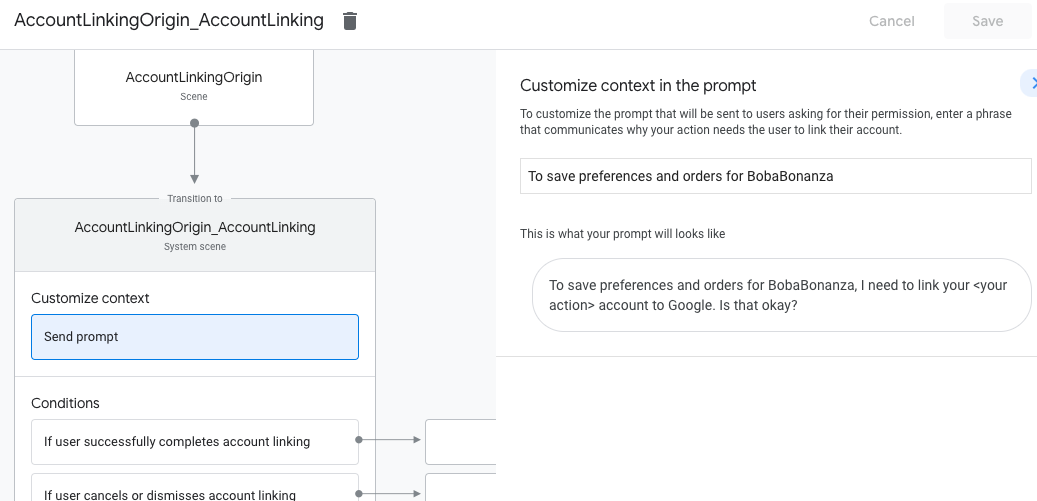
- ضمن الشروط، انقر على في حال أكمل المستخدم ربط الحساب بنجاح.
- اضبط كيفية سير العملية إذا وافق المستخدم على ربط حسابه. على سبيل المثال، يمكنك استدعاء Webhook لمعالجة أي منطق مخصّص للنشاط التجاري مطلوب والعودة إلى المشهد الأصلي.
- انقر على حفظ.
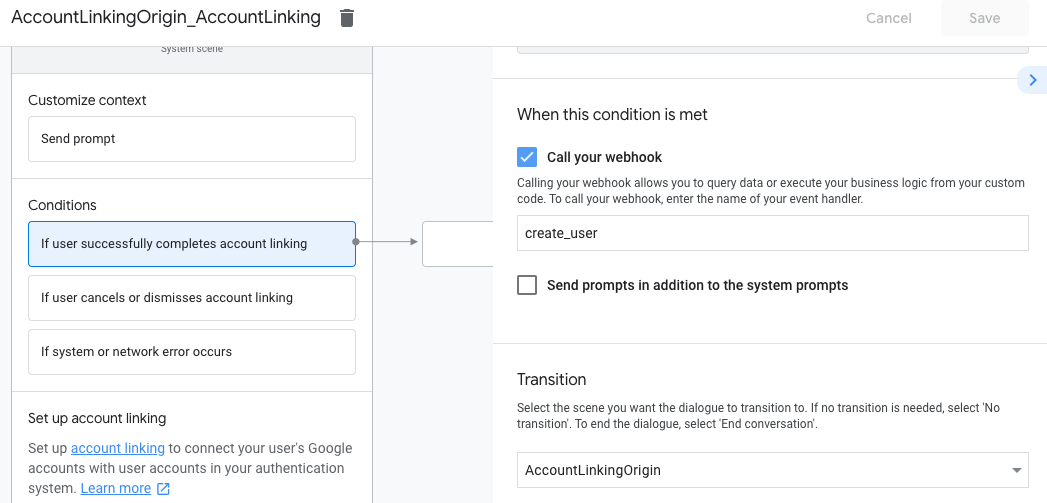
- ضمن الشروط، انقر على في حال ألغى المستخدم ربط الحساب أو رفضه.
- اضبط طريقة سير العملية إذا لم يوافق المستخدم على ربط حسابه. على سبيل المثال، أرسِل رسالة تأكيد وأعِد التوجيه إلى مشاهد توفّر وظائف لا تتطلّب ربط الحساب.
- انقر على حفظ.
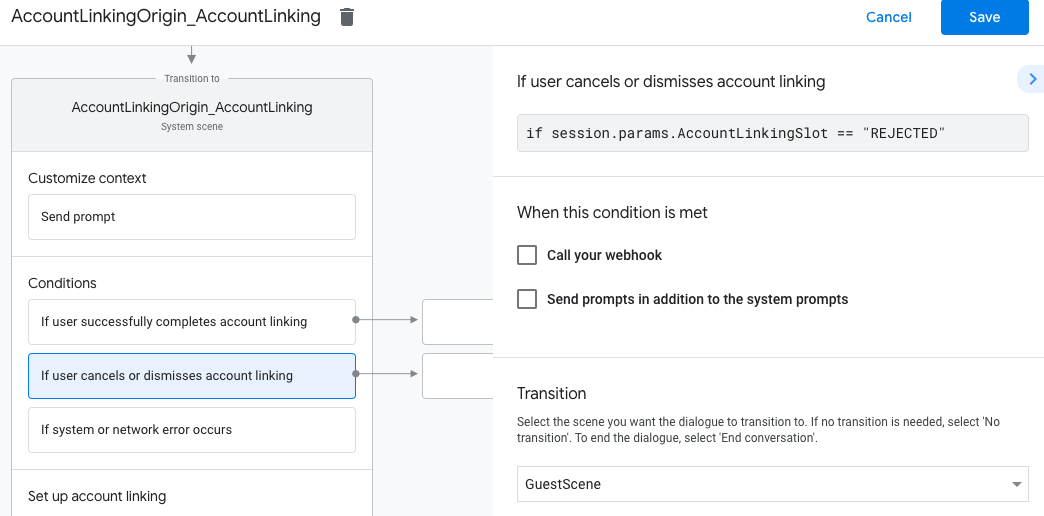
- ضمن الشروط، انقر على في حال حدوث خطأ في النظام أو الشبكة.
- اضبط كيفية سير العملية إذا تعذّر إكمال عملية ربط الحساب بسبب أخطاء في النظام أو الشبكة. على سبيل المثال، أرسِل رسالة تأكيد وأعِد التوجيه إلى مشاهد توفّر وظائف لا تتطلّب ربط الحساب.
- انقر على حفظ.
التعامل مع طلبات الوصول إلى البيانات
إذا كان طلب "مساعد Google" يتضمّن رمز دخول، عليك أولاً التأكّد من أنّ رمز الدخول صالح (ولم تنتهِ صلاحيته)، ثم استرداد حساب المستخدم المرتبط من قاعدة البيانات.
