
Der OAuth-Verknüpfungstyp unterstützt zwei branchenübliche OAuth 2.0-Vorgänge: den impliziten und den Autorisierungscode-Vorgang.
Im impliziten Codeablauf öffnet Google Ihren Autorisierungsendpunkt im Browser des Nutzers. Nach erfolgreicher Anmeldung geben Sie ein langlebiges Zugriffstoken an Google zurück. Dieses Zugriffstoken ist jetzt in jeder Anfrage enthalten, die von Assistant an Ihre Aktion gesendet wird.
Für den Autorisierungscodeablauf benötigen Sie zwei Endpunkte:
- Der Endpunkt für die Autorisierung, der für die Darstellung der Anmelde-UI für Nutzer sorgt, die noch nicht angemeldet sind, und die Einwilligung zum angeforderten Zugriff in Form eines kurzlebigen Autorisierungscodes erfasst.
- Der Endpunkt Tokenaustausch, der für zwei Arten von Austauschen verantwortlich ist:
- Tauscht einen Autorisierungscode gegen ein langlebiges Aktualisierungstoken und ein kurzlebiges Zugriffstoken aus. Dieser Austausch erfolgt, wenn der Nutzer die Kontoverknüpfung durchläuft.
- Tauscht ein langlebiges Aktualisierungstoken gegen ein kurzlebiges Zugriffstoken aus. Dieser Austausch findet statt, wenn Google ein neues Zugriffstoken benötigt, weil das abgelaufene Token abgelaufen ist.
Der implizite Codeablauf ist zwar einfacher zu implementieren, aber Google empfiehlt, dass mit dem impliziten Vorgang ausgestellte Zugriffstokens nie ablaufen, da die Verwendung des Tokenablaufs mit dem impliziten Vorgang den Nutzer zwingt, sein Konto noch einmal zu verknüpfen. Wenn Sie aus Sicherheitsgründen ein Token auslaufen müssen, sollten Sie stattdessen den Autorisierungscode-Ablauf verwenden.
OAuth-Kontoverknüpfung implementieren
Projekt konfigurieren
So konfigurieren Sie Ihr Projekt für die Verwendung der OAuth-Verknüpfung:
- Öffnen Sie die Actions Console und wählen Sie das gewünschte Projekt aus.
- Klicken Sie auf den Tab Entwickeln und wählen Sie Kontoverknüpfung aus.
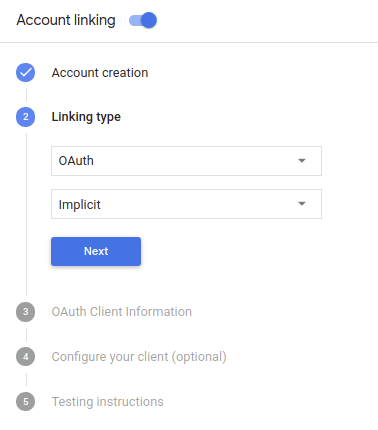
- Aktiviere den Schalter neben Kontoverknüpfung.
- Wählen Sie im Bereich Kontoerstellung die Option Nein, ich möchte die Kontoerstellung nur auf meiner Website zulassen aus.
Wählen Sie unter Verknüpfungstyp die Optionen OAuth und Implizit aus.
Unter Client Information (Client-Informationen):
- Weisen Sie Client-ID, die von Ihren Actions an Google ausgegeben wird einen Wert zu, um Anfragen von Google zu identifizieren.
- Fügen Sie die URLs für Ihre Autorisierungs- und Token-Austausch-Endpunkte ein.
- Klicken Sie auf Speichern.
OAuth-Server implementieren
Ihr Dienst führt eine Autorisierung durch, um den impliziten OAuth 2.0-Vorgang zu unterstützen. Endpunkt verfügbar über HTTPS. Dieser Endpunkt ist für die Authentifizierung und Einholen der Einwilligung der Nutzer für den Datenzugriff Den Autorisierungsendpunkt Nutzern, die noch nicht angemeldet sind, wird eine Anmeldeoberfläche angezeigt und die Daten werden aufgezeichnet. Zustimmung zum angeforderten Zugriff geben.
Wenn deine Aktion eine der autorisierten APIs deines Dienstes aufrufen muss, verwendet Google an diesen Endpunkt, um die Berechtigung von Ihren Nutzern zu erhalten, diese APIs auf ihrem
Eine typische von Google initiierte Sitzung im impliziten OAuth 2.0-Vorgang hat den folgenden Ablauf:
- Google öffnet Ihren Autorisierungsendpunkt im Browser des Nutzers. Die Der Nutzer meldet sich an, wenn er noch nicht angemeldet ist, und gewährt Google Zugriff auf die Datei ihre Daten mit Ihrer API verwenden, sofern sie nicht bereits die Berechtigung erteilt haben.
- Ihr Dienst erstellt ein Zugriffstoken und gibt es an Google, indem der Browser des Nutzers mit dem Zugriffstoken zurück zu Google weitergeleitet wird an die Anfrage angehängt.
- Google ruft die APIs Ihres Dienstes auf und hängt das Zugriffstoken mit für jede Anfrage. Ihr Dienst überprüft, ob das Zugriffstoken Google autorisiert, auf die API zuzugreifen und dann den API-Aufruf abzuschließen.
Autorisierungsanfragen verarbeiten
Wenn deine Aktion die Kontoverknüpfung über einen impliziten OAuth 2.0-Vorgang durchführen muss, Google sendet den Nutzer mit einer Anfrage, die Folgendes enthält, an Ihren Autorisierungsendpunkt folgende Parameter:
| Parameter des Autorisierungsendpunkts | |
|---|---|
client_id |
Die Client-ID, die Sie Google zugewiesen haben. |
redirect_uri |
Die URL, an die Sie die Antwort auf diese Anfrage senden. |
state |
Buchhaltungswert, der unverändert an Google zurückgegeben wird Weiterleitungs-URI. |
response_type |
Der Werttyp, der in der Antwort zurückgegeben werden soll. Für den impliziten OAuth 2.0-Code
ist der Antworttyp immer token. |
Wenn Ihr Autorisierungsendpunkt beispielsweise unter https://myservice.example.com/auth verfügbar ist,
könnte eine Anfrage so aussehen:
GET https://myservice.example.com/auth?client_id=GOOGLE_CLIENT_ID&redirect_uri=REDIRECT_URI&state=STATE_STRING&response_type=token
Führe die folgenden Schritte aus, damit der Autorisierungsendpunkt Anmeldeanfragen verarbeiten kann:
Prüfen Sie die Werte
client_idundredirect_uri, um So verhindern Sie, dass unbeabsichtigte oder falsch konfigurierte Client-Apps Zugriff gewährt werden:- Prüfen Sie, ob die
client_idmit Ihrer Client-ID übereinstimmt die Google zugewiesen sind. - Prüfen Sie, ob die in
redirect_uriangegebene URL hat das folgende Format:https://oauth-redirect.googleusercontent.com/r/YOUR_PROJECT_ID
- Prüfen Sie, ob die
Prüfen Sie, ob der Nutzer in Ihrem Dienst angemeldet ist. Wenn der Nutzer nicht angemeldet ist angemeldet haben, müssen Sie den Anmelde- bzw. Anmeldevorgang für den Dienst abschließen.
Generieren Sie ein Zugriffstoken, das Google für den Zugriff auf Ihre API verwendet. Die Zugriffstoken kann ein beliebiger Stringwert sein, muss aber den Wert Nutzer und den Client, für den das Token bestimmt ist, und darf nicht erraten werden.
Eine HTTP-Antwort senden, die den Browser des Nutzers an die URL weiterleitet
redirect_uriwird angegeben. Schließen Sie alle folgende Parameter im URL-Fragment:access_token: das Zugriffstoken, das Sie gerade generiert habentoken_type: der Stringbearerstate: der unveränderte Statuswert aus dem Original Anfrage Hier ein Beispiel für die resultierende URL:https://oauth-redirect.googleusercontent.com/r/YOUR_PROJECT_ID#access_token=ACCESS_TOKEN&token_type=bearer&state=STATE_STRING
Der OAuth 2.0-Weiterleitungs-Handler von Google empfängt das Zugriffstoken und bestätigt,
dass sich der Wert für state nicht geändert hat. Nachdem Google eine
Zugriffstoken für Ihren Dienst erhalten, hängt Google das Token an nachfolgende Aufrufe an.
als Teil des AppRequest an Ihre Aktion.
Sprachbenutzeroberfläche für den Authentifizierungsvorgang entwerfen
Prüfen, ob der Nutzer bestätigt ist, und den Kontoverknüpfungsvorgang starten
- Öffnen Sie Ihr Actions Builder-Projekt in der Actions Console.
- Erstellen Sie eine neue Szene, um die Kontoverknüpfung in Ihrer Aktion zu starten:
- Klicken Sie auf Szenen.
- Klicken Sie auf das Hinzufügen-Symbol (+), um eine neue Szene hinzuzufügen.
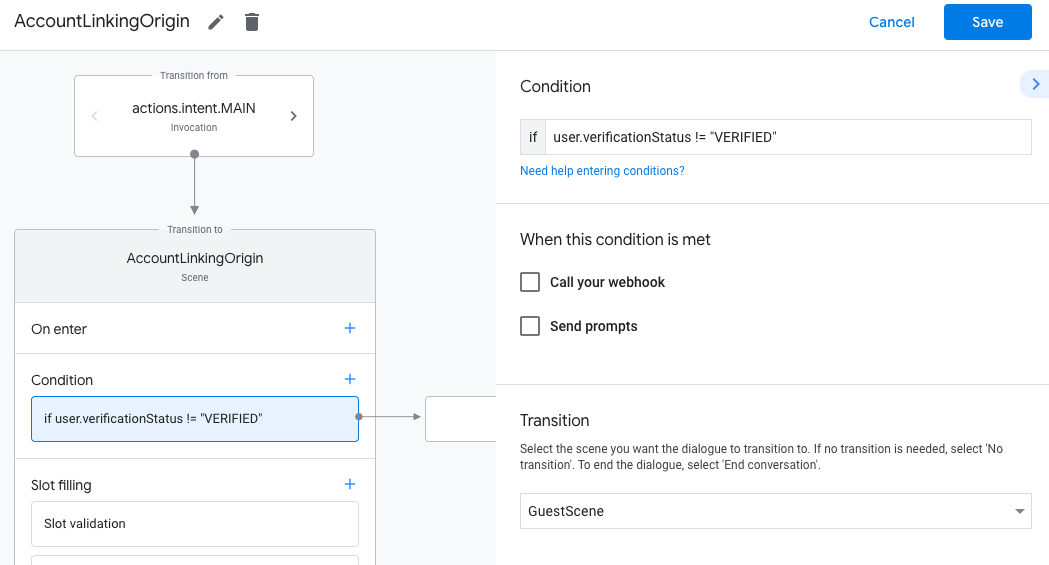
- Klicken Sie in der neu erstellten Szene auf das Symbol zum Hinzufügen add für Bedingungen.
- Fügen Sie eine Bedingung hinzu, die prüft, ob der mit der Unterhaltung verknüpfte Nutzer ein bestätigter Nutzer ist. Wenn die Prüfung fehlschlägt, kann für Ihre Aktion während der Unterhaltung keine Kontoverknüpfung durchgeführt werden. In diesem Fall sollte auf Funktionen zurückgegriffen werden, für die keine Kontoverknüpfung erforderlich ist.
- Geben Sie im Feld
Enter new expressionunter Bedingung die folgende Logik ein:user.verificationStatus != "VERIFIED" - Wählen Sie unter Übergang eine Szene aus, für die keine Kontoverknüpfung erforderlich ist, oder eine Szene, die den Einstiegspunkt für Funktionen ist, die nur für Gäste verfügbar sind.
- Geben Sie im Feld
- Klicken Sie für Bedingungen auf das Symbol zum Hinzufügen add.
- Fügen Sie eine Bedingung hinzu, um einen Vorgang für die Kontoverknüpfung auszulösen, wenn der Nutzer keine zugehörige Identität hat.
- Geben Sie im Feld
Enter new expressionunter Bedingung die folgende Logik ein::user.verificationStatus == "VERIFIED" - Wählen Sie unter Übergang die Systemszene Kontoverknüpfung aus.
- Klicken Sie auf Speichern.
- Geben Sie im Feld
![]()
Nach dem Speichern wird Ihrem Projekt eine neue Szene für die Kontoverknüpfung mit dem Namen <SceneName>_AccountLinking hinzugefügt.
Szene für die Kontoverknüpfung anpassen
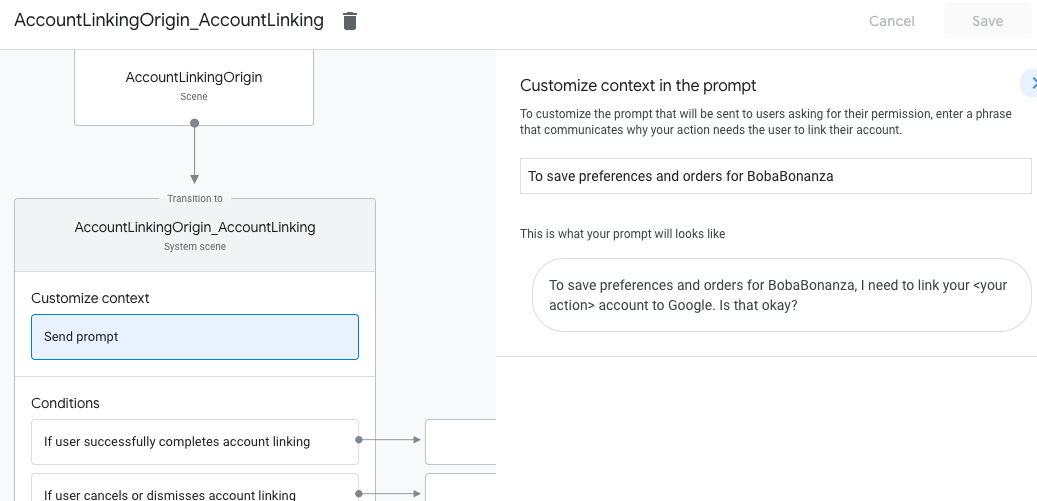
- Wählen Sie unter Szenen die Systemszene für die Kontoverknüpfung aus.
- Klicken Sie auf Prompt senden und fügen Sie einen kurzen Satz hinzu, um dem Nutzer zu erklären, warum die Action auf seine Identität zugreifen muss (z. B. „Zum Speichern Ihrer Einstellungen“).
- Klicken Sie auf Speichern.
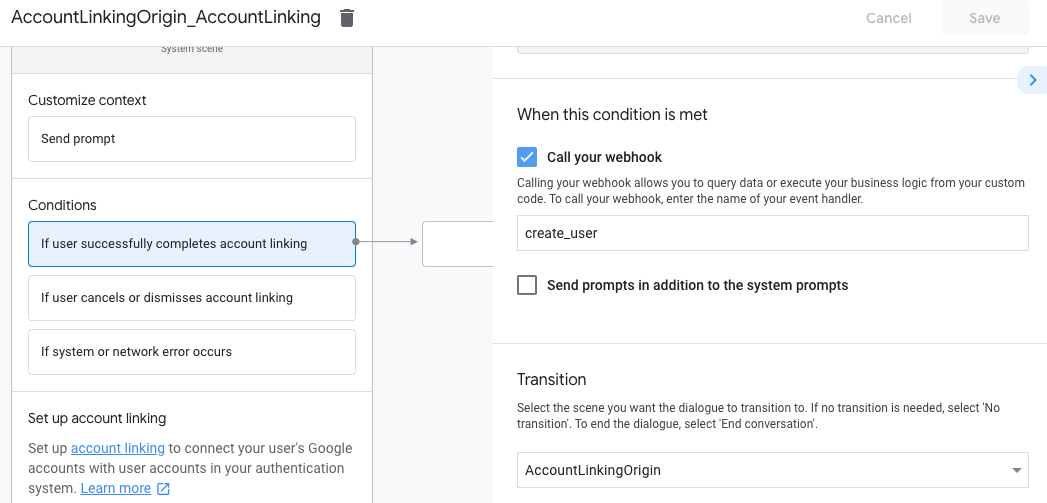
- Klicken Sie unter Bedingungen auf Wenn der Nutzer die Kontoverknüpfung erfolgreich abschließt.
- Konfigurieren Sie, wie der Ablauf fortgesetzt werden soll, wenn der Nutzer der Verknüpfung seines Kontos zustimmt. Rufen Sie den Webhook beispielsweise auf, um die erforderliche benutzerdefinierte Geschäftslogik zu verarbeiten und zur ursprünglichen Szene zurückzukehren.
- Klicken Sie auf Speichern.
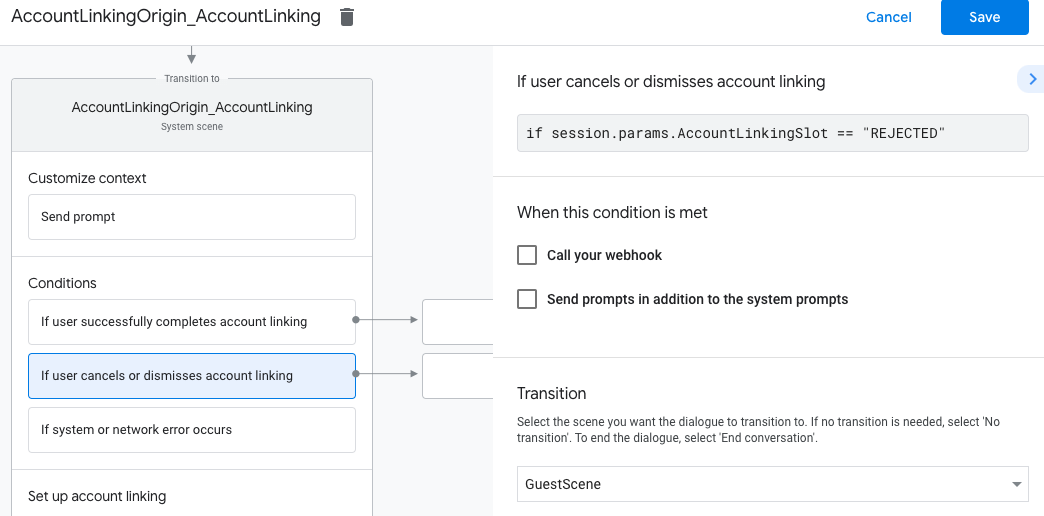
- Klicken Sie unter Bedingungen auf Wenn der Nutzer die Kontoverknüpfung abbricht oder schließt.
- Konfigurieren Sie, wie der Vorgang fortgesetzt werden soll, wenn der Nutzer der Verknüpfung seines Kontos nicht zustimmt. Senden Sie beispielsweise eine Bestätigungsnachricht und leiten Sie Nutzer zu Szenen weiter, die Funktionen bieten, für die keine Kontoverknüpfung erforderlich ist.
- Klicken Sie auf Speichern.
- Klicken Sie unter Bedingungen auf Bei System- oder Netzwerkfehler.
- Konfigurieren Sie, wie der Ablauf fortgesetzt werden soll, wenn der Ablauf für die Kontoverknüpfung aufgrund von System- oder Netzwerkfehlern nicht abgeschlossen werden kann. Senden Sie beispielsweise eine Bestätigungsnachricht und leiten Sie Nutzer zu Szenen weiter, die Funktionen bieten, für die keine Kontoverknüpfung erforderlich ist.
- Klicken Sie auf Speichern.
Datenzugriffsanfragen bearbeiten
Wenn die Assistant-Anfrage ein Zugriffstoken enthält, prüfen Sie zuerst, ob das Zugriffstoken gültig (und nicht abgelaufen) ist, und rufen Sie dann das zugehörige Nutzerkonto aus Ihrer Datenbank ab.