

उपहार कार्ड में टेंप्लेट रेंडरिंग की सुविधा काम करती है. अगर कोई टेंप्लेट तय नहीं किया गया है, तो डिफ़ॉल्ट टेंप्लेट का इस्तेमाल किया जाता है.
टेंप्लेट की परिभाषा
पास टेंप्लेट को क्लास लेवल पर तय किया जाता है. इसका इस्तेमाल, क्लास से जुड़े किसी भी ऑब्जेक्ट को दिखाने के लिए किया जाता है. टेंप्लेट से यह तय होता है कि पास के अलग-अलग सेक्शन में कौनसे फ़ील्ड दिखाने हैं.
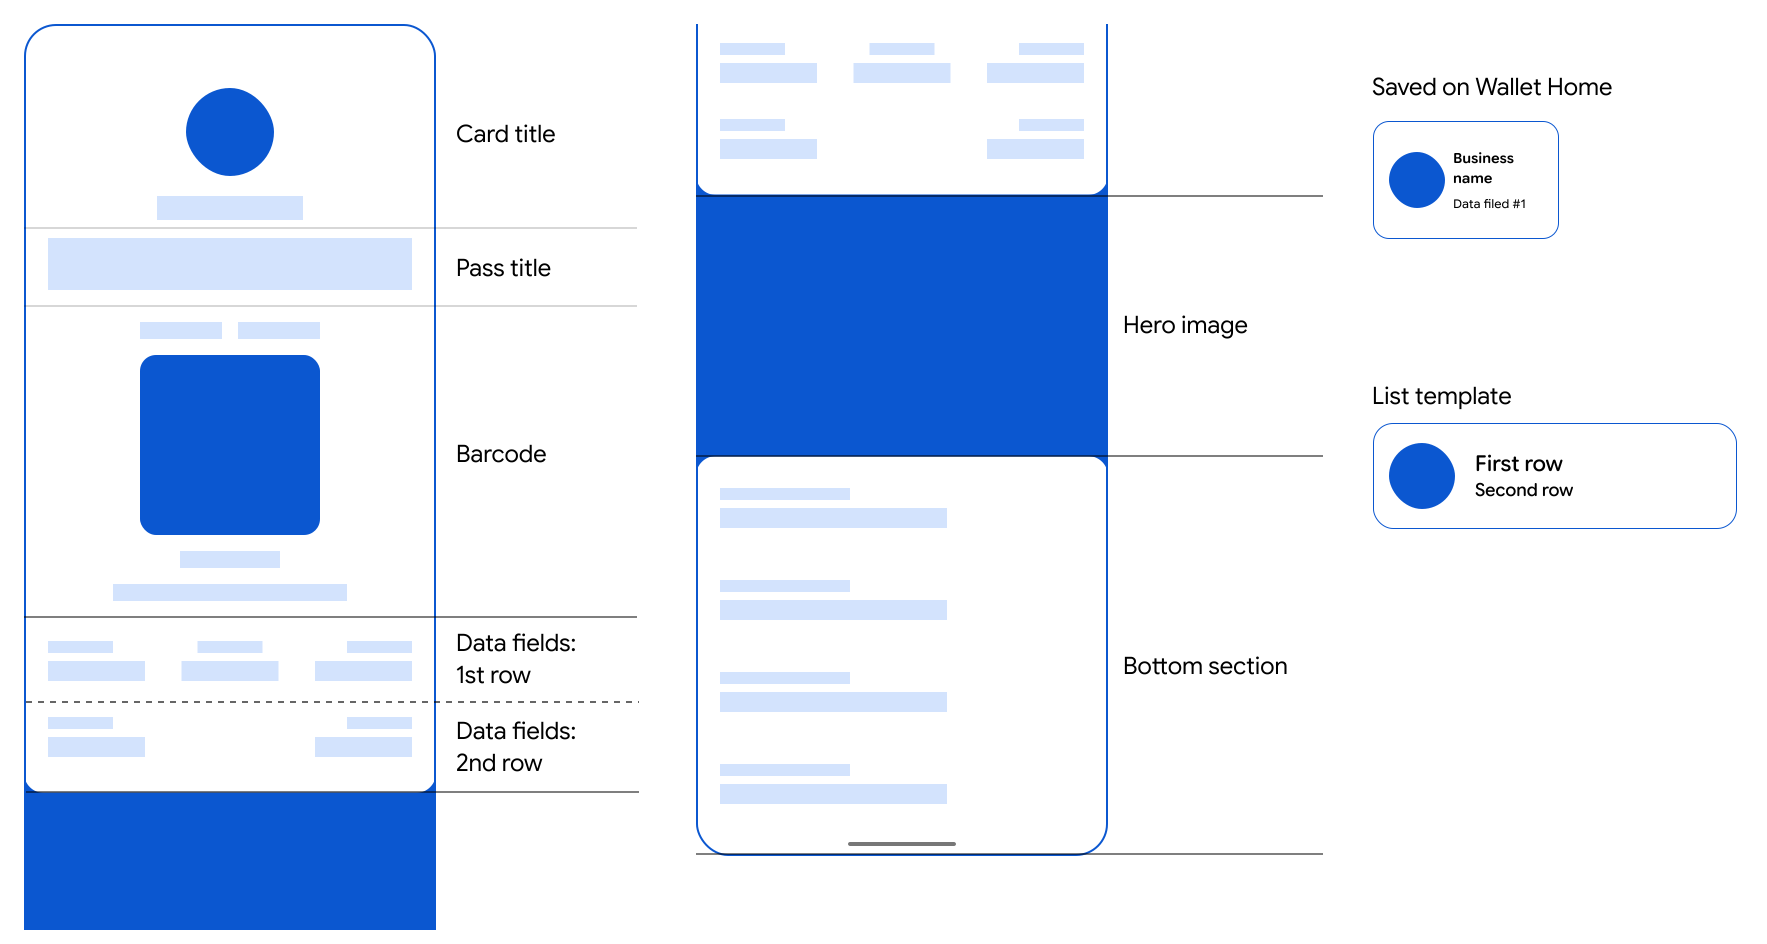
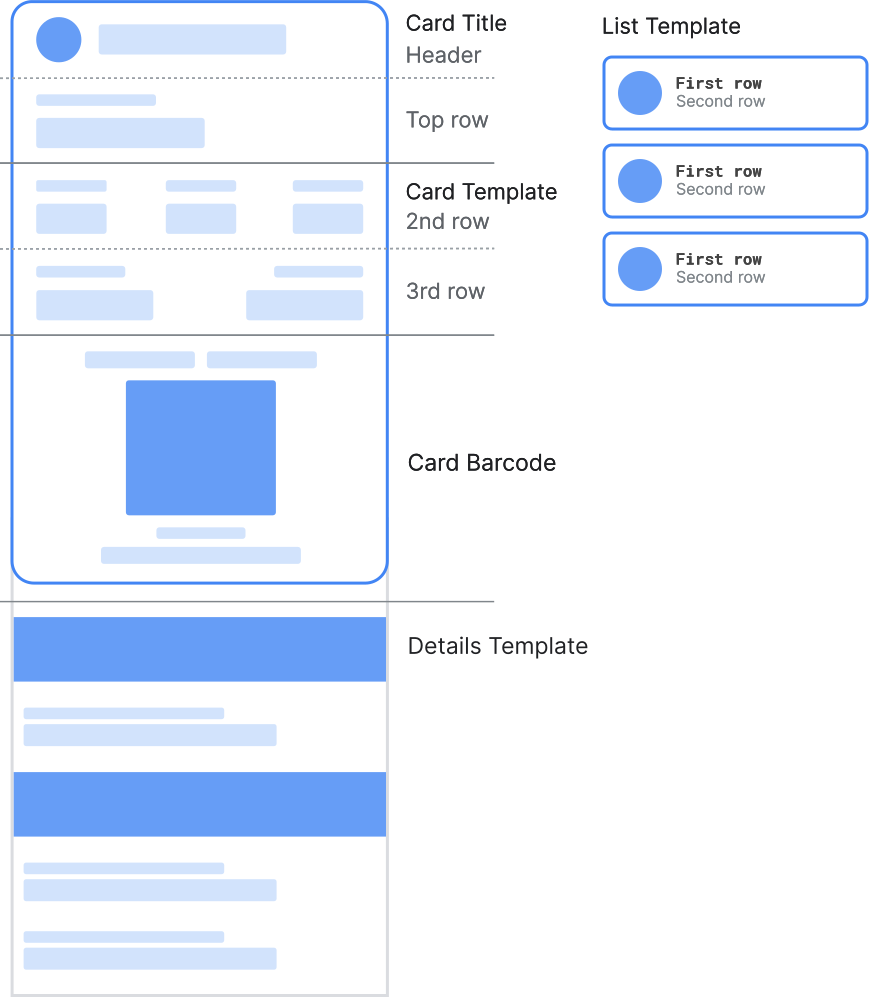
इस टेंप्लेट को इन सेक्शन में बांटा गया है:
Android
वेब
कार्ड शीर्षक
Android
|
डिफ़ॉल्ट रूप से इस्तेमाल होने वाला कार्ड का टाइटल
वाइड-लोगो कार्ड का टाइटल
|
वेब
|
डिफ़ॉल्ट रूप से इस्तेमाल होने वाला कार्ड का टाइटल
वाइड-लोगो कार्ड का टाइटल
|
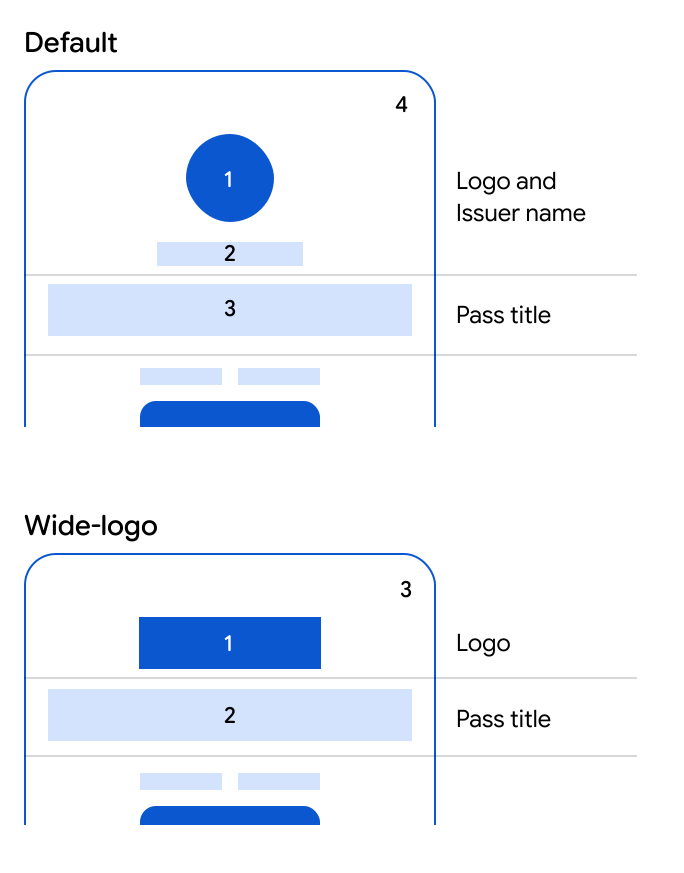
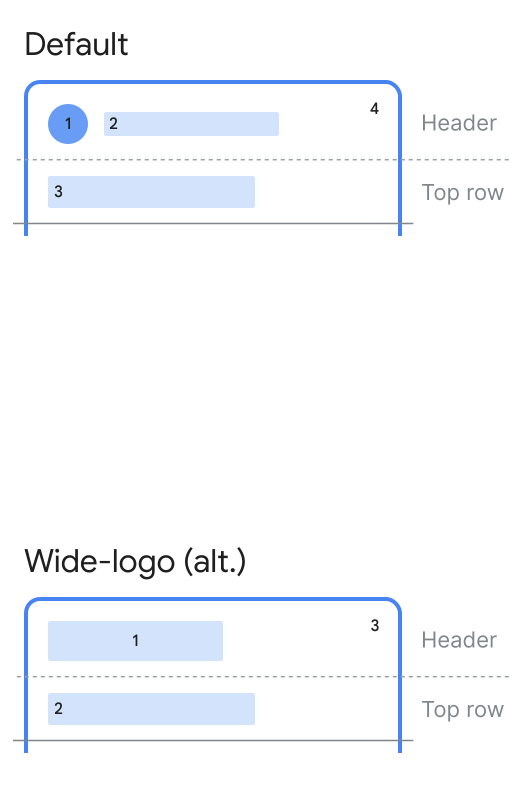
कार्ड के टाइटल वाले सेक्शन में, लोगो, कारोबारी या कंपनी का नाम, और बैलेंस दिखता है. इन्हें भरने के लिए इस्तेमाल किए गए फ़ील्ड के रेफ़रंस और न ही इनकी जगह में बदलाव किया जा सकता है.
वाइड लोगो फ़ील्ड सेट होने पर, Android डिवाइसों पर लोगो और जारी करने वाले का नाम दिखाने वाले डिफ़ॉल्ट टेंप्लेट हेडर की जगह वाइड लोगो दिखता है.
चौड़ा हेडर लोगो बनाते समय, चौड़े लोगो वाली इमेज से जुड़े दिशा-निर्देशों का पालन करें, ताकि आपके पास पर आपकी इमेज सबसे सही तरीके से दिखे.
कार्ड टेंप्लेट
Android
वेब
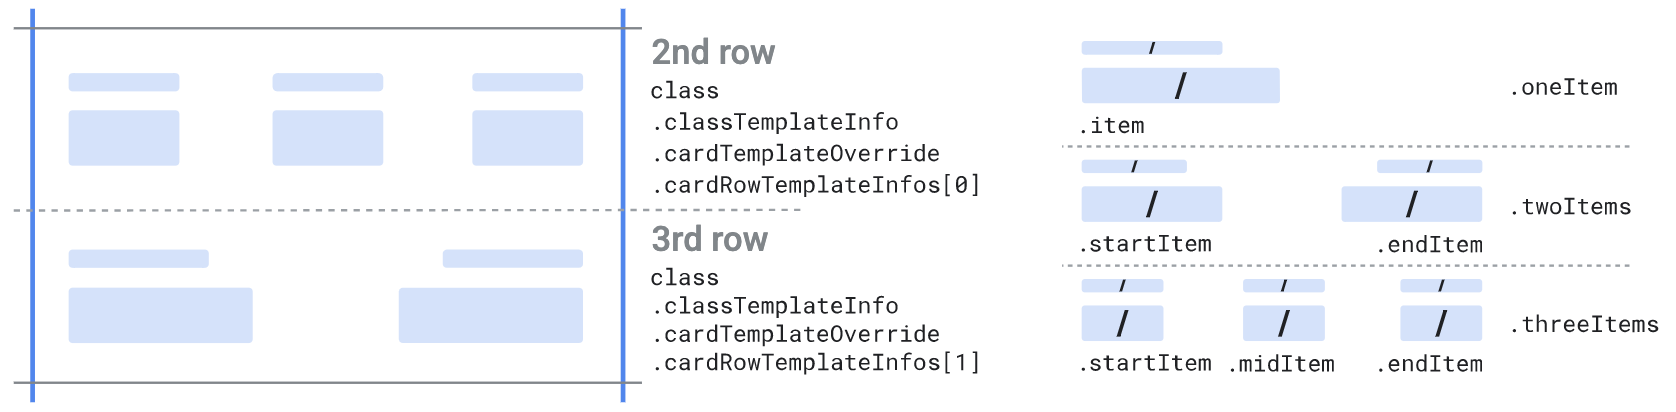
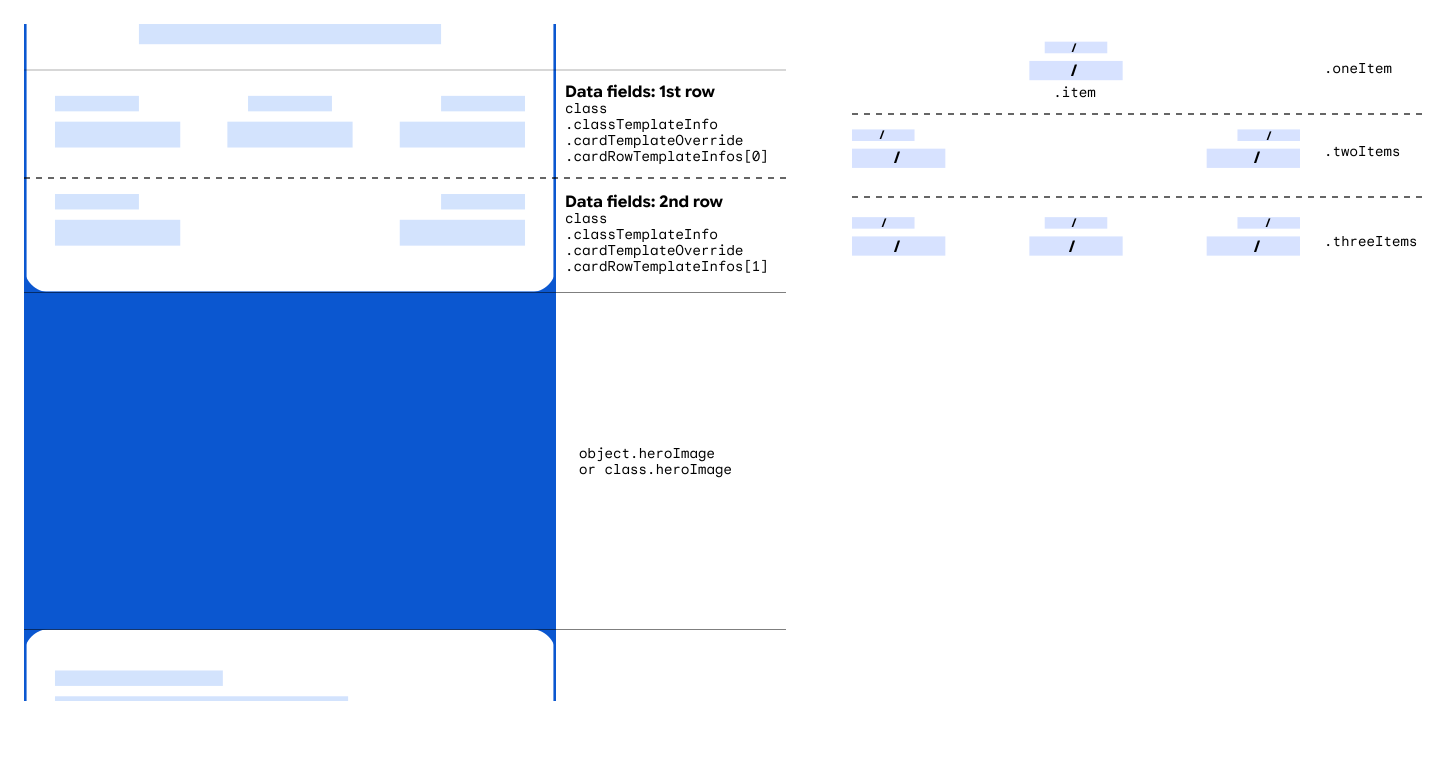
कार्ड टेंप्लेट सेक्शन का इस्तेमाल, अतिरिक्त लाइनें दिखाने के लिए किया जाता है. इन लाइनों में, टेक्स्ट पर आधारित स्ट्रक्चर्ड डेटा फ़ील्ड या टेक्स्ट मॉड्यूल फ़ील्ड हो सकते हैं.
आपके पास यह तय करने का विकल्प होता है कि class.classTemplateInfo.cardTemplateOverride.cardRowTemplateInfos[] लिस्ट में मौजूद ऑब्जेक्ट की संख्या कितनी हो. इसके लिए, आपको लाइनों की संख्या तय करनी होगी. इस सूची में कम से कम एक एलिमेंट होना चाहिए. हमारा सुझाव है कि ज़्यादा से ज़्यादा दो एलिमेंट इस्तेमाल करें. हर एलिमेंट, इनमें से किसी एक टाइप का होना चाहिए:
-
oneItem, जो एक आइटम स्वीकार करता है:item
-
twoItems, जो दो आइटम स्वीकार करता है:startItemendItem
-
threeItems, जो तीन आइटम स्वीकार करता है:startItemmiddleItemendItem
हर आइटम को सिंगल फ़ील्ड सिलेक्टर (.firstValue), दो फ़ील्ड सिलेक्टर (.firstValue और .secondValue) या पहले से तय आइटम (.predefinedItem) के तौर पर तय किया जा सकता है. चुने गए फ़ील्ड की वैल्यू और उनके लेबल, दोनों दिखाए जाते हैं. दो फ़ील्ड सिलेक्टर तय करने पर, चुने गए फ़ील्ड की वैल्यू "/" सेपरेटर के साथ दिखती हैं. चुने गए फ़ील्ड के लेबल के लिए भी यही तरीका अपनाया जाता है. पहले से तय किए गए आइटम का इस्तेमाल, ज़्यादा जटिल रेंडरिंग तय करने के लिए किया जाता है.
यहां दिए गए कोड सैंपल में, कार्ड टेंप्लेट की कार्ड लाइन के सेक्शन को दो लाइनें तय करने के लिए बदलने का तरीका दिखाया गया है. हर लाइन में तीन आइटम शामिल होते हैं. इनमें से हर आइटम, क्लास-लेवल के छह textModuleData कस्टम फ़ील्ड और उनके हेडर को लेबल के तौर पर रेफ़रंस देता है:
Python
 {
   ... //Rest of class
   "textModulesData": [
        {
            "header": "Label 1",
            "body": "Some info 1",
            "id": "myfield1"
        },
        {
            "header": "Label 2",
            "body": "Some info 2",
            "id": "myfield2"
        },
        {
            "header": "Label 3",
            "body": "Some info 3",
            "id": "myfield3"
        },
        {
            "header": "Label 4",
            "body": "Some info 4",
            "id": "myfield4"
        },
        {
            "header": "Label 5",
            "body": "Some info 5",
            "id": "myfield5"
        },
        {
            "header": "Label 6",
            "body": "Some info 6",
            "id": "myfield6"
        }
    ],
   "classTemplateInfo": {
        "cardTemplateOverride": {
            "cardRowTemplateInfos": [{
                "threeItems": {
                    "startItem": {
                        "firstValue": {
                            "fields": [{
                                "fieldPath": "class.textModulesData['myfield1']"
                            }]
                        }
                    },
                    "middleItem": {
                        "firstValue": {
                            "fields": [{
                                "fieldPath": "class.textModulesData['myfield2']"
                            }]
                        }
                    },
                    "endItem": {
                        "firstValue": {
                            "fields": [{
                                "fieldPath": "class.textModulesData['myfield3']"
                            }]
                        }
                    },
                }
            },{
                "threeItems": {
                    "startItem": {
                        "firstValue": {
                            "fields": [{
                                "fieldPath": "class.textModulesData['myfield4']"
                            }]
                        }
                    },
                    "middleItem": {
                        "firstValue": {
                            "fields": [{
                                "fieldPath": "class.textModulesData['myfield5']"
                            }]
                        }
                    },
                    "endItem": {
                        "firstValue": {
                            "fields": [{
                                "fieldPath": "class.textModulesData['myfield6']"
                            }]
                        }
                    },
                }
            }]
        }
    }
}
Java
// Rest of class
  .setTextModulesData((new ArrayList<TextModuleData>() {
    {
      add((new TextModuleData()).setHeader("Label 1")
        .setBody("Some info 1")
        .setId("myfield1"));
      add((new TextModuleData()).setHeader("Label 2")
        .setBody("Some info 1")
        .setId("myfield2"));
      add((new TextModuleData()).setHeader("Label 3")
        .setBody("Some info 3")
        .setId("myfield3"));
      add((new TextModuleData()).setHeader("Label 4")
        .setBody("Some info 4")
        .setId("myfield4"));
      add((new TextModuleData()).setHeader("Label 5")
        .setBody("Some info 5")
        .setId("myfield5"));
      add((new TextModuleData()).setHeader("Label 6")
        .setBody("Some info 5")
        .setId("myfield6"));
    }
  }))
  .setClassTemplateInfo((new ClassTemplateInfo())
    .setCardTemplateOverride((new CardTemplateOverride())
      .setCardRowTemplateInfos(new ArrayList<CardRowTemplateInfo>() {
        {
          add((new CardRowTemplateInfo()).setThreeItems((new CardRowThreeItems())
            .setStartItem((new TemplateItem()).setFirstValue((new FieldSelector()).setFields(new ArrayList<FieldReference>(){
              {
                add((new FieldReference()).setFieldPath("class.textModulesData['myfield1']"));
              }
            })))
            .setMiddleItem((new TemplateItem()).setFirstValue((new FieldSelector()).setFields(new ArrayList<FieldReference>(){
              {
                add((new FieldReference()).setFieldPath("class.textModulesData['myfield2']"));
              }
            })))
            .setEndItem((new TemplateItem()).setFirstValue((new FieldSelector()).setFields(new ArrayList<FieldReference>(){
              {
                add((new FieldReference()).setFieldPath("class.textModulesData['myfield3']"));
              }
            })))
          ));
          add((new CardRowTemplateInfo()).setThreeItems((new CardRowThreeItems())
            .setStartItem((new TemplateItem()).setFirstValue((new FieldSelector()).setFields(new ArrayList<FieldReference>(){
              {
                add((new FieldReference()).setFieldPath("class.textModulesData['myfield4']"));
              }
            })))
            .setMiddleItem((new TemplateItem()).setFirstValue((new FieldSelector()).setFields(new ArrayList<FieldReference>(){
              {
                add((new FieldReference()).setFieldPath("class.textModulesData['myfield5']"));
              }
            })))
            .setEndItem((new TemplateItem()).setFirstValue((new FieldSelector()).setFields(new ArrayList<FieldReference>(){
              {
                add((new FieldReference()).setFieldPath("class.textModulesData['myfield6']"));
              }
            })))
          ));
          }
  })))
PHP
// Rest of class
    $textModulesData1 = new Google_Service_Walletobjects_TextModuleData();
    $textModulesData1->setBody("Some info 1");
    $textModulesData1->setHeader("Label 1");
    $textModulesData1->setId("myfield1");

    $textModulesData2 = new Google_Service_Walletobjects_TextModuleData();
    $textModulesData2->setBody("Some info 2");
    $textModulesData2->setHeader("Label 2");
    $textModulesData2->setId("myfield2");

    $textModulesData3 = new Google_Service_Walletobjects_TextModuleData();
    $textModulesData3->setBody("Some info 3");
    $textModulesData3->setHeader("Label 3");
    $textModulesData3->setId("myfield3");

    $textModulesData4 = new Google_Service_Walletobjects_TextModuleData();
    $textModulesData4->setBody("Some info 4");
    $textModulesData4->setHeader("Label 4");
    $textModulesData4->setId("myfield4");

    $textModulesData5 = new Google_Service_Walletobjects_TextModuleData();
    $textModulesData5->setBody("Some info 5");
    $textModulesData5->setHeader("Label 5");
    $textModulesData5->setId("myfield5");

    $textModulesData6 = new Google_Service_Walletobjects_TextModuleData();
    $textModulesData6->setBody("Some info 6");
    $textModulesData6->setHeader("Label 6");
    $textModulesData6->setId("myfield6");

    $textModulesDatas = array($textModulesData1, $textModulesData2, $textModulesData3,
                  $textModulesData4, $textModulesData5, $textModulesData6);

    $startItemField = new Google_Service_Walletobjects_FieldReference();
    $startItemField->setFieldPath("class.textModulesData['myfield1']");

    $startItemFirstValue = new Google_Service_Walletobjects_FieldSelector();
    $startItemFirstValue->setFields(array($startItemField));

    $startItem = new Google_Service_Walletobjects_TemplateItem();
    $startItem->setFirstValue($startItemFirstValue);

    $middleItemField = new Google_Service_Walletobjects_FieldReference();
    $middleItemField->setFieldPath("class.textModulesData['myfield2']");

    $middleItemFirstValue = new Google_Service_Walletobjects_FieldSelector();
    $middleItemFirstValue->setFields(array($middleItemField));

    $middleItem = new Google_Service_Walletobjects_TemplateItem();
    $middleItem->setFirstValue($middleItemFirstValue);

    $endItemField = new Google_Service_Walletobjects_FieldReference();
    $endItemField->setFieldPath("class.textModulesData['myfield3']");

    $endItemFirstValue = new Google_Service_Walletobjects_FieldSelector();
    $endItemFirstValue->setFields(array($endItemField));

    $endItem = new Google_Service_Walletobjects_TemplateItem();
    $endItem->setFirstValue($endItemFirstValue);

    $cardRowTemplate = new Google_Service_Walletobjects_CardRowThreeItems();
    $cardRowTemplate->setStartItem($startItem);
    $cardRowTemplate->setMiddleItem($middleItem);
    $cardRowTemplate->setEndItem($endItem);

    $cardRowTemplateInfo1 = new Google_Service_Walletobjects_CardRowTemplateInfo();
    $cardRowTemplateInfo1->setThreeItems($cardRowTemplate);

    $startItemField2 = new Google_Service_Walletobjects_FieldReference();
    $startItemField2->setFieldPath("class.textModulesData['myfield4']");

    $startItemFirstValue2 = new Google_Service_Walletobjects_FieldSelector();
    $startItemFirstValue2->setFields(array($startItemField2));

    $startItem2 = new Google_Service_Walletobjects_TemplateItem();
    $startItem2->setFirstValue($startItemFirstValue2);

    $middleItemField2 = new Google_Service_Walletobjects_FieldReference();
    $middleItemField2->setFieldPath("class.textModulesData['myfield5']");

    $middleItemFirstValue2 = new Google_Service_Walletobjects_FieldSelector();
    $middleItemFirstValue2->setFields(array($middleItemField2));

    $middleItem2 = new Google_Service_Walletobjects_TemplateItem();
    $middleItem2->setFirstValue($middleItemFirstValue2);

    $endItemField2 = new Google_Service_Walletobjects_FieldReference();
    $endItemField2->setFieldPath("class.textModulesData['myfield6']");

    $endItemFirstValue2 = new Google_Service_Walletobjects_FieldSelector();
    $endItemFirstValue2->setFields(array($endItemField2));

    $endItem2 = new Google_Service_Walletobjects_TemplateItem();
    $endItem2->setFirstValue($endItemFirstValue2);

    $cardRowTemplate2 = new Google_Service_Walletobjects_CardRowThreeItems();
    $cardRowTemplate2->setStartItem($startItem2);
    $cardRowTemplate2->setMiddleItem($middleItem2);
    $cardRowTemplate2->setEndItem($endItem2);

    $cardRowTemplateInfo2 = new Google_Service_Walletobjects_CardRowTemplateInfo();
    $cardRowTemplateInfo2->setThreeItems($cardRowTemplate2);

    $cardTemplateOverride = new Google_Service_Walletobjects_CardTemplateOverride();
    $cardTemplateOverride->setCardRowTemplateInfos(array($cardRowTemplateInfo1,
                  $cardRowTemplateInfo2));

    $classTemplateInfo = new Google_Service_Walletobjects_ClassTemplateInfo();
    $classTemplateInfo->setCardTemplateOverride($cardTemplateOverride);

    $payload->setTextModulesData($textModulesDatas);
    $payload->setClassTemplateInfo($classTemplateInfo);
यह कोड, पास बनाता है. इसमें कोड टेंप्लेट सेक्शन का फ़ॉर्मैट यह होता है:
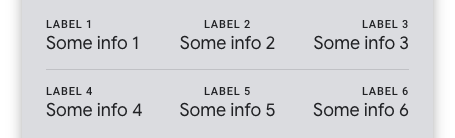
अगर कोई आइटम खाली है, तो उसे नहीं दिखाया जाता. ज़्यादा जानकारी के लिए, फ़ील्ड के रेफ़रंस देखें. अगर किसी लाइन में मौजूद सभी आइटम खाली हैं, तो वह लाइन नहीं दिखती. अगर किसी लाइन में कुछ आइटम खाली हैं, लेकिन सभी नहीं, तो खाली नहीं हैं उन आइटम को फिर से व्यवस्थित किया जाता है और कम आइटम वाली लाइन के तौर पर दिखाया जाता है.
कार्ड टेंप्लेट को बदलने पर, लाइनों की डिफ़ॉल्ट संख्या, आइटम की डिफ़ॉल्ट संख्या, और फ़ील्ड के डिफ़ॉल्ट रेफ़रंस का इस्तेमाल किया जाता है. ज़्यादा जानकारी के लिए, डिफ़ॉल्ट टेंप्लेट देखें.
मुख्य इमेज तय करने के बाद, यह पहली लाइन के बाद दिख सकती है. ऐसा तब होता है, जब cardRowTemplateInfos सूची में एक से ज़्यादा लाइनें हों. इसके अलावा, यह लाइन के ऊपर भी दिख सकती है. ऐसा तब होता है, जब सूची में सिर्फ़ एक लाइन हो.
कार्ड का बारकोड
Android
|
|
वेब
|
|
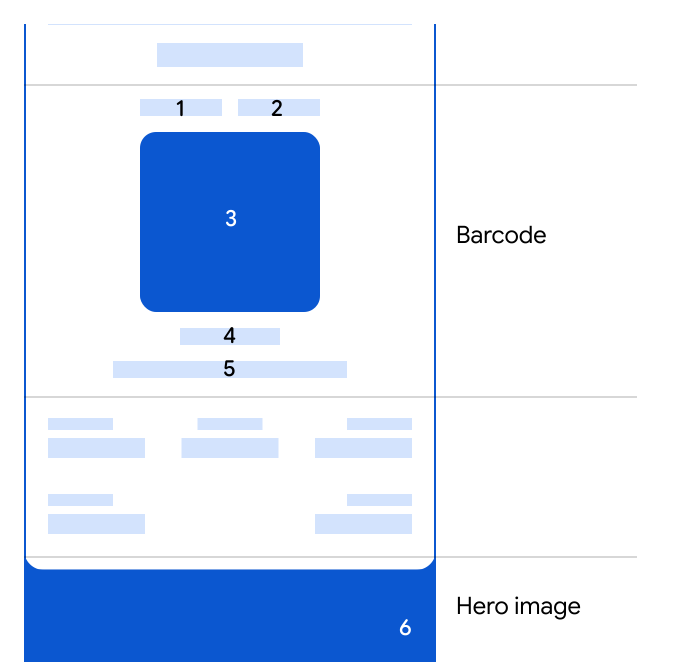
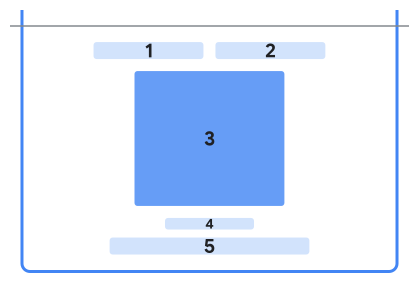
कार्ड बारकोड सेक्शन का इस्तेमाल, बारकोड से पहले और बाद में अतिरिक्त टेक्स्ट या इमेज दिखाने के लिए किया जाता है. इस सेक्शन में मौजूद किसी भी फ़ील्ड में जानकारी डालना ज़रूरी नहीं है.
तीन फ़ील्ड सिलेक्टर होते हैं. इनका इस्तेमाल, बारकोड से पहले और बाद में मौजूद दो फ़ील्ड को एक साथ दिखाने के लिए किया जा सकता है. इन्हें बिना किसी लेबल के दिखाया जाता है. ये टेक्स्ट पर आधारित स्ट्रक्चर्ड डेटा फ़ील्ड, टेक्स्ट मॉड्यूल फ़ील्ड या इमेज मॉड्यूल फ़ील्ड हो सकते हैं. अगर इमेज का इस्तेमाल किया जाता है, तो वे ब्रैंड के दिशा-निर्देशों के मुताबिक होनी चाहिए.
बारकोड को टाइप और वैल्यू के हिसाब से तय किया जाता है. बारकोड के इस्तेमाल किए जा सकने वाले टाइप की सूची देखने के लिए, रेफ़रंस देखें. इसके अलावा, बारकोड के ठीक नीचे टेक्स्ट दिखाया जा सकता है. इस टेक्स्ट से, बारकोड को स्कैन करना आसान हो जाता है. इसके अलावा, इसके और भी फ़ायदे हैं.
नीचे दिए गए कोड सैंपल में, पास के बारकोड सेक्शन को बदलने का तरीका बताया गया है. इससे बारकोड के ऊपर एक इमेज दिखेगी:
Python
#... rest of class
    "imageModulesData": [
        {
            "mainImage": {
                "sourceUri": {
                    "uri":  "http://farm4.staticflickr.com/3738/12440799783_3dc3c20606_b.jpg",
                    "description": "Coffee"
                }
            },
            "id": "myimage"
        }
    ],
    "classTemplateInfo": {
        "cardBarcodeSectionDetails": {
            "firstTopDetail": {
                "fieldSelector": {
                    "fields": [
                        {
                        "fieldPath": "class.imageModulesData['myimage'].mainImage"
                        }
                    ]
                }
            }
        }
    }
}
Java
//... rest of class
  .setImageModulesData((new ArrayList<ImageModuleData>() {
    {
      add((new ImageModuleData())
        .setId("myimage")
        .setMainImage((new Image()).setSourceUri((new ImageUri()).setDescription("Coffee beans")
          .setUri("http://farm4.staticflickr.com/3738/12440799783_3dc3c20606_b.jpg"))));
        }
      }))
      .setClassTemplateInfo((new ClassTemplateInfo())
        .setCardBarcodeSectionDetails((new CardBarcodeSectionDetails())
          .setFirstTopDetail((new BarcodeSectionDetail())
            .setFieldSelector((new FieldSelector())
              .setFields((new ArrayList<FieldReference>(){
                {
                  add((new FieldReference()).setFieldPath("class.imageModulesData['myimage'].mainImage"));
                }
            })))))
      }
PHP
//... rest of class
    $imageUri = new Google_Service_Walletobjects_ImageUri();
    $imageUri->setUri("https://farm8.staticflickr.com/7340/11177041185_a61a7f2139_o.jpg");
    $imageUri->setDescription("Baconrista flights image");
    $image = new Google_Service_Walletobjects_Image();
    $image->setSourceUri($imageUri);
    $imageModulesData = new Google_Service_Walletobjects_ImageModuleData();
    $imageModulesData->setMainImage($image);
            $imageModulesData->setId("myimage");

    $cardBarcodeFieldReference = new Google_Service_Walletobjects_FieldReference();
    $cardBarcodeFieldReference->setFieldPath("class.imageModulesData['myimage'].mainImage");

    $cardBarcodeFieldSelector = new Google_Service_Walletobjects_FieldSelector();
    $cardBarcodeFieldSelector->setFields(array($cardBarcodeFieldReference));

    $cardBarcodeDetail = new Google_Service_Walletobjects_BarcodeSectionDetail();
    $cardBarcodeDetail->setFieldSelector($cardBarcodeFieldSelector);

    $cardBarcodeSectionDetails = new Google_Service_Walletobjects_CardBarcodeSectionDetails();
    $cardBarcodeSectionDetails->setFirstTopDetail($cardBarcodeDetail);

    $classTemplateInfo = new Google_Service_Walletobjects_ClassTemplateInfo();
    $classTemplateInfo->setCardBarcodeSectionDetails($cardBarcodeSectionDetails);

    $payload->setClassTemplateInfo($classTemplateInfo);
            $payload->setImageModuleData($imageModulesData);
यह कोड, बारकोड सेक्शन के इस फ़ॉर्मैट वाला पास बनाता है:
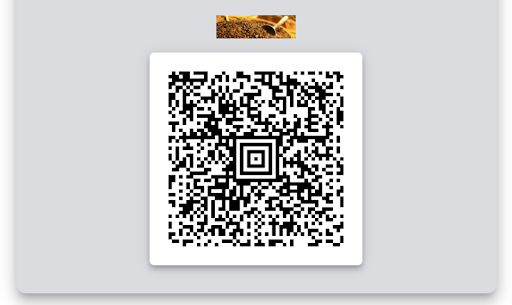
बारकोड सेक्शन को बदलने पर, बारकोड के डिफ़ॉल्ट फ़ील्ड का इस्तेमाल किया जाता है. ज़्यादा जानकारी के लिए, डिफ़ॉल्ट टेंप्लेट देखें.
सबसे नीचे वाला सेक्शन
Android
|
|
वेब
|
|
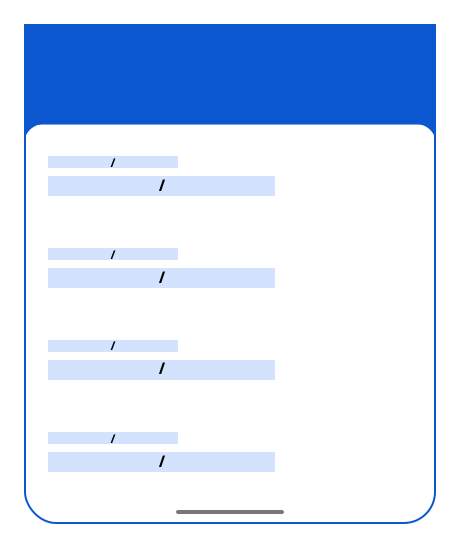
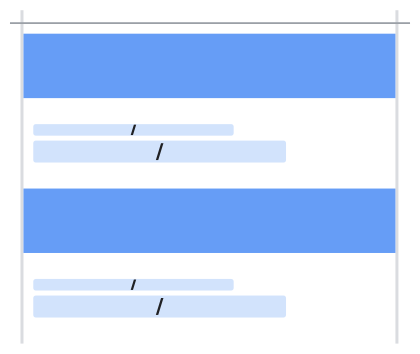
सबसे नीचे वाले सेक्शन में, आइटम की सूची class.classTemplateInfo.detailsTemplateOverride.detailsItemInfos[] दी गई है. इन आइटम में किसी भी तरह के स्ट्रक्चर्ड डेटा फ़ील्ड, टेक्स्ट मॉड्यूल फ़ील्ड, लिंक मॉड्यूल फ़ील्ड, इमेज मॉड्यूल फ़ील्ड या मैसेज शामिल हो सकते हैं.
हर आइटम को एक फ़ील्ड सिलेक्टर (.firstValue), दो फ़ील्ड सिलेक्टर (.firstValue और .secondValue) या पहले से तय किया गया आइटम (.predefinedItem) के तौर पर तय किया जा सकता है. चुने गए फ़ील्ड की वैल्यू और उनके लेबल, दोनों दिखाए जाते हैं. दो फ़ील्ड सिलेक्टर तय करने पर, चुने गए फ़ील्ड की वैल्यू "/" सेपरेटर के साथ दिखती हैं. चुने गए फ़ील्ड के लेबल के लिए भी यही तरीका अपनाएं. पहले से तय किए गए आइटम का इस्तेमाल, ज़्यादा जटिल रेंडरिंग तय करने के लिए किया जाता है. इमेज मॉड्यूल फ़ील्ड, बिना लेबल के पूरी चौड़ाई में रेंडर किए जाते हैं.
यहां दिए गए कोड सैंपल में, पास के सबसे नीचे वाले सेक्शन को बदलने का तरीका बताया गया है. इससे, लेबल के साथ एक linksModuleData फ़ील्ड दिखेगा:
Python
//... rest of class
   "linksModuleData": {
        "uris": [
            {
                "uri": "http://maps.google.com/",
                "description": "Nearby Locations",
                "id":"mylink"
            }
        ]
    },
   "classTemplateInfo": {
        "detailsTemplateOverride": {
            "detailsItemInfos": [
                {
                    "item":{
                        "firstValue": {
                            "fields": [{
                                "fieldPath": "class.linksModuleData.uris['mylink']"
                            }]
                        }
                    }
                }
            ]
        }
     }
//... rest of class
Java
 //... rest of class
  .setLinksModuleData((new ArrayList<LinksModuleData>() {
    {
      add((new LinksModuleData()).setDescription("Nearby Locations")
        .setUri("http://maps.google.com/")
        .setId("mylink"));
      }))
      .setClassTemplateInfo((new ClassTemplateInfo())
        .setDetailsTemplateOverride((new DetailsTemplateOverride())
          .setDetailsItemInfos(new ArrayList<DetailsItemInfo>(){
            {
              add((new DetailsItemInfo())
                .setItem((new TemplateItem()).setFirstValue((new FieldSelector()).setFields(new ArrayList<FieldReference>(){
                  {
                    add((new FieldReference()).setFieldPath("class.linksModuleData.uris['mylink']"));
                  }
                }))));
              }
            }))
//... rest of class
PHP
    //... rest of class building
    $locationUri = new Google_Service_Walletobjects_Uri();
    $locationUri->setUri("http://maps.google.com/");
    $locationUri->setDescription("Nearby Locations");
    $locationUri->setId("mylink");

    $linksModuleData = new Google_Service_Walletobjects_LinksModuleData();
    $linksModuleData->setUris(array($locationUri));

    $detailItemFieldReference = new Google_Service_Walletobjects_FieldReference();
    $detailItemFieldReference->setFieldPath("class.linksModuleData.uris['mylink']");
    $detailItemFieldSelector = new Google_Service_Walletobjects_FieldSelector();
    $detailItemFieldSelector->setFields(array($detailItemFieldReference));

    $detailItem = new Google_Service_Walletobjects_TemplateItem();
    $detailItem->setFirstValue($detailItemFieldSelector);

    $detailsItemInfo = new Google_Service_Walletobjects_DetailsItemInfo();
    $detailsItemInfo->setItem($detailItem);

    $cardDetailsTemplateOverride = new Google_Service_Walletobjects_DetailsTemplateOverride();
    $cardDetailsTemplateOverride->setDetailsItemInfos(array($detailsItemInfo));

    $classTemplateInfo = new Google_Service_Walletobjects_ClassTemplateInfo();
    $classTemplateInfo->setDetailsTemplateOverride($cardDetailsTemplateOverride);

    $payload->setClassTemplateInfo($classTemplateInfo);
    $payload->setLinksModuleData($linksModuleData);
    //... rest of class
इस कोड से, पास का बॉटम सेक्शन इस फ़ॉर्मैट में दिखता है:

अगर कोई आइटम खाली है, तो उसे नहीं दिखाया जाता. ज़्यादा जानकारी के लिए, फ़ील्ड के रेफ़रंस देखें.
अगर सबसे नीचे वाले सेक्शन को नहीं बदला जाता है, तो डिफ़ॉल्ट क्रम में रेफ़रंस फ़ील्ड की डिफ़ॉल्ट सूची दिखती है. ज़्यादा जानकारी के लिए, डिफ़ॉल्ट टेंप्लेट देखें.
सूची वाला टेंप्लेट
|
|
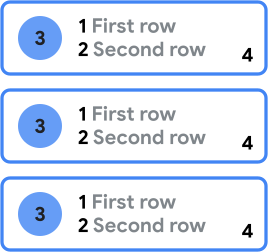
सूची वाले टेंप्लेट सेक्शन का इस्तेमाल यह चुनने के लिए किया जाता है कि Google Wallet ऐप्लिकेशन के "पास" व्यू में कौनसे फ़ील्ड दिखाने हैं. सूची में पास को लोगो, बैकग्राउंड कलर, और तीन लाइनों के साथ दिखाया जाता है.
यहां दिए गए कोड सैंपल में, पास के लिस्ट टेंप्लेट को बदलने का तरीका बताया गया है. इससे लिस्ट टेंप्लेट की पहली लाइन में, पास के ऑब्जेक्ट की समयसीमा खत्म होने की तारीख वाला फ़ील्ड दिखेगा:
Python
#... rest of class definition
   "classTemplateInfo": {
        "listTemplateOverride":{
            "firstRowOption": {
                "fieldOption":{
                    "fields": [{
                        "fieldPath": "object.validTimeInterval.end"
                    }]
                }
            }
        }
   }
}
Java
//... rest of class
  .setClassTemplateInfo((new ClassTemplateInfo())
    .setListTemplateOverride((new ListTemplateOverride())
      .setFirstRowOption((new FirstRowOption())
        .setFieldOption((new FieldSelector()).setFields(new ArrayList<FieldReference>(){
          {
            add((new FieldReference()).setFieldPath("object.validTimeInterval.end"));
          }
        }))))
//... rest of class
PHP
    //... rest of class
    $fieldReference = new Google_Service_Walletobjects_FieldReference();
    $fieldReference->setFieldPath("object.validTimeInterval.end");

    $fieldOption = new Google_Service_Walletobjects_FieldSelector();
    $fieldOption->setFields(array($fieldReference));

    $firstRowOption = new Google_Service_Walletobjects_FirstRowOption();
    $firstRowOption->setFieldOption($fieldOption);

    $listTemplateOverride = new Google_Service_Walletobjects_ListTemplateOverride();
    $listTemplateOverride->setFirstRowOption($firstRowOption);

    $classTemplateInfo = new Google_Service_Walletobjects_ClassTemplateInfo();
    $classTemplateInfo->setListTemplateOverride($listTemplateOverride);

    $payload->setClassTemplateInfo($classTemplateInfo);
    //... rest of class
यह कोड, पास बनाता है. इसमें सूची वाले टेंप्लेट का यह रेंडरेशन होता है:

फ़ील्ड सिलेक्टर का इस्तेमाल करके, तीन लाइनों को तय किया जा सकता है. फ़ील्ड बिना लेबल के दिखते हैं.
लेबल
स्ट्रक्चर्ड डेटा के सभी फ़ील्ड में, Google की ओर से दिया गया लेबल होता है. Google की यह ज़िम्मेदारी है कि वह इन सभी लेबल का अनुवाद, उन सभी भाषाओं में उपलब्ध कराए जिनमें ये लेबल काम करते हैं.
class.custom<name_of_the_field>Label फ़ील्ड में से किसी एक का इस्तेमाल करके, इनमें से कुछ लेबल को अपनी पसंद के मुताबिक बनाया जा सकता है. किसी लेबल को पसंद के मुताबिक बनाने पर, आपको उस लेबल का अनुवाद उन सभी भाषाओं में उपलब्ध कराना होगा जिनमें आपको उसे इस्तेमाल करना है.
फ़ील्ड के रेफ़रंस
फ़ील्ड रेफ़रंस का इस्तेमाल, टेंप्लेट के अलग-अलग हिस्सों में class.classTemplateInfo.*.fields[] फ़ॉर्म के साथ किया जाता है. फ़ील्ड रेफ़रंस में, स्ट्रक्चर्ड डेटा फ़ील्ड, टेक्स्ट मॉड्यूल फ़ील्ड, लिंक मॉड्यूल फ़ील्ड, इमेज मॉड्यूल फ़ील्ड या मैसेज के पाथ की सूची होती है.
हर फ़ील्ड रेफ़रंस में, सभी तरह के पाथ इस्तेमाल करने की अनुमति नहीं है. उदाहरण के लिए, कुछ फ़ील्ड रेफ़रंस सिर्फ़ टेक्स्ट पर आधारित स्ट्रक्चर्ड डेटा फ़ील्ड या टेक्स्ट मॉड्यूल फ़ील्ड के पाथ की अनुमति देते हैं. टेक्स्ट पर आधारित स्ट्रक्चर्ड फ़ील्ड, स्ट्रक्चर्ड डेटा फ़ील्ड होते हैं. ये स्ट्रिंग, स्थानीय भाषा में स्ट्रिंग, तारीख या पैसे के टाइप के होते हैं.
इस सूची का इस्तेमाल, फ़ॉलबैक लॉजिक लागू करने के लिए किया जा सकता है. इसका मतलब है कि अगर सूची में मौजूद पहला पाथ, खाली फ़ील्ड में बदल जाता है, तो अगले पाथ का आकलन किया जाता है. फ़ॉलबैक लॉजिक, मुख्य रूप से टेक्स्ट पर आधारित स्ट्रक्चर्ड डेटा फ़ील्ड या टेक्स्ट मॉड्यूल फ़ील्ड के लिए होता है. एक ही सूची में अलग-अलग तरह के फ़ील्ड शामिल न करें. फ़ॉलबैक लॉजिक का इस्तेमाल सावधानी से करें. इसका इस्तेमाल सिर्फ़ तब करें, जब आपको ऐसे फ़ील्ड का एक जैसा पैटर्न चाहिए जो कुछ ऑब्जेक्ट में मौजूद हों, लेकिन अन्य में न हों. ज़्यादातर मामलों में, अलग-अलग इस्तेमाल के उदाहरणों के लिए अलग-अलग क्लास बनाना आसान होता है.
अगर फ़ील्ड रेफ़रंस की सूची में मौजूद सभी पाथ, खाली फ़ील्ड में बदल जाते हैं, तो फ़ील्ड रेफ़रंस का इस्तेमाल करने वाला आइटम नहीं दिखता. अगर आपको फ़ील्ड रेफ़रंस का इस्तेमाल करने वाले आइटम को हमेशा मौजूद रखना है, तो पक्का करें कि कम से कम एक पाथ खाली न हो. हमारा सुझाव है कि आप किसी फ़ील्ड को ‘-’ जैसे खास वर्ण पर सेट करें, ताकि शून्य वैल्यू को दिखाया जा सके. भले ही, कुछ फ़ील्ड में सिर्फ़ स्पेस वाली स्ट्रिंग की अनुमति हो.
किसी सूची में मौजूद फ़ील्ड का रेफ़रंस देने के लिए, सूची में फ़ील्ड के इंडेक्स का इस्तेमाल किया जा सकता है. इसके अलावा, ज़्यादातर मामलों में रेफ़रंस आईडी का इस्तेमाल किया जा सकता है. सूची के जिन आइटम का रेफ़रंस आईडी के हिसाब से दिया जा सकता है उनमें .id फ़ील्ड होता है. हमारा सुझाव है कि जब सूची में फ़ील्ड का इंडेक्स उपलब्ध हो, तब इंडेक्स के बजाय रेफ़रंस आईडी का इस्तेमाल करें.
यहां सूची में मौजूद फ़ील्ड को रेफ़रंस करने का उदाहरण दिया गया है.
object.imageModulesData[0].id = my-first-idobject.imageModulesData[1].id = my-second-idclass.detailsTemplateOverride.detailsItemInfos[0].item.firstValue.fields[0].fieldPath = object.imageModulesData[‘my-second-id’]class.detailsTemplateOverride.detailsItemInfos[1].item.firstValue.fields[0].fieldPath = object.imageModulesData[0]
इस मामले में, पास के 'जानकारी' सेक्शन में मौजूद पहला आइटम, ऑब्जेक्ट में बताई गई दूसरी इमेज है. वहीं, पास के 'जानकारी' सेक्शन में मौजूद दूसरा आइटम, ऑब्जेक्ट में बताई गई पहली इमेज है.
डिफ़ॉल्ट टेंप्लेट
Android

|
|
वेब
|
|
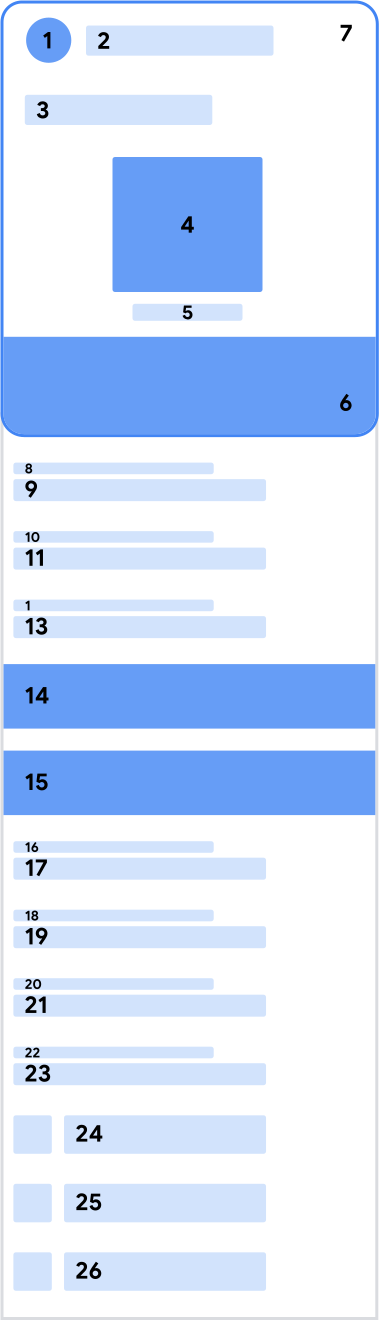
इमेज मॉड्यूल फ़ील्ड के लिए, हम क्लास से सिर्फ़ एक इमेज मॉड्यूल फ़ील्ड और ऑब्जेक्ट से सिर्फ़ एक इमेज मॉड्यूल फ़ील्ड दिखाते हैं. अगर आपको किसी भी लेवल पर एक से ज़्यादा इमेज मॉड्यूल फ़ील्ड की ज़रूरत है, तो डिफ़ॉल्ट टेंप्लेट को बदलें.
टेक्स्ट मॉड्यूल फ़ील्ड के लिए, हम क्लास से ज़्यादा से ज़्यादा 20 टेक्स्ट मॉड्यूल फ़ील्ड और ऑब्जेक्ट से 20 टेक्स्ट मॉड्यूल फ़ील्ड दिखाते हैं. फ़ील्ड उसी क्रम में दिखते हैं जिस क्रम में उन्हें ऐरे में तय किया गया है. अगर आपको किसी भी लेवल पर 20 से ज़्यादा टेक्स्ट मॉड्यूल फ़ील्ड की ज़रूरत है, तो डिफ़ॉल्ट टेंप्लेट को बदलें.
मैसेज के लिए, हम क्लास से ज़्यादा से ज़्यादा 20 मैसेज और ऑब्जेक्ट से 20 मैसेज ही दिखाते हैं. हम मैसेज के क्रम की गारंटी नहीं देते. अगर आपको किसी भी लेवल पर 20 से ज़्यादा मैसेज चाहिए या किसी भी ऑर्डर के लिए गारंटी चाहिए, तो डिफ़ॉल्ट टेंप्लेट को बदलें.
लिंक मॉड्यूल फ़ील्ड के लिए, तय किए जा सकने वाले यूआरआई की संख्या पर कोई पाबंदी नहीं है. हर लेवल (क्लास या ऑब्जेक्ट) के लिए, यूआरआई को इस क्रम में ग्रुप करके दिखाया जाता है:
- मैप के कोऑर्डिनेट
- टेलीफ़ोन नंबर
- ईमेल पते
- वेब पेज
हर ग्रुप के लिए, यूआरआई उसी क्रम में दिखाए जाते हैं जिस क्रम में उन्हें ऐरे में तय किया गया है. अगर आपको किसी और क्रम में जानकारी चाहिए, तो डिफ़ॉल्ट टेंप्लेट को बदलें.
|
|
|