
Fleet Engine
Fleet Engine
Fleet Engine เป็นบริการแบ็กเอนด์ที่คุณผสานรวมไว้ในระบบการจัดการขนส่ง แพลตฟอร์มนี้ทำงานร่วมกับ API และ SDK ที่หลากหลายเพื่อปรับปรุงการทำแผนที่ การกำหนดเส้นทาง และการจัดการตำแหน่ง รวมถึง Mobility SDK ต่อไปนี้
- SDK ไดรเวอร์
- SDK สำหรับผู้บริโภค
- การดำเนินการของกลุ่ม
ประสบการณ์ของผู้ขับขี่

ประสบการณ์ของผู้ขับขี่
Navigation SDK และ Driver SDK จะทำงานร่วมกันเพื่อปรับแต่งประสบการณ์การขับขี่ให้เหมาะกับรูปแบบการนำส่งของคุณ
- Navigation SDK: สร้างประสบการณ์การนําทางแบบเลี้ยวต่อเลี้ยวในแอปเพื่อแนะนําเส้นทางแก่ผู้ขับขี่แบบเรียลไทม์
- Driver SDK: เปิดใช้การแสดงตำแหน่งของคนขับและเส้นทางที่ดำเนินการผ่าน Fleet Engine
ประสบการณ์ของผู้บริโภค

ประสบการณ์ของผู้บริโภค
Consumer SDK มีอินเทอร์เฟซที่จำลองข้อมูลการเดินทางและติดตามเซสชันการเดินทางใน Fleet Engine เพื่อให้คุณแสดงข้อมูลการเดินทางที่สมบูรณ์ซึ่งอิงตามแผนที่แก่ผู้ใช้ที่เป็นผู้บริโภคได้ คุณใช้ประโยชน์จากการปรับปรุงต่อไปนี้ได้
- แผนที่สไตล์คุณ: แผนที่ของคุณจะตรงกับการสร้างแบรนด์
- ตำแหน่งยานพาหนะ: ให้ผู้บริโภคติดตามความคืบหน้าของการเดินทางหรือการนำส่ง
- เวลาโดยประมาณ: ระบุเวลาถึงโดยอิงตามสภาพการจราจรแบบเรียลไทม์
การดำเนินการของกลุ่ม

การดำเนินการของกลุ่ม
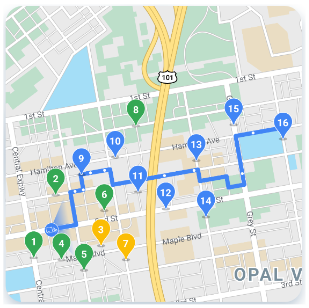
แสดงภาพตำแหน่งรถส่งสินค้าและจุดแวะพักในยานพาหนะของคุณได้แบบเกือบเรียลไทม์ หากทราบเส้นทาง คอมโพเนนต์มุมมองแผนที่จะแสดงภาพเคลื่อนไหวของยานพาหนะขณะเคลื่อนที่ไปตามเส้นทางที่คาดการณ์ไว้ การดำเนินการของกลุ่มรถมีฟีเจอร์ต่อไปนี้
- การติดตามยานพาหนะในกองรถ: แสดงตำแหน่งแบบเรียลไทม์ เวลาถึงโดยประมาณ เส้นทาง จุดจอดพักที่วางแผนไว้ และงานที่เสร็จสมบูรณ์สำหรับยานพาหนะในกองรถ
- การบันทึกในระบบคลาวด์: ดูบันทึกแบบละเอียดที่คุณวิเคราะห์และใช้เพื่อสร้างเมตริกและปรับปรุงประสิทธิภาพของกลุ่มอุปกรณ์ได้
บริการ Google Maps Platform Mobility
บริการด้านอุปกรณ์เคลื่อนที่เป็นชุดเครื่องมือการพัฒนาสำหรับการสร้างการดำเนินการด้านการขนส่งและโลจิสติกส์สำหรับธุรกิจของคุณ ข้อเสนอนี้มี API และ SDK ที่หลากหลายที่คุณผสานรวมเข้ากับแอปพลิเคชันสำหรับกรณีการใช้งานพื้นฐาน 2 กรณีดังนี้
- บริการคนขับรถแบบออนดีมานด์ เช่น บริการร่วมเดินทางและการจัดส่งอาหาร
- บริการพนักงานขับรถตามกำหนดการ เช่น การจัดส่ง
ชุดเครื่องมือนี้ประกอบด้วยบริการบนเว็บและชุด API ที่รวมฟังก์ชันการทำงานของแผนที่ เส้นทาง และสถานที่ไว้ในอินเทอร์เฟซที่ออกแบบมาสำหรับกรณีการใช้งานในอุตสาหกรรมเหล่านี้โดยเฉพาะ นอกจากนี้ยังมีบริการแบ็กเอนด์เพื่อช่วยจัดการเส้นทางของผู้ขับ ข้อมูลวิเคราะห์ และบริการติดตามให้กับทีมปฏิบัติการของกลุ่มยานพาหนะด้วย
เรียกดูข้อมูลทางด้านขวาเพื่อดูว่าบริการระบบเคลื่อนที่แต่ละรายการนำเสนออะไรบ้าง
แพ็กเกจบริการระบบเคลื่อนที่
ตรวจสอบแพ็กเกจที่พร้อมให้บริการเพื่อช่วยคุณดำเนินการขนส่งและโลจิสติกส์สำหรับธุรกิจของคุณ อ่านเกี่ยวกับโควต้า หรือการเริ่มต้นใช้งานหรือข้อมูลเพิ่มเติม โปรดติดต่อฝ่ายขาย
Mobility Activate ประกอบด้วยสิทธิ์เข้าถึง Google Maps Platform API ที่หลากหลาย ซึ่งรวมถึง Navigation SDK
Mobility Optimize มีบริการทั้งหมดในแพ็กเกจ Mobility Activate รวมถึง API สำหรับการจำกัดความเร็วและการเพิ่มประสิทธิภาพเส้นทางเดียวสำหรับยานพาหนะ
Mobility Accelerate ประกอบด้วยบริการทั้งหมดใน Mobility Optimize รวมถึง API และ SDK ที่จำเป็นในการผสานรวมกับบริการ Fleet Engine แบบเก็บสถานะที่รับ บำรุงรักษา และให้ข้อมูลเกี่ยวกับยานพาหนะ การเดินทาง และงานต่างๆ