

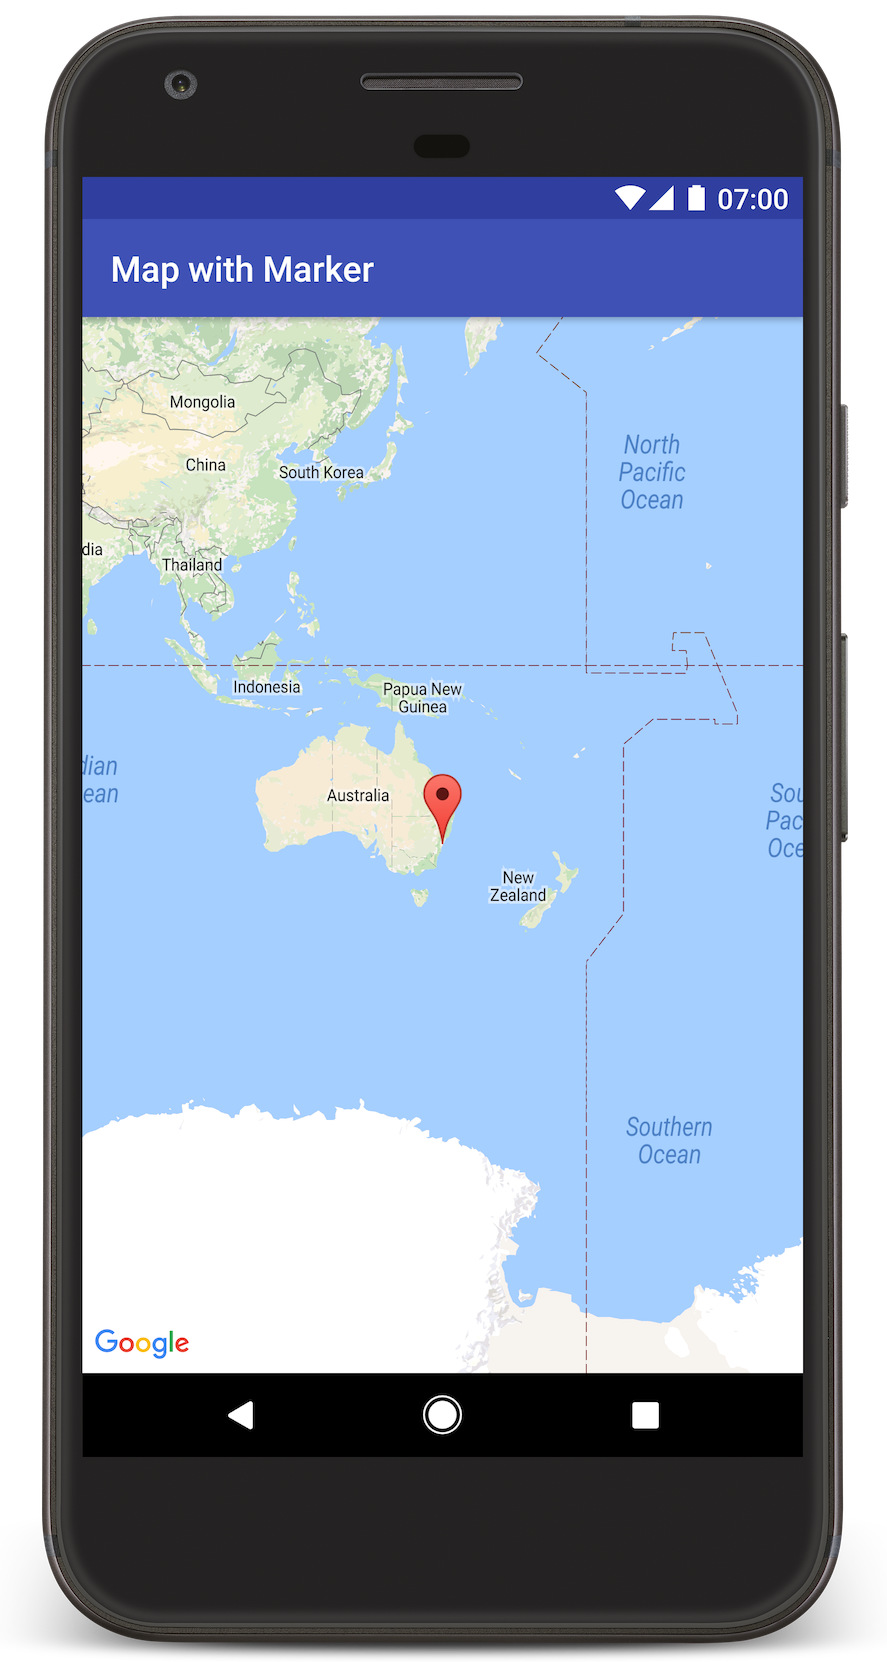
במדריך הזה מוסבר איך להוסיף מפת Google לאפליקציה ל-Android. המפה כוללת סמן, שנקרא גם סיכה, כדי לציין מיקום ספציפי.
פועלים לפי ההדרכה כדי ליצור אפליקציה ל-Android באמצעות ה-SDK של מפות ל-Android. סביבת הפיתוח המומלצת היא Android Studio.
קבל את הקוד
משכפלים או מורידים את המאגר Google Maps Android API v2 Samples מ-GitHub.
הצגת גרסת ה-Java של הפעילות:
// Copyright 2020 Google LLC // // Licensed under the Apache License, Version 2.0 (the "License"); // you may not use this file except in compliance with the License. // You may obtain a copy of the License at // // http://www.apache.org/licenses/LICENSE-2.0 // // Unless required by applicable law or agreed to in writing, software // distributed under the License is distributed on an "AS IS" BASIS, // WITHOUT WARRANTIES OR CONDITIONS OF ANY KIND, either express or implied. // See the License for the specific language governing permissions and // limitations under the License. package com.example.mapwithmarker; import android.os.Bundle; import androidx.appcompat.app.AppCompatActivity; import com.google.android.gms.maps.CameraUpdateFactory; import com.google.android.gms.maps.GoogleMap; import com.google.android.gms.maps.OnMapReadyCallback; import com.google.android.gms.maps.SupportMapFragment; import com.google.android.gms.maps.model.LatLng; import com.google.android.gms.maps.model.MarkerOptions; /** An activity that displays a Google map with a marker (pin) to indicate a particular location. */ public class MapsMarkerActivity extends AppCompatActivity implements OnMapReadyCallback { @Override protected void onCreate(Bundle savedInstanceState) { super.onCreate(savedInstanceState); // Retrieve the content view that renders the map. setContentView(R.layout.activity_maps); // Get the SupportMapFragment and request notification when the map is ready to be used. SupportMapFragment mapFragment = (SupportMapFragment) getSupportFragmentManager().findFragmentById(R.id.map); mapFragment.getMapAsync(this); } /** * Manipulates the map when it's available. The API invokes this callback when the map is ready * to be used. This is where we can add markers or lines, add listeners or move the camera. In * this case, we just add a marker near Sydney, Australia. If Google Play services is not * installed on the device, the user receives a prompt to install Play services inside the * SupportMapFragment. The API invokes this method after the user has installed Google Play * services and returned to the app. */ @Override public void onMapReady(GoogleMap googleMap) { // Add a marker in Sydney, Australia, // and move the map's camera to the same location. LatLng sydney = new LatLng(-33.852, 151.211); googleMap.addMarker(new MarkerOptions().position(sydney).title("Marker in Sydney")); googleMap.moveCamera(CameraUpdateFactory.newLatLng(sydney)); } }
צפייה בגרסת Kotlin של הפעילות:
// Copyright 2020 Google LLC // // Licensed under the Apache License, Version 2.0 (the "License"); // you may not use this file except in compliance with the License. // You may obtain a copy of the License at // // http://www.apache.org/licenses/LICENSE-2.0 // // Unless required by applicable law or agreed to in writing, software // distributed under the License is distributed on an "AS IS" BASIS, // WITHOUT WARRANTIES OR CONDITIONS OF ANY KIND, either express or implied. // See the License for the specific language governing permissions and // limitations under the License. package com.example.mapwithmarker import android.os.Bundle import android.widget.Toast import androidx.appcompat.app.AppCompatActivity import com.google.android.gms.maps.CameraUpdateFactory import com.google.android.gms.maps.GoogleMap import com.google.android.gms.maps.OnMapReadyCallback import com.google.android.gms.maps.SupportMapFragment import com.google.android.gms.maps.model.LatLng import com.google.android.gms.maps.model.MarkerOptions /** * An activity that displays a Google map with a marker (pin) to indicate a particular location. */ class MapsMarkerActivity : AppCompatActivity(), OnMapReadyCallback { override fun onCreate(savedInstanceState: Bundle?) { super.onCreate(savedInstanceState) // Retrieve the content view that renders the map. setContentView(R.layout.activity_maps) // Get the SupportMapFragment and request notification when the map is ready to be used. val mapFragment = supportFragmentManager.findFragmentById(R.id.map) as? SupportMapFragment mapFragment?.getMapAsync(this) } override fun onMapReady(googleMap: GoogleMap) { val sydney = LatLng(-33.852, 151.211) googleMap.addMarker( MarkerOptions() .position(sydney) .title("Marker in Sydney"), ) googleMap.moveCamera(CameraUpdateFactory.newLatLng(sydney)) } }
הגדרת פרויקט הפיתוח
כדי ליצור את פרויקט המדריך ב-Android Studio, פועלים לפי השלבים הבאים.
- מורידים ומתקינים את Android Studio.
- מוסיפים את החבילה Google Play Services ל-Android Studio.
- משכפלים או מורידים את מאגר הדוגמאות של Google Maps Android API v2, אם לא עשיתם את זה כשהתחלתם לקרוא את המדריך הזה.
מייבאים את פרויקט המדריך:
- ב-Android Studio, בוחרים באפשרות File > New > Import Project (קובץ > חדש > ייבוא פרויקט).
- עוברים למיקום שבו שמרתם את מאגר הדוגמאות של Google Maps Android API v2 אחרי שהורדתם אותו.
- מאתרים את הפרויקט MapWithMarker במיקום הזה:
PATH-TO-SAVED-REPO/android-samples/tutorials/java/MapWithMarker(Java) או
PATH-TO-SAVED-REPO/android-samples/tutorials/kotlin/MapWithMarker(Kotlin) - בוחרים את ספריית הפרויקט ולוחצים על Open. עכשיו Android Studio יוצר את הפרויקט באמצעות כלי ה-build של Gradle.
הפעלת ממשקי ה-API הנדרשים וקבלת מפתח API
כדי להשלים את המדריך הזה, אתם צריכים פרויקט ב-Google Cloud שבו מופעלים ממשקי ה-API הנדרשים, ומפתח API שמורשה להשתמש ב-SDK של מפות ל-Android. לפרטים נוספים:
הוספת מפתח ה-API לאפליקציה
- פותחים את הקובץ
local.propertiesשל הפרויקט. מוסיפים את המחרוזת הבאה ומחליפים את הערך
YOUR_API_KEYבערך של מפתח ה-API:MAPS_API_KEY=YOUR_API_KEYכשיוצרים את האפליקציה, הפלאגין Secrets Gradle ל-Android מעתיק את מפתח ה-API והופך אותו לזמין כמשתנה build במניפסט של Android, כמו שמוסבר בהמשך.
יוצרים ומריצים את האפליקציה
כדי ליצור ולהפעיל את האפליקציה:
מחברים מכשיר Android למחשב. פועלים לפי ההוראות כדי להפעיל את אפשרויות למפתחים במכשיר Android ולהגדיר את המערכת לזיהוי המכשיר.
לחלופין, אתם יכולים להשתמש ב-Android Virtual Device (AVD) Manager כדי להגדיר מכשיר וירטואלי. כשבוחרים אמולטור, חשוב לבחור קובץ אימג' שכולל את Google APIs. לפרטים נוספים, קראו את המאמר הגדרת פרויקט ב-Android Studio .
ב-Android Studio, לוחצים על האפשרות Run בתפריט (או על סמל ההפעלה). בוחרים מכשיר לפי ההנחיות.
Android Studio מפעיל את Gradle כדי ליצור את האפליקציה, ואז מריץ את האפליקציה במכשיר או באמולטור. אמורה להופיע מפה עם סמן שמצביע על סידני בחוף המזרחי של אוסטרליה, בדומה לתמונה בדף הזה.
פתרון בעיות:
- אם המפה לא מופיעה, צריך לוודא שקיבלתם מפתח API והוספתם אותו לאפליקציה, כמו שמתואר למעלה. בודקים את היומן ב-Android Monitor של Android Studio כדי לראות אם יש הודעות שגיאה לגבי מפתח ה-API.
- משתמשים בכלים לניפוי באגים של Android Studio כדי להציג יומנים ולנפות באגים באפליקציה.
הבנת הקוד
בחלק הזה של המדריך מוסברים החלקים החשובים ביותר של האפליקציה MapWithMarker, כדי לעזור לכם להבין איך ליצור אפליקציה דומה.
בדיקת המניפסט של Android
שימו לב לרכיבים הבאים בקובץ AndroidManifest.xml של האפליקציה:
מוסיפים רכיב
meta-dataכדי להטמיע את הגרסה של Google Play Services שאיתה האפליקציה עברה הידור.<meta-data android:name="com.google.android.gms.version" android:value="@integer/google_play_services_version" />מוסיפים רכיב
meta-dataשמציין את מפתח ה-API. הדוגמה שמצורפת למדריך הזה ממפה את הערך של מפתח ה-API למשתנה build שתואם לשם המפתח שהגדרתם קודם,MAPS_API_KEY. כשמפתחים את האפליקציה, הפלאגין Secrets Gradle ל-Android הופך את המפתחות בקובץlocal.propertiesלוריאנט build של המניפסט.<meta-data android:name="com.google.android.geo.API_KEY" android:value="${MAPS_API_KEY}" />בקובץ
build.gradle, השורה הבאה מעבירה את מפתח ה-API למניפסט של Android.id 'com.google.android.libraries.mapsplatform.secrets-gradle-plugin'
דוגמה למניפסט מלא:
<?xml version="1.0" encoding="utf-8"?>
<!--
 Copyright 2020 Google LLC

 Licensed under the Apache License, Version 2.0 (the "License");
 you may not use this file except in compliance with the License.
 You may obtain a copy of the License at

      http://www.apache.org/licenses/LICENSE-2.0

 Unless required by applicable law or agreed to in writing, software
 distributed under the License is distributed on an "AS IS" BASIS,
 WITHOUT WARRANTIES OR CONDITIONS OF ANY KIND, either express or implied.
 See the License for the specific language governing permissions and
 limitations under the License.
-->

<manifest xmlns:android="http://schemas.android.com/apk/res/android">

    <application
        android:allowBackup="true"
        android:icon="@mipmap/ic_launcher"
        android:label="@string/app_name"
        android:supportsRtl="true"
        android:theme="@style/AppTheme">

        <meta-data
            android:name="com.google.android.gms.version"
            android:value="@integer/google_play_services_version" />

        <!--
             The API key for Google Maps-based APIs.
        -->
        <meta-data
            android:name="com.google.android.geo.API_KEY"
            android:value="${MAPS_API_KEY}" />

        <activity
            android:name=".MapsMarkerActivity"
            android:label="@string/title_activity_maps"
            android:exported="true">
            <intent-filter>
                <action android:name="android.intent.action.MAIN" />

                <category android:name="android.intent.category.LAUNCHER" />
            </intent-filter>
        </activity>
    </application>

</manifest>
הוספת מפה
להציג מפה באמצעות SDK של מפות ל-Android.
מוסיפים רכיב
<fragment>לקובץ הפריסה של הפעילות,activity_maps.xml. הרכיב הזה מגדירSupportMapFragmentשישמש כמאגר למפה ויספק גישה לאובייקטGoogleMap. במדריך נעשה שימוש בגרסה של ספריית התמיכה של Android של קטע המפה, כדי להבטיח תאימות לדורות קודמים של Android framework.<!-- Copyright 2020 Google LLC Licensed under the Apache License, Version 2.0 (the "License"); you may not use this file except in compliance with the License. You may obtain a copy of the License at http://www.apache.org/licenses/LICENSE-2.0 Unless required by applicable law or agreed to in writing, software distributed under the License is distributed on an "AS IS" BASIS, WITHOUT WARRANTIES OR CONDITIONS OF ANY KIND, either express or implied. See the License for the specific language governing permissions and limitations under the License. --> <fragment xmlns:android="http://schemas.android.com/apk/res/android" xmlns:tools="http://schemas.android.com/tools" android:id="@+id/map" android:name="com.google.android.gms.maps.SupportMapFragment" android:layout_width="match_parent" android:layout_height="match_parent" tools:context="com.example.mapwithmarker.MapsMarkerActivity" />
ב-method
onCreate()של הפעילות, מגדירים את קובץ הפריסה כתצוגת התוכן. מקבלים נקודת אחיזה לקטע המפה באמצעות קריאה ל-FragmentManager.findFragmentById(). אחר כך משתמשים ב-getMapAsync()כדי להירשם לקריאה החוזרת (callback) של המפה:Java
@Override protected void onCreate(Bundle savedInstanceState) { super.onCreate(savedInstanceState); // Retrieve the content view that renders the map. setContentView(R.layout.activity_maps); // Get the SupportMapFragment and request notification when the map is ready to be used. SupportMapFragment mapFragment = (SupportMapFragment) getSupportFragmentManager().findFragmentById(R.id.map); mapFragment.getMapAsync(this); }
Kotlin
override fun onCreate(savedInstanceState: Bundle?) { super.onCreate(savedInstanceState) // Retrieve the content view that renders the map. setContentView(R.layout.activity_maps) // Get the SupportMapFragment and request notification when the map is ready to be used. val mapFragment = supportFragmentManager.findFragmentById(R.id.map) as? SupportMapFragment mapFragment?.getMapAsync(this) }
מטמיעים את הממשק
OnMapReadyCallbackומבטלים את השיטהonMapReady()כדי להגדיר את המפה כשהאובייקטGoogleMapזמין:Java
public class MapsMarkerActivity extends AppCompatActivity implements OnMapReadyCallback { // ... @Override public void onMapReady(GoogleMap googleMap) { LatLng sydney = new LatLng(-33.852, 151.211); googleMap.addMarker(new MarkerOptions().position(sydney).title("Marker in Sydney")); } }
Kotlin
class MapsMarkerActivity : AppCompatActivity(), OnMapReadyCallback { // ... override fun onMapReady(googleMap: GoogleMap) { val sydney = LatLng(-33.852, 151.211) googleMap.addMarker( MarkerOptions() .position(sydney) .title("Marker in Sydney"), ) } }
כברירת מחדל, ה-SDK של מפות ל-Android מציג את התוכן של חלון המידע כשהמשתמש מקיש על סמן. אם אתם רוצים להשתמש בפעולת ברירת המחדל, אתם לא צריכים להוסיף רכיב click listener לסמן.
השלבים הבאים
מידע נוסף על אובייקט המפה ועל מה שאפשר לעשות עם סמנים.