این بخش SimpleExampleServlet معرفی میکند که سادهترین پیادهسازی نمونه از یک منبع داده است که همراه با کتابخانه ارائه میشود. این بخش همچنین دستورالعملهای گام به گام در مورد نحوه اجرا و آزمایش SimpleExampleServlet ارائه میدهد.
معرفی SimpleExampleServlet
کلاس SimpleExampleServlet در بسته examples قرار دارد. این کلاس نمونهای از سادهترین پیادهسازی یک منبع داده را ارائه میدهد. SimpleExampleServlet از DataSourceServlet ارثبری میکند، generateDataTable() را پیادهسازی میکند و باید درون یک کانتینر servlet اجرا شود.
بخشی از SimpleExampleServlet در زیر ارائه شده است. تابع generateDataTable دادهها را در اختیار کتابخانه قرار میدهد. این تابع یک توضیح جدول داده ایجاد میکند، ستونهای جدول داده را تعریف میکند و جدول داده را با دادهها پر میکند. کتابخانه تمام اقدامات دیگر مورد نیاز برای بازگرداندن جدول داده به تجسم پرسوجو را مدیریت میکند.
// This example extends DataSourceServlet public class SimpleExampleServlet extends DataSourceServlet { @Override public DataTable generateDataTable(Query query, HttpServletRequest request) { // Create a data table, DataTable data = new DataTable(); ArrayListcd = new ArrayList (); cd.add(new ColumnDescription("name", ValueType.TEXT, "Animal name")); cd.add(new ColumnDescription("link", ValueType.TEXT, "Link to wikipedia")); cd.add(new ColumnDescription("population", ValueType.NUMBER, "Population size")); cd.add(new ColumnDescription("vegeterian", ValueType.BOOLEAN, "Vegetarian?")); data.addColumns(cd); // Fill the data table. try { data.addRowFromValues("Aye-aye", "http://en.wikipedia.org/wiki/Aye-aye", 100, true); data.addRowFromValues("Sloth", "http://en.wikipedia.org/wiki/Sloth", 300, true); data.addRowFromValues("Leopard", "http://en.wikipedia.org/wiki/Leopard", 50, false); data.addRowFromValues("Tiger", "http://en.wikipedia.org/wiki/Tiger", 80, false); } catch (TypeMismatchException e) { System.out.println("Invalid type!"); } return data; } }
اجرا و آزمایش SimpleExampleServlet
این بخش دستورالعملهایی در مورد نحوه اجرا و آزمایش SimpleExampleServlet ارائه میدهد.
اگر قبلاً این کار را انجام ندادهاید، برای اطلاعات مربوط به پیشنیازها و دستورالعملهای نحوه دانلود و ساخت کتابخانه، به بخش نصب مراجعه کنید. اگر از قبل سرور وب مانند Apache Tomcat روی سیستم خود ندارید، مطمئن شوید که آن را نصب میکنید که به عنوان یک کانتینر سرولت نیز عمل میکند. دستورالعملهای این بخش مختص Apache Tomcat در سیستم ویندوز است.
برای اجرا و آزمایش SimpleExampleServlet ، یک برنامه وب ایجاد کنید که منبع داده SimpleExampleServlet را اجرا کند، سپس یک صفحه وب نمونه با تجسمی که دادههای پرسوجو شده از منبع داده را نشان میدهد، اجرا کنید. این موضوع در بخشهای زیر توضیح داده شده است:
ایجاد یک برنامه وب در آپاچی تامکت
برای ایجاد یک برنامه وب در آپاچی تامکت، دستورالعملهای زیر را دنبال کنید یا آنها را تطبیق دهید. این دستورالعملها مخصوص آپاچی تامکت در سیستم عامل ویندوز هستند:
- به دایرکتوری که Tomcat را در آن نصب کردهاید بروید. این دایرکتوری در این سند به صورت
<tomcat_home>نوشته شده است. - به زیرشاخهی
webappsبروید. - یک زیرشاخه به نام
myWebAppایجاد کنید. - به زیرشاخهای که ایجاد کردهاید بروید و زیرشاخهی دیگری به نام
WEB-INFایجاد کنید. - به زیرشاخه
WEB-INFبروید و زیرشاخه دیگری به نامlibایجاد کنید.
مسیر کامل باید<tomcat_home>/webapps/myWebApp/WEB-INF/libباشد. -
web.xmlاز<data_source_library_install>/examples/src/htmlبه پوشهWEB-INFکپی کنید.<data_source_library_install>پوشهای است که کتابخانه منبع داده را در آن نصب کردهاید. خطوط زیر درweb.xmlSimpleExampleServletتعریف و نگاشت میکنند:<servlet> <servlet-name>My Servlet</servlet-name> <description>My servlet description.</description> <servlet-class>SimpleExampleServlet</servlet-class> </servlet> <servlet-mapping> <servlet-name>My Servlet</servlet-name> <url-pattern>/simpleexample</url-pattern> </servlet-mapping>
- به دایرکتوری که کتابخانه منبع داده را در آن نصب کردهاید بروید. این دایرکتوری در این سند به صورت
<data_source_library_install>نوشته شده است. - تمام بستههای وابستگی را در
<tomcat_home>/webapps/myWebApp/WEB-INF/libکپی کنید. بستهها در<data_source_library_install>/libنصب میشوند، مگر اینکه آنها را در دایرکتوری دیگری قرار دهید. - اگر خودتان کتابخانه را ساختهاید،
visualization-datasource-1.0.2.jarوvisualization-datasource-examples.jarرا کپی کنید.
از<data_source_library_install>/build
به<tomcat_home>/webapps/myWebApp/WEB-INF/lib.
اگر فایل زیپ را از حالت فشرده خارج کردهاید،visualization-datasource-1.0.2.jarوvisualization-datasource-examples.jarرا کپی کنید.
از<data_source_library_install>
به<tomcat_home>/webapps/myWebApp/WEB-INF/lib.
توجه داشته باشید که شماره نسخه موجود در نام فایل jar ممکن است بسته به آخرین شماره نسخه متفاوت باشد. - تامکت را اجرا کنید، یا اگر از قبل در حال اجرا است، آن را مجدداً راهاندازی کنید.
- روی لینک زیر کلیک کنید:
http://localhost:8080/myWebApp/simpleexample
بسته به عرض صفحه نمایش شما، صفحه نمایش ۶ تا ۷ خط متن را نمایش میدهد.
متن باgoogle.visualization.Query.setResponseشروع میشود.
و با/Tiger'},{v:80.0},{v:false}]}]}});
این دادهای است که توسط منبع داده شما به یک تجسم پرسوجو بازگردانده میشود.
استفاده از مصورسازی برای مشاهده دادهها
فایل getting_started.html در دایرکتوری <data_source_library_install>/examples/src/html میتواند برای مشاهدهی بصریسازی دادهها استفاده شود. خط زیر که از getting_started.html گرفته شده است، سرولت مورد استفاده را مشخص میکند. نگاشت سرولت در مرحلهی ۸ ایجاد یک برنامهی وب در آپاچی تامکت تنظیم شده است.
var query = new google.visualization.Query('simpleexample');
برای اطلاعات بیشتر در مورد نحوه مشخص کردن یک تجسم و استفاده از زبان پرس و جو، به بخش «استفاده از نمودارها و مرجع زبان پرس و جو» مراجعه کنید.
برای مشاهدهی بصریسازی دادههای ارائه شده توسط منبع داده، دستورالعملهای زیر را دنبال کنید یا آنها را تطبیق دهید:
- فایل
getting_started.htmlرا از دایرکتوری<data_source_library_install>/examples/src/htmlکپی کنید.
به دایرکتوری<tomcat_home>/webapps/myWebApp/. - روی لینک زیر http://localhost:8080/myWebApp/getting_started.html کلیک کنید، باید تصویر زیر را ببینید:
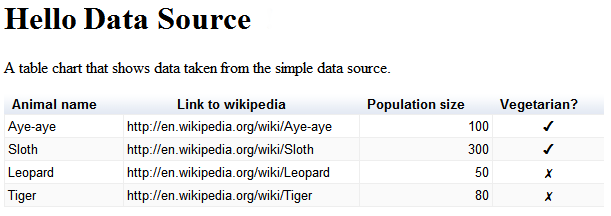
همین! شما اولین منبع داده خود را تنظیم کردهاید.
مراحل بعدی
مثال بعدی در بخش « استفاده از یک مخزن داده خارجی» توضیح داده شده است. به عنوان جایگزین، میتوانید به مقدمه برگردید یا لینکهای زیر را بررسی کنید:
- برای آشنایی با کلاسهای پرکاربرد کتابخانه، به بخش کلاسهای کلیدی مراجعه کنید.
- برای مثالی از نحوه پیادهسازی جریان رویدادهای خودتان و قابلیتهای پرسوجو، به تعریف قابلیتها و جریان رویدادها مراجعه کنید.
- اگر نمیخواهید از
DataSourceServletارثبری کنید، میتوانید یک منبع داده را همانطور که در بخش «استفاده از Servlet خودتان» توضیح داده شده است، پیادهسازی کنید. برای مثال، اگر یک servlet را از کلاس دیگری ارثبری میکنید، ممکن است نخواهید ازDataSourceServletارثبری کنید. - اگر نمیخواهید از سرولت استفاده کنید، به پیادهسازی منبع داده غیر سرولت مراجعه کنید.
- برای یادگیری نحوهی ارسال پارامترها از یک برنامه به یک منبع داده، به بخش ارسال پارامترها به
DataTableGenerator.generateDataTableمراجعه کنید.