이 섹션에서는 라이브러리와 함께 제공되는 데이터 소스의 가장 간단한 예시 구현인 SimpleExampleServlet를 소개합니다. 이 섹션에서는 SimpleExampleServlet를 실행하고 테스트하는 방법에 관한 단계별 안내도 제공합니다.
SimpleExampleServlet 소개
SimpleExampleServlet 클래스는 examples 패키지에 있습니다. 이 클래스는 데이터 소스의 가장 간단한 구현의 예를 제공합니다. SimpleExampleServlet는 DataSourceServlet에서 상속되고 generateDataTable()을 구현하며 서블릿 컨테이너 내에서 실행해야 합니다.
SimpleExampleServlet 스니펫은 아래에 제공됩니다. generateDataTable 함수는 라이브러리에 데이터를 노출합니다. 이 함수는 데이터 테이블 설명을 만들고, 데이터 테이블 열을 정의하고, 데이터 테이블을 데이터로 채웁니다.
라이브러리는 데이터 테이블을 쿼리 시각화로 반환하는 데 필요한 다른 모든 작업을 처리합니다.
// This example extends DataSourceServlet public class SimpleExampleServlet extends DataSourceServlet { @Override public DataTable generateDataTable(Query query, HttpServletRequest request) { // Create a data table, DataTable data = new DataTable(); ArrayListcd = new ArrayList (); cd.add(new ColumnDescription("name", ValueType.TEXT, "Animal name")); cd.add(new ColumnDescription("link", ValueType.TEXT, "Link to wikipedia")); cd.add(new ColumnDescription("population", ValueType.NUMBER, "Population size")); cd.add(new ColumnDescription("vegeterian", ValueType.BOOLEAN, "Vegetarian?")); data.addColumns(cd); // Fill the data table. try { data.addRowFromValues("Aye-aye", "http://en.wikipedia.org/wiki/Aye-aye", 100, true); data.addRowFromValues("Sloth", "http://en.wikipedia.org/wiki/Sloth", 300, true); data.addRowFromValues("Leopard", "http://en.wikipedia.org/wiki/Leopard", 50, false); data.addRowFromValues("Tiger", "http://en.wikipedia.org/wiki/Tiger", 80, false); } catch (TypeMismatchException e) { System.out.println("Invalid type!"); } return data; } }
SimpleExampleServlet 실행 및 테스트
이 섹션에서는 SimpleExampleServlet를 실행하고 테스트하는 방법을 설명합니다.
아직 설치하지 않은 경우 설치 섹션에서 필수 구성요소에 관한 정보와 라이브러리를 다운로드하고 빌드하는 방법을 확인하세요. 시스템에 아직 서블릿 컨테이너가 없는 경우 서블릿 컨테이너로도 작동하는 웹 서버(예: Apache Tomcat)를 설치해야 합니다. 이 섹션의 안내는 Windows 시스템의 Apache Tomcat에만 해당됩니다.
SimpleExampleServlet를 실행하고 테스트하려면 SimpleExampleServlet 데이터 소스를 실행하는 웹 애플리케이션을 만든 다음 데이터 소스에서 쿼리된 데이터를 보여주는 시각화가 포함된 예시 웹페이지를 실행하세요. 자세한 내용은 다음 섹션을 참고하세요.
Apache Tomcat에서 웹 애플리케이션 만들기
아래 안내를 따르거나 안내를 수정하여 Apache Tomcat에서 웹 애플리케이션을 만드세요. 다음 안내는 Windows 시스템의 Apache Tomcat에만 적용됩니다.
- Tomcat을 설치한 디렉터리로 이동합니다. 이 문서는
<tomcat_home>로 작성됩니다.
webapps하위 디렉터리로 이동합니다.
myWebApp라는 하위 디렉터리를 만듭니다.
- 방금 만든 하위 디렉터리로 변경하고
WEB-INF라는 다른 하위 디렉터리를 만듭니다.
WEB-INF하위 디렉터리로 변경하고lib이라는 다른 하위 디렉터리를 만듭니다.
전체 경로는<tomcat_home>/webapps/myWebApp/WEB-INF/lib이어야 합니다.
web.xml을<data_source_library_install>/examples/src/html에서WEB-INF디렉터리로 복사합니다. 여기서<data_source_library_install>은 데이터 소스 라이브러리를 설치한 디렉터리입니다.web.xml의 다음 줄은SimpleExampleServlet를 정의하고 매핑합니다.
<servlet>
  <servlet-name>My Servlet</servlet-name>
  <description>My servlet description.</description>
  <servlet-class>SimpleExampleServlet</servlet-class>
</servlet>

<servlet-mapping>
  <servlet-name>My Servlet</servlet-name>
  <url-pattern>/simpleexample</url-pattern>
</servlet-mapping>
- 데이터 소스 라이브러리를 설치한 디렉터리로 이동합니다.
이 문서는
<data_source_library_install>로 작성됩니다.
- 모든 종속 항목 패키지를
<tomcat_home>/webapps/myWebApp/WEB-INF/lib에 복사합니다. 패키지는 다른 디렉터리에 넣지 않는 한<data_source_library_install>/lib에 설치됩니다.
- 라이브러리를 직접 빌드한 경우
<data_source_library_install>/build
에서<tomcat_home>/webapps/myWebApp/WEB-INF/lib로visualization-datasource-1.0.2.jar및visualization-datasource-examples.jar
를 복사합니다.
ZIP 파일의 압축을 푼 경우<data_source_library_install>에서<tomcat_home>/webapps/myWebApp/WEB-INF/lib로visualization-datasource-1.0.2.jar및visualization-datasource-examples.jar를 복사합니다.
jar 파일 이름의 버전 번호는 최신 버전 번호에 따라 다를 수 있습니다.
- Tomcat을 시작하거나 Tomcat이 이미 실행 중인 경우 Tomcat을 다시 시작합니다.
- 다음 링크를 클릭합니다.
http://localhost:8080/myWebApp/simpleexample
화면 너비에 따라 6~7줄의 텍스트가 표시됩니다.
텍스트는google.visualization.Query.setResponse로 시작하고
/Tiger'},{v:80.0},{v:false}]}]}});로 끝납니다.
이는 데이터 소스에서 쿼리 시각화로 반환되는 데이터입니다.
시각화를 사용하여 데이터 보기
<data_source_library_install>/examples/src/html 디렉터리의 getting_started.html 파일을 사용하여 데이터 시각화를 볼 수 있습니다. getting_started.html에서 가져온 다음 줄은 사용할 서블릿을 지정합니다. 서블릿 매핑은 Apache Tomcat에서 웹 애플리케이션 만들기의 8단계에서 설정했습니다.
var query = new google.visualization.Query('simpleexample');
시각화 지정 및 쿼리 언어 사용 방법에 대한 자세한 내용은 차트 사용 및 쿼리 언어 참조를 참고하세요.
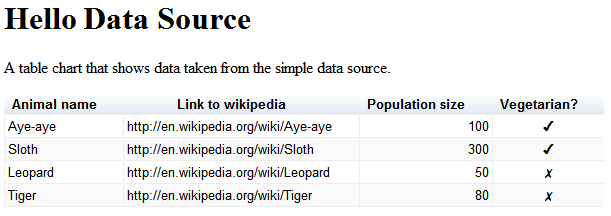
아래 안내를 따르거나 안내에 따라 데이터 소스에서 제공하는 데이터의 시각화를 확인하세요.
<data_source_library_install>/examples/src/html디렉터리
에서<tomcat_home>/webapps/myWebApp/디렉터리로getting_started.html파일을 복사합니다.
- http://localhost:8080/myWebApp/getting_started.html 링크를 클릭하면 다음이 표시됩니다.
이제 시작되었습니다. 첫 번째 데이터 소스를 설정했습니다.
다음 단계
다음 예는 외부 데이터 스토어 사용 섹션에 설명되어 있습니다. 또는 소개로 돌아가거나 다음 링크를 살펴볼 수 있습니다.
- 라이브러리에서 가장 일반적으로 사용되는 클래스에 관한 소개는 주요 클래스를 참고하세요.
- 자체 이벤트 흐름을 구현하고 기능을 쿼리하는 방법의 예는 기능 및 이벤트 흐름 정의를 참고하세요.
DataSourceServlet에서 상속받고 싶지 않다면 자체 서블릿 사용에 설명된 대로 데이터 소스를 구현하면 됩니다. 예를 들어 다른 클래스에서 서블릿을 상속하는 경우DataSourceServlet에서 상속하지 않을 수 있습니다.- 서블릿을 사용하지 않으려면 서블릿이 아닌 데이터 소스 구현을 참고하세요.
- 애플리케이션에서 데이터 소스로 매개변수를 전달하는 방법을 알아보려면
DataTableGenerator.generateDataTable에 매개변수 전달을 참고하세요.