本教程介绍了如何在网站上设置 purchase 事件,以便衡量用户何时进行了购买。本教程介绍了一些维度
指标,以及 Google Analytics 填充事件数据的报告。学习内容
如需详细了解电子商务事件,请参阅衡量电子商务。
准备工作
本教程假定您已完成以下操作:
此外,本教程还假定您满足以下条件:
- 拥有网站源代码的访问权限
- 拥有 Google Analytics 账号的“编辑者”(或更高级别)角色
第 1 步:将事件添加到网站中
您应将 purchase 事件放置在网站中发生用户购买事件的网页上。例如,您可以在用户购买时显示的确认页面上添加该事件。本教程介绍了如何将该事件添加到用户点击“购买”按钮时所在的网页。
将该事件放置在 <body> 标记末尾的 <script> 标记中。将
事件在网页加载时触发该事件。<script>通过
下一部分介绍了如何在用户点击“购买”时触发该事件。
<!--
  Note: In the following code sample, make sure to
  replace "TAG_ID" with your tag ID.
  Learn more: https://support.google.com/tagmanager/answer/12326985
-->
<!DOCTYPE html>
<html lang="en">
<head>
    <!-- Google tag (gtag.js) -->
    <script async src="https://www.googletagmanager.com/gtag/js?id=TAG_ID"></script>
    <script>
        window.dataLayer = window.dataLayer || [];
        function gtag(){dataLayer.push(arguments);}
        gtag('js', new Date());

        gtag('config', 'TAG_ID');
    </script>
</head>
<body>
    <div>This is where the purchase form would go</div>
    <button>Submit</button>
    <script>
    gtag("event", "purchase", {
        transaction_id: "T_12345_1",
        value: 30.03,
        tax: 4.90,
        shipping: 5.99,
        currency: "USD",
        coupon: "SUMMER_SALE",
        items: [
        // If someone purchases more than one item,
        // you can add those items to the items array
         {
          item_id: "SKU_12345",
          item_name: "Stan and Friends Tee",
          affiliation: "Google Merchandise Store",
          coupon: "SUMMER_FUN",
          discount: 2.22,
          index: 0,
          item_brand: "Google",
          item_category: "Apparel",
          item_category2: "Adult",
          item_category3: "Shirts",
          item_category4: "Crew",
          item_category5: "Short sleeve",
          item_list_id: "related_products",
          item_list_name: "Related Products",
          item_variant: "green",
          location_id: "ChIJIQBpAG2ahYAR_6128GcTUEo",
          price: 10.01,
          quantity: 3
        }]
    });
    </script>
</body>
</html>
第 2 步:将事件与按钮相关联
您可以通过几种方式设置 purchase 事件,让该事件在用户点击“购买”按钮时触发。一种方式是向“购买”按钮添加一个 ID,然后将事件代码放置在事件监听器中。在以下示例中,仅当用户点击包含 ID purchase 的按钮时,系统才会发送该事件。
<!--
  Note: In the following code sample, make sure to
  replace "TAG_ID" with your tag ID.
  Learn more: https://support.google.com/tagmanager/answer/12326985
-->
<!DOCTYPE html>
<html lang="en">
<head>
    <!-- Google tag (gtag.js) -->
    <script async src="https://www.googletagmanager.com/gtag/js?id=TAG_ID"></script>
    <script>
        window.dataLayer = window.dataLayer || [];
        function gtag(){dataLayer.push(arguments);}
        gtag('js', new Date());

        gtag('config', 'TAG_ID');
    </script>
</head>
<body>
    <div>This is where the purchase form would go</div>
    <button id="purchase">Purchase</button>
    <script>
    document.getElementById("purchase").addEventListener("click", function () {
        gtag("event", "purchase", {
                // This purchase event uses a different transaction ID
                // from the previous purchase event so Analytics
                // doesn't deduplicate the events.
                // Learn more: https://support.google.com/analytics/answer/12313109
                transaction_id: "T_12345_2",
                value: 30.03,
                tax: 4.90,
                shipping: 5.99,
                currency: "USD",
                coupon: "SUMMER_SALE",
                items: [
                {
                  item_id: "SKU_12345",
                  item_name: "Stan and Friends Tee",
                  affiliation: "Google Merchandise Store",
                  coupon: "SUMMER_FUN",
                  discount: 2.22,
                  index: 0,
                  item_brand: "Google",
                  item_category: "Apparel",
                  item_category2: "Adult",
                  item_category3: "Shirts",
                  item_category4: "Crew",
                  item_category5: "Short sleeve",
                  item_list_id: "related_products",
                  item_list_name: "Related Products",
                  item_variant: "green",
                  location_id: "ChIJIQBpAG2ahYAR_6128GcTUEo",
                  price: 10.01,
                  quantity: 3
                }]
          });
      });
    </script>
</body>
</html>
第 3 步:验证是否可以收集数据
DebugView 报告会显示来自您网站的实时数据,以便您
确保正确设置事件要在网页上启用调试模式,请将
将以下 debug_mode 参数添加到 config 命令中:
<!--
  Note: In the following code sample, make sure to
  replace "TAG_ID" with your tag ID.
  Learn more: https://support.google.com/tagmanager/answer/12326985
-->
<!DOCTYPE html>
<html lang="en">
<head>
    <!-- Google tag (gtag.js) -->
    <script async src="https://www.googletagmanager.com/gtag/js?id=TAG_ID"></script>
    <script>
        window.dataLayer = window.dataLayer || [];
        function gtag(){dataLayer.push(arguments);}
        gtag('js', new Date());

        gtag('config', 'TAG_ID',{ 'debug_mode': true });
    </script>
</head>
<body>
    <div>This is where the purchase form would go</div>
    <button id="purchase">Purchase</button>
    <script>
    document.getElementById("purchase").addEventListener("click", function () {
        gtag("event", "purchase", {
                // This purchase event uses a different transaction ID
                // from the previous purchase event so Analytics
                // doesn't deduplicate the events.
                // Learn more: https://support.google.com/analytics/answer/12313109
                transaction_id: "T_12345_3",
                value: 30.03,
                tax: 4.90,
                shipping: 5.99,
                currency: "USD",
                coupon: "SUMMER_SALE",
                items: [
                {
                  item_id: "SKU_12345",
                  item_name: "Stan and Friends Tee",
                  affiliation: "Google Merchandise Store",
                  coupon: "SUMMER_FUN",
                  discount: 2.22,
                  index: 0,
                  item_brand: "Google",
                  item_category: "Apparel",
                  item_category2: "Adult",
                  item_category3: "Shirts",
                  item_category4: "Crew",
                  item_category5: "Short sleeve",
                  item_list_id: "related_products",
                  item_list_name: "Related Products",
                  item_variant: "green",
                  location_id: "ChIJIQBpAG2ahYAR_6128GcTUEo",
                  price: 10.01,
                  quantity: 3
                }]
        });
    });
    </script>
</body>
</html>
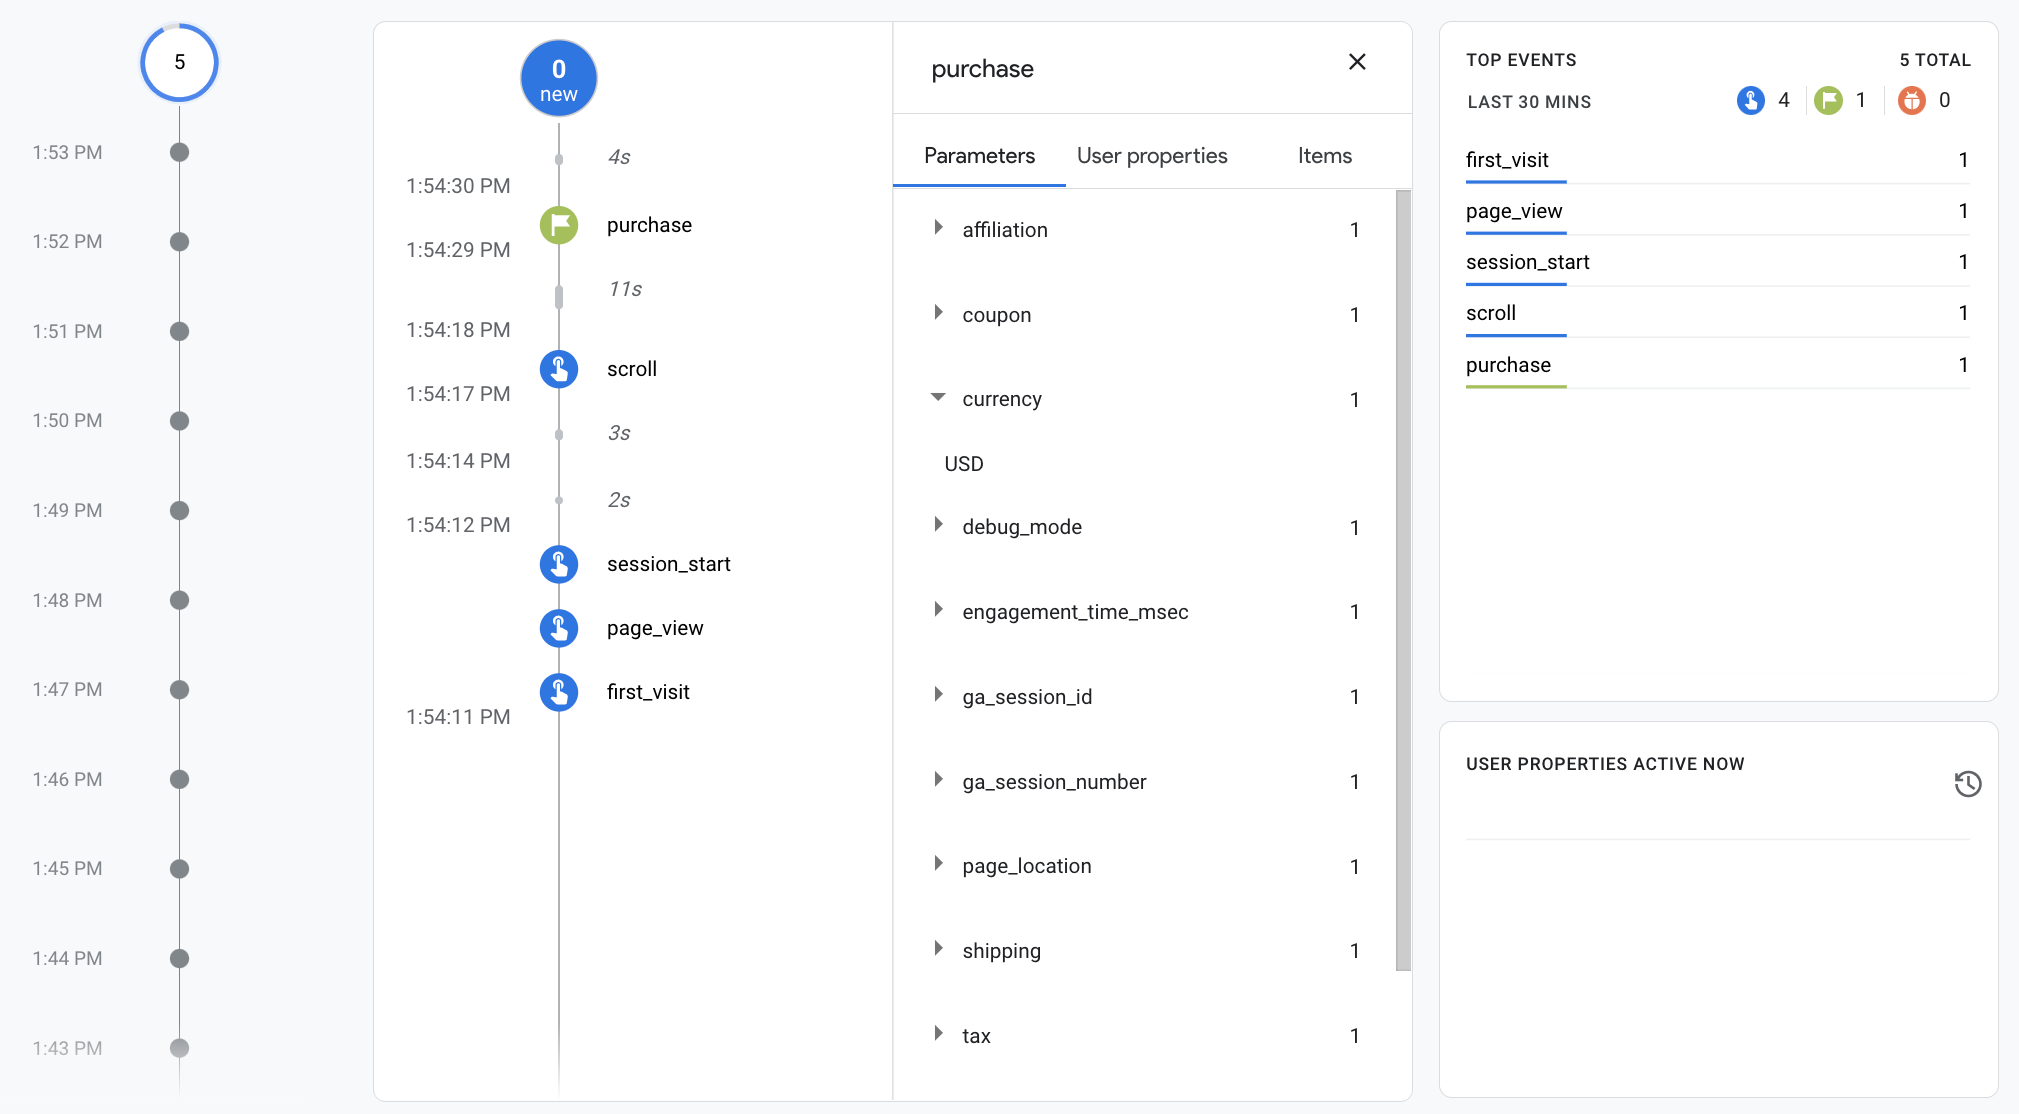
启用调试模式后,当用户使用您的网站时,您将开始看到事件数据填充到 DebugView 报告中。例如,用户点击您网站上的“购买”按钮时,系统会将以下数据填充到该报告中。您可以选择某个事件,以查看与该事件关联的参数、用户属性和商品。
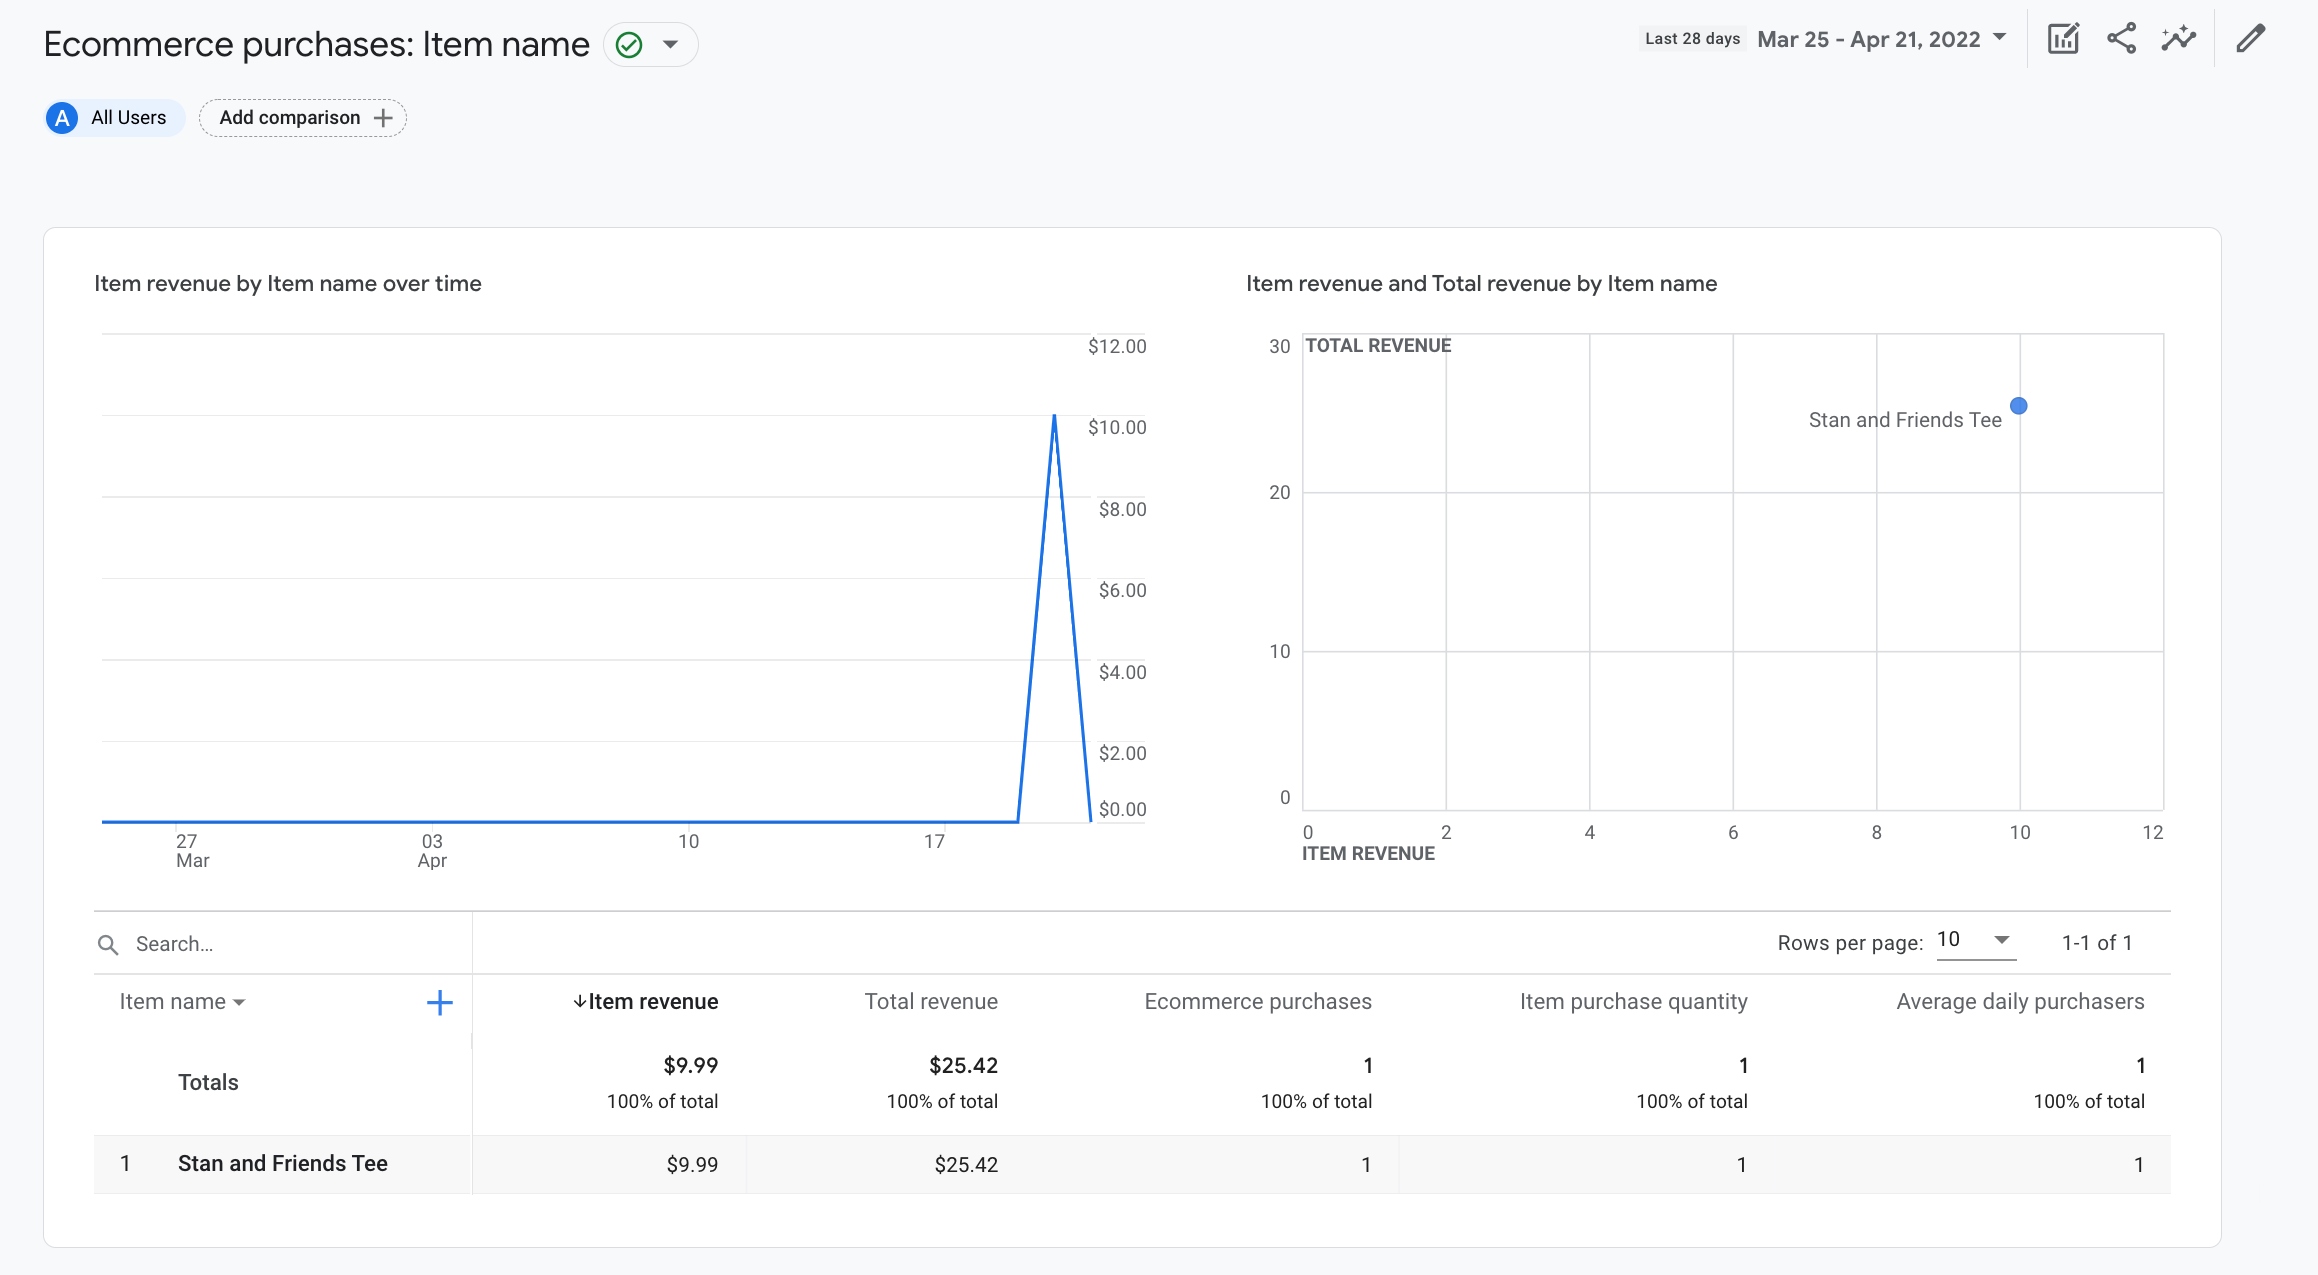
第 4 步:查看电子商务数据
大约 24 小时后,您可通过报告、探索和 Google Analytics Data API,查看与 purchase 事件一同发送的数据。您还可以在设置 BigQuery Export 时,访问 BigQuery 中的数据。
“购买”会自动填充各种预构建的维度
和指标,在报告和探索中使用。通过
下面列举了部分维度填充了来自
purchase 事件:
| 参数 | 维度 | 值 |
|---|---|---|
affiliation |
商品关联商户 | Google Merchandise Store |
currency |
币种 | USD |
discount |
商品折扣金额 | 2.22 |
index |
商品列表位置 | 0 |
item_brand |
商品品牌 | |
item_category |
商品类别 | Apparel |
item_id |
商品 ID | SKU_12345 |
item_list_id |
商品列表 ID | related_products |
item_list_name |
商品列表名称 | Related Products |
item_name |
商品名称 | Stan and Friends Tee |
item_variant |
商品款式 | green |
location_id |
商品位置 ID | ChIJIQBpAG2ahYAR_6128GcTUEo(旧金山对应的 Google 地点 ID) |
shipping |
运费 | 5.99 |
tax |
税额 | 4.90 |
transaction_id |
交易 ID | T_12345 |
除了维度之外,Google Analytics 还会填充多种与电子商务和收入相关的指标。例如,如果用户点击“购买”按钮一次,Google Analytics 中便会填充以下指标:
- “商品收入”指标的值为 $30.03
- 总收入指标的值为 30.03 美元
- “电子商务购买次数”指标的值为 1
您可以使用这些维度和指标来构建探索和自定义 报告,但您也可以使用以下预构建的电子商务购买 报告来查看电子商务数据: