
In diesem Tutorial erfahren Sie, wie Sie in Ihre Android-App eine Google-Karte mit einer Markierung für einen bestimmten Ort einbinden.
Im Rahmen dieses Tutorials wird eine Android-App mithilfe des Maps SDK for Android erstellt. Die empfohlene Entwicklungsumgebung ist Android Studio.
Code abrufen
So sieht die Java-Version der Aktivität aus:
// Copyright 2020 Google LLC // // Licensed under the Apache License, Version 2.0 (the "License"); // you may not use this file except in compliance with the License. // You may obtain a copy of the License at // // http://www.apache.org/licenses/LICENSE-2.0 // // Unless required by applicable law or agreed to in writing, software // distributed under the License is distributed on an "AS IS" BASIS, // WITHOUT WARRANTIES OR CONDITIONS OF ANY KIND, either express or implied. // See the License for the specific language governing permissions and // limitations under the License. package com.example.mapwithmarker; import android.os.Bundle; import androidx.appcompat.app.AppCompatActivity; import com.google.android.gms.maps.CameraUpdateFactory; import com.google.android.gms.maps.GoogleMap; import com.google.android.gms.maps.OnMapReadyCallback; import com.google.android.gms.maps.SupportMapFragment; import com.google.android.gms.maps.model.LatLng; import com.google.android.gms.maps.model.MarkerOptions; /** * An activity that displays a Google map with a marker (pin) to indicate a particular location. */ public class MapsMarkerActivity extends AppCompatActivity implements OnMapReadyCallback { @Override protected void onCreate(Bundle savedInstanceState) { super.onCreate(savedInstanceState); // Retrieve the content view that renders the map. setContentView(R.layout.activity_maps); // Get the SupportMapFragment and request notification when the map is ready to be used. SupportMapFragment mapFragment = (SupportMapFragment) getSupportFragmentManager() .findFragmentById(R.id.map); mapFragment.getMapAsync(this); } /** * Manipulates the map when it's available. * The API invokes this callback when the map is ready to be used. * This is where we can add markers or lines, add listeners or move the camera. In this case, * we just add a marker near Sydney, Australia. * If Google Play services is not installed on the device, the user receives a prompt to install * Play services inside the SupportMapFragment. The API invokes this method after the user has * installed Google Play services and returned to the app. */ @Override public void onMapReady(GoogleMap googleMap) { // Add a marker in Sydney, Australia, // and move the map's camera to the same location. LatLng sydney = new LatLng(-33.852, 151.211); googleMap.addMarker(new MarkerOptions() .position(sydney) .title("Marker in Sydney")); googleMap.moveCamera(CameraUpdateFactory.newLatLng(sydney)); } }
Die Kotlin-Version der Aktivität sieht so aus:
// Copyright 2020 Google LLC // // Licensed under the Apache License, Version 2.0 (the "License"); // you may not use this file except in compliance with the License. // You may obtain a copy of the License at // // http://www.apache.org/licenses/LICENSE-2.0 // // Unless required by applicable law or agreed to in writing, software // distributed under the License is distributed on an "AS IS" BASIS, // WITHOUT WARRANTIES OR CONDITIONS OF ANY KIND, either express or implied. // See the License for the specific language governing permissions and // limitations under the License. package com.example.mapwithmarker import android.os.Bundle import android.widget.Toast import androidx.appcompat.app.AppCompatActivity import com.google.android.gms.maps.CameraUpdateFactory import com.google.android.gms.maps.GoogleMap import com.google.android.gms.maps.OnMapReadyCallback import com.google.android.gms.maps.SupportMapFragment import com.google.android.gms.maps.model.LatLng import com.google.android.gms.maps.model.MarkerOptions /** * An activity that displays a Google map with a marker (pin) to indicate a particular location. */ class MapsMarkerActivity : AppCompatActivity(), OnMapReadyCallback { override fun onCreate(savedInstanceState: Bundle?) { super.onCreate(savedInstanceState) // Retrieve the content view that renders the map. setContentView(R.layout.activity_maps) // Get the SupportMapFragment and request notification when the map is ready to be used. val mapFragment = supportFragmentManager.findFragmentById(R.id.map) as? SupportMapFragment mapFragment?.getMapAsync(this) } override fun onMapReady(googleMap: GoogleMap) { val sydney = LatLng(-33.852, 151.211) googleMap.addMarker( MarkerOptions() .position(sydney) .title("Marker in Sydney") ) googleMap.moveCamera(CameraUpdateFactory.newLatLng(sydney)) } }
Entwicklungsprojekt einrichten
Führen Sie die folgenden Schritte aus, um das Tutorialprojekt in Android Studio zu erstellen.
- Laden Sie Android Studio herunter und installieren Sie es.
- Fügen Sie das Paket Google Play-Dienste in Android Studio ein.
- Klonen Sie das Repository „Google Maps Android API v2 Samples“ oder laden Sie es herunter, sofern Sie das nicht schon zu Beginn dieses Tutorials getan haben.
Tutorialprojekt importieren:
- Wählen Sie in Android Studio File > New > Import Project aus.
- Gehen Sie zu dem Speicherort, an dem Sie das Repository „Google Maps Android API v2 Samples“ nach dem Download gespeichert haben.
- Suchen Sie nach dem Projekt MapWithMarker unter:
PATH-TO-SAVED-REPO/android-samples/tutorials/java/MapWithMarker(Java) oder
PATH-TO-SAVED-REPO/android-samples/tutorials/kotlin/MapWithMarker(Kotlin) - Wählen Sie das Projektverzeichnis aus und klicken Sie auf Open. Ihr Projekt wird jetzt mit dem Build-Tool „Gradle“ in Android Studio erstellt.
Erforderliche APIs aktivieren und API-Schlüssel anfordern
Als letzten Schritt benötigen Sie noch ein Google Cloud-Projekt mit den erforderlichen, aktivierten APIs und einen API-Schlüssel, der zum Verwenden des Maps SDK for Android berechtigt. Weitere Informationen finden Sie hier:
API-Schlüssel in die App einfügen
- Öffnen Sie die
local.properties-Datei Ihres Projekts. Fügen Sie den folgenden String ein und ersetzen Sie dabei
YOUR_API_KEYdurch den Wert Ihres API-Schlüssels:MAPS_API_KEY=YOUR_API_KEYWenn Sie Ihre App erstellen, wird der API-Schlüssel über das Secrets Gradle-Plug-in für Android kopiert und dann als Build-Variable im Android-Manifest zur Verfügung gestellt. Dies wird weiter unten genauer beschrieben.
App erstellen und ausführen
So erstellen Sie die App und führen sie aus:
Verbinden Sie ein Android-Gerät mit Ihrem Computer. Folgen Sie dieser Anleitung, um Entwickleroptionen auf Ihrem Android-Gerät zu aktivieren und Ihr System so zu konfigurieren, dass das Gerät erkannt wird.
Alternativ können Sie mit Android Virtual Device (AVD) Manager ein virtuelles Gerät konfigurieren. Beim Auswählen eines Emulators müssen Sie ein Image angeben, das die Google APIs enthält. Weitere Informationen finden Sie unter Android Studio-Projekt einrichten.
Klicken Sie in Android Studio auf die Menüoption Run oder das Wiedergabesymbol. Wählen Sie ein Gerät aus, wenn Sie dazu aufgefordert werden.
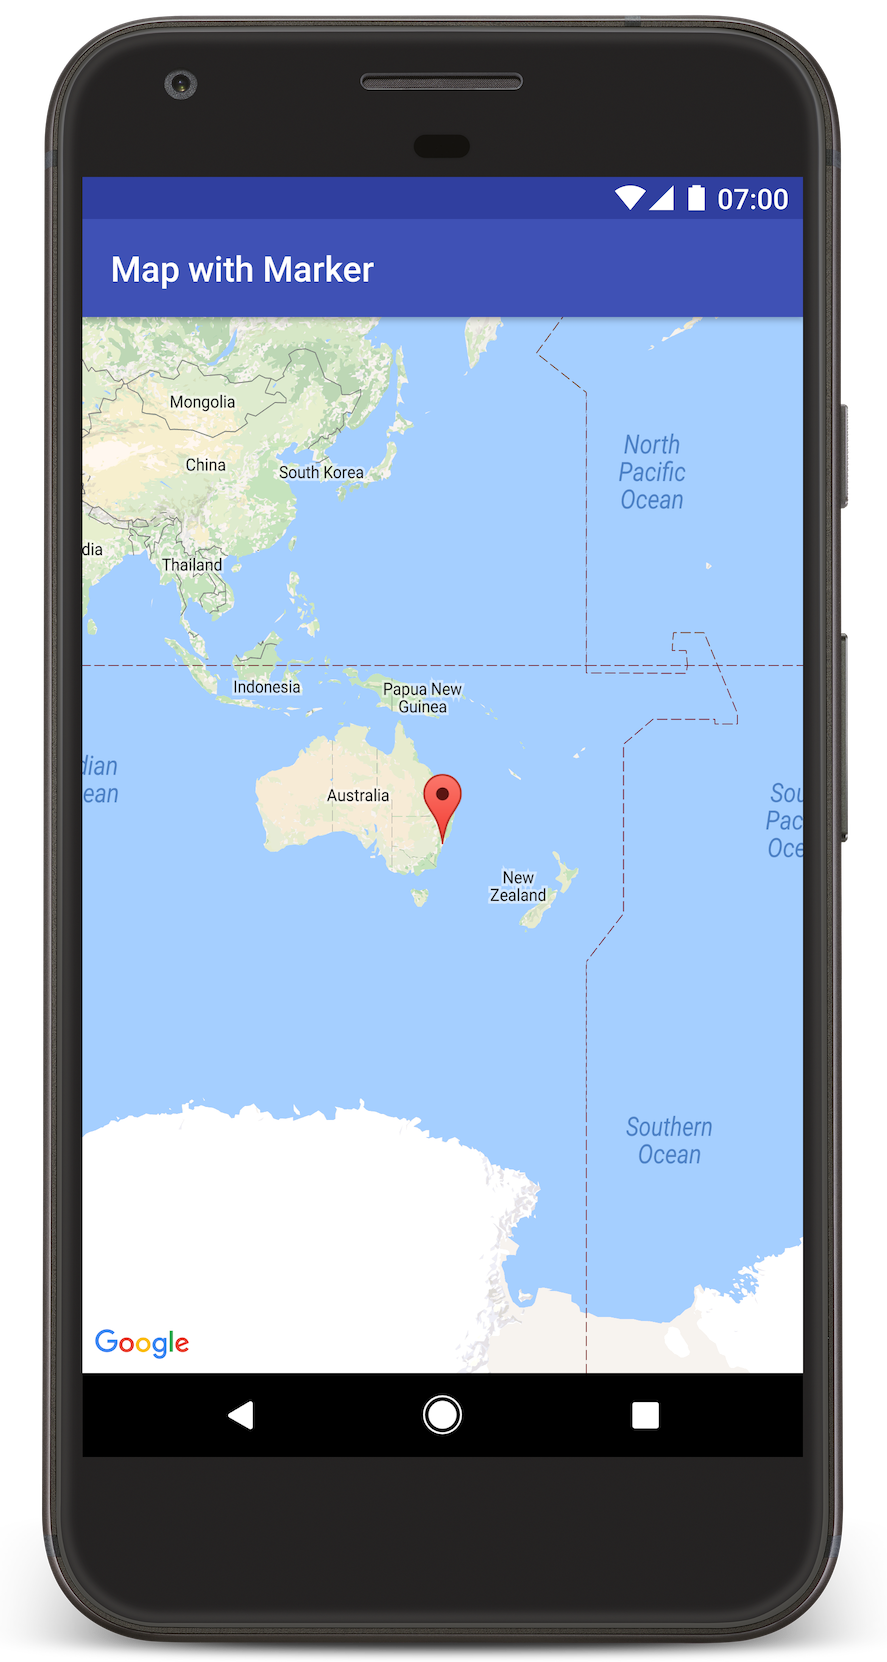
In Android Studio wird Gradle aufgerufen, um die App zu erstellen. Dann wird die App auf dem Gerät oder im Emulator ausgeführt. Es sollte eine Karte mit einer Markierung für Sydney an der Ostküste Australiens angezeigt werden, ähnlich wie das Bild auf dieser Seite.
Fehlerbehebung:
- Wenn Sie keine Karte sehen, prüfen Sie, ob Sie einen API-Schlüssel erhalten und ihn wie oben beschrieben in die App eingefügt haben. Prüfen Sie, ob es im Protokoll im Android Monitor von Android Studio Fehlermeldungen zum API-Schlüssel gibt.
- Verwenden Sie die Fehlerbehebungstools in Android Studio, um Protokolle aufzurufen und Fehler in der App zu beheben.
Wichtigste Code-Elemente für die App-Erstellung
In diesem Teil des Tutorials werden die wichtigsten Elemente der App MapWithMarker beschrieben, damit Sie besser verstehen, wie Sie eine ähnliche App erstellen können.
Mit dem Android-Manifest arbeiten
Fügen Sie die folgenden Elemente in die Datei AndroidManifest.xml Ihrer App ein:
Ein
meta-data-Element, um die Version der Google Play-Dienste einzubetten, mit der die App kompiliert wurde.<meta-data android:name="com.google.android.gms.version" android:value="@integer/google_play_services_version" />Ein
meta-data-Element, um den API-Schlüssel anzugeben. Im Beispiel in diesem Tutorial wird der Wert für den API-Schlüssel einer Build-Variablen zugeordnet, die dem Namen des zuvor definierten Schlüssels entspricht:MAPS_API_KEY. Wenn Sie Ihre App erstellen, werden die Schlüssel in Ihrerlocal.properties-Datei über das Secrets Gradle-Plug-in für Android als Manifest-Build-Variable verfügbar gemacht.<meta-data android:name="com.google.android.geo.API_KEY" android:value="${MAPS_API_KEY}" />In der
build.gradle-Datei wird der API-Schlüssel von der folgenden Zeile an Ihr Android-Manifest übergeben:id 'com.google.android.libraries.mapsplatform.secrets-gradle-plugin'
Hier sehen Sie ein Beispiel eines vollständigen Manifests:
<?xml version="1.0" encoding="utf-8"?>
<!--
 Copyright 2020 Google LLC

 Licensed under the Apache License, Version 2.0 (the "License");
 you may not use this file except in compliance with the License.
 You may obtain a copy of the License at

      http://www.apache.org/licenses/LICENSE-2.0

 Unless required by applicable law or agreed to in writing, software
 distributed under the License is distributed on an "AS IS" BASIS,
 WITHOUT WARRANTIES OR CONDITIONS OF ANY KIND, either express or implied.
 See the License for the specific language governing permissions and
 limitations under the License.
-->

<manifest xmlns:android="http://schemas.android.com/apk/res/android">

    <application
        android:allowBackup="true"
        android:icon="@mipmap/ic_launcher"
        android:label="@string/app_name"
        android:supportsRtl="true"
        android:theme="@style/AppTheme">

        <meta-data
            android:name="com.google.android.gms.version"
            android:value="@integer/google_play_services_version" />

        <!--
             The API key for Google Maps-based APIs.
        -->
        <meta-data
            android:name="com.google.android.geo.API_KEY"
            android:value="${MAPS_API_KEY}" />

        <activity
            android:name=".MapsMarkerActivity"
            android:label="@string/title_activity_maps"
            android:exported="true">
            <intent-filter>
                <action android:name="android.intent.action.MAIN" />

                <category android:name="android.intent.category.LAUNCHER" />
            </intent-filter>
        </activity>
    </application>

</manifest>
Karte hinzufügen
Rufen Sie mit dem Maps SDK for Android eine Karte auf.
Fügen Sie der Layoutdatei
activity_maps.xmlIhrer Aktivität ein<fragment>-Element hinzu. Mit diesem Element wird einSupportMapFragmentdefiniert, das als Container für die Karte fungiert und Zugriff auf dasGoogleMap-Objekt bietet. In diesem Tutorial wird die Version der Android Support Library des Kartenfragments verwendet, um die Abwärtskompatibilität mit früheren Versionen des Android-Frameworks sicherzustellen.<!-- Copyright 2020 Google LLC Licensed under the Apache License, Version 2.0 (the "License"); you may not use this file except in compliance with the License. You may obtain a copy of the License at http://www.apache.org/licenses/LICENSE-2.0 Unless required by applicable law or agreed to in writing, software distributed under the License is distributed on an "AS IS" BASIS, WITHOUT WARRANTIES OR CONDITIONS OF ANY KIND, either express or implied. See the License for the specific language governing permissions and limitations under the License. --> <fragment xmlns:android="http://schemas.android.com/apk/res/android" xmlns:tools="http://schemas.android.com/tools" android:id="@+id/map" android:name="com.google.android.gms.maps.SupportMapFragment" android:layout_width="match_parent" android:layout_height="match_parent" tools:context="com.example.mapwithmarker.MapsMarkerActivity" />
Legen Sie in der
onCreate()-Methode die Layoutdatei als Inhaltsansicht fest: Erstellen Sie einen Handle für das Kartenfragment, indem SieFragmentManager.findFragmentById()aufrufen. Registrieren Sie sich dann mitgetMapAsync()für den Karten-Callback:Java
@Override protected void onCreate(Bundle savedInstanceState) { super.onCreate(savedInstanceState); // Retrieve the content view that renders the map. setContentView(R.layout.activity_maps); // Get the SupportMapFragment and request notification when the map is ready to be used. SupportMapFragment mapFragment = (SupportMapFragment) getSupportFragmentManager() .findFragmentById(R.id.map); mapFragment.getMapAsync(this); }
Kotlin
override fun onCreate(savedInstanceState: Bundle?) { super.onCreate(savedInstanceState) // Retrieve the content view that renders the map. setContentView(R.layout.activity_maps) // Get the SupportMapFragment and request notification when the map is ready to be used. val mapFragment = supportFragmentManager.findFragmentById(R.id.map) as? SupportMapFragment mapFragment?.getMapAsync(this) }
Implementieren Sie die
OnMapReadyCallback-Oberfläche und überschreiben Sie dieonMapReady()-Methode, um die Karte einzurichten, wenn dasGoogleMap-Objekt verfügbar ist:Java
public class MapsMarkerActivity extends AppCompatActivity implements OnMapReadyCallback { // ... @Override public void onMapReady(GoogleMap googleMap) { LatLng sydney = new LatLng(-33.852, 151.211); googleMap.addMarker(new MarkerOptions() .position(sydney) .title("Marker in Sydney")); } }
Kotlin
class MapsMarkerActivity : AppCompatActivity(), OnMapReadyCallback { // ... override fun onMapReady(googleMap: GoogleMap) { val sydney = LatLng(-33.852, 151.211) googleMap.addMarker( MarkerOptions() .position(sydney) .title("Marker in Sydney") ) } }
Standardmäßig wird vom Maps SDK for Android der Inhalt des Infofensters angezeigt, wenn der Nutzer auf eine Markierung tippt. Wenn Sie mit dem Standardverhalten zufrieden sind, müssen Sie keinen Klick-Listener für die Markierung hinzufügen.
Nächste Schritte
Beschäftigen Sie sich ausführlicher mit dem Thema Map-Objekt und den Möglichkeiten, die Markierungen bieten.