總覽
有了精細權限,消費者就能更精確地控管要與各個應用程式分享哪些帳戶資料。這項功能提供更完善的控制權、透明度和安全性,對使用者和開發人員都有好處。本指南將說明成功更新應用程式以處理精細權限時,必須進行的變更和步驟。
什麼是精細權限?
假設您開發的效率提升應用程式同時要求電子郵件和日曆範圍。使用者可能只希望透過您的應用程式存取 Google 日曆,而非 Gmail。透過精細的 OAuth 權限,使用者可以選擇只授予 Google 日曆權限,但不要授予 Gmail 權限。讓使用者授予特定資料的存取權,可減少資料暴露、增進信任感,並讓使用者以隱私權優先的方式控管自己的數位生活。請務必設計應用程式來處理這類情況。
要求多個非登入範圍時
登入和非登入範圍
如果應用程式同時要求登入和非登入範圍,使用者會先看到登入範圍 (email、profile 和 openid) 的同意畫面。使用者同意分享基本身分資訊 (姓名、電子郵件地址和個人資料相片) 後,就會看到非登入範圍的精細權限同意畫面。在這種情況下,應用程式必須檢查使用者授予的範圍,且不得假設使用者授予所有要求的範圍。在下列範例中,網頁應用程式會要求所有三個登入範圍,以及 Google 雲端硬碟的非登入範圍。使用者同意登入範圍後,會看到 Google 雲端硬碟權限的精細權限同意畫面:

多個非登入範圍
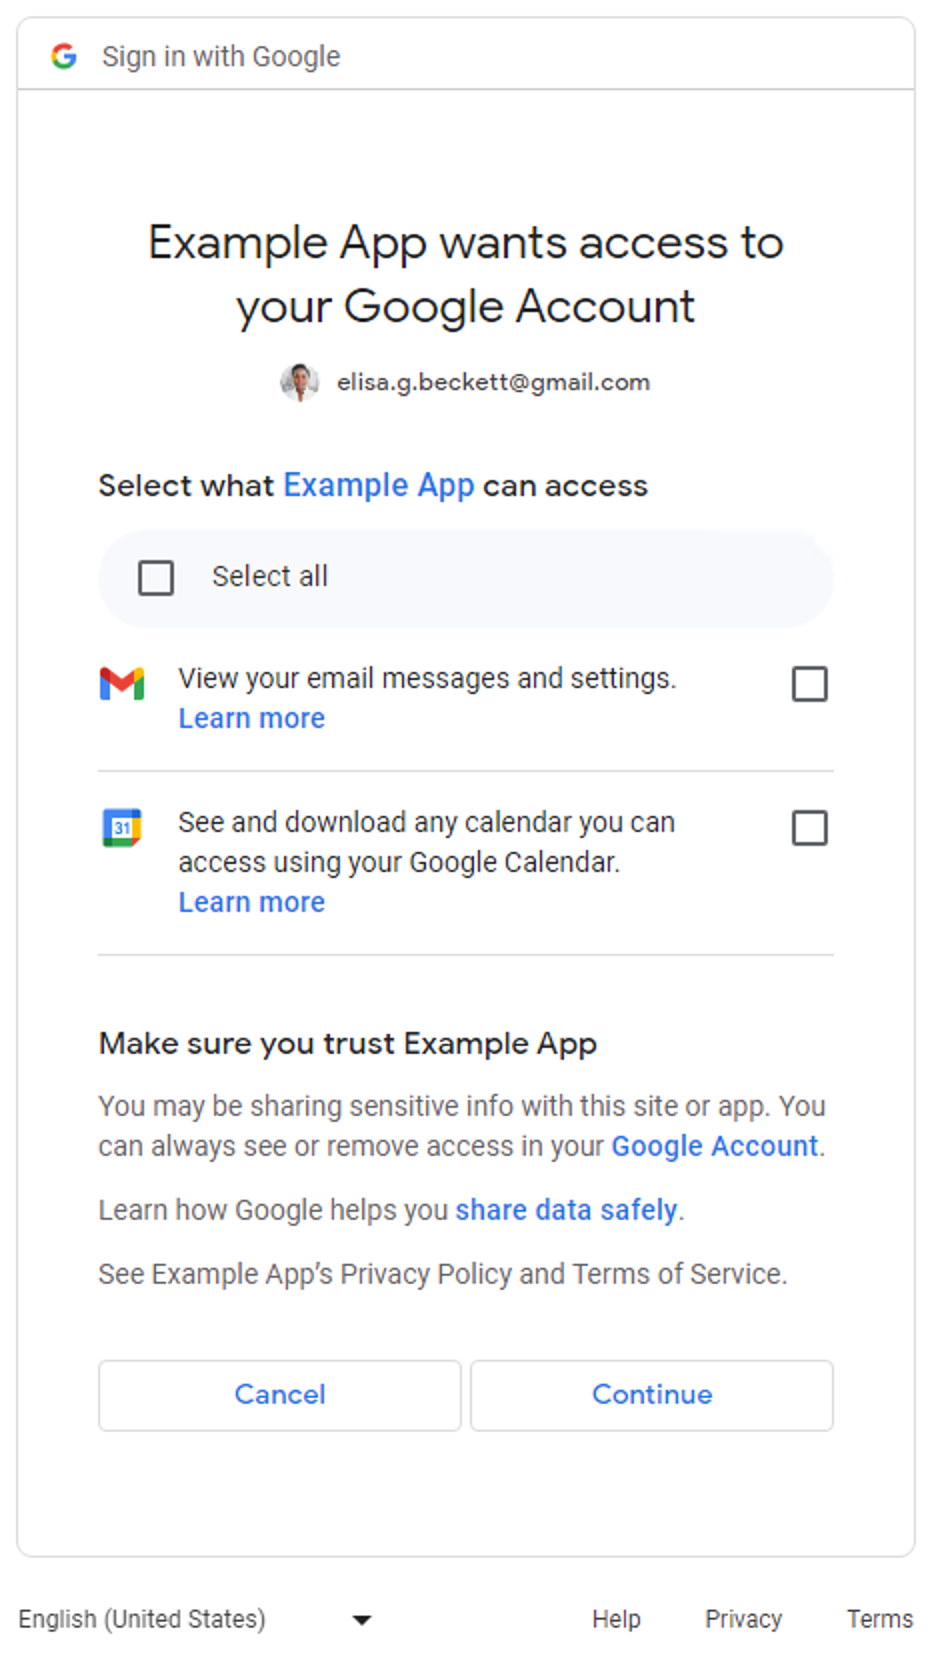
如果應用程式要求多個非登入範圍,使用者會看到精細權限同意畫面。使用者可以選取要核准哪些權限,與應用程式分享。以下是要求存取使用者 Gmail 郵件和 Google 日曆資料的細部權限同意畫面範例:
如果應用程式只要求登入範圍 (email、profile 和 openid),則不適用精細權限同意畫面。使用者可以核准或拒絕整個登入要求。換句話說,如果應用程式只要求登入範圍 (一、二或全部三個),則不適用細部權限同意畫面。
如果應用程式只要求一項非登入範圍,則不適用於細部權限同意畫面。換句話說,使用者只能核准或拒絕整個要求,同意畫面中不會顯示核取方塊。下表摘要說明何時會顯示精細權限同意畫面。
| 登入範圍數量 | 非登入範圍數量 | 精細權限同意畫面 |
|---|---|---|
| 1-3 | 0 | 不適用 |
| 1-3 | 1+ | 支援 |
| 0 | 1 | 不適用 |
| 0 | 2+ | 支援 |
判斷應用程式是否受到影響
請仔細檢查應用程式中所有使用 Google OAuth 2.0 授權端點要求權限的部分。請注意,要求多個範圍的權限會啟動精細權限同意畫面,並向使用者顯示。在這種情況下,請確保程式碼可以處理使用者只授權部分範圍的情況。
如何判斷應用程式是否使用多個範圍
檢查應用程式程式碼或外送網路呼叫,判斷應用程式發出的 Google OAuth 2.0 授權要求是否會導致系統顯示精細權限同意畫面。
檢查應用程式程式碼
請檢查應用程式程式碼中,您呼叫 Google OAuth 授權端點以要求使用者授權的部分。如果您使用 Google API 用戶端程式庫,通常可以在用戶端初始化步驟中,找到應用程式要求哪些範圍。下一節會提供幾個範例。請參閱應用程式使用的 SDK 說明文件,瞭解如何處理 Google OAuth 2.0,並根據下列範例中的指引,判斷應用程式是否受到影響。
Google Identity 服務
下列 Google Identity 服務 JavaScript 程式庫程式碼片段會使用多個非登入範圍初始化 TokenClient。當網頁應用程式要求使用者授權時,系統會顯示精細權限同意畫面。
const client = google.accounts.oauth2.initTokenClient({
  client_id: 'YOUR_CLIENT_ID',
  scope: 'https://www.googleapis.com/auth/calendar.readonly \
  https://www.googleapis.com/auth/contacts.readonly',
  callback: (response) => {
    ...
  },
});
Python
下列程式碼片段使用 google-auth-oauthlib.flow 模組建構授權要求;scope 參數包含兩個非登入範圍。當網頁應用程式要求使用者授權時,系統會顯示精細權限同意畫面。
import google.oauth2.credentials
import google_auth_oauthlib.flow

# Use the client_secret.json file to identify the application requesting
# authorization. The client ID (from that file) and access scopes are required.
flow = google_auth_oauthlib.flow.Flow.from_client_secrets_file(
    'client_secret.json',
    scopes=['https://www.googleapis.com/auth/calendar.readonly',
                    'https://www.googleapis.com/auth/contacts.readonly'])
Node.js
下列程式碼片段會建立 google.auth.OAuth2 物件,定義授權要求中的參數,這些參數的 scope 參數包含兩個非登入範圍。當網頁應用程式要求使用者授權時,系統會顯示精細權限同意畫面。
const {google} = require('googleapis');

/**
  * To use OAuth2 authentication, we need access to a CLIENT_ID, CLIENT_SECRET, AND REDIRECT_URI
  * from the client_secret.json file. To get these credentials for your application, visit
  * https://console.cloud.google.com/apis/credentials.
  */
const oauth2Client = new google.auth.OAuth2(
  YOUR_CLIENT_ID,
  YOUR_CLIENT_SECRET,
  YOUR_REDIRECT_URL
);

// Access scopes for read-only Calendar and Contacts.
const scopes = [
  'https://www.googleapis.com/auth/calendar.readonly',
  'https://www.googleapis.com/auth/contacts.readonly']
];

// Generate a url that asks permissions
const authorizationUrl = oauth2Client.generateAuthUrl({
  // 'online' (default) or 'offline' (gets refresh_token)
  access_type: 'offline',
  /** Pass in the scopes array defined above.
    * Alternatively, if only one scope is needed, you can pass a scope URL as a string */
  scope: scopes,
  // Enable incremental authorization. Recommended as best practices.
  include_granted_scopes: true
});
檢查外送網路通話
- 網頁應用程式 - 在 Chrome 中檢查網路活動
- Android - 使用「網路檢查器」檢查網路流量
-
Chrome 應用程式
- 前往 Chrome 擴充功能頁面
- 勾選擴充功能頁面右上角的「開發人員模式」核取方塊
- 選取要監控的擴充功能
- 在擴充功能頁面的「檢查檢視畫面」部分,按一下「背景頁面」連結。
- 系統會開啟「開發人員工具」彈出式視窗,您可以在「網路」分頁中監控網路流量。
- iOS - 使用 Instruments 分析 HTTP 流量
- 電腦應用程式 - 使用網路擷取工具 適用於開發應用程式的作業系統
檢查網路呼叫時,請找出傳送至 Google OAuth 授權端點的要求,並檢查 scope 參數。
這些值會導致系統顯示細部權限同意畫面。
scope參數包含登入範圍和非登入範圍。下列範例要求包含所有三種登入範圍,以及一個非登入範圍,可查看使用者 Google 雲端硬碟檔案的中繼資料:
https://accounts.google.com/o/oauth2/v2/auth?
access_type=offline&
scope=https%3A%2F%2Fwww.googleapis.com%2Fauth%2Fuserinfo.email%20https%3A%2F%2Fwww.googleapis.com%2Fauth%2Fuserinfo.profile%20openid%20https%3A%2F%2Fwww.googleapis.com%2Fauth%2Fdrive.metadata.readonly&
include_granted_scopes=true&
response_type=code&
redirect_uri=YOUR_REDIRECT_URL&
client_id=YOUR_CLIENT_ID
scope參數包含多個非登入範圍。下列範例要求包含兩個非登入範圍,可查看使用者 Google 雲端硬碟中繼資料,以及管理特定 Google 雲端硬碟檔案:
https://accounts.google.com/o/oauth2/v2/auth?
access_type=offline&
scope=https%3A%2F%2Fwww.googleapis.com%2Fauth%2Fdrive.metadata.readonly%20https%3A%2F%2Fwww.googleapis.com%2Fauth%2Fdrive.file&
include_granted_scopes=true&
response_type=code&
redirect_uri=YOUR_REDIRECT_URL&
client_id=YOUR_CLIENT_ID
處理細部權限的最佳做法
如果您判斷應用程式需要更新才能處理細部權限,請對程式碼進行必要更新,以便正確處理多個範圍的同意聲明。所有應用程式都應遵守下列最佳做法:
- 詳閱《 Google API 服務:使用者資料政策》,並確保遵守相關規定。
- 要求執行工作所需的特定範圍。您必須遵守 Google OAuth 2.0 政策,只要求您需要的範圍。除非應用程式的核心功能必須取得多個範圍的權限,否則請避免在登入時要求多個範圍的權限。如果將多個範圍的權限綁在一起,尤其是對於不熟悉應用程式功能的新手使用者而言,他們可能難以理解為何需要這些權限。這可能會引發警報,並阻止使用者進一步與您的應用程式互動。
- 提供正當理由給使用者,再要求授權。清楚說明應用程式需要所要求權限的原因、您將如何處理使用者資料,以及使用者核准要求後可獲得的好處。研究顯示,這些說明有助於提升使用者信任度和參與度。
- 應用程式要求範圍時,請使用 增量授權,避免管理多個存取權杖。
- 檢查使用者授予的範圍。一次要求多個範圍時,使用者可能不會授予應用程式要求的所有範圍。應用程式應一律檢查使用者授予的範圍,並停用相關功能,以處理範圍遭拒的情況。請遵循 Google OAuth 2.0 政策,處理多個範圍的同意聲明,且只有在使用者明確表示要使用需要該範圍的特定功能時,才再次提示使用者同意。
更新應用程式以處理精細權限
Android 應用程式
請參閱您用來與 Google OAuth 2.0 互動的 SDK 說明文件,並根據最佳做法更新應用程式,以處理精細權限。
如果您使用 Play 服務的 auth.api.signin SDK 與 Google OAuth 2.0 互動,可以透過 requestPermissions 函式要求所需範圍的最小集合,並透過 hasPermissions 函式檢查使用者在要求精細權限時授予的範圍。
Chrome 擴充功能應用程式
您應使用 Chrome Identity API,根據最佳做法搭配 Google OAuth 2.0 使用。
以下範例說明如何正確處理精細權限。
manifest.json
以下範例資訊清單檔案會為 Chrome 擴充功能應用程式宣告兩個非登入範圍。
{
  "name": "Example Chrome extension application",
  ...
  "permissions": [
      "identity"
    ],
  "oauth2" : {
      "client_id": "YOUR_CLIENT_ID",
      "scopes":["https://www.googleapis.com/auth/calendar.readonly",
                "https://www.googleapis.com/auth/contacts.readonly"]
  }
}
方法有誤
全有或全無
使用者按一下按鈕,即可啟動授權程序。這段程式碼片段假設使用者會看到「全有或全無」的同意畫面,其中包含 manifest.json 檔案中指定的兩個範圍。未檢查使用者授予的範圍。
oauth.js
...
document.querySelector('button').addEventListener('click', function () {
  chrome.identity.getAuthToken({ interactive: true },
      function (token) {
          if (token === undefined) {
            // User didn't authorize both scopes.
            // Updating the UX and application accordingly
            ...
          } else {
            // User authorized both or one of the scopes.
            // It neglects to check which scopes users granted and assumes users granted all scopes.

            // Calling the APIs, etc.
            ...
          }
      });
});
正確做法
最小範圍
選取所需的最小範圍組合
應用程式只應要求所需的最少權限範圍。建議應用程式在需要完成工作時,一次要求一個範圍。
在本範例中,假設 manifest.json 檔案中宣告的兩個範圍是所需範圍的最小集合。oauth.js 檔案會使用 Chrome Identity API,向 Google 啟動授權程序。您應選擇
啟用精細權限,讓使用者進一步控管授予應用程式的權限。應用程式應檢查使用者授權的範圍,妥善處理使用者的回應。
oauth.js
...
document.querySelector('button').addEventListener('click', function () {
  chrome.identity.getAuthToken({ interactive: true, enableGranularPermissions: true },
      function (token, grantedScopes) {
          if (token === undefined) {
            // User didn't authorize any scope.
            // Updating the UX and application accordingly
            ...
          } else {
            // User authorized the request. Now, check which scopes were granted.
            if (grantedScopes.includes('https://www.googleapis.com/auth/calendar.readonly'))
            {
              // User authorized Calendar read permission.
              // Calling the APIs, etc.
              ...
            }
            else
            {
              // User didn't authorize Calendar read permission.
              // Update UX and application accordingly
              ...
            }

            if (grantedScopes.includes('https://www.googleapis.com/auth/contacts.readonly'))
            {
              // User authorized Contacts read permission.
              // Calling the APIs, etc.
              ...
            }
            else
            {
              // User didn't authorize Contacts read permission.
              // Update UX and application accordingly
              ...
            }
          }
      });
});
iOS、iPadOS 和 macOS 應用程式
請參閱您用來與 Google OAuth 2.0 互動的 SDK 說明文件,並根據最佳做法更新應用程式,以處理精細權限。
如果您使用 iOS 和 macOS 版 Google 登入程式庫與 Google OAuth 2.0 互動,請參閱文件,瞭解如何處理精細權限。
網頁應用程式
請參閱您用來與 Google OAuth 2.0 互動的 SDK 說明文件,並根據最佳做法更新應用程式,以處理精細權限。
伺服器端 (離線) 存取權
- 架設伺服器,並定義可公開存取的端點,以接收授權碼。
- 在 Google Cloud 控制台的「用戶端」頁面中,設定公開端點的 重新導向 URI 。
以下程式碼片段顯示 NodeJS 範例,要求兩個非登入範圍。使用者會看到精細權限同意畫面。
方法有誤
全有或全無
使用者會重新導向至授權網址。程式碼片段會假設使用者看到「全有或全無」的同意畫面,其中包含 scopes 陣列中指定的兩個範圍。未檢查使用者授予的範圍。
main.js
...
const oauth2Client = new google.auth.OAuth2(
  YOUR_CLIENT_ID,
  YOUR_CLIENT_SECRET,
  YOUR_REDIRECT_URL
);

// Access scopes for two non-Sign-In scopes - Google Calendar and Contacts
const scopes = [
  'https://www.googleapis.com/auth/contacts.readonly',
  'https://www.googleapis.com/auth/calendar.readonly'
];

// Generate a url that asks permissions for the Google Calendar and Contacts scopes
const authorizationUrl = oauth2Client.generateAuthUrl({
  // 'online' (default) or 'offline' (gets refresh_token)
  access_type: 'offline',
  // Pass in the scopes array defined above
  scope: scopes,
  // Enable incremental authorization. Recommended as best practices.
  include_granted_scopes: true
});

async function main() {
  const server = http.createServer(async function (req, res) {
    // Example on redirecting user to Google OAuth 2.0 server.
    if (req.url == '/') {
      res.writeHead(301, { "Location": authorizationUrl });
    }
    // Receive the callback from Google OAuth 2.0 server.
    if (req.url.startsWith('/oauth2callback')) {
      // Handle the Google OAuth 2.0 server response
      let q = url.parse(req.url, true).query;

      if (q.error) {
        // User didn't authorize both scopes.
        // Updating the UX and application accordingly
        ...
      } else {
        // User authorized both or one of the scopes.
        // It neglects to check which scopes users granted and assumes users granted all scopes.

        // Get access and refresh tokens (if access_type is offline)
        let { tokens } = await oauth2Client.getToken(q.code);
        // Calling the APIs, etc.
        ...
      }
    }
    res.end();
  }).listen(80);
}
正確做法
最小範圍
選取所需的最小範圍組合
應用程式只應要求所需的最少權限範圍。建議應用程式在需要完成工作時,一次要求一個範圍。應用程式要求範圍時,應使用增量授權,避免管理多個存取權杖。
如果應用程式必須要求多個非登入範圍,您應一律在要求時使用增量授權,並檢查使用者授予的範圍。
在這個範例中,我們假設應用程式需要這兩個範圍才能正常運作。您應選擇 啟用精細權限,讓使用者進一步控管授予應用程式的權限。應用程式應檢查使用者授權的範圍,妥善處理使用者的回應。
main.js
...
const oauth2Client = new google.auth.OAuth2(
  YOUR_CLIENT_ID,
  YOUR_CLIENT_SECRET,
  YOUR_REDIRECT_URL
);

// Access scopes for two non-Sign-In scopes - Google Calendar and Contacts
const scopes = [
  'https://www.googleapis.com/auth/contacts.readonly',
  'https://www.googleapis.com/auth/calendar.readonly'
];

// Generate a url that asks permissions for the Google Calendar and Contacts scopes
const authorizationUrl = oauth2Client.generateAuthUrl({
  // 'online' (default) or 'offline' (gets refresh_token)
  access_type: 'offline',
  // Pass in the scopes array defined above
  scope: scopes,
  // Enable incremental authorization. Recommended as best practices.
  include_granted_scopes: true,
  // Set to true to enable more granular permissions for Google OAuth 2.0 client IDs created before 2019.
  // No effect for newer Google OAuth 2.0 client IDs, since more granular permissions is always enabled for them.
  enable_granular_consent: true
});

async function main() {
  const server = http.createServer(async function (req, res) {
    // Redirect users to Google OAuth 2.0 server.
    if (req.url == '/') {
      res.writeHead(301, { "Location": authorizationUrl });
    }
    // Receive the callback from Google OAuth 2.0 server.
    if (req.url.startsWith('/oauth2callback')) {
      // Handle the Google OAuth 2.0 server response
      let q = url.parse(req.url, true).query;

      if (q.error) {
        // User didn't authorize both scopes.
        // Updating the UX and application accordingly
        ...
      } else {
        // Get access and refresh tokens (if access_type is offline)
        let { tokens } = await oauth2Client.getToken(q.code);
        oauth2Client.setCredentials(tokens);

        // User authorized the request. Now, check which scopes were granted.
        if (tokens.scope.includes('https://www.googleapis.com/auth/calendar.readonly'))
        {
          // User authorized Calendar read permission.
          // Calling the APIs, etc.
          ...
        }
        else
        {
          // User didn't authorize Calendar read permission.
          // Calling the APIs, etc.
          ...
        }

        // Check which scopes user granted the permission to application
        if (tokens.scope.includes('https://www.googleapis.com/auth/contacts.readonly'))
        {
          // User authorized Contacts read permission.
          // Calling the APIs, etc.
          ...
        }
        else
        {
          // User didn't authorize Contacts read permission.
          // Update UX and application accordingly
          ...
        }
      }
    }
    res.end();
  }).listen(80);
}
請參閱 伺服器端網頁應用程式指南,瞭解如何從伺服器型應用程式存取 Google API。
僅限用戶端存取
- 如果應用程式使用 Google Identity 服務 JavaScript 程式庫與 Google OAuth 2.0 互動,請參閱這份文件,瞭解如何處理精細權限。
- 如果應用程式使用 JavaScript 直接呼叫 Google OAuth 2.0 授權端點,請參閱這份文件,瞭解如何處理精細權限。
測試更新後的應用程式是否能處理精細權限
- 列出使用者可以回應權限要求的所有情況,以及應用程式的預期行為。舉例來說,如果使用者只授權您要求的三個範圍中的兩個,應用程式就應相應運作。
-
測試應用程式,並啟用精細權限。啟用精細權限的方法有兩種:
- 檢查應用程式的 OAuth 2.0 同意畫面,確認應用程式是否已啟用精細權限。您也可以透過 Google Cloud 控制台建立新的 Web、Android 或 iOS Google OAuth 2.0 用戶端 ID,以進行測試,因為這些 ID 一律會啟用精細權限。
-
呼叫 Google OAuth 授權端點時,請將
enable_granular_consent參數設為true。部分 SDK 支援這項參數。如為其他平台,請參閱說明文件,瞭解如何手動新增這項參數及其值。如果您的實作方式不支援新增參數,您可以透過 Google Cloud 控制台建立新的網頁版、Android 版或 iOS 版 Google OAuth 2.0 用戶端 ID,僅供測試用途,如上一個要點所述。
- 測試更新後的應用程式時,請使用個人 Google 帳戶 (@gmail.com),而非 Workspace 帳戶。這是因為目前系統不會對具有網域範圍授權委派或標示為信任的 Workspace Enterprise 應用程式,套用細部權限變更。因此,使用貴機構的 Workspace 帳戶進行測試時,可能無法如預期顯示新的細分式同意畫面。