

以 OAuth 為基礎的 Google 登入「簡化」連結類型,會在以 OAuth 為基礎的帳戶連結上新增 Google 登入功能。這項功能可讓 Google 使用者透過語音順暢地連結帳戶,也能讓使用非 Google 身分註冊服務的使用者連結帳戶。
這類連結會先進行 Google 登入,讓您檢查系統中是否有使用者的 Google 個人資料資訊。如果系統找不到使用者的資訊,就會啟動標準 OAuth 流程。使用者也可以選擇使用 Google 個人資料資訊建立新帳戶。
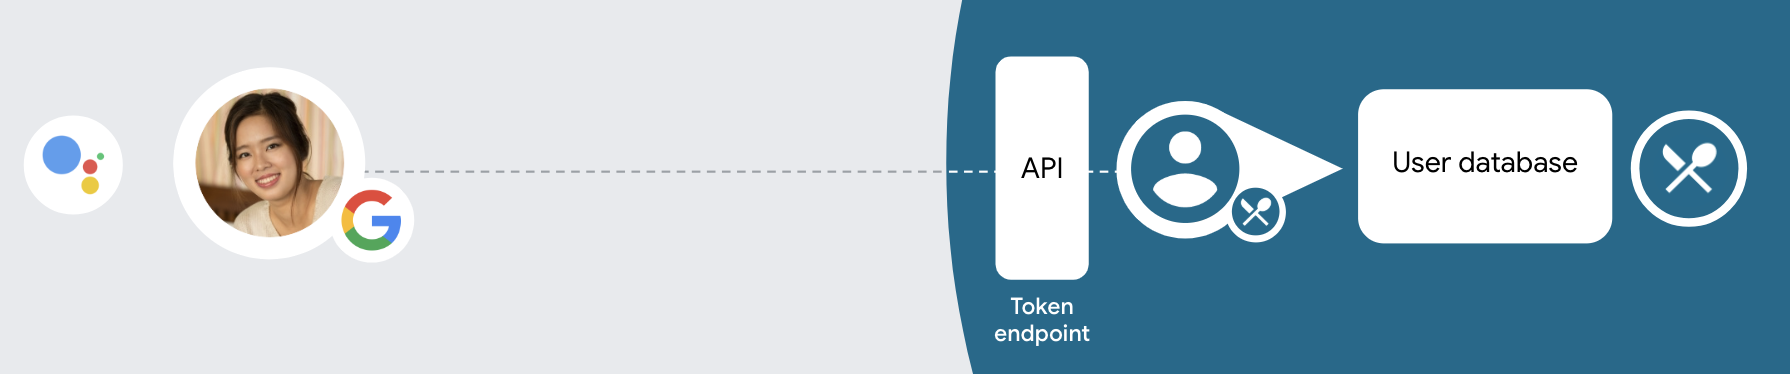
如要使用簡化連結類型執行帳戶連結,請按照下列一般步驟操作:
- 首先,請使用者同意存取他們的 Google 個人資料。
- 使用個人資料中的資訊識別使用者。
- 如果驗證系統中沒有相符的 Google 使用者,系統會根據您在 Actions 管理中心設定的 Actions 專案,決定是否允許透過語音或僅透過網站建立使用者帳戶,然後繼續執行流程。
- 如果允許透過語音建立帳戶,請驗證從 Google 收到的 ID 權杖。然後根據 ID 權杖中包含的設定檔資訊建立使用者。
- 如果不允許透過語音建立帳戶,系統會將使用者轉移至瀏覽器,載入授權頁面並完成使用者建立流程。
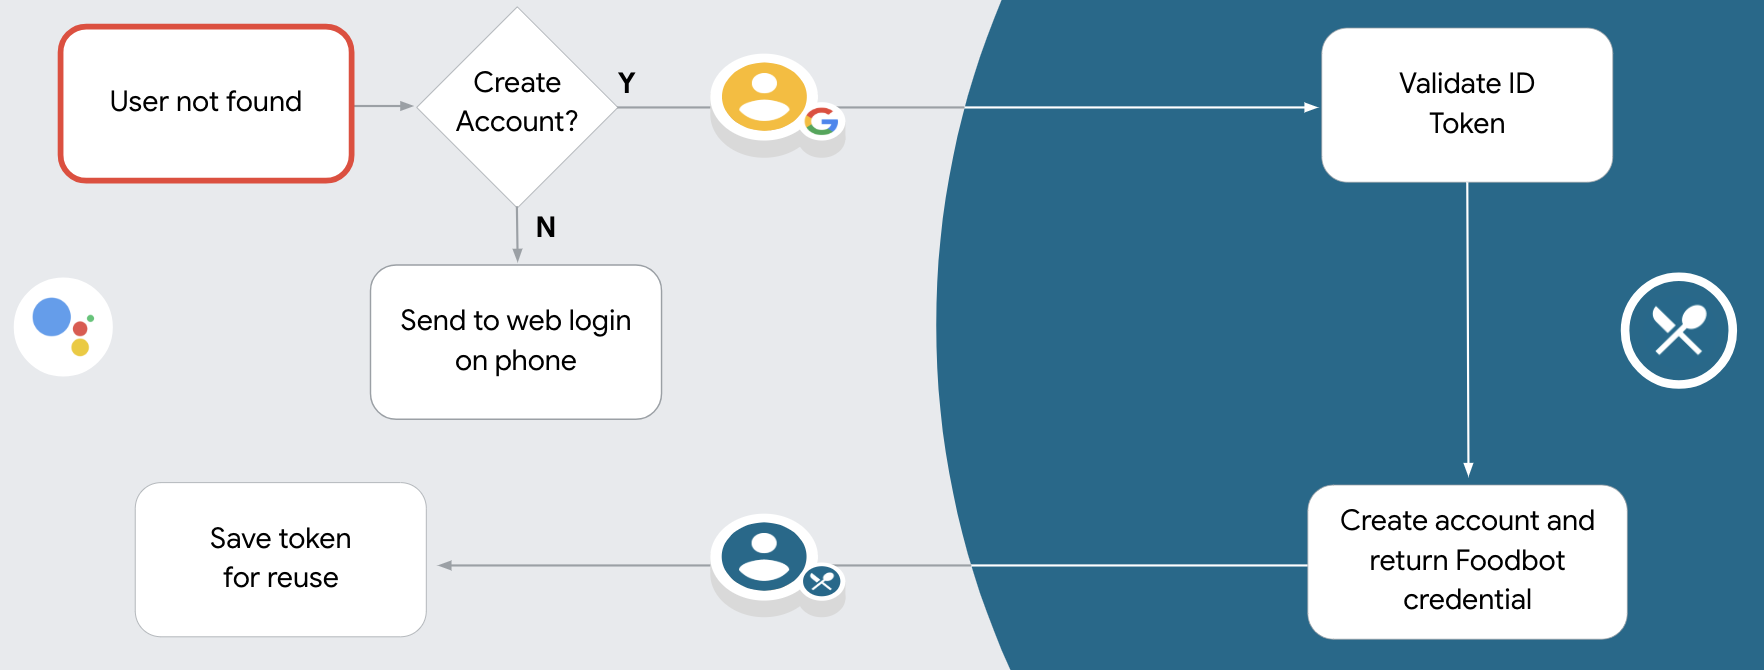
支援透過語音建立帳戶
如果允許使用者透過語音建立帳戶,Google 助理會詢問使用者是否要執行下列操作:
- 使用對方的 Google 帳戶資訊在系統上建立新帳戶,或
- 如果使用者有現有的非 Google 帳戶,請使用其他帳戶登入驗證系統。
如要盡量減少帳戶建立流程的阻力,建議允許透過語音建立帳戶。如果使用者想使用現有的非 Google 帳戶登入,才需要離開語音流程。
禁止透過語音建立帳戶
如果禁止透過語音建立使用者帳戶,Google 助理會開啟您提供的使用者驗證網站網址。如果互動發生在沒有螢幕的裝置上,Google 助理會引導使用者前往手機,繼續完成帳戶連結流程。
在下列情況下,建議禁止建立:
您不希望允許非 Google 帳戶使用者建立新帳戶,而是希望他們連結至驗證系統中的現有帳戶。舉例來說,如果您提供會員方案,可能需要確保使用者不會失去現有帳戶累積的點數。
您必須完全掌控帳戶建立流程。舉例來說,如果您需要在帳戶建立期間向使用者顯示服務條款,可以禁止建立帳戶。
實作以 OAuth 為基礎的 Google 登入「簡化」連結
帳戶會透過業界標準的 OAuth 2.0 流程連結。 Actions on Google 支援隱含和授權碼流程。
In the implicit code flow, Google opens your authorization endpoint in the user's browser. After successful sign in, you return a long-lived access token to Google. This access token is now included in every request sent from the Assistant to your Action.
In the authorization code flow, you need two endpoints:
- The authorization endpoint, which is responsible for presenting the sign-in UI to your users that aren't already signed in and recording consent to the requested access in the form of a short-lived authorization code.
- The token exchange endpoint, which is responsible for two types of exchanges:
- Exchanges an authorization code for a long-lived refresh token and a short-lived access token. This exchange happens when the user goes through the account linking flow.
- Exchanges a long-lived refresh token for a short-lived access token. This exchange happens when Google needs a new access token because the one it had expired.
Although the implicit code flow is simpler to implement, Google recommends that access tokens issued using the implicit flow never expire, because using token expiration with the implicit flow forces the user to link their account again. If you need token expiration for security reasons, you should strongly consider using the auth code flow instead.
設定專案
如要設定專案以使用簡化連結,請按照下列步驟操作:
- 開啟 Actions 管理中心,然後選取要使用的專案。
- 按一下「開發」分頁,然後選擇「帳戶連結」。
- 將「帳戶連結」旁的切換鈕設為開啟。
- 在「帳戶建立」部分中,選取「是」。
在「連結類型」中,選取「OAuth 和 Google 登入」和「隱含」。
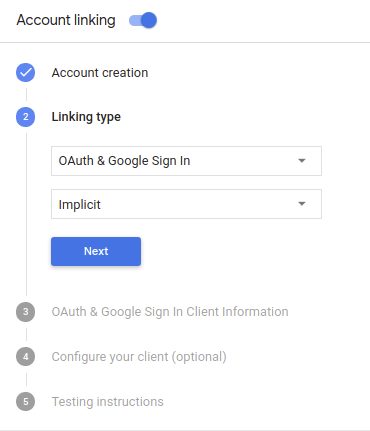
在「Client Information」(客戶資訊) 中,執行下列操作:
- 為「Google 簽發給動作的用戶端 ID」指派值,以識別來自 Google 的要求。
- 插入授權和權杖交換端點的網址。
按一下 [儲存]。
導入 OAuth 伺服器
To support the OAuth 2.0 implicit flow, your service makes an authorization endpoint available by HTTPS. This endpoint is responsible for authenticating and obtaining consent from users for data access. The authorization endpoint presents a sign-in UI to your users that aren't already signed in and records consent to the requested access.
When your Action needs to call one of your service's authorized APIs, Google uses this endpoint to get permission from your users to call these APIs on their behalf.
A typical OAuth 2.0 implicit flow session initiated by Google has the following flow:
- Google opens your authorization endpoint in the user's browser. The user signs in if not signed in already, and grants Google permission to access their data with your API if they haven't already granted permission.
- Your service creates an access token and returns it to Google by redirecting the user's browser back to Google with the access token attached to the request.
- Google calls your service's APIs, and attaches the access token with each request. Your service verifies that the access token grants Google authorization to access the API and then completes the API call.
Handle authorization requests
When your Action needs to perform account linking via an OAuth 2.0 implicit flow, Google sends the user to your authorization endpoint with a request that includes the following parameters:
| Authorization endpoint parameters | |
|---|---|
client_id |
The client ID you assigned to Google. |
redirect_uri |
The URL to which you send the response to this request. |
state |
A bookkeeping value that is passed back to Google unchanged in the redirect URI. |
response_type |
The type of value to return in the response. For the OAuth 2.0 implicit
flow, the response type is always token. |
For example, if your authorization endpoint is available at https://myservice.example.com/auth,
a request might look like:
GET https://myservice.example.com/auth?client_id=GOOGLE_CLIENT_ID&redirect_uri=REDIRECT_URI&state=STATE_STRING&response_type=token
For your authorization endpoint to handle sign-in requests, do the following steps:
Verify the
client_idandredirect_urivalues to prevent granting access to unintended or misconfigured client apps:- Confirm that the
client_idmatches the client ID you assigned to Google. - Confirm that the URL specified by the
redirect_uriparameter has the following form:https://oauth-redirect.googleusercontent.com/r/YOUR_PROJECT_ID
- Confirm that the
Check if the user is signed in to your service. If the user isn't signed in, complete your service's sign-in or sign-up flow.
Generate an access token that Google will use to access your API. The access token can be any string value, but it must uniquely represent the user and the client the token is for and must not be guessable.
Send an HTTP response that redirects the user's browser to the URL specified by the
redirect_uriparameter. Include all of the following parameters in the URL fragment:access_token: the access token you just generatedtoken_type: the stringbearerstate: the unmodified state value from the original request The following is an example of the resulting URL:https://oauth-redirect.googleusercontent.com/r/YOUR_PROJECT_ID#access_token=ACCESS_TOKEN&token_type=bearer&state=STATE_STRING
Google's OAuth 2.0 redirect handler will receive the access token and confirm
that the state value hasn't changed. After Google has obtained an
access token for your service, Google will attach the token to subsequent calls
to your Action as part of the AppRequest.
處理自動連結
當使用者同意您的動作存取其 Google 個人資料後,Google 傳送的要求包含已簽署的 Google 使用者身分識別資訊。 聲明包含使用者的 Google 帳戶 ID、姓名、 以及電子郵件地址為專案設定的憑證交換端點會處理
如果驗證系統中已有對應的 Google 帳戶,
權杖交換端點會傳回使用者權杖如果 Google 帳戶不是
與現有使用者相符,權杖交換端點會傳回 user_not_found 錯誤。
這項要求的格式如下:
POST /token HTTP/1.1
Host: oauth2.example.com
Content-Type: application/x-www-form-urlencoded

grant_type=urn:ietf:params:oauth:grant-type:jwt-bearer&intent=get&assertion=JWT&consent_code=CONSENT_CODE&scope=SCOPES
您的權杖交換端點必須能處理下列參數:
| 權杖端點參數 | |
|---|---|
grant_type |
要交換的權杖類型。對於這些要求,這個
參數值為 urn:ietf:params:oauth:grant-type:jwt-bearer。 |
intent |
這類要求的參數值為 `get`。 |
assertion |
JSON Web Token (JWT),提供已簽署 識別使用者的身分JWT 包含使用者的 Google 帳戶 ID、名稱和電子郵件地址。 |
consent_code |
選用:出現一次性代碼時,系統會發送一次性代碼, 使用者已同意您的動作存取指定範圍。 |
scope |
選用:您設定 Google 向使用者要求的範圍。 |
當權杖交換端點收到連結要求時,應執行 包括:
驗證並解碼 JWT 斷言
您可以使用適用於您語言的 JWT 解碼程式庫,驗證 JWT 斷言並解碼。 使用 Google 的公開金鑰 (適用於 JWK PEM 格式),用來驗證符記 簽章。
解碼後的 JWT 斷言會如下所示:
{
  "sub": 1234567890,        // The unique ID of the user's Google Account
  "iss": "https://accounts.google.com",        // The assertion's issuer
  "aud": "123-abc.apps.googleusercontent.com", // Your server's client ID
  "iat": 233366400,         // Unix timestamp of the assertion's creation time
  "exp": 233370000,         // Unix timestamp of the assertion's expiration time
  "name": "Jan Jansen",
  "given_name": "Jan",
  "family_name": "Jansen",
  "email": "jan@gmail.com", // If present, the user's email address
  "locale": "en_US"
}
除了驗證權杖的簽章外,也請驗證斷言的核發機構
(iss 欄位) 為「https://accounts.google.com」,而目標對象 (aud 欄位)
是指派給動作的用戶端 ID。
檢查驗證系統是否已有 Google 帳戶
確認是否符合下列任一條件:
- 在斷言的
sub欄位中,Google 帳戶 ID 位於您的使用者資料庫中。 - 斷言中的電子郵件地址與您使用者資料庫中的使用者相符。
如果任一條件為 true,表示使用者已註冊,您可以核發 存取權杖
如果聲明中未提供 Google 帳戶 ID 或電子郵件地址
與您資料庫中的使用者相符,這表示對方尚未註冊。在這種情況下,您的
權杖交換端點應傳回 HTTP 401 錯誤,指定 error=user_not_found。
如以下範例所示:
HTTP/1.1 401 Unauthorized
Content-Type: application/json;charset=UTF-8

{
  "error":"user_not_found",
}
user_not_found 錯誤的 401 錯誤回應時,
使用 intent 參數值來呼叫權杖交換端點
設為 create 並傳送包含使用者個人資訊的 ID 權杖
。
透過 Google 登入功能處理帳戶建立作業
當使用者需要在您的服務上建立帳戶時,Google 會
要求傳送至權杖交換端點
intent=create,如以下範例所示:
POST /token HTTP/1.1
Host: oauth2.example.com
Content-Type: application/x-www-form-urlencoded

response_type=token&grant_type=urn:ietf:params:oauth:grant-type:jwt-bearer&scope=SCOPES&intent=create&consent_code=CONSENT_CODE&assertion=JWT[&NEW_ACCOUNT_INFO]
assertion 參數包含專為您提供的 JSON Web Token (JWT) 提供的
經簽署的 Google 使用者身分識別資訊。JWT 包含
包含使用者的 Google 帳戶 ID、名稱和電子郵件地址,您可以使用
為您的服務建立新帳戶。
如要回應帳戶建立要求,您的權杖交換端點必須 包括:
驗證並解碼 JWT 斷言
您可以使用適用於您語言的 JWT 解碼程式庫,驗證 JWT 斷言並解碼。 使用 Google 的公開金鑰 (適用於 JWK PEM 格式),用來驗證符記 簽章。
解碼後的 JWT 斷言會如下所示:
{
  "sub": 1234567890,        // The unique ID of the user's Google Account
  "iss": "https://accounts.google.com",        // The assertion's issuer
  "aud": "123-abc.apps.googleusercontent.com", // Your server's client ID
  "iat": 233366400,         // Unix timestamp of the assertion's creation time
  "exp": 233370000,         // Unix timestamp of the assertion's expiration time
  "name": "Jan Jansen",
  "given_name": "Jan",
  "family_name": "Jansen",
  "email": "jan@gmail.com", // If present, the user's email address
  "locale": "en_US"
}
除了驗證權杖的簽章外,也請驗證斷言的核發機構
(iss 欄位) 為「https://accounts.google.com」,而目標對象 (aud 欄位)
是指派給動作的用戶端 ID。
驗證使用者資訊並建立新帳戶
確認是否符合下列任一條件:
- 在斷言的
sub欄位中,Google 帳戶 ID 位於您的使用者資料庫中。 - 斷言中的電子郵件地址與您使用者資料庫中的使用者相符。
如果符合任一條件,請提示使用者連結現有帳戶
回應該請求,並傳回 HTTP 401 錯誤,
error=linking_error 和使用者的電子郵件地址為 login_hint,如
範例:
HTTP/1.1 401 Unauthorized
Content-Type: application/json;charset=UTF-8

{
  "error":"linking_error",
  "login_hint":"foo@bar.com"
}
如果兩個條件皆不成立,請使用這項資訊建立新的使用者帳戶 使用這組 API新帳戶通常不會設定密碼。是 建議您在其他平台中加入 Google 登入功能,方便使用者登入 透過 Google 顯示在應用程式各平台上此外,也可以 透過電子郵件,使用可啟動密碼復原流程的連結,讓使用者完成設定 一組密碼登入其他平台
建立完畢後,請核發存取權杖 ,並傳回 JSON 物件中 也就是您的 HTTPS 回應內文,如以下範例所示:
{
  "token_type": "Bearer",
  "access_token": "ACCESS_TOKEN",

  "expires_in": SECONDS_TO_EXPIRATION
}
設計驗證流程的語音使用者介面
檢查使用者是否已通過驗證,然後開始帳戶連結流程
- 在 Actions Console 中開啟 Actions Builder 專案。
- 在動作中建立新場景,開始連結帳戶:
- 按一下「場景」。
- 按一下「新增」 (+) 圖示,即可新增場景。
- 在新建立的場景中,按一下「條件」的「新增」圖示 add。
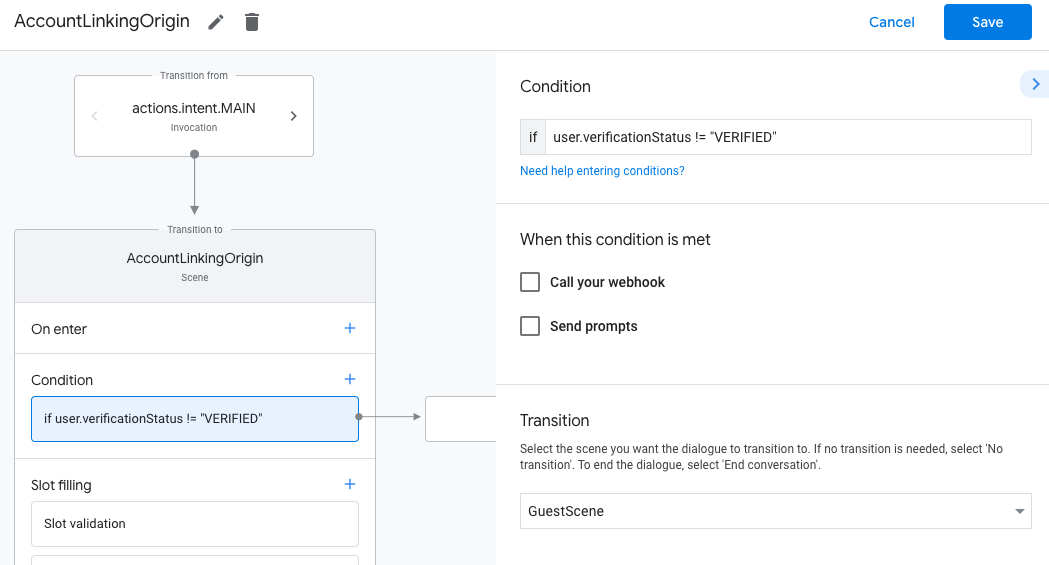
- 新增條件,檢查與對話相關聯的使用者是否為已驗證使用者。如果檢查失敗,動作就無法在對話期間執行帳戶連結,且應改為提供不需要帳戶連結的功能存取權。
- 在「條件」下方的
Enter new expression欄位中,輸入下列邏輯:user.verificationStatus != "VERIFIED" - 在「轉場效果」下方,選取不需要連結帳戶的場景,或是僅限訪客使用的功能進入點場景。
- 在「條件」下方的
- 按一下「條件」的「新增」add圖示。
- 新增條件,在使用者沒有相關聯的身分時觸發帳戶連結流程。
- 在「條件」下方的
Enter new expression欄位中,輸入下列邏輯:user.verificationStatus == "VERIFIED" - 在「Transition」下方,選取「Account Linking」系統場景。
- 按一下 [儲存]。
- 在「條件」下方的
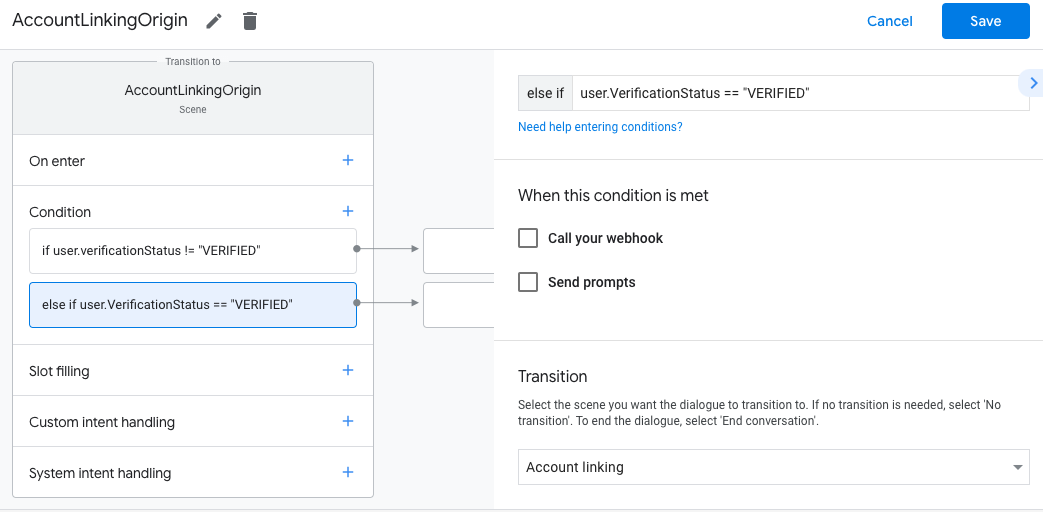
儲存後,專案中會新增名為「<SceneName>_AccountLinking」的帳戶連結系統場景。
自訂帳戶連結場景
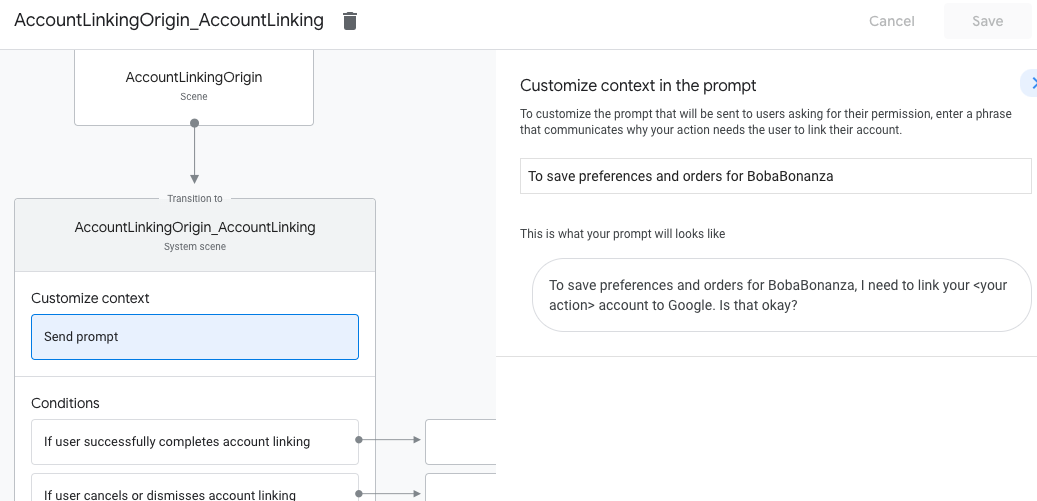
- 在「場景」下方,選取帳戶連結系統場景。
- 按一下「傳送提示」,並新增簡短句子,向使用者說明動作為何需要存取身分識別資訊 (例如「儲存偏好設定」)。
- 按一下 [儲存]。
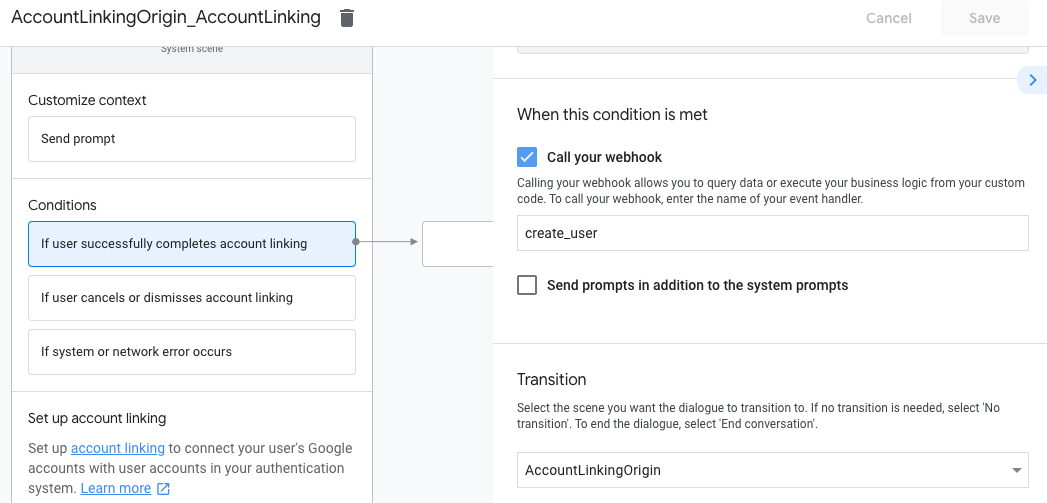
- 按一下「條件」下方的「如果使用者成功完成帳戶連結」。
- 設定使用者同意連結帳戶時,流程應如何繼續進行。 舉例來說,呼叫 Webhook 來處理任何必要的自訂商業邏輯,然後返回原始場景。
- 按一下 [儲存]。
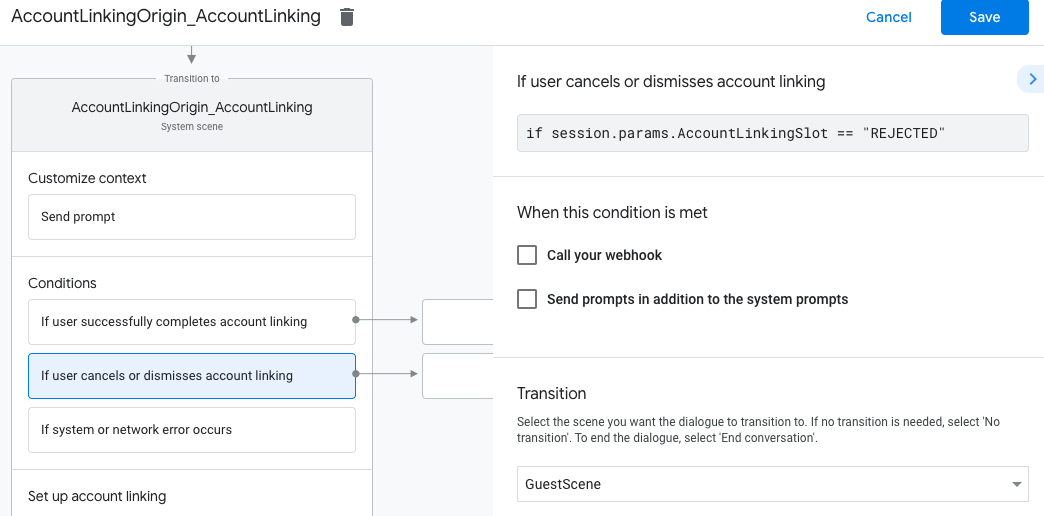
- 在「條件」下方,按一下「如果使用者取消或關閉帳戶連結」。
- 設定使用者不同意連結帳戶時,流程應如何進行。舉例來說,傳送確認訊息,然後重新導向至不需要帳戶連結的功能場景。
- 按一下 [儲存]。
- 在「條件」下方,按一下「如果發生系統或網路錯誤」。
- 設定帳戶連結流程因系統或網路錯誤而無法完成時,流程應如何繼續。舉例來說,傳送確認訊息,然後重新導向至不需要帳戶連結的功能場景。
- 按一下 [儲存]。
處理資料存取要求
如果Google 助理要求包含存取權杖,請先檢查存取權杖是否有效且未過期,然後從使用者帳戶資料庫中擷取與權杖相關聯的使用者帳戶。