Функция App Flip Linking (App Flip) на основе OAuth позволяет пользователям быстро связать свои учетные записи в вашей системе аутентификации со своими учетными записями Google. Если ваше приложение установлено на телефоне пользователя в момент начала процесса привязки учетной записи, он автоматически переключается на ваше приложение для получения авторизации.
Этот подход обеспечивает более быстрый процесс привязки, поскольку пользователю не нужно повторно вводить имя пользователя и пароль для аутентификации; вместо этого App Flip использует учетные данные из учетной записи пользователя в вашем приложении. После того, как пользователь свяжет свою учетную запись Google с вашим приложением, он сможет воспользоваться любыми разработанными вами интеграциями.
Вы можете настроить App Flip как для приложений iOS, так и для Android.
Требования
Для внедрения App Flip необходимо выполнить следующие требования:
- Для работы приложения необходимо установить приложение для Android или iOS.
- Вы должны владеть, управлять и обслуживать сервер OAuth 2.0, поддерживающий поток авторизационного кода OAuth 2.0.
App Flip Flow на основе OAuth
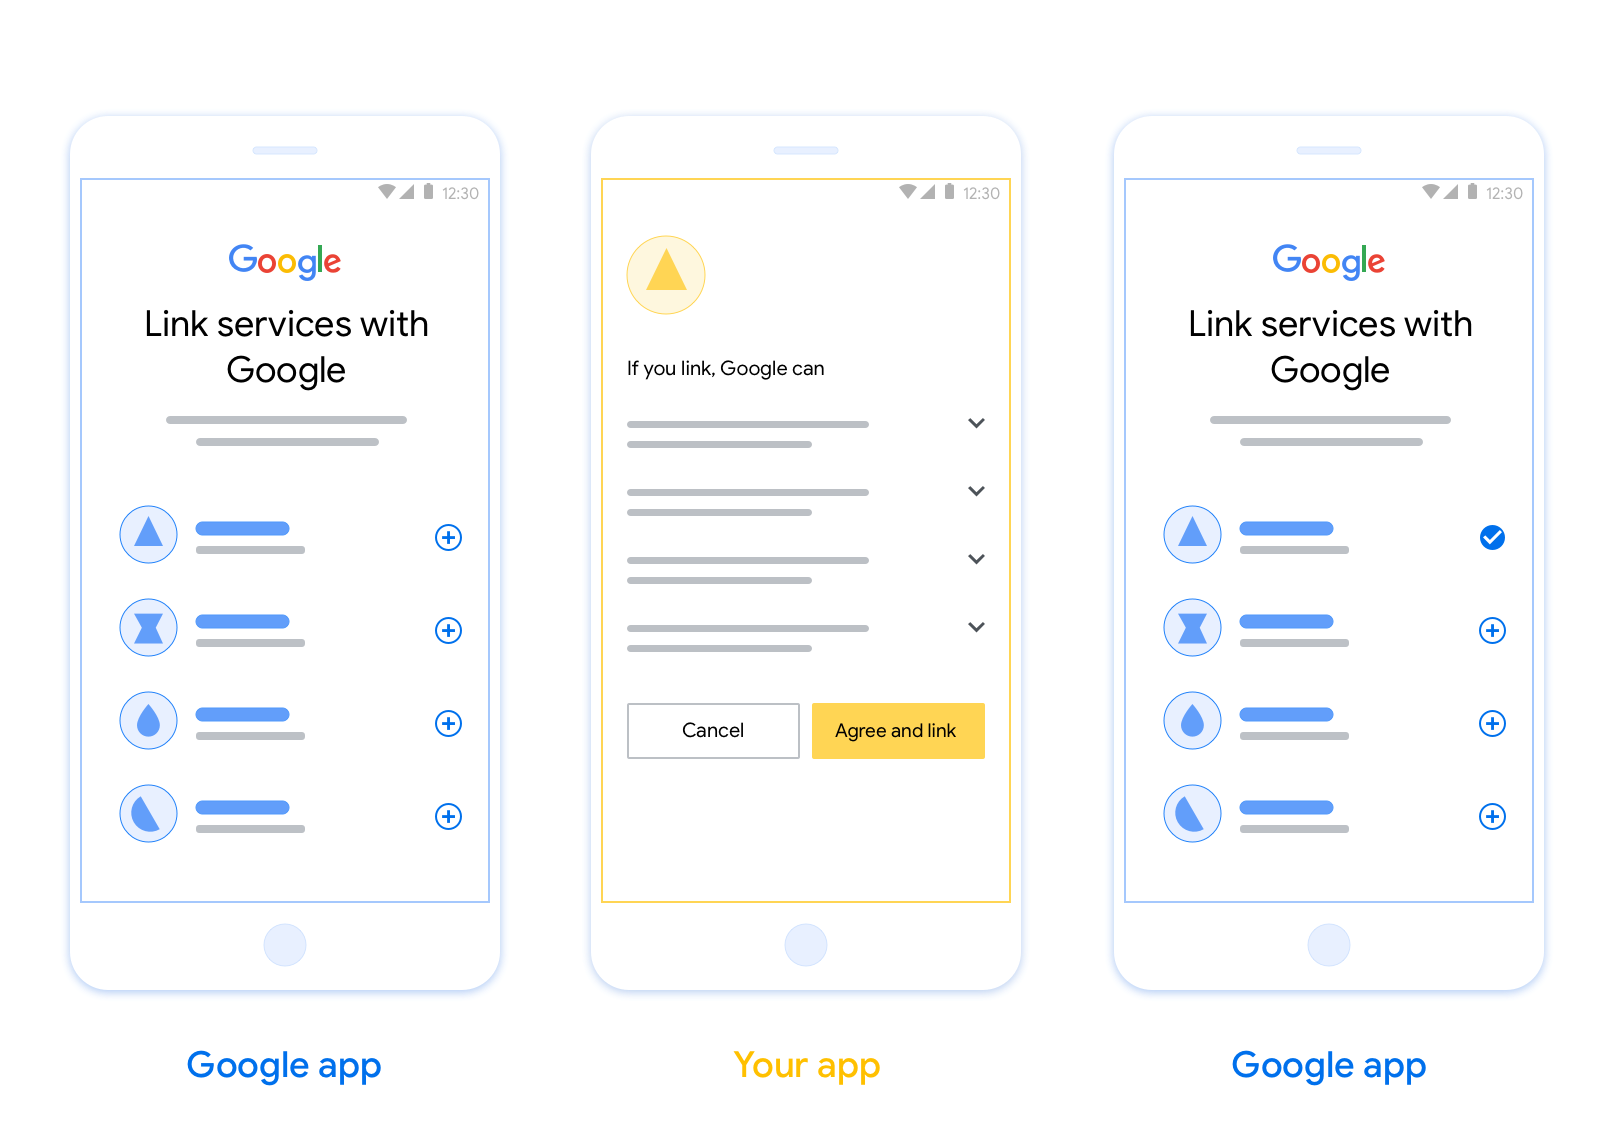
На следующей диаграмме подробно описано взаимодействие между пользователем, приложением Google, вашим приложением и вашим сервером авторизации для App Flip.
Роли и обязанности
В таблице ниже определены роли и обязанности участников процесса переосмысления приложения.
| Актер / Компонент | Роль GAL | Обязанности |
|---|---|---|
| Приложение/сервер Google | Клиент OAuth | Запускает процесс связывания, инициирует прямую ссылку на ваше мобильное приложение, обменивает код авторизации на токены и безопасно сохраняет их для доступа к API вашего сервиса. |
| Ваше приложение | Агент по авторизации | Проверяет подлинность пользователя (обычно используя существующие учетные данные приложения), получает согласие и извлекает код авторизации с вашего сервера. |
| Ваш сервер авторизации | Сервер авторизации | Проверяет коды авторизации и токены обновления, а также выдает токены доступа на сервер Google. |
Дополнительные сведения о потоке кода авторизации привязки OAuth см. в разделе Реализация сервера OAuth .
Руководство по проектированию
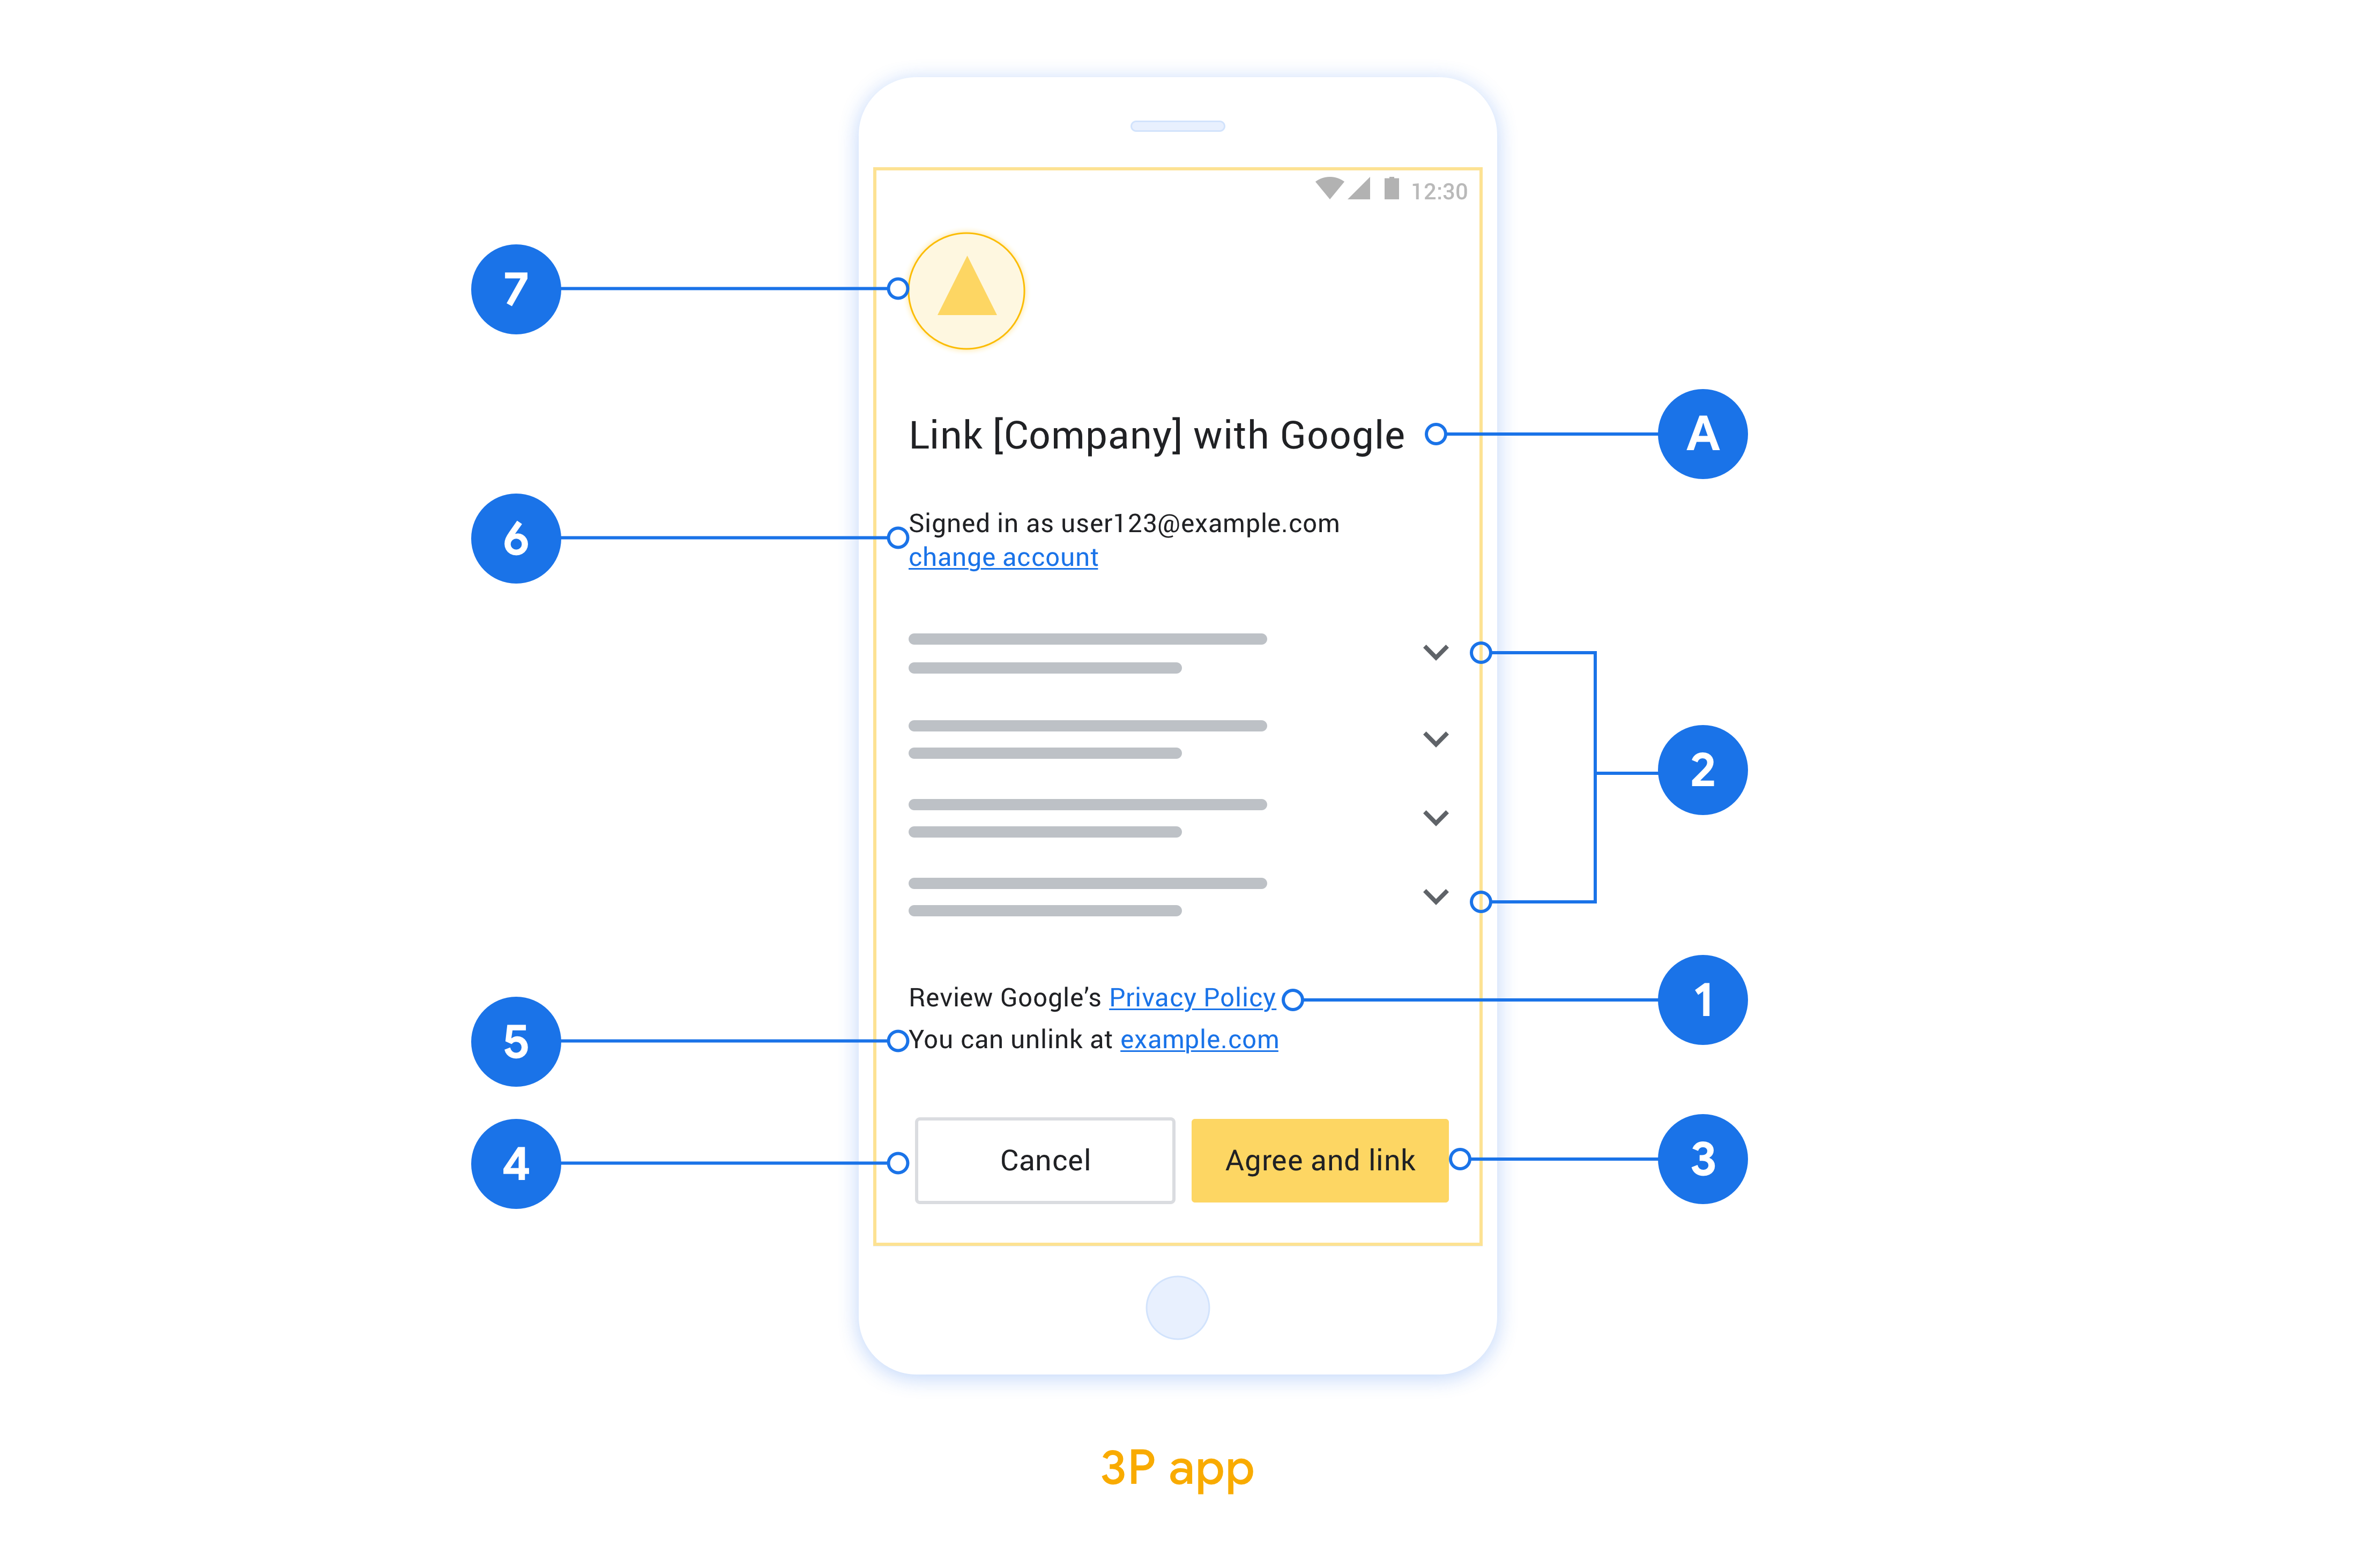
В этом разделе описаны требования и рекомендации по дизайну экрана согласия на привязку аккаунта App Flip. После того, как Google вызывает ваше приложение, оно отображает пользователю экран согласия.
Требования
- Вы должны сообщить, что учетная запись пользователя привязывается к Google, а не к конкретному продукту Google, например Google Home или Google Assistant.
Рекомендации
Мы рекомендуем вам сделать следующее:
Отобразите Политику конфиденциальности Google. Добавьте ссылку на Политику конфиденциальности Google на экран согласия.
Данные для обмена. Чётко и ясно объясните пользователю, какие данные Google требует от него и почему.
Чёткий призыв к действию. Разместите чёткий призыв к действию на экране согласия, например, «Согласиться и подключиться». Это необходимо, поскольку пользователям необходимо понимать, какие данные им необходимо предоставить Google для подключения своих аккаунтов.
Возможность отклонить или отменить. Предоставьте пользователям возможность вернуться назад, отклонить или отменить подписку, если они решили не использовать ссылку.
Возможность отмены привязки. Предложите пользователям механизм отмены привязки, например, URL-адрес для доступа к настройкам их учётной записи на вашей платформе. Кроме того, вы можете добавить ссылку на учётную запись Google , где пользователи смогут управлять своей привязанной учётной записью.
Возможность смены учётной записи пользователя. Предложите пользователям способ переключения учётных записей. Это особенно полезно, если пользователи часто используют несколько учётных записей.
- Если пользователю необходимо закрыть экран согласия для переключения учетных записей, отправьте в Google устранимую ошибку, чтобы пользователь мог войти в нужную учетную запись с помощью привязки OAuth и неявного потока.
Добавьте свой логотип. Разместите логотип вашей компании на экране согласия. Разместите логотип в соответствии с вашими рекомендациями по стилю. Если вы также хотите разместить логотип Google, см. раздел «Логотипы и товарные знаки» .
Настройка App Flip на основе OAuth
В следующих разделах описаны необходимые условия для App Flip на основе OAuth и порядок настройки проекта App Flip в консоли действий.
Создайте действие и настройте сервер OAuth 2.0.
Прежде чем вы сможете настроить App Flip, вам необходимо сделать следующее:
- Создайте действие. Чтобы создать Действие, следуйте инструкциям в разделе «Создание проекта» .
- Настройте сервер OAuth 2.0. Дополнительные сведения о настройке сервера OAuth см. в разделе Реализация связывания учетных записей OAuth .
Настройте App Flip в консоли действий.
В следующем разделе описывается, как настроить App Flip в консоли действий .
- Нажмите «Разработать» в верхней части навигации. Затем нажмите «Привязка учетной записи» на левой панели навигации.
- Включите переключатель рядом с пунктом «Привязка учетной записи».
- В разделе «Создание учетной записи» выберите «Нет, я хочу разрешить создание учетной записи только на своем веб-сайте» .
- Нажмите Далее .
- В разделе «Тип связи» выберите «OAuth» и «Код авторизации» в раскрывающихся меню.
- Нажмите Далее .
- Заполните все поля в разделе «Информация о клиенте OAuth» . (Если App Flip не поддерживается, в качестве запасного варианта используется обычный OAuth.)
- Нажмите Далее .
- В разделе «Использовать приложение для привязки учетной записи (необязательно)» установите флажок «Включить для iOS» .
- Заполните поле «Универсальная ссылка» . Дополнительную информацию об универсальных ссылках см. в разделе «Разрешение приложениям и веб-сайтам ссылаться на ваш контент» .
- Если вы хотите дополнительно настроить свой клиент, добавьте области и нажмите «Добавить область» в разделе «Настроить клиент» (необязательно). Если нет, нажмите «Далее».
- В разделе «Инструкции по тестированию» введите
test(или любую другую строку) в качестве заполнителя. (Заполнение этого поля с использованием тестовой учетной записи необходимо только в том случае, если вы действительно отправляете свое действие на публикацию.) - Нажмите Сохранить .
Теперь вы можете перейти к следующему разделу, чтобы реализовать App Flip в своем приложении для iOS или Android.
Внедрите App Flip в свои собственные приложения.
Чтобы реализовать App Flip, вам необходимо изменить код авторизации пользователя в вашем приложении, чтобы он принимал глубокую ссылку от Google.
Проверьте приложение Flip на своем устройстве
Теперь, когда вы создали действие и настроили App Flip на консоли и в своем приложении, вы можете протестировать App Flip на своем мобильном устройстве. Вы можете использовать приложение Google Assistant для тестирования App Flip.
Чтобы протестировать App Flip из приложения Assistant, выполните следующие действия:
- Перейдите в консоль действий и выберите свой проект.
- Нажмите «Тест» в верхней части навигации.
- Запустите процесс привязки учетной записи из приложения Assistant:
- Откройте приложение Google Ассистент .
- Нажмите «Настройки» .
- На вкладке «Ассистент» нажмите «Управление домом».
- Нажмите «Добавить» (+) .
- Выберите действие из списка поставщиков. В списке он будет иметь префикс «[test]». Когда вы выбираете [тестовое] действие из списка, оно должно открыть ваше приложение.
- Убедитесь, что ваше приложение было запущено, и начните тестирование процесса авторизации.