
OAuth ベースのアプリ切り替えリンク(アプリ切り替え)を使用すると、デベロッパーの認証システムに登録されているユーザーのアカウントを、そのユーザーの Google アカウントに簡単にリンクできます。 ユーザーのスマートフォンに対象のアプリがインストールされている場合、ユーザーがアカウントへの関連付けを開始すると、そのアプリにシームレスに切り替わってユーザーの認可を取得します。
この方法では、ユーザーが認証用のユーザー名とパスワードを再入力する必要がないため、アカウントへの関連付けが迅速に行われます。アプリ切り替えでは、アプリのユーザー アカウントの認証情報が使用されます。ユーザーが Google アカウントをアプリにリンクすると、デベロッパーが開発した統合機能を利用できるようになります。
iOS アプリと Android アプリの両方でアプリ切り替えを設定できます。
要件
アプリ切り替えを実装するには、次の要件を満たす必要があります。
- Android アプリまたは iOS アプリが必要です。
- OAuth 2.0 認可コードフローをサポートする OAuth 2.0 サーバーを所有、管理、維持している必要があります。
OAuth ベースのアプリ切り替えフロー
次のシーケンス図は、アプリ切り替えにおけるユーザー、Google アプリ、デベロッパーのアプリ、デベロッパーの認可サーバー間のインタラクションの詳細を示しています。
役割と責任
次の表に、アプリ切り替えフローにおけるアクターの役割と責任を示します。
| アクター / コンポーネント | GAL ロール | 責任 |
|---|---|---|
| Google アプリ / サーバー | OAuth クライアント | アカウントへの関連付け処理を開始し、モバイルアプリへのディープリンクをトリガーして、認証コードをトークンと交換し、サービス API にアクセスするために安全に保存します。 |
| デベロッパーのアプリ | 認可エージェント | ユーザーを認証し(通常は既存のアプリの認証情報を使用)、 同意を取得して、サーバーから認証コードを取得します。 |
| デベロッパーの認可サーバー | 認可サーバー | 認可コードと更新トークンを検証し、Google サーバーにアクセス トークンを発行します。 |
OAuth リンクの認証コードフローの詳細については、OAuth サーバーを実装するをご覧ください。
設計ガイドライン
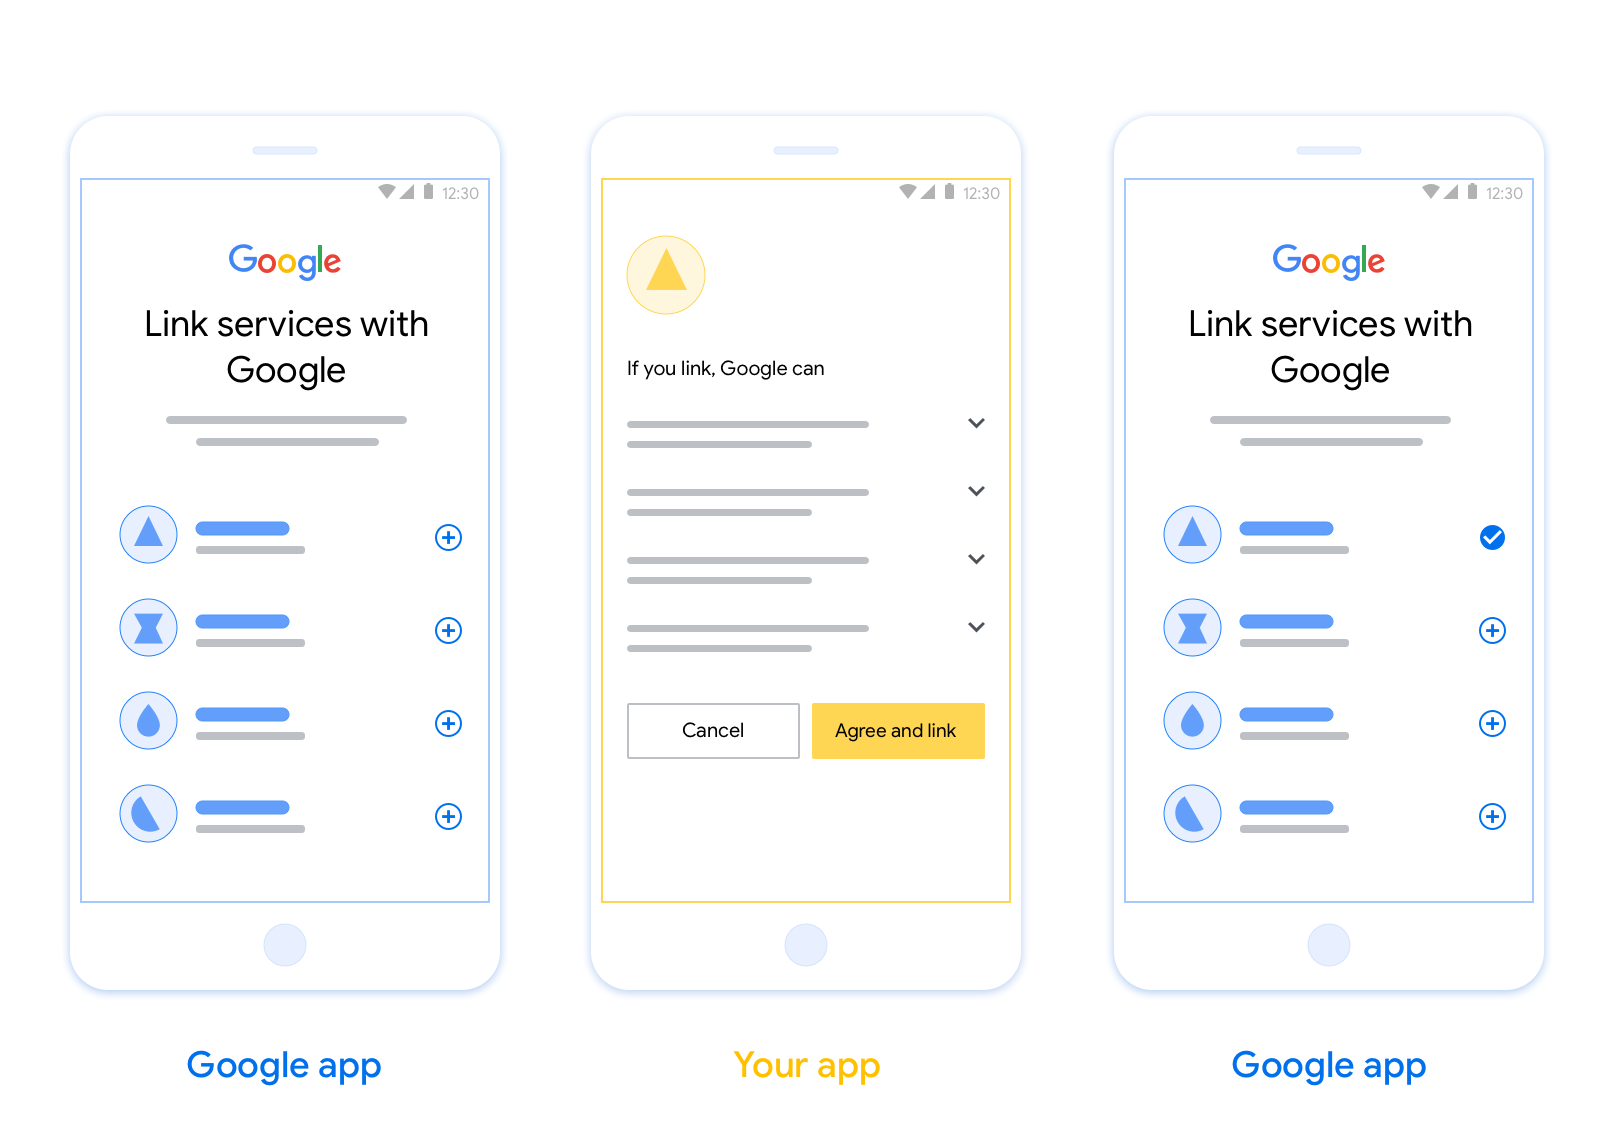
このセクションでは、App Flip のアカウント リンクの同意画面の設計要件と推奨事項について説明します。Google がアプリを呼び出すと、アプリはユーザーに同意画面を表示します。
要件
- ユーザーのアカウントが Google Home や Google アシスタントなどの特定の Google サービスではなく、Google にリンクされることを伝える必要があります。
推奨事項
次のことをおすすめします。
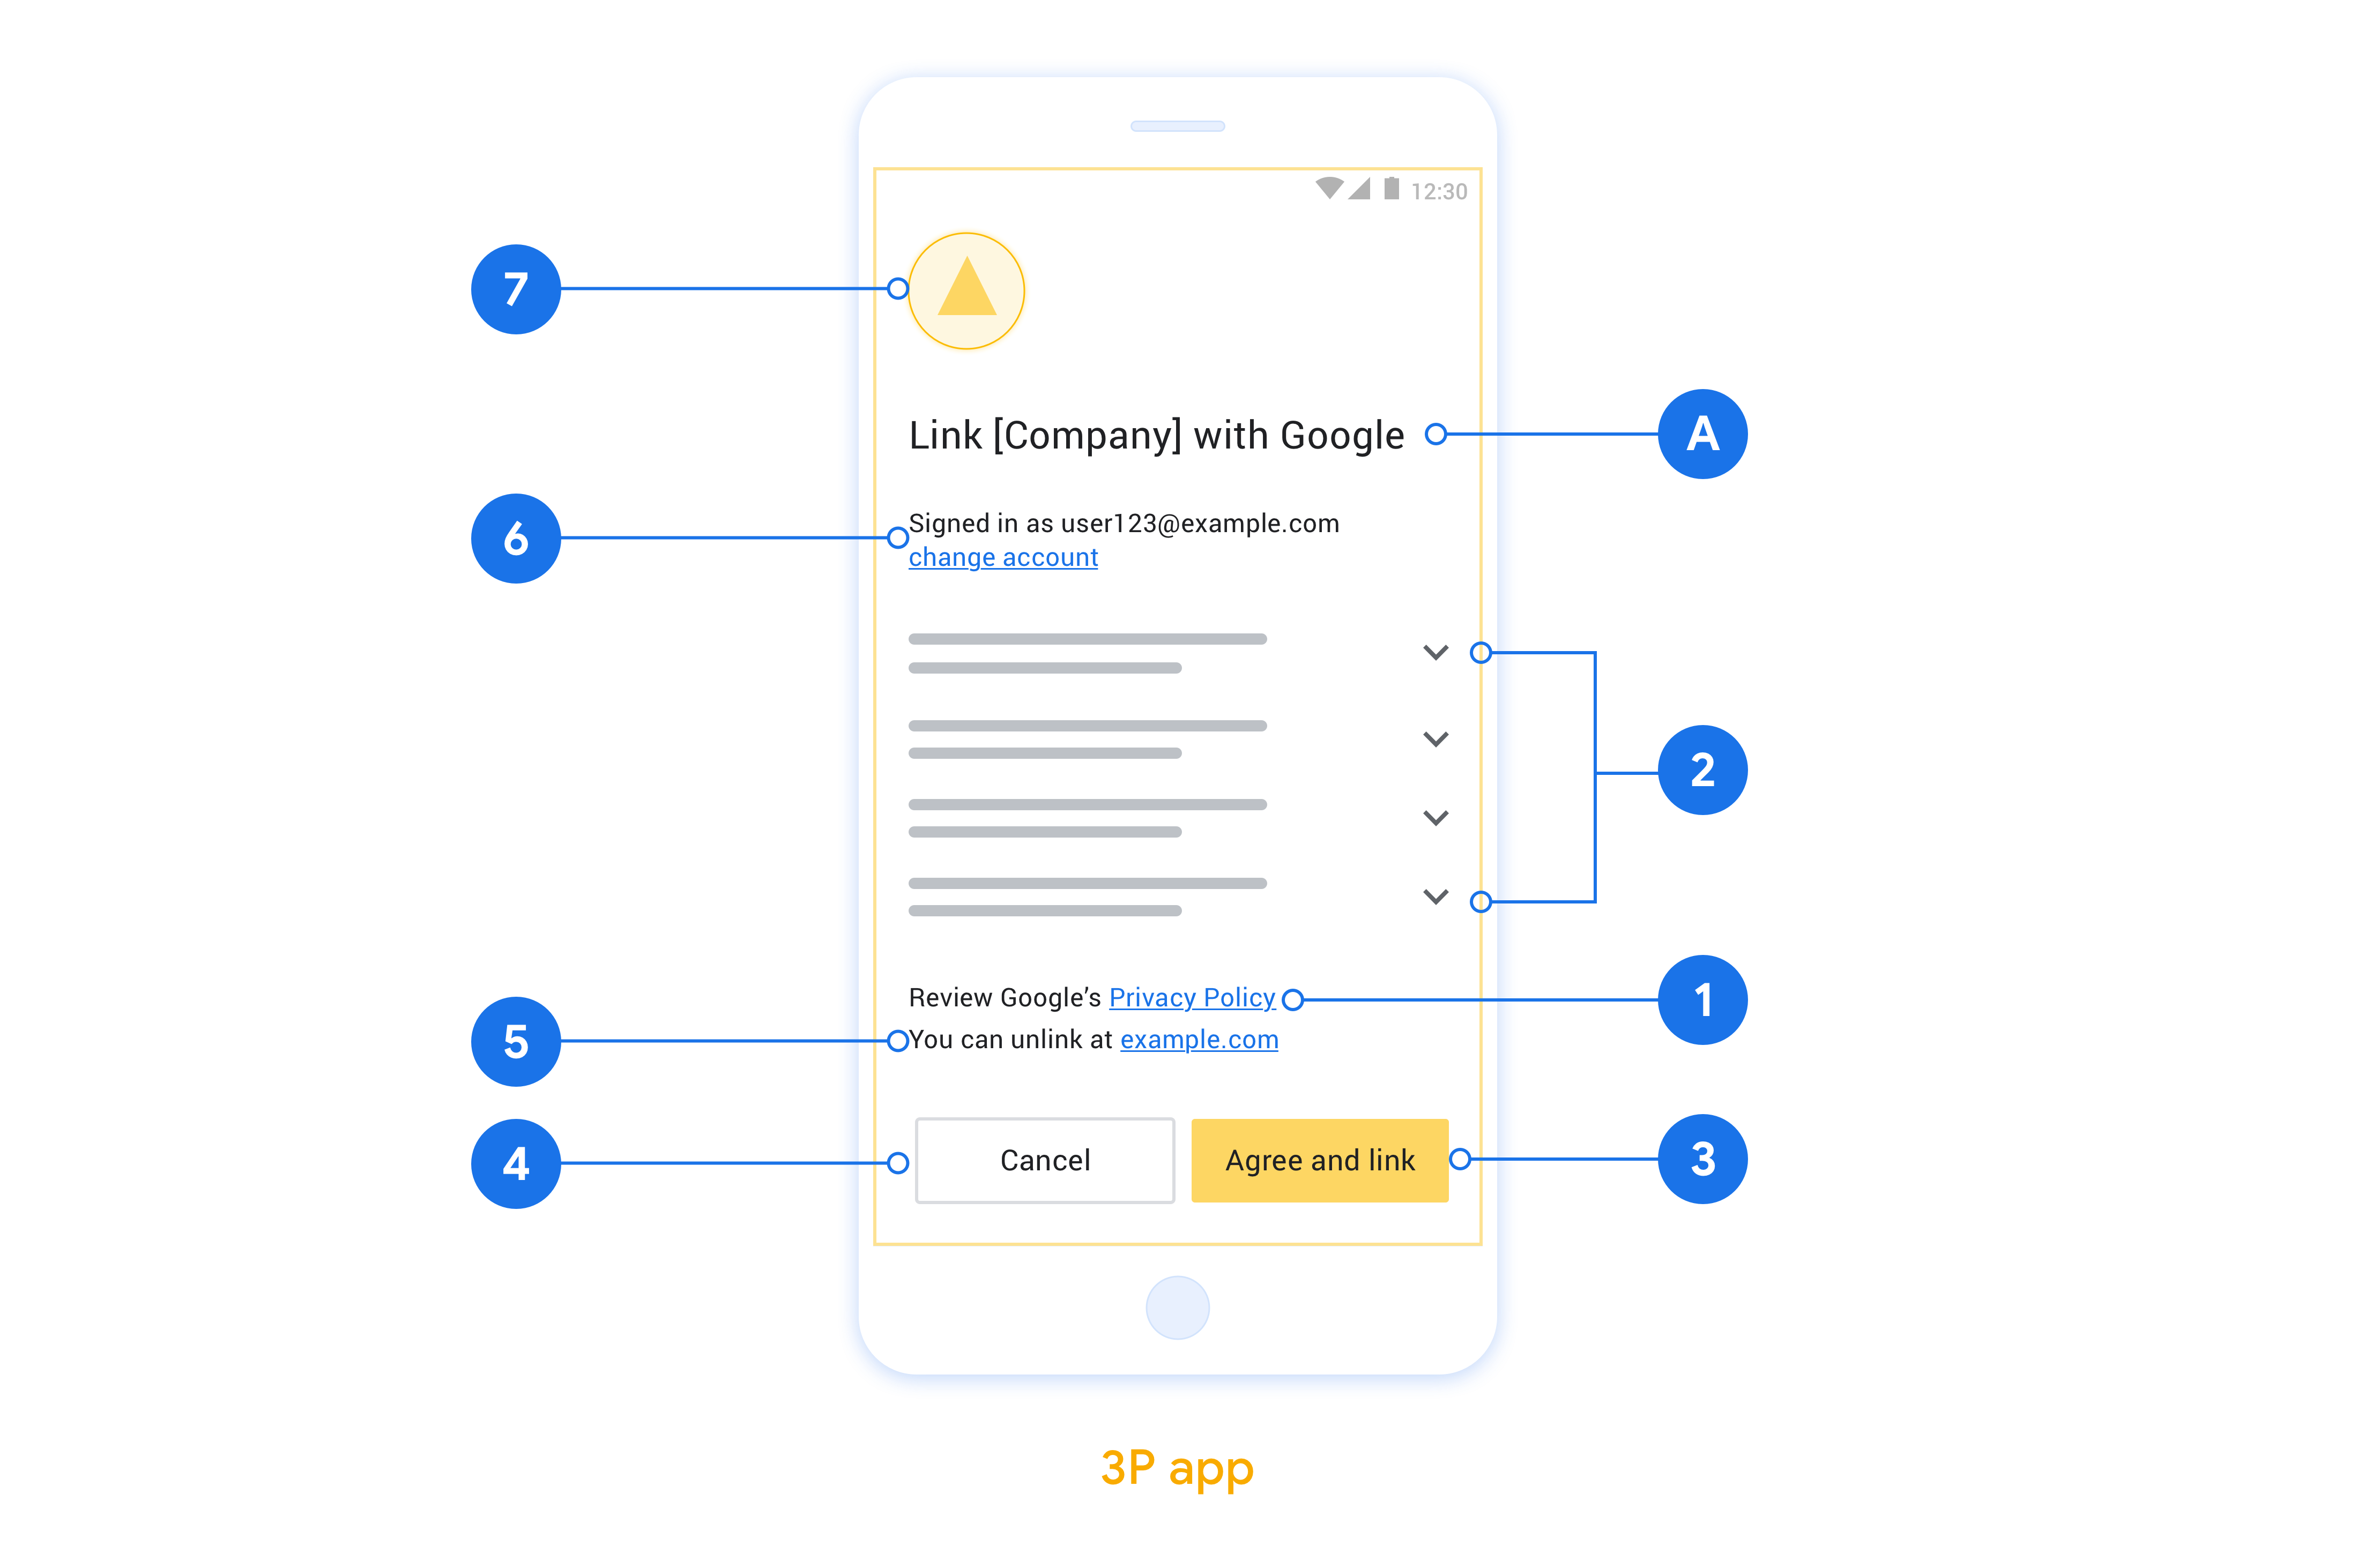
Google のプライバシー ポリシーを表示します。同意画面に Google のプライバシー ポリシーへのリンクを含めます。
共有されるデータ。明確で簡潔な表現を使用して、Google がユーザーのどのデータを必要としているか、またその理由をユーザーに伝えます。
行動を促す明確なフレーズがある。同意画面に「同意してリンク」などの明確な行動を促すフレーズを記載します。これは、アカウントをリンクするために Google と共有する必要があるデータをユーザーが理解する必要があるためです。
拒否またはキャンセルできること。リンクしないことを選択した場合に、ユーザーが戻る、拒否する、キャンセルする方法を提供します。
リンクを解除できること。ユーザーがリンクを解除できる仕組み(プラットフォームのアカウント設定への URL など)を提供します。または、ユーザーがリンクされたアカウントを管理できる Google アカウントへのリンクを含めることもできます。
ユーザー アカウントを変更する機能。ユーザーがアカウントを切り替える方法を提案します。これは、ユーザーが複数のアカウントを持っている場合に特に便利です。
- ユーザーがアカウントを切り替えるために同意画面を閉じる必要がある場合は、回復可能なエラーを Google に送信して、ユーザーが OAuth リンクとインプリシット フローを使用して目的のアカウントにログインできるようにします。
ロゴを含めます。同意画面に会社のロゴを表示します。スタイル ガイドラインに沿ってロゴを配置します。Google のロゴも表示する場合は、ロゴと商標をご覧ください。
OAuth ベースのアプリ切り替えを設定する
以下のセクションでは、OAuth ベースのアプリ切り替えの前提条件と、アプリ切り替えプロジェクトを Actions Console で設定する方法について説明します。
アクションを作成して OAuth 2.0 サーバーを設定する
アプリ切り替えを設定する前に、以下を行う必要があります。
- アクションを作成する。アクションを作成する手順については、プロジェクトを作成するをご覧ください。
- OAuth 2.0 サーバーを設定する。OAuth サーバーの設定について詳しくは、OAuth によるアカウント リンクを実装するをご覧ください。
Actions Console でアプリ切り替えを設定する
次のセクションでは、Actions Console でアプリ切り替えを構成する方法を説明します。
- 上部のナビゲーションにある [Develop](開発)をクリックし、左側のナビゲーションで [Account linking](アカウントのリンク)をクリックします。
- [アカウントのリンク] の横にあるスイッチをオンにします。
- [Account creation](アカウントの作成)で、[No, I only want to allow account creation on my website](いいえ、自分のウェブサイトでのアカウントの作成のみを許可します)を選択します。
- [次へ] をクリックします。
- [Linking type](リンクタイプ)で、[OAuth] と [Authorization code](認証コード)を選択します。
- [次へ] をクリックします。
- [OAuth Client information] のすべてのフィールドを入力します。(アプリ切り替えがサポートされていない場合は、通常の OAuth がフォールバックとして使用されます)。
- [次へ] をクリックします。
- [Use your app for account linking (optional)] で、[Enable for iOS](iOS で有効にする)をオンにします。
- [Universal Link](ユニバーサル リンク)フィールドに入力します。ユニバーサル リンクについて詳しくは、コンテンツへのアプリとウェブサイトのリンクを許可する をご覧ください。
- クライアントを設定したい場合は、スコープを追加し、[Configure your client (optional)](クライアントを構成する(省略可))で [Add scope](スコープを追加)をクリックします。構成しない場合は、[次へ] をクリックします。
- [Testing instructions](テスト手順)で、プレースホルダとして「
test」(または任意の文字列)を入力します。(テスト アカウントでこのフィールドを入力する必要があるのは、実際にアクションを提出して公開する場合のみです)。 - [保存] をクリックします。
次のセクションでは、iOS アプリまたは Android アプリにアプリ切り替えを実装します。
ネイティブ アプリにアプリ切り替えを実装する
アプリ切り替えを実装するには、Google からのディープリンクを許可するようにアプリのユーザー認可コードを変更する必要があります。
デバイスでアプリ切り替えをテストする
アクションを作成し、コンソールとアプリでアプリ切り替えを設定したら、モバイル デバイスでアプリ切り替えをテストできます。Google アシスタント アプリを使ってアプリ切り替えをテストすることもできます。
アシスタント アプリからアプリ切り替えをテストする手順は次のとおりです。
- Actions Console に移動して、プロジェクトを選択します。
- 上部のナビゲーションで [Test](テスト)をクリックします。
- アシスタント アプリからアカウントのリンクフローをトリガーします。
- Google アシスタント アプリを起動します。
- [設定] をクリックします。
- [アシスタント] タブで、[スマートホーム] をクリックします。
- [追加(+)] をクリックします。
- プロバイダのリストからアクションを選択します。リストの先頭に「[test]」が付きます。リストから [test] アクションを選択する場合、アプリを開く必要があります。
- アプリが起動したことを確認し、承認フローのテストを開始します。